11.3 Development guidelines
|
| < Day Day Up > |
|
11.3 Development guidelines
The main steps for building the integration solution presented in Figure 11-3 are:
-
Create an enterprise service using WebSphere Studio Application Developer Integration Edition V5.0.
-
Test the enterprise service in the WebSphere Studio Application Developer Integration Edition V5.0.
-
Deploy generated Java classes into IBM WebSphere Application Server Enterprise V5.0.
-
Configure a J2EE Connector connection factory in IBM WebSphere Application Server Enterprise V5.0.
-
Configure the service in the IBM Web Services Gateway V5.0.2.
-
Web service-enable your client application.
| Note | Our sample implementation code is available on the Web; see Appendix B, "Additional material" on page 335 for details. The application deployed to the gateway is packaged in ITSOConnectorApp.ear. The client application implementation is included in the ITSOSourceApp project. |
The configuration of the IBM CICS Transaction Gateway is beyond the scope of this redbook. For further details on the CICS Transaction Gateway and J2EE Connectors refer to the following redbooks:
-
CICS Transaction Gateway V5 The WebSphere Connector for CICS, SG24-6133
-
Patterns: Self-Service Application Solutions Using WebSphere Application Server V5, SG24-6591
11.3.1 Creating a CICS enterprise service
This section explains how to use the IBM WebSphere Studio Application Developer Integration Edition V5.0 to create an enterprise service for an existing CICS program. The enterprise service and its deployment classes can be used by applications running in IBM WebSphere Application Server Enterprise V5.0.
The main steps to develop the enterprise service are:
-
Import the resource adapter into the workspace.
-
Create the enterprise service WSDL description.
-
Create the proxy and data types.
-
Generate WSDL description of the proxy.
Import the resource adapter into the workspace
It is only necessary to import the CICS ECI Connector once per workspace. To check if the connector is already present, switch to the J2EE Hierarchy view in the Business Integration perspective. The ECIResourceAdapter should be listed in the Connector Modules folder, as shown in Figure 11-4.
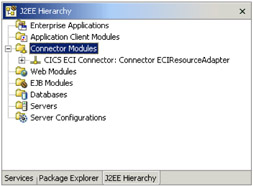
Figure 11-4: CICS ECI Connector in the J2EE Hierarchy
If you need to import the CICS ECI Connector:
-
Select File → Import... → RAR file and click Next.
-
Browse to the cicseci.rar file in the <STUDIO_HOME>\resource adapters folder. <STUDIO_HOME> is the installation path of WebSphere Studio Application Developer Integration Edition.
Select cicseci.rar and click Open.
-
Check Standalone connector project, and select the New connector project option.
-
Enter the New project name. We used CICS ECI Connector.
-
Click Finish.
The CICS ECI Connector should now be correctly listed in the J2EE Hierarchy view of the Business Integration perspective, as shown in Figure 11-4.
Create the enterprise service WSDL description
To create the enterprise service WSDL description, first create a new enterprise application and Web module:
-
To create a new enterprise application project and Web module project, select File → New → Project... → J2EE → Enterprise Application Project, then click Next.
-
Select Create J2EE 1.3 Enterprise Application project and click Next.
-
In the Enterprise Application Project window set the following fields:
-
Enterprise application project name: ITSOConnectorApp.
-
Uncheck Application client module and EJB module.
Click Finish.
-
-
-
To set the Context Root of the new Web module to ITSOConnectorApp, open the J2EE Navigator view of the J2EE Perspective, right-click the ITSOConnectorAppWeb project and select Properties → Web.
-
Add a new package to the Web module by right-clicking the Java Source folder in the ITSOConnectorAppWeb project and selecting New →Package. Set the new package name to com.ibm.itso.es.inventory.
-
Import the source file defining the interface for the CICS service:
-
Right-click the com.ibm.itso.es.inventory package, select Import... → File System, then click Next.
-
Browse to the source file, getdate.c in our case, and click Finish.
The getdate.c source file actually contains the full source code for our backend CICS application. To set up this application on CICS, we compiled and linked the source on z/OS, placed the load module in a CICS RPL library, and installed the program definition to CICS.
-
You are now ready to create the enterprise service. To create the enterprise service:
-
Right-click the com.ibm.itso.es.inventory package, select New → Other... → Business Integration → Service built from... and click Next.
-
In the New Service window select CICS ECI in the left panel and click Next.
-
In the Connection Properties window, shown in Figure 11-5, enter the details for your CICS Transaction Gateway.
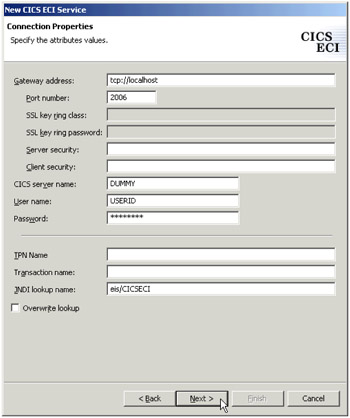
Figure 11-5: Connection PropertiesFor our example, the JNDI lookup name should be eis/CICSECI. This is the JNDI reference to the J2C connection factory needed in the application server environment.
Click Next.
-
In the Service Binding window specify the package and the interface file name, as shown in Figure 11-6. The other fields will be automatically filled.
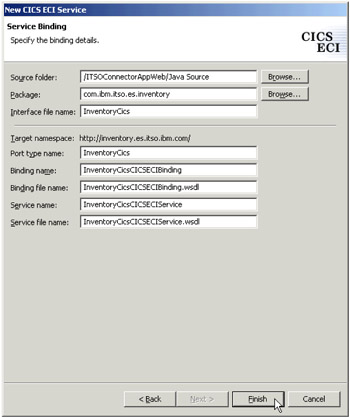
Figure 11-6: Service BindingClick Finish.
Notice that three WSDL files are now present in com.ibm.itso.es.inventory package:
-
InventoryCics.wsdl
-
InventoryCicsCICSECIBinding.wsdl
-
InventoryCicsCICESCIService.wsdl
Create the binding operations using the following steps:
-
Double-click InventoryCicsCICESCIBinding.wsdl to open it in WSDL editor. Select the Bindings tab.
-
In the Port Type and Binding Operations section click New to add a new operation.
-
In the Operation Binding window, set the Operation name to getDeliveryDate and click Next.
-
In the CICS ECI Connector Operation Binding Properties window, set the functionName to GETDATE (uppercase). This is the name of the CICS program that will be invoked for the service. Accept the defaults for the other fields and click Next.
-
In the Operation Binding window click Import... in the Input message section.
-
Navigate to the interface source file, getdate.c, in the ITSOConnectorAppWeb/Java Source/com/ibm/itso/es/inventory folder, and click Next.
-
In the C Import Properties window, set the platform properties for the environment hosting the CICS service. In our case, we set the Floating point format to IBM 390 Hexadecimal and the Code page selection to Cp037.
Click Next.
-
In the following window, click Next again.
-
In the C Importer window, choose COMM_AREA as structure definition. In the XSD type name, set the name for the generated Java class. We used InventoryData.
Click Finish.
-
Back in the Operation Binding window, check Use input message for output and click Finish.
The WSDL definition of the enterprise service is complete, and the J2EE Navigator view should look similar to Figure 11-7.
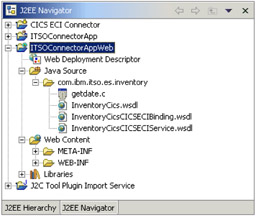
Figure 11-7: J2EE Navigator view after creating the enterprise service WSDL files
The three WSDL files generated provide a complete description of the service, how it is accessed, its methods (getDeliveryDate), and data types (InventoryData). WebSphere Studio's enterprise services toolkit uses the Web Services Description Language as the model for describing any kind of service. Using the toolkit it is possible to build an object for accessing the service from the WSDL description.
Create the proxy and data types
Since the actual implementation of our service exists in a CICS server, we need to build a class to connect to this service, acting as a proxy. The enterprise services toolkit provides a number of options for deploying services, including:
-
SOAP
-
EJB
-
JMS
-
JavaBean proxy
For this scenario, we selected a JavaBean proxy, primarily because it is the simplest choice. Our simple scenario does not require the remote access, transaction, and security management capabilities provided by EJBs, so there is really no need to introduce them here.
To build a Java proxy class:
-
Right-click the InventoryCicsCICSECIService.wsdl file and choose Enterprise Services → Generate Service Proxy....
-
In the first window, accept the default options by clicking Next.
-
In the second window, select the operations to be included in the proxy. In this case, select getDeliveryDate and click Finish.
As shown in Figure 11-8, the following Java files have been created:
-
InventoryCicsProxy.java is the proxy class.
-
InventoryData.java represents the data type used by the proxy.
-
InventoryDataFormatHandler.java provides the binding from the Java representation of the data type to the native format.
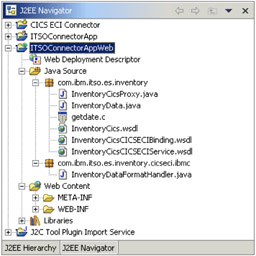
Figure 11-8: J2EE Navigator view after creating the service proxy classes
Generate WSDL description of the proxy
The InventoryCicsProxy.java class provides access to the CICS Transaction Gateway and invokes the GETDATE CICS function. To publish this class as a Web service on the Web Services Gateway, it is necessary to obtain a WSDL description of it by following these steps:
-
Right-click the InventoryCicsProxy.java class in the Java Source folder of the ITSOConnectorAppWeb project and select Web Services → Generate WSDL files.
-
In the Web Service Deployment Settings window, click Next.
-
In the Web Service Java Bean Selection window, select com.ibm.itso.es.inventory.InventoryCicsProxy as Bean and click Next.
-
In the Web Service Java Bean Identity window, abbreviate the Web service URI and default paths for the generated files, as we did, as shown in Figure 11-9. Click Next.

Figure 11-9: Web Service Java Bean Identity -
In the Web Service Java Bean Methods window, check only the method com.ibm.itso.es.inventory.InventoryData getDeliveryDate() and uncheck all the others. Click Finish.
The Web Content folder of the ITSOConnectorAppWeb now contains two sub-folders:
-
wsdl contains the WSDL service definitions needed to deploy the service in the Web Services Gateway.
-
admin contains some JSPs for administering Web services deployed directly to WebSphere Application Server. We are using the Web Services Gateway, so these files are not needed and this folder can be deleted.
Next, we need to make some changes so the generated WSDL can be accessed by the gateway and by our client application:
-
Move the InventoryData.xsd file from the Web Content\wsdl\com\ibm\itso\es\inventory folder to the Web Content\wsdl folder. Then delete the Web Content\wsdl\com folder and its sub-folders.
-
Edit InventoryCicsProxy.wsdl in the Web Content\wsdl folder and change the location attribute of the following import statement (near the start):
<import location="com/ibm/itso/es/inventory/InventoryData.xsd" ... <import location="InventoryCicsProxy.wsdl" ...
Replace the com/ibm/itso/es/inventory/ prefix with the following prefix:
http://wsgw2.itso.ral.ibm.com:9080/ITSOConnectorApp/wsdl/
-
Save and close the file.
-
Edit InventoryCicsProxyJava.wsdl in the Web Content\wsdl folder and change the location attribute of the following two import statements (near the start):
<import location="com/ibm/itso/es/inventory/InventoryData.xsd" ... <import location="InventoryCicsProxy.wsdl" ...
Delete the com/ibm/itso/es/inventory/ prefix from the first import, then add the following prefix to both import locations:
http://wsgw2.itso.ral.ibm.com:9080/ITSOConnectorApp/wsdl/
-
Save and close the file.
The WSDL definition of the service proxy is complete.
11.3.2 Testing the enterprise service
In this section, we create a simple JSP to test the generated Java proxy. We also explain how to configure the WebSphere Studio test environment to test the application. Our test JSP (TestProxy.jsp) uses the generated InventoryCicsProxy class to invoke the GETDATE CICS function and display the result.
Creating a JSP to test the enterprise service
To create a JSP to test the deployed enterprise service:
-
Right-click the Web Content folder of the ITSOConnectorAppWeb project and select New → JSP File. In the New JSP File window, set the File Name to TestProxy.jsp and click Finish.
-
Add the required code to the test JSP. The listing for our TestProxy.jsp file is shown in Example 11-1. It contains a very simple example of how the service proxy class can be used.
Example 11-1: TestProxy.jsp

<!DOCTYPE HTML PUBLIC "-//W3C//DTD HTML 4.01 Transitional//EN"> <HTML> <HEAD> <%@ page language="java" contentType="text/html; charset=ISO-8859-1" pageEncoding="ISO-8859-1" %> <META http-equiv="Content-Type" content="text/html; charset=ISO-8859-1"> <META name="GENERATOR" content="IBM WebSphere Studio"> <TITLE>TestProxy.jsp</TITLE> </HEAD> <BODY> <h1>Test proxy jsp: ITSOConnectorApp</h1> <% com.ibm.itso.es.inventory.InventoryData indata = new com.ibm.itso.es.inventory.InventoryData(); indata.setPartNumber("1"); com.ibm.itso.es.inventory.InventoryData outdata = null; com.ibm.itso.es.inventory.InventoryCicsProxy proxy = new com.ibm.itso.es.inventory.InventoryCicsProxy(); outdata = proxy.getDeliveryDate(indata); out.println("The expect delivery date of part number " +indata.getPartNumber() +" is " +outdata.getDeliveryDate()); %> </BODY> </HTML>
The enterprise service application is complete, and the J2EE Navigator view should look similar to Figure 11-10.
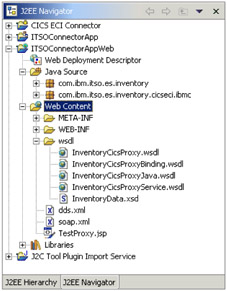
Figure 11-10: J2EE Navigator view after creating the test JSP
Configuring the test environment
It is necessary to define a J2C configuration factory, as shown in Figure 11-11, to configure the WebSphere Studio test environment. Use the following steps to do this:
-
Switch to the J2EE Hierarchy view in the J2EE Perspective.
-
Expand the Servers folder and double-click the required server. We are using WebSphere v5.0 Test Environment.
-
When the server configuration editor opens, select the J2C tab.
-
In the Node Settings, J2C Resource Adapters section, click Add.
-
Select CICS ECI Connector for the Resource Adapter Name and click OK.
-
Select the CICS ECI Connector in the J2C Resource Adapters table and click Add in the J2C Connection Factories section.
-
In the Create Connection Factory window, set the Name to CICSECI, set the JNDI name to eis/CICSECI, and click OK.
-
In the Resource Properties section, enter the details for your CICS Transaction Gateway. These settings should be the same as those used when creating the enterprise service (see Figure 11-5 on page 245).
-
Save and close the server configuration.
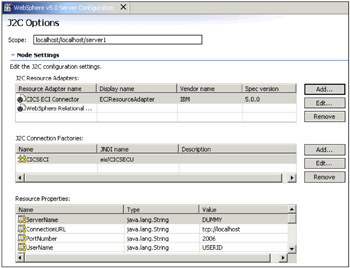
Figure 11-11: J2C settings for the WebSphere Studio test environment
Run TestProxy.jsp
To run the test JSP, right-click TestProxy.jsp and select Run on Server.... The result should look similar to Figure 11-12.
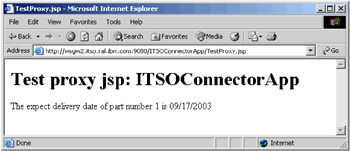
Figure 11-12: TestProxy.jsp successful test result
This test checks that the generated Java proxy can invoke the CICS service via the CICS Transaction Gateway and that the data types involved are handled correctly.
11.3.3 Deploying generated Java classes to WebSphere Enterprise
The generated Java proxy classes must be deployed to the application server to put our solution into production. In this section we produce two different packages:
-
A JAR file containing Java classes that must be included in the WebSphere Application Server classpath. The Web Services Gateway needs a package to find the proxy and data types classes for invoking the CICS service.
-
An EAR file of the ITSOConnectorApp J2EE project. This package contains the WSDL definitions and the test JSP.
To create the required packages:
-
Open the J2EE Perspective.
-
Right-click ITSOConnectorApp J2EE project and select Export... → EAR file. Export the project to ITSOConnectorApp.ear.
-
Right-click the Java Source folder of the ITSOConnectorAppWeb project and select Export... → JAR file. Export the folder to ITSOConnectorApp.jar.
-
Deploy the exported EAR file in the IBM WebSphere Application Server Enterprise V5.0 runtime.
-
Copy the exported JAR file to somewhere in the WebSphere Application Server classpath, such as the <WAS_HOME>\lib\app folder.
11.3.4 Configuring a J2C connection factory in WebSphere
In this section we describe the steps needed to set up a CICS J2C connection factory in WebSphere Application Server for accessing the CICS Transaction Gateway.
Adding the cicsecitools.jar
The WebSphere Studio Integration Edition environment uses a slightly different version of CICS ECI Resource Adapter from the one provided with the CICS Transaction Gateway. The Studio version contains the cicsecitool.jar file that provides the Web Services Invocation Framework support.
To enable the WSIF support in WebSphere Application Server, copy the cicsecitools.jar file from the CICS ECI Connector\connectorModule folder in your Studio workspace to the <WAS_HOME>\lib directory on the application server.
Installing the CICS ECI Resource Adapter
The cicseci.rar file is included in IBM CICS Transaction Gateway, which is installed during the WebSphere Studio installation. It can be found in the <CTG_HOME>\deployable folder, where <CTG_HOME> is the install path of the CICS Transaction Gateway.
To install the CICS ECI Resource Adapter on the production server machine:
-
Start the WebSphere Administrative Console.
-
In the navigation frame on the left, navigate to Resources → Resource Adapters.
-
Click Install RAR in the Resource Adapters form on the right.
-
Browse to the cicseci.rar file and click Next.
-
In the Configuration form, click OK to accept the default settings.
Adding a connection factory
To add a J2C connection factory using the CICS ECI adapter:
-
In the WebSphere Administrative Console navigation frame, navigate to Resources → Resource Adapters.
-
Click the newly created resource adapter, ECIResourceAdapter in our case, in the Resource Adapters form on the right.
-
Scroll down the right form and click the J2C Connection Factories link.
-
In the J2C Connection Factories form, click New.
-
In the J2C Connection Factory form, set the Name to CICSECI, set the JNDI name to eis/CICSECI, and click OK.
-
Back in the J2C Connection Factories form, click the newly created CICSECI connection factory.
-
Scroll down the right form and click the Custom Properties link.
-
In the Custom Properties form, enter the details for your CICS Transaction Gateway. These settings should be the same as those used when creating the enterprise service (see Figure 11-5 on page 245).
-
Save your changes and restart the application server.
-
Test application server CICS connectivity using the TestProxy.jsp:
-
http://localhost:9080/ITSOConnectorApp/TestProxy.jsp
-
11.3.5 Configuring the service in Web Services Gateway
After developing and deploying the enterprise service, we are ready to deploy the Web Services Gateway service that will expose our enterprise service as a Web service. Notice that the application developed is not a Web service, but only a Java class. The Web Services Gateway creates the actual implementation of the Web service using the Java class to process client requests.
Deploying the gateway service
To deploy InventoryCicsProxy.wsdl as a gateway service:
-
Configure the gateway and deploy the SOAPHTTPChannel1, as described in 10.4.1, "Installing and configuring the Web Services Gateway" on page 220.
When configuring the gateway, we used the following settings:
-
Namespace URI for services: urn:wsgw2.itso.ral.ibm.com
-
WSDL URI for exported definitions: http://wsgw2.itso.ral.ibm.com:9080/wsgw
-
-
Open the Web Services Gateway systems administration console and click Services → Deploy in the navigation panel on the left.
-
In the Deploy Gateway Service window, we set the following fields:
-
Gateway Service Name: InventoryCicsWsgw
-
Message part representation: Deployed Java classes
-
Channels: click to select SOAPHTTPChannel1
-
WSDL Location: http://wsgw2.itso.ral.ibm.com:9080/ITSOConnectorApp/wsdl/InventoryCicsProxyJava.wsdl
-
Location Type: URL
We accepted the defaults for the remaining fields. Our gateway service settings are shown in Figure 11-13.
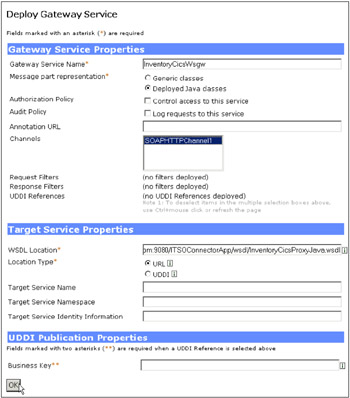
Figure 11-13: Deploying a gateway service -
-
Click OK to deploy the service.
Exporting the WSDL file
When the service is deployed, the gateway generates new WSDL files that can be shared with clients of the enterprise service. The gateway-generated WSDL implementation definition file has the gateway as the service end-point, and it imports the WSDL interface definition file that contains bindings and portType information.
To export the WSDL file generated by the Web Services Gateway:
-
Open the Web Services Gateway systems administration console and click Services → List in the navigation panel on the left.
-
In the List of Gateway Services window, click the required service, InventoryDocWsgw in our case.
-
In the Service: InventoryDocWsgw window:
-
Scroll down to the Exported WSDL definitions section.
-
Right-click External WSDL implementation definition (WSDL only) and select Save Target As... from the pop-up menu.
-
Save the WSDL file to the required location. We saved the file as InventoryDocWsgw.wsdl under the ITSOSourceAppWeb\WebContent\WEB-INF\wsdl folder in our WebSphere Studio workspace.
-
You are now ready to Web service-enable your source application using the gateway-generated WSDL implementation definition file for your target service.
11.3.6 Web service enabling the source application
See Figure 8-11 on page 167 for an overview of the Web service development process for a source application. Let's walk through this process for our source application.
To Web service enable the source application using the gateway generated WSDL implementation definition file:
-
Open a command window.
-
Using the gateway WSDL file exported in "Exporting the WSDL file" on page 258, generate the Web service client deployment descriptors and classes using the WSDL2Java tool. We used the command shown in Example 11-2.
Example 11-2: Generating client deployment descriptors and classes using WSDL2Java
C:\WebSphere\AppServer\bin\WSDL2Java -verbose -role client -container web -NStoPkg http://wsdl/InventoryCicsProxyJava/=com.ibm.itso.es.inventory -NStoPkg http://wsdl/InventoryCicsProxy/=com.ibm.itso.es.inventory -output C:\workspace\ITSOSourceAppWeb\WebContent C:\workspace\ITSOSourceAppWeb\WebContent\WEB-INF\wsdl\InventoryCicsWsgw.wsdl WSWS3185I: Info: Parsing XML file: C:\...\WEB-INF\wsdl\InventoryCicsWsgw.wsdl Retrieving document at 'http://wsgw2.itso.ral.ibm.com:9080/wsgw/ServiceInterface?name=InventoryCicsWsgw', relative to 'C:\...\WEB-INF\wsdl\InventoryCicsWsgw.wsdl'. Retrieving document at 'http://wsgw2.itso.ral.ibm.com:9080/wsgw/ServiceImport?name=InventoryCicsWsgw&uri=http%3A%2F%2F wsgw2.itso.ral.ibm.com%3A9080%2FITSOConnectorApp%2Fwsdl%2FInventoryData.xsd', relative to 'http://wsgw2.itso.ral.ibm.com:9080/wsgw/ServiceInterface?name=InventoryCicsWsgw'. Retrieving document at 'http://wsgw2.itso.ral.ibm.com:9080/wsgw/ServiceImport?name=InventoryCicsWsgw&uri=http%3A%2F%2F wsgw2.itso.ral.ibm.com%3A9080%2FITSOConnectorApp%2Fwsdl%2FInventoryCicsProxy.wsdl', relative to 'http://wsgw2.itso.ral.ibm.com:9080/wsgw/ServiceInterface?name=InventoryCicsWsgw'. WSWS3204E: Error: {http://inventory.es.itso.ibm.com/}InventoryData already exists. WSWS3282I: Info: Generating C:\...\itso\es\inventory\InventoryData.java. WSWS3282I: Info: Generating C:\...\itso\es\inventory\InventoryData_Helper.java. WSWS3282I: Info: Generating C:\...\itso\es\inventory\InventoryData_Ser.java. WSWS3282I: Info: Generating C:\...\itso\es\inventory\InventoryData_Deser.java. WSWS3282I: Info: Generating C:\...\ral\itso\wsgw2\InventoryCicsWsgw.java. WSWS3282I: Info: Generating C:\...\ral\itso\wsgw2\InventoryCicsWsgwLocator.java. WSWS3282I: Info: Generating C:\...\itso\es\inventory\InventoryCicsProxy.java. WSWS3282I: Info: Generating C:\...\es\inventory\InventoryCicsProxySOAPHTTPBindingStub.java. WSWS3282I: Info: Generating C:\...\WEB-INF\webservicesclient.xml. WSWS3282I: Info: Generating C:\...\WEB-INF\ibm-webservicesclient-bnd.xmi. WSWS3282I: Info: Generating C:\...\WEB-INF\ibm-webservicesclient-ext.xmi. WSWS3282I: Info: Generating C:\...\WEB-INF\InventoryCicsWsgw_mapping.xml. -
In WebSphere Studio, move the generated Java source files from the Web module's WebContent folder to its JavaSource folder:
-
Right click the ITSOSourceAppWeb project and select Refresh from the pop-up menu. The generated files should now appear in the Studio workspace.
-
Move the com.ibm.itso.es.inventory and com.ibm.ral.itso.wsgw2 packages in the ITSOSourceAppWeb\WebContent folder to the ITSOSourceAppWeb\JavaSource folder.
-
-
Add client application code to invoke the Web service on the target application.
To invoke GETDATE CICS function via the Web Services Gateway, we added the com.ibm.itso.command.GatewayCicsBean command bean in our ITSOSourceAppWeb module.
-
Test, then deploy the source application in your IBM WebSphere Application Server V5.0.2 runtime environment.
|
| < Day Day Up > |
|
EAN: N/A
Pages: 139