Section 11.1. Viewing Keynote Slideshows
Keynote lets you present your slideshow in three different ways. Normal slideshows are those you control yourself, advancing each slide as you make your presentation to a group of peoplea class, a board of directors, or a conference audience, for example. Self-playing slideshows don't require any assistance from you. They play on autopilot, advancing each slideand often repeating the slideshow over and over. Hyperlinks -only slideshows depend on the viewer to click onscreen buttons as she works through the presentation. Just as you must design and lay out each of these slideshow varieties differently, their playback techniques differ as well. (See Section 11.1.3 for details on how to configure your slideshow so it operates in one of these three modes.)
11.1.1. Presenting Normal Slideshows
The easiest way to present a Keynote slideshow is right on your computer's screensomething you've probably been doing all along as you create a slideshowby clicking the Play button in the toolbar to view your work in progress. If your audience is very smalltwo or three peoplethis method can work well. If you have your presentation on a laptop, you can take it to your audience and be ready to present at a moment's noticeperfect for the road- warrior salesman or a college recruiter.
When your audience is larger, you need to connect your computer to a large external display or video projector. Whichever method you use, the final step in preparing your presentation for view is setting Keynote's display preferences.
11.1.1.1. Setting slideshow preferences
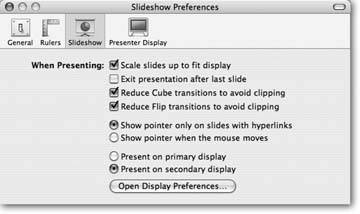
Some of Keynote's preferences apply only when you play the slideshow, so be sure to check how they're set before show time. Choose Keynote  Preferences, and click the Slideshow button (Figure 11-1). The first four checkboxes control how the slide images appear onscreen. Usually you want them all turned on except for the second one, "Exit presentation after last slide." The other controls affect pointer behavior and presenting with a dual display configuration.
|
-
Scale slides up to fit display . Turn on this checkbox in order to make your slide image as large as possible, filling the screen height without any black border. You usually want this checkbox turned on.
-
Exit presentation after last slide . If you turn on this checkbox, Keynote returns to its editing mode if you advance past the last slide in your slideshow. It's a good idea to turn this checkbox off, to keep the last slide in your presentation onscreen even if you accidentally click the mouse or press the Space bar. When you turn this checkbox off, you prevent the dramatic end of your show being ruined by a view of the Keynote editing window, your cluttered icons, or the desktop background picture of your wife at the Halloween party. When you're ready to exit the slideshow, just press the Escape key.
-
Reduce Cube transitions to avoid clipping, and reduce Flip transitions to avoid clipping . Turn on these last two checkboxes in order to slightly reduce the size of Keynote's animations during the Cube and Flip transitions. These preferences only matter if you actually use the Cube and Flip transitions in your slideshowand even then, the effect is extremely subtle. These animations actually extend beyond the normal slide boundaries, using some of the slide border to display the transition. If you turn on the first checkbox to scale your slides up to fit the display, and then you should turn on both of these checkboxes as well.
-
Show pointer only on slides with hyperlinks . The first two radio buttons control the pointer display during the slideshow. Choose this standard setting to keep the pointer hidden from view except when you actually need itto click a hyperlink.
-
Show pointer when the mouse moves . If you choose this option instead, you can make the arrow cursor visible any time you move the mouse. This option is useful if you want to point things out on your slides during the show. But since the merest touch of the mouse makes the pointer appear, if you use this option you probably want to use the Space bar, the right arrow key, or a remote control to advance slides instead of clicking the mouse.
-
Present on primary display . The last two radio buttons determine which screen displays your slideshow if you have two displays connected to your computer (for example, a video projector connected to a laptop) and your computer is capable of dual display mode (see next section). Any time you have two displays connected to your Mac, one of them displays the menu barthis is the primary display. Usually you don't want to show the menu bar on the screen your audience sees. In the case of the video projector and the laptop, the laptop would be the primary display. The screen that's not showing your slideshow displays either the presenter displaya view of the current slide, the next slide, speakers notes, and timersor the Keynote editing window (see next section and Section 9.1.2. Choose this button if you do want to view your presentation on the primary displayalthough the secondary display is usually the best place for it.
-
Present on secondary display . You'll usually want to choose this button when you're presenting your slideshow on a second display or projector.
-
Open Display Preferences . Click this button to open your Mac's System Preferences Display pane in order to set your display resolutions , color depth, andif you're using two displaysthe screen arrangement (see Section 11.1.1.3).
11.1.1.2. Setting up the presenter display
Choose Keynote Preferences and click the Presenter Display button at the top of the Preferences window to open the final section of Keynotes preferences (Figure 11-2). These settings come into play only when you've connected a second display to your computerand only if your computer is capable of dual display mode (see Section 8.3).
In Slideshow Preferences you determined which of the displays to use for the slideshow presentation. The Presenter Display preference settings apply to the other displaythe alternate display.
|
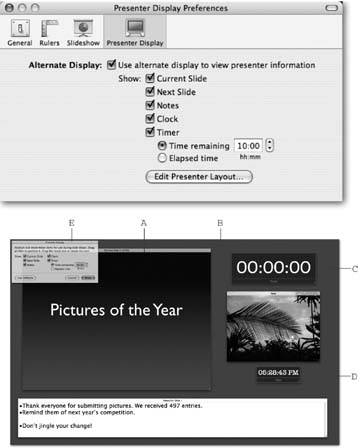
Turn on the checkbox marked "Use alternate display to view presenter information" if you want to use the presenter display. Then turn on any or all of the other checkboxes to choose what you want to see on your display while you're presenting. You can use the timer to display either elapsed time, or time remaining. If you choose time remaining, use the up and down arrow button, or enter your allotted time in the box in hours and minutes. (Minutes can feel like hours when you're the one presenting!)
Click Edit Presenter Layout to arrange the presenter screen's look. Resize and reposition the windows to create the view that shows you the information you need to see. You can even overlap these windows if you have a small screen. Click an overlapped window to bring it to the front. You can use the Presenter Display dialog box while you're rearranging to turn the various elements on or off, or to set the timer. If you want to go back to Apple's stock arrangement, click Use Defaults. When you're happy with your presenter display arrangement, click Done.
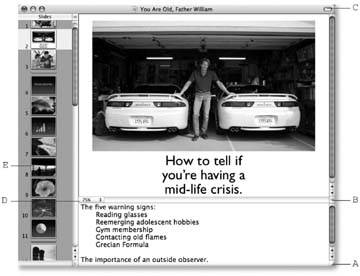
If you're giving a presentation in which you may need to jump around from slide to slide in different parts of the slideshow, consider using a different kind of presenter display: the Keynote editing window (see Figure 11-3). In the Presenter Display Preferences, turn off the checkbox marked "Use alternate display to view presenter information." Choose View Navigator to show the slide thumbnails and expand the Keynote editing window as large as possible to show as many thumbnails as possible. If you use the Notes field, enlarge it so you can see as much of the notes as you need to during the slideshow.
With this view on your presenter screen, you can jump to any slide during the presentation by clicking its thumbnail in the navigator.
|
11.1.1.3. Connecting a second display
If you're presenting to more than a few people, you probably want to connect a second display to your computereither a large monitor or a video projector. As discussed in Chapter 8, you can connect a second display to just about any Macintosh, although what you see on the second display depends upon your computer's video hardware. iBooks, iMacs, eMacs, and Minis can only perform video mirroring (the same image on both monitors ), while PowerBooks (and Power Macs, depending on their video card) can also be used in dual-display (also known as screen spanning ) modethe second monitor shows a different image.
-
Attach the second display or projector to your computer, using the cable adapternicknamed a dongle if you need it .
If you have a choiceas you do with many of the more recent displays or projectors when connecting to PowerBooksopt for the digital connection (DVI) for best results.
-
Choose Keynote
Preferences, click the Slideshow button, and then click Open Display Preferences (or choose Apple menu System Preferences, and then click Displays) . The Display Preferences window appears. If you see a tab labeled Arrange, then your computer's capable of screen spanning, and therefore you can use Keynote's presenter display. If the Arrange tab is absent, then you're limited to video mirroringyou can't use Keynote's presenter display. Instead you see the full-screen slideshow presentation on both screens.
-
Click the Arrange tab and reposition the screen images to control how your computer's desktop spans the two displays. Or turn on the checkbox for Mirror Displays if you don't want to use the screen spanning mode .
Setting the arrangement of the two displays isn't too important for Keynote presentations. Its purpose is mainly for people who are lucky enough to have two monitors that they can use to create a larger desktopor virtual monitoron which to work. When you're setting up the typical Keynote dual display arrangement, it's most important to set the primary display (the one with the menu bar that you see) and the secondary display (the one your audience views). Drag the menu bar from one screen image to the other to make either display primary.
-
Click the Display tab .
Two Display windows appear, one for each of your displays. Select a display resolution from the Resolutions list, and a color depth from the Colors pop-up menu for each display.
If you're using mirroringeither because your computer doesn't support dual display mode, or because you prefer to see exactly the same thing your audience seesuse the same resolution and color depth for each display. For best results when you use screen spanning, your Keynote slide size should be the same as the screen resolution for the display you'll be using for the slideshow presentation.
Most video projectors use either 800 x 600 or 1024 x 768 pixels resolutionwhich match the standard sizes for most Keynote themes. Set your display resolution to match your projector's resolution. If you created your Keynote slideshow at a lower or higher resolution, Keynote can scale the slideshow up or down to fill the screen. Keynote scales down automatically if the slides are larger than the screen. Use Keynote's Slideshow Preferences (see Section 11.1.1.1) to scale up to fill the screen if the slides are smaller than the screen.
Note: If you don't get an image on your second display when you plug it inor if the display doesn't sync with your computer, resulting in a squashed, stretched , or unstable imagefirst try restarting the display. If that doesn't work, leave the display connected and restart the computer to bring it into synchronization.
11.1.1.4. Connecting your audio output
If your slideshow contains sound and you're presenting to a group of people instead of just a single viewer, you need some kind of sound amplification. Many video projectors have a built-in amplifier and speaker that can work in a pinch for a small group. In most cases, however, you need something with a little more oomph and a lot more fidelity. Depending on the size of your presentation space, your amplification system could be a boom box with an auxiliary input, a public address system capable of filling Shea Stadiumor anything in between.
Connect your computer's audio output jack to the amplifier's input. The type of cable you need to link the two depends on the input connections on the boom box, amplifier, or PA system. The computer's end of the cable requires a 1/8 inch stereo miniplug. The amplifier end probably requires the same miniplug or a pair of RCA plugs (those are the red and white plugs you often find plugged into the back of stereos). It's good to have one of each of these cables in your bag.
Choose ![]() menu System Preferences, click Sound, and then click the Output tab. Adjust the Output volume slider to about 80 percent and play part of your slideshow that contains audio. Use the volume control on the amplifier or PA system to adjust the sound to a comfortable level.
menu System Preferences, click Sound, and then click the Output tab. Adjust the Output volume slider to about 80 percent and play part of your slideshow that contains audio. Use the volume control on the amplifier or PA system to adjust the sound to a comfortable level.
If you're lucky enough to have sound professionals in charge of your audio setup, they'll take care of the connections and be able to adjust the volume during the presentation. If you're on your own, then either you or a helper should be able to adjust the volume during the show, in case people in the back can't hear, or you notice those in the front stuffing Kleenex in their ears.
11.1.1.5. Connecting the remote control
If you're using a remote control to advance your slides, connect its receiver to your computer's USB port, turn it on, and make sure it actually works at a distance before your audience begins to arrive .
11.1.1.6. Playing the slideshow
-
Open the Keynote document and select the first slide in the show by clicking it in the organizer, choosing Slide
Go to First Slide, or pressing Home on your keyboard . You can select any other slide in the slideshow if you want to begin playing it at a different point. You can also set up the slideshow to begin playing automatically when you open the documenta good idea for slideshows you've finished editing. Then Keynote opens directly to the first slide and bypasses the editing screenthat "man behind the curtain" that you shouldn't be exposing to your audience, anyway.
Open the Document Inspector and turn on the checkbox labeled "Automatically play upon open" to activate this feature.
-
If your slideshow isn't set to play automatically, click the toolbar's Play button or press
 -Option-P (or choose View Play Slideshow) to start the show .
 Keynote displays the first slide. If you have a single-display system, Keynote hides your desktop and displays the slide full-screen or surrounded by a black border, depending on how you set up its scaling preferences. If you have two displays set up for mirroring, you see the same view as a single-display systemon both screens. If you've set up your dual display system with screen spanning, then you see the slideshow presentation on one display, and either the presenter display or the Keynote editing window on the other screen.
-
Advance through your slideshow by clicking the mouse, pressing the Space bar, or clicking your remote control. (See Table 11-1 for the complete list of all the keyboard commands you can use during a slideshow.)
When you've set up slides with builds that are set to build "on click," then these advancing techniques trigger each build and then advance the next slide. If you want to skip the builds and just move to the next slide, press ] (right bracket ).
-
Reverse to the previous slide by pressing P (for previous), Delete, or Left Arrow. Return to the first slide by pressing the Home key. Go to the last slide by pressing the End key .
-
You can pause your presentation on the current slide, even if it's set to automatically advance, by pressing F (for freeze). To pause the presentation and display a black screenso your audience turns their attention back to you instead of the screenpress B (for black screen). When you're ready to continue the slideshow, just press any key .
-
Use the mouse to click hyperlinks .
If the hyperlink opens an email message or a Web page, Keynote pauses, hides the slideshow, and switches to your email program or Web browser. When it's time to switch back to the slideshow, press
-Tab or click the Keynote Dock icon (which now displays a green Play button). -
Use the slide switcher to jump to another slide anywhere in the presentation (see Figure 11-4). Press the + sign or equal sign (=) to display this onscreen slide navigator with the next slide selected. Press the - sign or hyphen to display the slide switcher with the previous slide selected. Or type a slide number to open the slide switcher with that slide selected .
When the slide switcher appears, use the + sign or - sign keys to move forward or backward through the slides in the switcher. Alternatively, click the arrows in the slide switcher or type a slide number to jump to that slide. When the slide you're looking for appears in the middle position in the switcher, press Return to go to that slide and close the slide switcher; or click any of the three slides in the switcher to close it and go to that slide.

Figure 11-4. Press the plus (+) sign or minus () sign keys to open Keynote's slide switcher. Then use the + or - keys, or click the slide switcher's arrows, to move in either direction through the slideshow. You can also type a slide number to move directly to that slide. When the slide you want occupies the center position, press Return to close the switcher and move to that slide. If you decide you don't want to switch to another slide after all, press the Escape key to close the switcher.
-
If you're using the presenter display, you can scroll your speaker notes up or down by pressing U or D (for up or down) .
-
Quit the presentation and return to the Keynote editing window by pressing the Escape key, Q (for quit), or period (.) .
Table 11-1. Keynote Presentation Shortcuts
| To do this during a slideshow | Do any of these |
|---|---|
| Play slideshow | Click Play button in toolbar, |
| Play slideshow from the beginning | Option-click Play button in toolbar |
| Advance to next build, or to next slide if there are no builds | Click, Space bar, N, Return, Page Down, Right Arrow, Down Arrow, Shift-Right Arrow* |
| Reverse to previous build | [ (left bracket), Shift-Page Up*, Shift-Left Arrow* |
| Advance to next slide (in order to skip builds) | ] (right bracket), Shift-Page Down*, Shift-Down Arrow* |
| Reverse to previous slide in slideshow | Right-click, P, Delete, Page Up, Left Arrow, Up Arrow, Shift-Up Arrow* |
| Go to first slide in slideshow | Home |
| Go to last slide in slideshow | End |
| Reverse through previously viewed slides (not necessarily in the slideshow order) | Z |
| Pauseor freezeslideshow on current slide | F |
| Pause slideshow and display black screen | B |
| Resume paused slideshow | Any key |
| Pause the slideshow, hide Keynote, and switch to the last application used | H (Press |
| Show or hide Presenter Keyboard Shortcuts window | ?, Help,/(slash) |
| Show or hide the arrow cursor | C |
| Open the slide switcher to a slide | Slide number |
| Open the slide switcher to the next slide | + (plus sign), = (equal sign) |
| Open the slide switcher to the previous slide | - (hyphen or minus sign) |
| Go to the middle slide in the slide switcher and close the slide switcher | Return, Enter |
| Close the slide switcher | Escape |
| Reset the timer in the presenter display | R |
| Scroll notes up in the presenter display | U |
| Scroll notes down in the presenter display | D |
| Quit the slideshow, returning to Keynote editing window | Escape, Q, |
11.1.2. Creating Self-playing Slideshows
Self playing or kiosk slideshows put your Keynote presentation on autopilot. They play completely automatically, advancing each slide and build according to the timings you set.
Kiosk presentations are usually set to loop, playing over and over again to display your latest product, explain a museum exhibit, or embarrass attendees at your 40th high school reunion.
Even though these kinds of slideshows are completely automatic, Keynote still responds to keyboard commands during the presentation. To prevent viewers from pausing or stopping the presentation, remove the keyboardor in the case of a laptop, cover it.
You can control Keynote builds and transitions automatically in two ways.
-
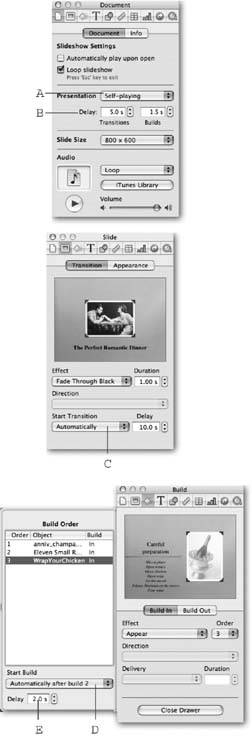
Individually, for each slide or build . You can set the duration for any slide by opening the Slide Inspector to the Transition tab, setting the Start Transition pop-up menu to Automatically, and entering the number of seconds you want to display the slide in the Delay box. Keynote allows a maximum of 600 seconds delay (see Section 10.13.1).
You can set an automatically timed build by opening the Build Inspector's Build Order drawer , setting the Start Build pop-up menu to "Automatically after," and entering the time delay in the Delay boxup to 60 seconds (see Section 10.13.2.1).
-
Globally, for every slide build and transition in the slideshow . Open the Document Inspector, click the Document tab, set the Presentation pop-up menu to Self-playing, and then enter the time delays in the two boxes. Keynote allows for some very slow-paced self-playing presentationsup to 999 seconds for transitions or builds.
The automatic timings you set in the Slide Inspector and the Build Inspector override those of the Document Inspectorso if you set automatic timing for the whole slideshow, you can still set different individual slide timings.
To turn a normal presentation into a self-playing presentation, open the Document Inspector, click the Document button, and then select Self-playing from the Presentation pop-up menu. Then set your desired transition and build delays in the two boxes with the up and down arrow buttons or by typing the number of seconds in the boxes (Figure 11-5).
11.1.3. Setting Up Hyperlinks-only Slideshows
Create a hyperlinks-only presentation if you want your viewers to be able to navigate through the slideshow at their own pace, clicking onscreen buttons to move from slide to slideas you did when you watched the iWorks Tour presentation (Help iWork Tour). You cant turn a normal presentation into a hyperlinks-only presentation the way you can with a self-playing presentation. You have to plan ahead for this kind of presentation when you design and create your slides, because hyperlinks-only presentations require you to provide one or more hyperlinks on every slide (see Section 10.12).
|
Once you've created a slideshow containing hyperlinks on every slide, you can turn it into a hyperlinks-only presentation. Open the Document Inspector, click the Document tab, and choose "Hyperlinks only" from the Presentation pop-up menu.
In this kind of presentation, Keynote expects you to navigate with hyperlinksthe normal slide advancing techniques and keyboard shortcuts don't work. The only keys the program responds to are the Escape key and the period (.), which stop the slideshow; and the question mark (?) and the help key, which summon the relatively useless Presenter Keyboard Shortcuts window listing all the commands you can't use in a hyperlinks-only presentation.
EAN: 2147483647
Pages: 134