Section 10.1. Setting Up the Keynote Document
Before you can start creating slides, you first have to create a Keynote document: the container that becomes your virtual slide tray for the presentation. To do so, launch Keynote (or, if it's already running, choose File  New) to open the template chooser. Select a theme and a slide size , and then click Choose (see Section 9.1).
Before you start plugging in your content, you need to think about how you're going to deliver this presentation. Will you be in control of the presentation, advancing the slides manually? Will it play automatically, all by itself? Will the viewer control the show, by clicking buttons onscreen? Keynote can create three varieties of slideshows to satisfy each of these scenarios.
-
Normal . This choice is the one for a presentation you control yourself, by click ing the mouse, using the keyboard, or using a remote control. Keynote creates this type of show unless you choose otherwise .
-
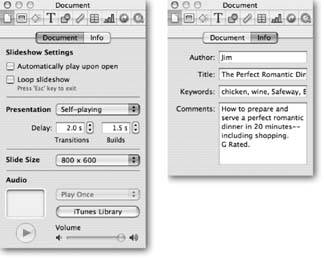
Self-playing . Choose this option if your presentation is destined to play all by itselfcommonly called kiosk mode without human intervention. This method is the way to make a sales presentation that plays continuously during an open house, or an educational slideshow that's part of a museum exhibit. In this kind of presentation, slides change automatically after a predetermined length of time. You can set the slide interval for the whole show or on a slide-by-slide basis. See Section 11.1.3 for details on setting up self-playing shows.
-
Hyperlinks only . Create this kind of Keynote presentation if you want viewers to interact with your show by doing things like navigating from slide to slide, choosing to view different parts of the slideshow, visiting a Web page, or creating an email message. Also known as an interactive slideshow , the Hyperlinks only style of Keynote presentation is ideal for self-paced trainings or lessons. The iWork Tour is an example of this kind of slideshow. See Section 11.1.3 for more information about using hyperlinks to create this kind of show.
To choose one of the three presentation styles from the Presentation pop-up menu (Figure 10-1), open the Document Inspector, click the Document tab, and then make your selection.
|
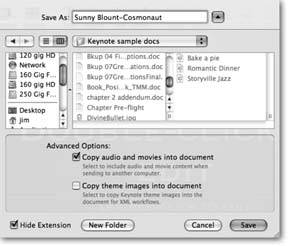
After choosing a theme and a presentation style, make sure to save your Keynote document. That way, you can easily save your changes by periodically pressing ![]() -S once you start creating slides. The first time you save a Keynote document, the program presents you with a couple of vitally important file-saving options. You see these options, however, only if you click the blue button next to the Save As field in the Save dialog box (Figure 10-2).
-S once you start creating slides. The first time you save a Keynote document, the program presents you with a couple of vitally important file-saving options. You see these options, however, only if you click the blue button next to the Save As field in the Save dialog box (Figure 10-2).
The first advanced option checkbox is labeled "Copy audio and movies into document." If you turn on this checkbox, Keynote copies any audio or movie files you include in your presentation into the Keynote document. If you don't turn on this checkbox, then Keynote just creates links to the audio and movie files on your hard drive. (If you'll just be playing the presentation on your own computer, the only effect of turning on this checkbox is to increase the file size of your Keynote file, since it now includes those duplicate media files.)
|
You use this checkbox when you transfer your Keynote presentation to another computer. If you're going to transfer it, you want to make sure you turn on this checkbox so that Keynote can get to all the media files it needs.
You want to turn on the second checkbox, "Copy theme images into document," only when you're using a non-Apple theme for your presentation. If you're transferring your presentation to another computer, that computer has to have Keynote 2 installed to run it (therefore it also has all of Keynote 2's themes available). However, if you create your own themes, or purchase additional themes, those theme images aren't available on other computersunless you've installed those same themes on those computers as well. Turning on this checkbox gets around any such problems by copying all the necessary theme images into the Keynote document. Then, as long as the computer has Keynote 2 installed, the presentation plays properly.
Apple must have recently hired a dialog-box writer from Microsoft who came up with the geeky note about "XML workflows." What it should say is, "Turn on this checkbox if you're using non-Apple themes and you want to play this presentation on another computer."
EAN: 2147483647
Pages: 134