Section 5.1. Making Tables
You can add tables to a Pages document either as fixed or in-line objects, with one important distinction: fixed tables are limited to one page, while in-line tables can span several pages. (Pop back to Section 4.2 for a recap of the difference between fixed and inline objects.)
How many cells can you put in a table? Though you'd be hard pressed to think up a need for such a table, as far as Pages is concerned , a table can be as small as one cell : one column wide by one row high. At the other extreme, Pages can make tables up to 20 columns wide. A fixed table can fill an entire page with as many rows as you can squeeze in, while an in-line table can stretch over many pages, or columns linked text boxes, with an essentially unlimited number of rowsfor a catalog product list, for example. Massive tables, however, can slow down Pages as it constantly updates hundreds of cells. If you need a table that's more than a few pages long, consider breaking it up into two or more tables, each a few pages long.
|
5.1.1. Inserting In-line Tables
You determine whether a table's fixed or in-line when you add it to a Pages document, just like with other objects. To add an in-line table, place the insertion point in the text where you want the table to appear, click the Objects button in the toolbar, and choose Table from its pop-up menu (or choose Insert  Table). You can insert a table in any text column or text box.
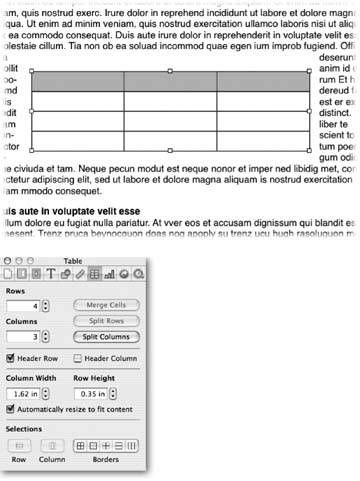
Pages starts you off with a table of three columns and four rows, which fills the text column from left to right, and Pages opens the Table Inspector so you can tailor the number of rows and columns, or adjust the Column Width and Row Height to suit your needs.
Note: As you work with tables, you make two different kinds of selections over and over: selecting the entire tableto change its size or position, for example; or selecting a cell or cells within the tableto do things like enter text or change a cell background.Click a table once to select the entire table; and then click once again to select a cell within the table. Pages highlights the selected cell with a yellow outline, removes the selection handles from the table, and the blinking insertion point appears within the cell, ready for you to start typing. If the table's not selected, double-click a cell to select that cell. (When you double-click this way, your first click actually selects the table, and your second click selects the cell.)
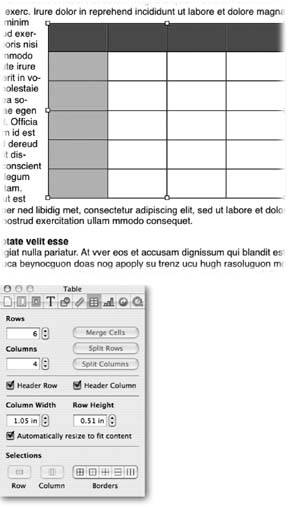
In-line tables one page or less in height possess only one active selection handleat the bottom-right. Drag it to resize the table. Any time an in-line table extends onto another page or another column, active selection handles vanish completely. Turn to the Metrics Inspector and use the Size boxes to adjust the overall size of the table. Click the up and down arrow button or enter measurements directly into the Width and Height boxes, and then press Return. When a table occupies more than one page or column, the Metric Inspector's height measurement is the total from the top of the table on its first page or column to the bottom of the table on its last page or column (Figure 5-2).
|

If you reduce the width of the text column containing an in-line table, you also make the table narrower. Then, if you make that column wider, the table width increases until the column reaches its original widthat which point the table stops expanding as you make the column wider than it originally was.
Note: Pages doesn't allow you to wrap text around the sides of an in-line tableit dims those options in the Wrap Inspector. Text wrapping around fixed tables, on the other hand, is unimpededPages treats them like any other fixed object.
5.1.2. Inserting Fixed Tables
Add a fixed table by clicking in the margin of the document so the insertion point disappears, clicking the Objects button in the toolbar, and then choosing Table from its pop-up menu (or choosing Insert Table). Pages starts you off with its standard table of three columns by four rows, and opens the Table Inspector so you can tailor the number and size of rows and columns to your needs. The size settings apply to every row and column when you select the whole table. Drag any of a fixed tables eight selection handles to resize it (Figure 5-3).
Tip: You can change the size and look of the table Pages gives you if you prefer that your new tables not be three columns by four rows with a gray header row. To do so, follow these steps: when you insert the first table in your document, add or remove rows or columns, resize it, and change backgrounds or borders. Then select the table and choose Format
Advanced Define Default Table Style. Pages uses your new table style for any new tables in this document. If you want to use this table style for other new documents, you have to make a template document with your new table style. See Section 7.1 for details on how to create a template. Note: If you continue to hold the Option key as you drag to draw a table, Pages centers the table on the point where you begin dragging. Hold down the Shift key while you drag, and Pages performs its usual proportion constraint.
Open the Metrics Inspector to resize a fixed table by manually adjusting table dimensions. Use the up and down arrow buttons , or enter width and height measurements in the Size boxes. Pages allows you to enter height measurements that are taller than the page, even though it can display only what fits on one pagethe rest of the table protrudes beyond the bottom or top page margins, existing in a digital limbo. The oversized table is still available if you drag it up or down the page, reduce the row heights, or delete some rows.
|
The Metric Inspector also gives you the tools you need to rotate your tableor, for mirror-writing fans, to flip it. At the bottom of the Inspector window, use the Rotate knob or the Flip buttons. (See Section 4.3.7) for more on the Metrics Inspector.)
5.1.3. Setting Table Options
Before you begin actually entering text in your brand-new table, consider a couple more setup options in the Table Inspector. Newborn Pages tables appear with a header rowa colored first row designed to hold your column labels. In-line tables that span more than one page or column display the header row at the top of each page or column. The Table Inspector's Header Row checkbox controls the presence or absence of a header row. Similarly, turn on the checkbox for Header Column to add a new first column to the table as a shaded repository for your row labels, as shown in Figure 5-4.
|
If you want to lock in your table's row height, turn off the checkbox for "Automatically resize to fit content." With this checkbox turned off, the table's cell size doesn't change, no matter how much text you enter into a cell. Pages hides any overflow text and displays a clipping indicator (+) to alert you to the hidden text so you can edit it down or adjust its font size to fit. Use this option for tables that don't need to display much text, in order to maintain the row regularity.
Turn on the checkbox for "Automatically resize to fit content" and Pages expands the row height as you enter new text. This option is the one to choose when you care more about the content of the table's cells than about the regularity of the gridthe work experience column in your list of prospective job interns, for example. Since Pages makes room in the row as you type more text, the entire table grows as well. This table growth stops when an expanding in-line table cell reaches the bottom of the page, column, or text boxa cell can't spread out onto another page, column, or linked text box.
Tip: When Pages automatically resizes rows as you type, an in-line table can expand to fill more than one page or column. But in the case of a fixed table, the expanding rows can end up pushing the lower rows of the table right off the bottom of the page. If this happens, you have to insert another table on the next page, and cut and paste the overflow rows into it (see Section 5.1.5.1).
5.1.4. Typing Into Tables
A table is essentially a cluster of text boxesadding and editing text in a table works the same as it does in text boxes. Double-click a table cell and type to enter text; format the text using any of the options available in the Font Panel, the Text Inspector, or the Styles Drawer. Cell text can include hyperlinks but not bookmarks (Section 4.5). Move through the cells from left to right and top to bottom by pressing Tab, or press Shift-Tab to move backwards through the cells. When you use the Tab key to navigate your table, Pages selects the text of any cell you land in. Start typing to replace all the text in that cell, or click to place the insertion point within the text to add to the cell. Since you've already created a type of text alignment on the page with the cells in the table itself, you probably don't need to use tabs within cells very oftenbut when you do, create a tab by pressing Option-Tab. Press Return to create a new paragraph within the cell.
Edit text within a cell in the usual way: click once to place the insertion point in a particular spot, double-click to select a word, triple-click to select a paragraph. Choose Edit Copy to copy some selected text from a cell, and choose Edit Paste and paste that text at the insertion point in the same cell, a different cell, or outside of the table.
Text alignment inside table cells works the same as aligning text inside a text box (see Section 4.2.5.2). In addition to the usual horizontal alignment stylesleft-aligned, centered, right-aligned, or justifiedyou can also align text vertically. To do so, select one or more cells and open the Text Inspector's Text tab. Use the three vertical alignment buttons to move the text to the top or bottom of the cell, or keep it vertically centered. Vertical alignment applies to all the text in the cell even if you've broken it into paragraphs. However, you can apply horizontal alignment on a paragraph by paragraph basis.
Control the distance between the text and the edge of the cell with the Text Inspector's Inset Margin slider. Tighten up the gap between the text and the cell edge by moving the slider to the left or entering a lower number in the Inset Margin measurement box. Pages applies the inset margin around all four sides of the cell.
The Inset Margin adjustment sets the maximum text area for a cell, but choose View Show Rulers and you can adjust right and left margins inward from the inset marginas well as set first-line indents and tabs for the selected cell. You can use the rulers on only one cell at a time. See Section 2.1.2.1 for in-depth ruler details.
5.1.5. Selecting Cells
After you double-click a table cell to select it (or single-click a cell in a selected table), you can move around the table by clicking other cells. Use the Tab key to move to the next cell to the right or the first cell of the next row (or Shift-Tab to move backwards). Pages selects the text of any cell where you land. Start typing to replace all the text in that cell or click to place the insertion point within the text to add to it. You can also use the arrow keys to jump from cell to cell when the cells are empty. In empty cells, the arrow keys move your selection from cell to cell; but as soon as you land in a cell containing text, the arrow key moves the insertion point through the text until it reaches the end, and then it jumps to the next cell.
The arrow keys let you cycle through all the cells in the table. When you reach the end of a row using the right-arrow key, for example, another press on that key selects the cell at the beginning of the next row. When you use the left or right arrow keys, this movement stops when you reach the first or last cell in the table. But when you reach these terminal cells with the up or down arrow keys, Pages moves the insertion point out of the table and up or down the page.
When you reach the final cell of a table using the Tab key, another press causes Pages to add a new row to the bottom of the table, and moves the selection to the first cell in the new row.
You can select several cells at once in order to, for example, change their background color or delete all their contents. Pages gives you a few ways to select groups of cells:
-
Shift-click cells or drag the mouse across the cells to select a contiguous group .
-
 -click to select noncontiguous cells or to deselect cells that you've already selected.
 -
Pages gives you three ways to select an entire row or column. Select a cell within the row or column, Control-click (or right-click) within the table but outside the selected cell, and choose Select Row or Select Column from the pop-up menu; select a cell and choose Format
Table, and then choose Select Row or Select Column from the submenu; or select a cell, and click the Row or Column button in the Table Inspectors Selections section. -
You can select multiple rows or columns by selecting cells in each of the rows or columns before choosing the Select Row or Select Column command.
5.1.5.1. Moving cell content
You can move the contents of one celltext and background color, or an image if there is oneto another cell by cutting or copying and pasting, or by dragging. The trick is to first get the cell out of its text-editing mode. Select a cell and press ![]() -Return to make the insertion point disappear, and then drag the cell's contents to another cell. As you drag, your arrow cursor sprouts a green ball bearing a + sign and a blue border appears around the cell in which Pages intends to drop your selection. As long as the cell's insertion point isn't showing, you can:
-Return to make the insertion point disappear, and then drag the cell's contents to another cell. As you drag, your arrow cursor sprouts a green ball bearing a + sign and a blue border appears around the cell in which Pages intends to drop your selection. As long as the cell's insertion point isn't showing, you can:
-
Drag a cell's contents to an empty cell to move the cell's contents.
-
Drag a cell's contents to another occupied cell, and Pages swaps their contents.
-
Hold down the Option key while you drag a cell's contents to another, and Pages copies the contents of the first cellwhether the second cell was occupied or not.
-
Choose Edit
Cut to delete the cells contents, select another cell in the same table or a different one, and then choose Edit Paste to move the cells contents to the cell you've just selected. -
Choose Edit
Copy, select another cell in the same table or a different one, and choose Edit Paste to copy the cells contents to the cell you've just selected. -
Press Delete to delete the text and background of the cell.
5.1.6. Adding and Deleting Rows and Columns
If you set up your table with exactly the right number of rows and columns when you inserted it, congratulations! You can skip ahead to the next section. Usually, however, you'll find it necessary to adjust the number of rows and columns as you work on a table.
You can add more rows and columns to your table any time. To do so, select a cell and choose Format Table Add Row Above or Add Row Below to add a new row above or below your selected cell. Or choose Format Table Add Column Before or Add Column After to add a new column before or after your selected cell. You can also find these commands (and all the other table- related menu commands) in the shortcut menus ; Control-click anywhere in the table except in the selected cell to invoke this timesaving feature.
Note: When Pages adds a new row or column to a table with the Add Row or Column Before or After commands, it duplicates the cell backgrounds from the selected row or columnbut not the cell text.
Delete a row or column by selecting a cell within it, and choosing Format Table Delete Row or Delete Column. You can also delete multiple rows or columns by selecting two or more cells in adjacent rows or columns, and choosing the same commands, which now read Delete Rows or Delete Columns.
You can add more rows to the bottom of the table or more columns to the right side by increasing the number of rows and columns in the Table Inspector's Rows and Columns boxes. Pages tacks on the new cells, duplicating the bottom row's or right column's background fill. If you lower the numbers listed in the Table Inspector's Rows and Columns boxes, Pages trims the cells and any data they contain from the bottom or the right side of the table.
5.1.6.1. Adding and deleting row and column headers
Often you want to add column or row labels to clue your readers in to the kind of information your table contains. Pages provides column and row headers to help you out.
You can add a header row or header column using the Format Table commands or by turning on the Table Inspectors Header Row or Header Column checkboxes. Delete a header row or column by using those same menu commands or turning off the checkboxes in the Table Inspector for Header Row or Header Column. New Pages tables always begin life with a shaded header rowa place for your column headings. Delete it if you don't need it.
Just like page headers that appear on every page of a document, a table header row appears at the top of each page when a table spans several pages or columns. This way, you can easily keep track of what all those columns represent on each page. For example, your soccer team roster may contain several columns with contact phone numbershome phone, mom's work phone, mom's cellphone, dad's work phone, dad's cellphone, doctor's emergency phone, and so on. Without a header row on each page, you'd be hard pressed to tell one column of phone numbers from another. If you insert a table inside a text box, it can continue through several linked text boxes, displaying the header row at the top of each. A header row appears the same on every page or column, so when you edit its text or appearance in one location, you change it everywhere.
A header column is always the leftmost column of the table, intended as a location for your row labelsthe names of the future World Cup stars in the above example.
Although Pages creates row and column headers with a background fill to differentiate them from the rest of the table, you can remove that fill or replace it with another that better suits your table design.
5.1.7. Formatting Tables
When the time comes to move beyond basic text tables, Pages is ready with a host of table formatting options. You can add a background color or image fill to the entire table or to individual cells; control if and how Pages displays cell borders; adjust opacity, rotation, and so on.
5.1.7.1. Adding backgrounds
You can add background colors, gradients, or images to the entire table or to individual cells the same way you would to a shape or text box. To add a background to the whole table, select the table so its selection handles show, open the Graphic Inspector, and, from the Fill pop-up menu, choose one of the fill styles. See Section 4.4 for details on all the filling possibilities.
To add a background to one or more cells, select them, and then use the Graphic Inspector's Fill menu as just described. Alternatively, you can drag and drop colors or images into individual table cells. Click the Colors button in the toolbar or choose View Show Colors to display the Color Picker. Select a color, adjust its opacity, and drag from the swatch into the table. Pages displays the green + sign ball next to your arrow cursor as you drag, and outlines the table cell beneath it in blue, indicating its readiness to receive the color when you release the mouse button.
Drag a picture from the Media Browser or from a folder on your hard drive and drop it into a table cell. Pages inserts the picture using the scale-to-fit optionwhich displays the entire picture within the bounds of the cell. It's quite unlikely that the picture's proportions will perfectly match the cell's proportions; therefore, take a trip back to the Graphic Inspector and, from the scale pop-up menu, try Scale to Fillor one of the other choices. See Section 4.4.4 for all the ins and outs of filling an object with an image.
Tables give you a great way to quickly lay out a group of pictures or make a catalog page. To do so, insert a table and adjust the cell sizes to accommodate each of your pictures and descriptions (see the upcoming section "Resizing cells, rows, and columns"). Then, add pictures to the cells, add your text, and change or remove the cell borders. Pages scales the pictures to fit or fill the cells, and the table structure keeps everything in line.
You can fill several table cells with the same image. Select the cells and, from the Graphic Inspector's pop-up menu, choose Image Fill. When you fill multiple cells with an image, it repeats in every cella picture can't span more than one cell. (If you want a picture to appear behind a group of cells, insert the picture into the document as a regular picture, mask or size it to match the size of the group of cells, and then arrange it behind the table and make sure the cells are set to No Fill.)
5.1.7.2. Formatting cell borders
New Pages tables feature a one-point, black border around every cell. That may be fine for a bare bones, quick and dirty table, but a little time spent modifying your table borders can pay off with a more visually appealing and more readable table. You can change the color, opacity, and border thicknessor remove the border entirely for the whole table, individual cells, or even a single side of a cell.
To make these border adjustments, you need to use both the Table Inspector and the Graphic Inspector. Open both Inspectors at the same time by opening one of them, and then Option-clicking the button in the Inspector toolbar to open the other one (Figure 5-5).
|

You can change the borders for the whole table at once by selecting the table so its selection handles are visible. Adjust the Graphic Inspector's Stroke settings in order to turn cell borders on or off with the pop-up menu; choose the border color by clicking the stroke color as well and using the color picker; and determine the border width by typing a number into the width box and pressing Return or using its up and down arrow button.
Use the Borders buttons at the bottom of the Table Inspector to modify only some of the table's borders. The first button selects all the borders (effectively the same as having no borders selected when the entire table is selected), the second button selects just the outside border of the table, the third button selects all the interior cell borders, the fourth button selects all the horizontal borders, and the last button selects all the vertical borders (Figure 5-5 shows you how this border selecting works).
You can also select individual border lines in order to adjust their stroke style. Click inside a table to select the whole table or a cell. Position your arrow cursor so the very tip of the arrow is on a cell border, and then click the mouse. Pages highlights the line in yellow and changes the arrow cursor into the line-selecting cursora pair of lines with a pair of perpendicular , outward- facing arrows. Move this cursor around the table to more easily select other border lines. Hold down the Shift key or ![]() (they do the same thing) while you click to select multiple lines.
(they do the same thing) while you click to select multiple lines.
To select individual cell sides, press the Option key while clicking the side you want; to select multiple cell sides, press Shift-Option (or ![]() -Option). Once you've selected border lines or cell sides, use the Graphic Inspector's Stroke section and opacity slider to adjust the lines.
-Option). Once you've selected border lines or cell sides, use the Graphic Inspector's Stroke section and opacity slider to adjust the lines.
Note: The Graphic Inspector's Shadow section is active any time you have any part of a table selected. When you've selected the whole table, a borderline, or a cell side, turning on the Shadow checkbox applies a shadow to the entire table. If you select one cell or a group of cells, Pages applies the shadow to the text within that cellnot to the table.
5.1.7.3. Resizing cells, rows, and columns
You needn't be constrained by the regularity of the cells after Pages inserts a table. You can resize individual cells or entire rows or columns directly in the table by selecting and dragging the cell borders. Select a borderline or cell side so that it's highlighted in yellow as described previously, and then drag to reposition it. As you drag, Pages displays the line's x or y coordinatesthe distance from the left or top edge of the page. You can drag only one line at a time. Header cells aren't quite so flexible. Header row cells must have equal heightsyou can't adjust the height of just one header row cell, and header column cells must have equal widthsyou can't adjust the width of one header column cell.
Use the Table Inspector when you want to set the dimensions of rows and columns by manually adjusting their settings. Select one or more cells, enter the measurements in the Column Width and Row Height boxes, and then press Returnor use the up and down arrow buttons.
If you've made a lot of sizing changes to your table's cells and things are starting to look a bit lopsided, Pages provides two commands that can return some regularity to your table. Select a group of cells and choose Format Table Distribute Rows Evenly, and Pages adjusts the height of the selected cells so that they all match. Similarly, the Distribute Columns Evenly command tells Pages to adjust the selected cells to make their widths match. If you select the entire table and then use both these commands, Pages makes every cell in the table the same size. If you have the Table Inspectors checkbox for "Automatically resize to fit content" turned on, the Distribute Rows Evenly command adjusts the rows to match the height of the cell that contains the most text. If that checkbox is turned off, Pages keeps the dimensions of the entire table the same while equalizing the height of the rows. Cells containing more text than can fit display the clipping indicator (+) to show that they have some hidden text.
5.1.7.4. Splitting and merging cells
Pages can split one cell into two, or merge two or more cells into one. For example, you could subdivide a large cell to break up its text or to add different background colors or images to the divided cells. Pages splits cells either horizontally or vertically into two equal halves . After they're split, you can adjust the new cell border to create cells of any proportion. Select a cell or group of cells and choose Format Table Split Into Rows to divide the cells horizontally. Choose the Split Into Columns command to divide the cells vertically. Instead of using the menu commands, you can also Control-click the table and choose the pop-up menus commands, or the Table Inspector's Split Rows or Split Columns buttons. The new cells you create possess the same background color or image as their parent cell.
When you split a cell into rows, any text it contains stays in the top cell. If you split a cell into columns, its text stays in the left cellunless the cell you're splitting is in the table's right hand column, in which case the text stays in the right cell.
Instead of dividing cells, you can unite themas long as the cells you're bringing together form a rectangle. You might find this ability useful in order to add a large background photo in place of a group of text-free cells within a larger table, or to change an entire column of cells into one large cell to act as a divider between columns. Start by selecting two or more cells. Then choose Format Table Merge Cells; use the same command from the shortcut pop-up menu; or click the Table Inspectors Merge Cells button. Alternatively, use the more direct method of Option-clicking on the cell border between the cells you wish to merge, and pressing Delete. Pages fuses the selected cells into one, using the background image or color from the upper, left, or upper-left cell of the group. If the cells contain text, Pages combines it in the new cell, separating text from cells in the same row with tabs and separating text from separate rows with paragraph breaks.
EAN: 2147483647
Pages: 134