Applying Audio Filters


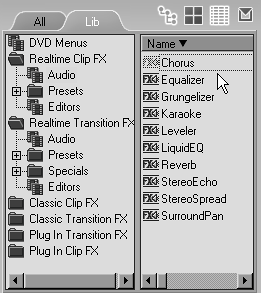
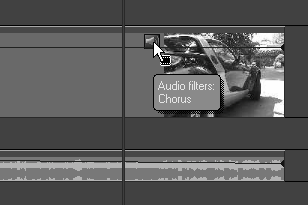
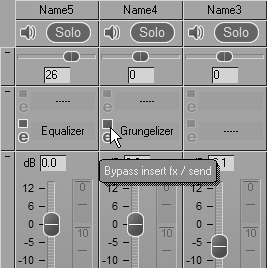
An audio filter is simply a mask that is added to the audio so that it can be artificially altered in various ways. Earlier versions of Liquid Edition featured very few audio filters, but then Pinnacle Systems purchased Steinberg and all that changed.

Version 6 features seven new audio filters and also the ability to use any VST plug-in, which essentially allows you to use one of the many audio plug-ins commercially available for video editing.

You can apply an audio filter in one of three ways: directly to a clip; to an entire audio track; to an entire track but via the Audio Editor.

To add an Audio Clip FX (filter) to a clip

1.

Click once on the Lib tab in the Project Browser to show the filters.

2.

Select the Audio Filters Rack in the Realtime Clip FX folder to display the available filters (Figure 7.52).

Figure 7.52. The Audio Filters Rack.


3.

Click the filter you want and drag and drop it onto the clip you want to adjust.

The affected clip displays a large purple line along the top; embedded audio clips also show a small speaker symbol (Figure 7.53).

Figure 7.53. The small speaker indicates the presence of an audio filter.


VST Plug-Ins

Additional VST plug-ins can be added to Liquid Edition by copying them to the \Plugins\VST folder. You can find this in the Pinnacle directory on your hard drive.

Once the application is restarted, Liquid Edition should automatically detect the extra plug-ins and add them to the Audio Filters Rack.


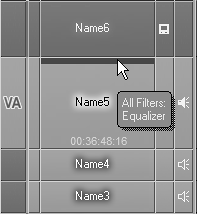
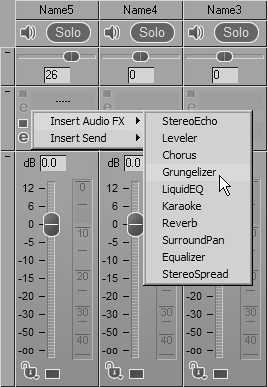
To add an Audio Clip FX to a track

1.

Click once on the Lib tab in the Project Browser to show the filters.

2.

Select the Audio Filters Rack in the Realtime Clip FX folder to display the available filters.

3.

Click the filter you want, and drag and drop it onto the track you want to adjust.

A purple line is displayed along the track name area (Figure 7.54).

Figure 7.54. Audio filter added to an entire track.


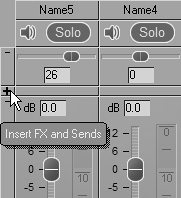
To add an audio filter in the Audio Editor interface

1.

Open the Audio Editor by pressing F4.

2.

If the Insert FX box is not already displayed in the Audio Editor, click the Settings tab, and click the check box next to Insert FX and Sends (Figure 7.55).

Figure 7.55. Activating the FX area of the Audio Editor.


3.

Return to the Mixer tab area and expand the Insert FX area by clicking the plus sign (+) (Figure 7.56).

Figure 7.56. Open up the FX area…


4.

Place the mouse cursor over the Insert FX box until it turns into a downward-facing black arrow; click here, selecting Insert Audio FX from the two choices, and then select the filter you require (Figure 7.57).

Figure 7.57. … and choose a filter to insert.


5.

Click once on the small blue square next to the filter to activate the filter without first editing its parameters (Figure 7.58).

Figure 7.58. Activate the filter by clicking the red square.


A purple line appears on the track to which you have applied these filters. Placing a mouse cursor over this line displays the name(s).

Tip

  • You can add as many filters as you like to a single track, but beyond a certain limit (dictated by what is on the Timeline), Liquid Edition needs to render the audio.


Pinnacle Liquid Edition 6 for Windows
ISBN: 0321269160
EAN: 2147483647
Year: 2003
Pages: 245
Authors: Paul Ekert

flylib.com © 2008-2017.
If you may any questions please contact us: flylib@qtcs.net