| There are a number of different names for chroma keying including the more familiar blue- or green-screen compositing. You often see this on national TV when the weather appears on a screen behind the weather person. In fact, the presenter is pointing to a blank green or blue screen and is looking at an image on a monitor in front of him or her. Blue-screen compositing is used extensively in movies to put objects and people into a shot. This is what allows Superman to fly and Spider-Man to spin webs around the city without either of them having to dangle from a helicopter. To create a chroma-based video clip, you need some fairly special equipment; just having a blue or green background isn't really enough to produce truly professional results. First, you must have the correct lighting to remove shadows and to allow the background to be a uniform shade of blue or green. If you don't do this correctly, the composite suffers from strange areas on the screen that appear to glimmer slightly as the light moves inside the shot. A modern audience will spot these and when they do, your effect falls flat. However, once you successfully shoot the clip and Liquid Edition captures it, the process of removing the green or blue color background is simply a matter of applying a filter and adjusting the parameters for maximum effect. The following task-based description refers to any of the chroma keying filters, including the Blue Screen, Green Screen, Chroma Key CPU, and Chromakeyer YUV effects. To apply one of the chroma key filters - Place the clip on the Timeline; then drag and drop the chroma key of your choice onto the clip (Figure14.35).
 Tip Tip
Figure 14.35. Adding a chroma filter to the Timeline. 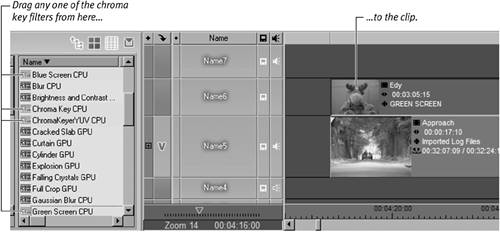
To use the Blue or Green Screen filters - Double-click the purple bar that runs the length of the clip to display the Green or Blue Screen Editor (Figure 14.36).
Figure 14.36. The Green Screen Key parameter interface. This is a Realtime filter. 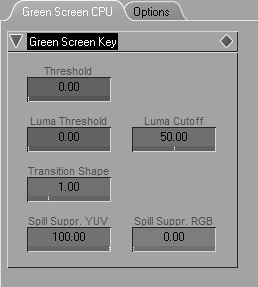
Adjusting the threshold produces the most noticeable difference when you're fine-tuning your chroma effect, but don't ignore the other settings as you adjust this clip (Figure 14.37).
Figure 14.37. Before and after adjusting the Green Screen parameters. 
Tip Don't forget that you're working with video, and as a result, you need to change the parameters for this effect throughout the length of the clip. For more details on adjusting parameters and working with keyframes, see Chapter 9.
To use the chroma key filter 1. | Double-click the purple bar that runs the length of the clip.
| 2. | Draw a circle around the color chart, tracing the color of your background (green in this example) (Figure 14.38).
Figure 14.38. Defining the color area with which the filter should work. 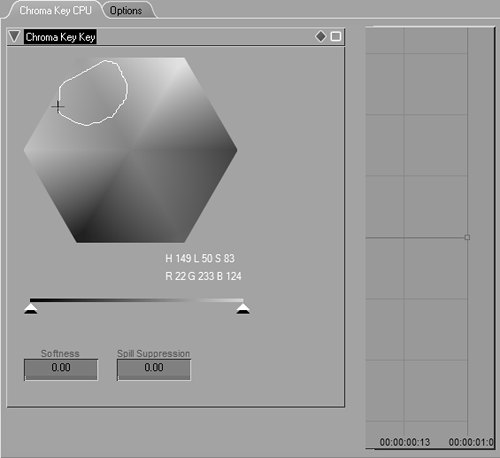
|
Tips Hold down the Ctrl key and left-click in the drawn area to move it around (Figure 14.39). Figure 14.39. Hold the Ctrl key to move the selection area. 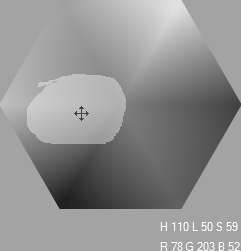
Hold down the Alt key and draw inside the area to subtract areas from your original drawing. Hold down the Shift key to add to the areas of your original drawing.
To use the Chromakeyer YUV filter 1. | Double-click the purple bar that runs the length of the clip).
| 2. | Use the color picker to drag the color band around the circle to achieve the result you are looking for (Figure 14.40).
Figure 14.40. You need to rotate the color area of the YUV filter to select the correct color. 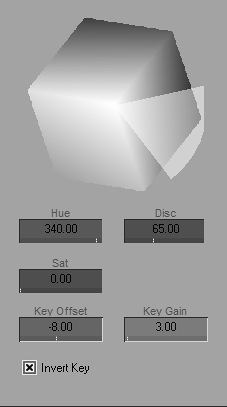
|
Tip
Chroma Keying on the Cheap Although I said that you need professional equipment to produce professional results, you can still experiment with chroma keying without having access to a large budget. To create the examples shown in this chapter, I printed off several sheets of green paper. I stuck these to the wall and tried not to leave gaps or create any ripples in the paper. Then, I just added a bright light source or two to eliminate shadows and voilàEdy the Elk is now a movie star (Figure 14.41). Figure 14.41. Edy the Elk and the Smart Roadster show how easy it is to create a green screen set at home and from suitable clips. 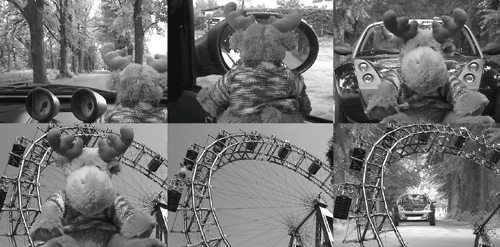
The top row of Figure 14.41 shows Edy inserted into the clip's Viewpoint, Mirror, and Approach. If you compare these screenshots with ones throughout this book, you'll see how convincing a simple green-screen effect can be. The bottom row shows Edy in front of the big Ferris wheel, and if you look carefully enough, you'll also see that he is sitting on one of the cars in the center right of the middle screenshot. In the last screen shot in this montage, I used the blue sky background behind the big Ferris wheel as the chroma keying color so that you can see the Approach clip through it. Chroma keying is a very versatile tool, but it's only as good as your imagination and the consistency of your chroma background. Take a look through your clips and see where you might add chroma keying to create unusual and interesting effects from videos that contain uniform amounts of color. Don't forget that you can combine a 2D filter with a chroma filter to rotate and resize the inserted object so it fits the scene better. For example, it's not hard to shrink someone to make them appear smaller than they are and then place them in a room full of what appears to be giant furniture. An Edy JPEG is one of the sample files available at www.peachpit.com/liquid6vqp. You can also download a green and blue JPEG to help create your own chroma key studio. |
|