Understanding Shapes and Masters
3 4
If you want to know what goes on behind the scenes when you work with Visio shapes, this section is for you. This information is useful primarily if you plan to create new shapes and save them for reuse as master shapes. Each master has an internal timestamp that records the date and time it was last updated. When you drag a master onto the drawing page, Visio uses its timestamp to determine whether to make a copy of the master on the document stencil. An instance or copy of the master appears on the drawing page, as Figure 21-9 shows. A drawing file always includes a document stencil that contains copies of the masters used in the drawing, even if the corresponding shapes are later deleted from the drawing page. An instance on the drawing page is linked to the copy of the master on the local stencil and inherits its behavior and appearance from that master. If you create a shape using the drawing tools, the shape is not linked to any master or the document stencil.
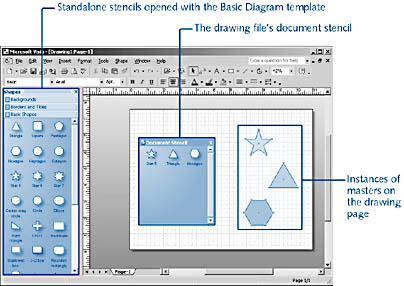
Figure 21-9. When you drag a shape from a stencil onto the drawing page, Visio places a copy of the master on the document stencil.
Inheritance is a weird fact of Visio life that keeps file management efficient and makes shapes reusable. Because of inheritance, you can quickly reformat all the instances of a master shape that you've already added to a drawing page by editing the copy of the master shape on the document stencil. You can also share shapes with other Visio users and know that the shape will look right on the other user's computer. Inheritance also explains why when you ungroup a shape created from a master, a dire-sounding message appears: "This action will sever the object's link to its master." This simply means that the shape on the page will no longer inherit from the master stored on the document stencil—that is, the shape is no longer an instance of the master. That severed master, however, remains on the document stencil. Only the link to the master has been removed.
To remove masters from a document stencil that are no longer linked to shapes on the page, you can display the document stencil and delete them manually. You can't tell by looking whether a master on the document stencil is linked to a shape instance on the drawing page, but if you try to delete a master that is still linked, you see the message shown in Figure 21-10. About the only time it's worth cleaning up a document stencil is if you're intending to save a drawing as a template and you want the drawing page and document stencil to be as small as possible in terms of file size.
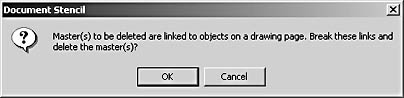
Figure 21-10. You can clean up a document stencil by deleting unneeded masters. If a master is still linked to a shape on the page, Visio warns you.
Troubleshooting
The Find Shape tool does not locate master shapes that have been customized.
If you create your own master shapes and want them to appear when you use the File, Find Shape command, you must do the following:
- Include keywords with the master shape. The keywords correspond to the search text users type in the Find Shape pane and are used by Visio to index shapes for searching. Keywords are an option in the Master Properties dialog box. For details, see "Editing Masters."
- Update the index of keywords that Visio maintains for locating shapes. To do this, choose File, Find Shape, and then click the Options link. On the Advanced tab, click Update Index, and then click OK.
- Store your stencil in the stencil path. Either you must save your stencil in one of Visio's solution folders, or add a file path to your stencil. Visio looks for stencil files in the file paths specified in the Options dialog box. Choose Tools, Options, File Paths to view or add a file path.
Saving Customized Shapes as Masters
Recent releases of Visio have made it much simpler than in the past to create masters. If you've drawn a shape, or edited one that you want to save, you can drag it onto any open stencil, as Figure 21-11 shows. If the stencil is open as read-only, Visio asks you whether you want to open the stencil for editing, and if you click Yes, Visio creates a default master. That's the quickest way to create a master and save it on a stencil. You can then edit the master and its icon, as described in the next section.
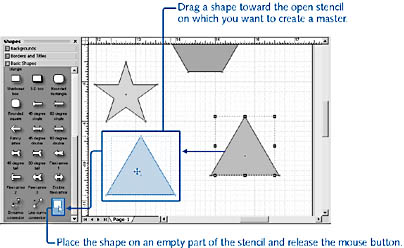
Figure 21-11. You can drag a shape onto any stencil to open the stencil for editing and save the shape as a master.
There are other ways to create a new master as well. You can
- Open a stencil for editing, add a new, blank master, and then create a shape. There may be an advantage to working this way; you get the same effect by creating your shape on the drawing page and then dragging it onto a stencil.
- Open a stencil for editing, edit an existing master, and then save your changes. This method is especially handy when you use a particular shape all the time and always edit it in the same way. You can instead go to the source and edit the master.
Tip
You can create a master from an object that you have pasted or imported into the Visio application from another program.
Editing Masters
As if Visio didn't have enough windows and panes already, the master drawing page window is the place where you can edit masters. To display this window, double-click a master on a stencil that's open for editing. Visio opens the master in its own drawing page, as Figure 21-12 shows. To close the window and save your changes, click the Close button in the master drawing window.
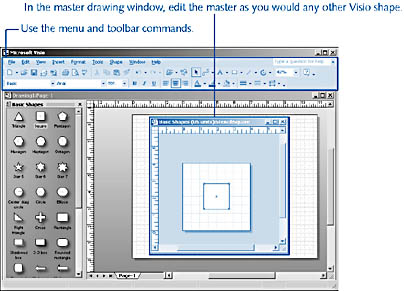
Figure 21-12. When you double-click a master, Visio opens the shape in the master drawing window. Often, the drawing page is sized to the shape.
In the master drawing window, you can edit the master as you would any other Visio shape. You can drag shapes from other stencils, draw or edit with the drawing tools, or paste an object from another application. The only difference is in how you save your changes: Click the Close button in the master drawing window. If you have made changes to the master, Visio prompts you with a message like the one shown in Figure 21-13. When you click Yes, Visio saves your changes and revises the master icon to match, if necessary (although you can disable this action).
Copyrighting Masters
The masters supplied by Microsoft Corporation are copyrighted. You are legally permitted to copy, modify, and reorganize them for your own use, and you can distribute drawings that contain them. However, you cannot legally sell or distribute original or modified Microsoft Visio masters.
What you can do if you're in the business of creating and selling shapes is copyright your own. Shape copyrights are displayed in the Special dialog box (Format, Special). The Copyright field is a one-shot deal: Once you type your copyright information and click OK, you can't edit the field's value.

Figure 21-13. When you click the Close button in the master drawing window, Visio prompts you to save your changes with this message.
Visio creates an icon and default name for new masters, both of which you can change. For example, if you create a new master by dragging a shape onto a stencil, the master icon is a rectangle with a miniature image of the shape and a label "Master.n," where n is the number of shapes on the stencil. A master has properties that include its icon size, name, and prompt—the text that appears on the status bar when you point to a shape on a stencil. You can also specify how icons are displayed and aligned on a stencil.
To edit a master's properties, follow these steps:
- On a stencil that's open for editing, right-click a master shape, and then choose Master Properties.
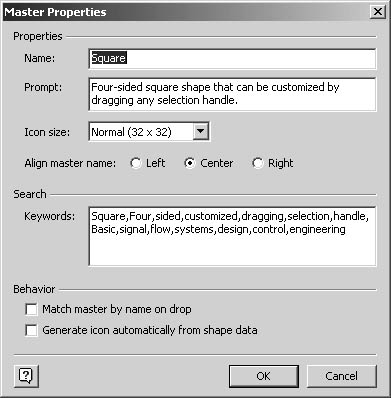
- In the Name box, type the name of the master shape as you want it to appear on the stencil. Table 21-1 lists the other options that you can specify.
- Click OK to close the Master Properties dialog box.
- To save your changes, right-click the stencil's title bar, and then choose Save. Or if the stencil is open in a standalone window, choose File, Save.
Tip
The Master Properties command is available only when you right-click a master on a stencil that's open for editing. If you open an original standalone stencil in its own window, Visio adds the Master menu to the menu bar, which also includes this command.
Table 21-1. Master Properties Dialog Box Options
| Option | Description |
|---|---|
Name | The master name that will appear with the master icon on the stencil. You can type up to 31 characters, but shorter is better. Visio truncates long names (exactly where depends on the screen resolution). |
Prompt | The text that appears in the balloon when you point to a master shape on a stencil. Visio masters use this text to explain a shape's purpose, but anything you think is useful information can go here. |
Icon Size | The size of the master icon on the stencil. The number in parentheses is the size in pixels. Normal is the setting Visio master shapes use. |
Align Master Name | How the master name is aligned with respect to the master icon. Visio master shapes use the Center setting. |
Keywords | Words that help users find shapes. Unless you're planning to distribute your stencil, you can probably ignore this. The Find Shapes command uses the words you type in this box to help users locate shapes. Separate each keyword with a comma. This field is not available if the master drawing page contains no shape. |
Match Master By Name On Drop | An option that tells Visio whether to link the instance of a master to the master on the document stencil with the same name. Visio master shapes do not use this setting. If this check box is not selected, Visio uses the master's timestamp to determine whether the master needs to be copied to the document stencil. |
Generate Icon Automatically From Shape Data | An option that tells Visio whether to re-create the master icon each time you save a change to the shape in the master drawing window. |
Designing and Displaying Master Icons
If you create and distribute master shapes on a stencil, well-designed, well-organized icons provide a nice touch. The master icon is a user's first clue about a shape's purpose. Although Visio creates and arranges master icons as you add new masters to a stencil, you'll probably want to refine both their look and location.
Creating Master Icons
There is a fine art to designing meaningful images in a space of 32 by 32 pixels, the default size of a master icon. If you want to design or edit the master icon on a stencil, you can work, pixel by pixel, in the icon editor. Visio typically creates an icon for you based on the appearance of the shape in the master drawing window. You can then refine the icon in the icon editor to change its shape and colors, as Figure 21-14 shows. Here's the trick: Select the Pencil tool and click the left mouse button to apply the Left Button Color to a pixel—likewise for the Right Button Color and the right mouse button. Select the colors on these buttons, and then left- and right-click with the Pencil tool to draw in the icon editor.
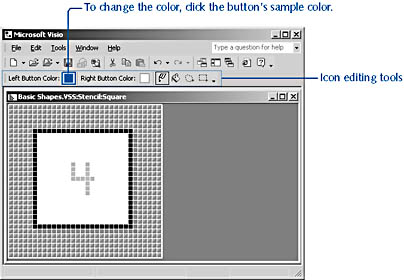
Figure 21-14. You can design a master icon, pixel by pixel, in the icon editor, which includes basic tools for setting pixel color.
Icons can be larger than 32 by 32 pixels. Their size is set in the Master Properties dialog box, as explained in the previous section. The Icon Size you specify there determines the size of the area in the icon editor.
Note
If you plan to design a unique master icon, make certain to clear the Generate Icon Automatically From Shape Data option in the Master Properties dialog box as well. Otherwise, Visio will overwrite your icon every time you edit the master in the master drawing window.
Follow these steps to edit a master icon in the icon editing window:
- On a stencil that's open for editing, right-click a master, and then choose Edit Icon.
Visio opens the icon editing window, displays the icon, and adds a toolbar with commands for editing the icon.
- Use the tools to change the colors and shape of the icon.
As you change the icon, your changes are reflected on the stencil. You may need to rearrange the windows to see both the stencil and icon editor windows.
- After you've edited the icon, click the Close button to close the editing window. When Visio prompts you to save the changes to the stencil, click Yes.
- If the results are disappointing, choose Edit, Undo Change Icon. Or press Ctrl+Z.
You can also use the Undo command while you're working in the icon editor.
Displaying Master Icons on a Stencil
In addition to editing or designing a master icon, you can change the order in which master shapes appear on a stencil and choose whether a name and description are displayed with the icon. For example, you can display a description next to the master shape icon that indicates the shape's purpose. To change the order of the stencil's icons, simply drag the master shape icons into position. Visio snaps the icons into alignment and creates rows and columns based on the size of the stencil window.
You can also choose how much information Visio displays for all master shapes. By default, Visio displays the master icon and shape name. You can instead display only the icon, only the name, or both with a description as well. When you change the way Visio displays master shapes and icons, all stencils you subsequently open are affected.
Follow these steps to change how master shapes are displayed:
- Close any drawing files that you have open.
- Choose File, Stencils, Open Stencil. Select a stencil file, and then open it as an original or copy. Visio opens the stencil in a standalone window and adds the Master menu to the menu bar.
- Choose View, and then choose Icons And Names, Icons Only, Names Only, or Icons And Details. Visio changes the master shape display depending on the command you choose.
Note
The icon commands appear on the View menu only when a stencil is open in a standalone window. Unless nothing else is open when you open a stencil, Visio places the stencil in a docked window, and the icon commands don't appear.
Creating a New Stencil
It's useful to create an entirely new stencil when you want to save shapes you create or consolidate masters from Visio stencils that you use frequently. To create a new, empty stencil file with write access, choose File, Stencils, New Stencil. If you already have a drawing file open, Visio opens the new stencil in a docked window that's open for editing. If nothing else is open in Visio when you create a new stencil, Visio displays the stencil in a stencil window and displays menus for working with stencils and masters, as Figure 21-15 shows.
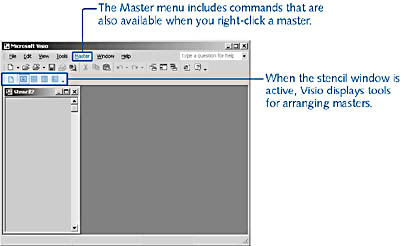
Figure 21-15. When you create a new, standalone stencil, Visio opens the stencil in a stencil window. The document's drawing page is closed.
There are a couple of advantages to starting a new stencil this way—that is, in a new window:
- The Master menu is added to the Visio window.
- Visio displays a toolbar with buttons for controlling the display of master icons in the stencil window.
- The new stencil document's drawing page is empty and its style lists include only the four default styles, so you're starting with the minimum file size.
Tip
To display the stencil's drawing page, which provides a convenient work area while you add masters, choose Window, Show Drawing Page.
Adding Shapes to a New Stencil
You can open other stencils, and then drag masters onto your new stencil. Or you can create and design masters from scratch in the stencil window. Table 21-2 summarizes techniques for working with stencils.
Table 21-2. Techniques for Working with Stencils
| Task | Technique |
|---|---|
Create a new, empty stencil | Choose File, Stencils, New Stencil. |
Create a new stencil based an existing stencil | Choose File, Stencils, Open Stencil. In the Open on Stencil dialog box, locate and select the stencil you want to use. Click the Open button's drop-down arrow, choose Copy, and then click Open. |
Add a master from one stencil to a different stencil | Open both stencils, and then drag the master from one stencil to another. |
Save changes to a docked stencil that's open for editing | Right-click the stencil's title bar, and then click Save or Save As. |
Save changes to a stencil open in a stencil window | With the stencil window active (click its title bar), choose File, Save or Save As. |
Saving Changes to a New Stencil
To save your changes, do one of the following:
- If the new stencil is in a docked stencil pane, right-click the stencil's title bar, and then choose Save.
- If the new stencil is open in a stencil window, choose File, Save (or press Ctrl+S).
To make sure that other users cannot open your stencil for editing, set the Read Only option in the Save As dialog box. For details, see "Saving and Opening Read-Only Stencils."
If you save your stencil file in one of the Visio Solution folders, it will appear with other stencils when you click the Open Stencil button on the Standard toolbar or use the File, Stencils, Open Stencil command. The default location to which Visio installs stencil files is C:\Program Files\Microsoft Office\Visio10\1033\Solutions.
You can also set up a folder on your computer for your customized stencils and then direct Visio to that path. To set the default file paths that Visio searches for stencil files, choose Tools, Options, and then click the File Paths tab. To add your path to the default shown in the Stencils box, type a semicolon (;) character after the displayed file path, and then type your path.
Saving a Document Stencil as a New Stencil
If you've been working in a drawing and want to save the masters that have accumulated on its document stencil as a new, standalone stencil, it's easy. Basically, you save the drawing file as a stencil file. This can be a quick way to create a new stencil, but it can also result in a larger than normal file size. When you save a drawing file as a stencil file, Visio saves all the masters on the document stencil, but also saves any shapes you've left on the drawing page. When you next open the stencil file, it will open in the normal fashion—either docked or in a standalone window, depending on how you open it. The shapes left on the drawing page are still stored with the file and take up file space, but they're not visible because the stencil's drawing page is closed.
It's best to delete the shapes from the drawing page when you want to save a drawing file as a stencil. Then only the masters on the document stencil are saved, which is really all you need if you plan to use the document as a stencil.
Follow these steps to save a drawing file's document stencil as a new stencil:
- Choose File, Stencils, Document Stencil to display the drawing file's document stencil if it is not already visible.
- Make sure that the document stencil contains the masters you want. You can delete masters you don't need, edit the master properties to change the master names, and drag master icons to arrange them in the order you want.
- To clean up the file before you save it, delete all the shapes from the drawing page.
Tip
A quick way to remove all shapes from the page is to choose Edit, Select All, and then press Delete. - Choose File, Save As.
- In the Save As Type list, select Stencil. Type a file name and specify the location you want.
- If you want to share your stencil with others but ensure that they can't edit it, click the Save button's drop-down list arrow, and choose Read Only.
For details about read-only stencils, see "Saving and Opening Read-Only Stencils."
- Click Save to display the Properties dialog box, in which you can type information about the file if you want. When you click OK, Visio saves the document as a stencil that you can open with other drawings.
EAN: 2147483647
Pages: 211