The Toolbox
|
| < Day Day Up > |
|
One problem with the effects we have examined is that they apply to the entire image. They don’t enable you to pick and choose what you want to alter. For this or for the creation of new images, we need to take a look at the GIMP Toolbox, shown in Figure 12.22. You can see that it is not very different from the Photoshop toolbox shown in Figure 12.23.
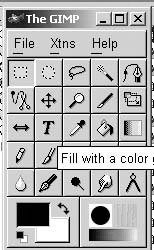
Figure 12.22: The GIMP Toolbox.

Figure 12.23: The Photoshop toolbox.
The first two tools, shown in Figure 12.24, are Selection tools. They enable you to select a portion of your image. You can then cut that portion, copy it, fill it in, or in some cases apply a filter to just that portion. The first Selection tool selects rectangular sections, and the second tool selects elliptical sections. You click on the tool you want, then drag your mouse across the image to select a region.
![]()
Figure 12.24: Selection tools.
The third tool is also a Selection tool. However, it does freehand selection. You click on the tool and then draw with your mouse around the region you want to select. This tool is very useful for those with an artistic leaning, but perhaps not as useful for those of us who have some difficulty drawing.
The next three tools are all also selection tools. These three, shown in Figure 12.25, are quite a bit more complicated. They enable you to select contiguous regions, regions defined by curves, and shapes. These tools are probably not for the beginner.
![]()
Figure 12.25: More selection tools.
The next three tools, shown in Figure 12.26, are very interesting. These enable you to move, zoom, or crop your image. The Move tool is rather simple. If you have pasted in an image, perhaps one cut or copied from another image, you can move it around until it is where you want. The second tool enables you to zoom in on an area of your image. If you are touching up an image, it is often a good idea to zoom in to do so.
![]()
Figure 12.26: The Move, Zoom, and Crop tools.
The third tool, the Crop tool, is a little more complex. After you select this tool and drag across a region of your image, you will see something like what is shown in Figure 12.27. You can now choose to crop the image so that only the area that is selected remains. You also can resize your image. Then the entire image will remain, but it will shrink to the size of the region you have selected.

Figure 12.27: Cropping an image.
The next tool enables you to rotate your image in any fashion you wish. Our image is shown with the Rotation tool in Figure 12.28.

Figure 12.28: The Rotation tool.
The next tool, shown in Figure 12.29 is the Flip tool. It enables you to flip your image.
![]()
Figure 12.29: The Flip tool.
The next tool is very useful. It is the Text tool. This tool is used to add text to your image. When you use this tool and click on your image, you will be presented with a screen much like the one shown in Figure 12.30. The Font tab on this screen enables you to select the font and font size. The Font Information tab gives information about the font. This may seem a bit odd, but graphics professionals often want rather in-depth information about the fonts they use. Remember that GIMP is designed to be a useful tool for the graphics professional as well as the casual home user. The Filter tab enables you to make the font bold, italic, and so on.
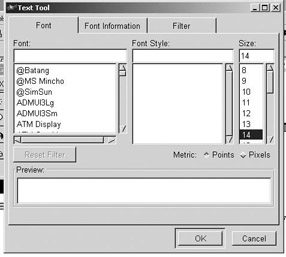
Figure 12.30: Using the Text tool.
Once you have chosen your settings, you enter the text you want. This brings us to the next tool, which is a very important tool. It is the Eyedropper tool. Anyone who has used Photoshop has probably used this tool. When you use the Eyedropper, you place it over a portion of the image and click, as shown in Figure 12.31. You will have the exact color of that portion of the image and can use that color with any paint tools. Basically this tool enables you to match the exact color of some portion of your image so that you can do touchups with a matching color.
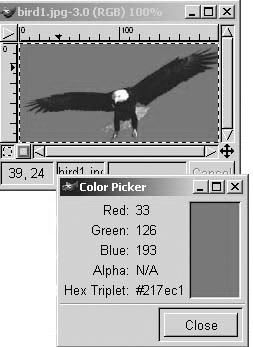
Figure 12.31: The Eyedropper tool.
The next two tools, shown in Figure 12.32, enable you to use the currently selected color (perhaps one you got with the Eyedropper) and either splash an entire area with that color (using the Paint Bucket tool) or paint a background that color.
![]()
Figure 12.32: The Paint Bucket and Background tools.
While we are on the topic of color selection, it is a good time to point out that you can select the color for any painting tool by using the squares at the bottom-left side. Click on the square, and you are presented with the Color Selection screen shown in Figure 12.33, where you can select the color for that tool to paint with. This is exactly the same way Adobe Photoshop does color selection.
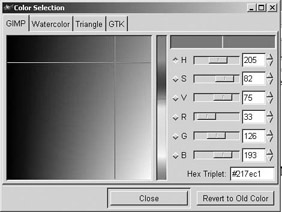
Figure 12.33: Selecting colors.
Selecting colors brings us to painting and drawing with those colors, and the next four tools, shown in Figure 12.34, enable us to do this. Each of these tools is used freehand. Drag your mouse, and you are drawing. The first is the Pencil tool and draws a thin line. The Paint tool will make strokes in the same manner as a paint brush would.
![]()
Figure 12.34: The Pencil, Paint, Erase, and Airbrush tools.
It is important to remember that you can change the settings for the pencil, paint brush, or eraser. If you go to File, select Dialogs, and choose Brushes, you will be presented with a screen like the one shown in Figure 12.35, where you can select the type of strokes you want your tool to make.

Figure 12.35: Brush stroke settings.
The third tool is the Erase tool. It erases something you have previously drawn. Then we come to the Airbrush tool. The Airbrush tool acts like a conventional airbrush, appearing to blow the paint onto the image. You can set it by going to File, selecting Dialogs, and choosing Tool Options, after selecting the Airbrush, of course. This dialog box is shown in Figure 12.36. As you can see, it is easy to change the pressure and the opacity of the airbrush. These are probably the two most important properties when airbrushing.
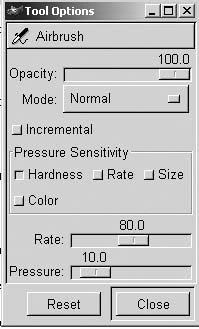
Figure 12.36: The Airbrush properties.
| Note | The Tool Options window is one that works with any tool. You will get different settings for different tools. |
Next is the Clone tool. It appears as a rubber stamp in the Toolbox. This tool works exactly the same as the Clone tool found in Adobe Photoshop. You use it to copy a section of an image to another place. You clone a portion of an image. This is very useful for restoring old photographs .
Next we come to the Blur tool. This tool can be used to blur or sharpen an image or a section of an image. The Tool Options for this tool are shown in Figure 12.37.
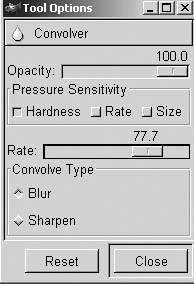
Figure 12.37: The Blur tool.
The last four tools, shown in Figure 12.38, are pretty simple. The first draws in ink. It is much like the Pencil, Paintbrush, and Airbrush tools. The next tool, the Burn tool, is used to burn off shaded or dark areas. This can be especially useful in restoring scanned photographs. The Smudge tool does exactly what its name suggests, it smudges an area of a picture. The Measure tool is used to measure the distance between points on your image.
![]()
Figure 12.38: The Ink, Burn, Smudge, and Measure tools.
As you can see, GIMP offers you a full range of functional and artistic graphics tools. It gives you virtually every option that Photoshop does, but it is free of charge. One area that Photoshop does surpass GIMP in is add-ons. You can find a number of add-on utilities for Photoshop that enable you to do even more with it. Unfortunately, there are almost no such add-ons for GIMP.
|
| < Day Day Up > |
|
EAN: 2147483647
Pages: 247
- Challenging the Unpredictable: Changeable Order Management Systems
- Distributed Data Warehouse for Geo-spatial Services
- Data Mining for Business Process Reengineering
- Relevance and Micro-Relevance for the Professional as Determinants of IT-Diffusion and IT-Use in Healthcare
- Development of Interactive Web Sites to Enhance Police/Community Relations