Enabling Authentication
As discussed earlier in this chapter, authentication is the process of validating the identity of the user making the current request. ASP.NET applications work with IIS to carry out authentication based on one of several authentication types, which are discussed in the following section.
Authentication and authorization in ASP.NET work hand-in-hand and operate on two distinct levels: the operating system/IIS level and the ASP.NET level. Here’s an overview of how IIS and ASP.NET interact:
-
A request comes in to IIS for a resource associated with ASP.NET (such as a Web Form).
-
If one of the IIS authentication methods is enabled, IIS performs authentication, and adds the authentication information to the request.
-
IIS passes the request to the ASP.NET run time. From this point on, IIS plays no further role in the request.
-
If Windows authentication is enabled, authorization is performed on the request using the authenticated identity passed by IIS, and if the authorization (typically ACL authorization) succeeds, the request is processed.
-
If Forms authentication is enabled, ASP.NET checks for the forms authentication cookie. If no cookie exists, the user is redirected to the configured login page. Once the user successfully logs in, an authentication cookie is set, and if the authorization (typically URL authorization) succeeds, the user is redirected to the requested resource.
-
If Passport authentication is enabled, ASP.NET checks for a Passport cookie, and if it does not exist, redirects the user to the Passport login page for the site. Once the user successfully logs in, the Passport cookie is set, and the user is redirected to the requested resource.
Selecting an Authentication Type
Three basic types of authentication are available for ASP.NET applications: Windows-based, Forms-based, and Passport. The authentication method you choose depends on the types of clients you’re dealing with, the level of control you have over the client browser choice, and a number of other factors. The next several sections will discuss the available authentication methods, how they’re implemented, and why you might choose one particular method over another.
| Note | The interaction between IIS and ASP.NET in terms of authentication and authorization might be somewhat confusing if you’re inexperienced with these features. Until you understand how the various options work, you should practice the techniques and procedures discussed in this section on a machine that is not exposed to the Internet or other potential sources of compromise. |
Requests for resources in an ASP.NET application go through two distinct levels of authentication: the IIS level and the ASP.NET application level. The type of authentication you choose determines which of these levels is used to determine whether the request is properly authenticated. As mentioned earlier, authorization also occurs on two levels, so it is important to choose the appropriate authorization method for the authentication type you’re using.
The authentication type is determined by the <authentication> element in the Web.config file for an application. You’ll see examples of this element later in this section. The full syntax of the <authentication> element is explained in Appendix B.
Using Windows-Based Authentication
In Windows-based authentication, ASP.NET relies on IIS to authenticate the incoming request by using one of its available authentication methods:
-
Basic authentication This method is compatible with most browsers, but the password is sent in clear text. Use this only if you can protect the communication with SSL encryption.
-
Digest authentication This authentication method was introduced as a feature of HTTP 1.1, so it might not be supported by all browsers. It sends a hashed value instead of a clear-text password, making it more secure than basic authentication. This method requires a Windows 2000 Domain Controller. You have to store a clear-text version of the password on the Domain Controller used to validate the password, so the Domain Controller must be secured from physical and network intrusions. If no Windows 2000 Domain Controller is available, this option will be unavailable, as seen in the Authentication Methods dialog box shown later in this chapter.
-
Integrated Windows (NTLM) authentication This method is available only with Internet Explorer. It’s the most secure method because it never sends the username or password over the network. Use this method if you require your clients to use Internet Explorer to access your application. Note also that Integrated Windows authentication will not work over an HTTP proxy connection, which can make it impossible for clients on a corporate network using a proxy to log in to an application over the Internet. It also requires each person that logs in to your site to have an NT account either on the Web server or on a domain controller trusted by the Web server.
If more than one authentication type check box is checked, Digest and Integrated Windows authentication will always take precedence over basic authentication.
Once IIS has authenticated the user, it passes the authenticated identity to ASP.NET, which can then use that information to allow or deny access to resources within the application. See “Authorizing Users and Roles” on page 175 for more information on this type of authorization.
Change the authentication method used by IIS
-
Open Internet Services Manager.
-
Right-click the site, virtual directory, or file for which you want to modify the authentication method. Select Properties.
-
On the Directory Security (or File Security) tab, in the Anonymous Access And Authentication Control section, click the Edit button. This will open the Authentication Methods dialog box.
-
In the Authentication Methods dialog box, uncheck the Anonymous Access check box. Then check the check box for the desired authentication method, as shown in the illustration on the following page (IIS 6.0 shown). Note that .NET Passport authentication is not available as an option in IIS versions earlier than IIS 6.0.

-
Click OK to close the Authentication Methods dialog box, and then click OK to close the Properties dialog box for the resource you selected in Step 2.
Configure Windows authentication for ASP.NET
-
Open the Web.config file for the application in Visual Studio .NET.
-
Modify the <authentication> element as follows. (Note that you can set the authentication method only at the application or server level. Attempting to add the <authentication> element to a Web.config in a subdirectory that is not configured as an IIS application will result in an error.)
<authentication mode="Windows" />
-
If desired, you can have ASP.NET impersonate the logged-in user (so that resource requests are made in the security context of the logged- in user) by adding the <identity> element as follows. (See “Using Impersonation” on page 177 for more on impersonation.)
<identity impersonate="true">
-
Save the Web.config file.
Once you have set the authentication mode to Windows, you need to set the authorization method to protect the desired resources.
Using .NET Passport Authentication
Passport authentication uses the centralized Passport authentication service provided by Microsoft. Passport authentication gives users a single login to use with any Passport-enabled site. To use Passport authentication with ASP.NET, you must download and install the Passport SDK, which is available at http:// www.passport.com/business. ASP.NET provides a wrapper around the Passport authentication service, so you can use it simply by setting the appropriate value for the Web.config <authentication> element.
Configure ASP.NET to use .NET Passport authentication
-
Open the Web.config file for the application in Visual Studio .NET.
-
Modify the <authentication> element as follows:
<authentication mode="Passport" />
-
If desired, you can set up an internal redirect URL for Passport authentication by adding a <passport> child element as follows. This will redirect users who have not authenticated to the specified internal URL rather than the default Passport login site.
<authentication mode="Passport"> <passport redirectUrl="<URL>"> </authentication>
-
Save the Web.config file.
| Note | To download and install the Passport SDK and use Passport authentication on your site, you will need to register on http://www.passport.com/business and pay a license fee. |
| Tip | In IIS 6.0, you can configure an application to use .NET Passport authentication using the IIS Manager applet, as described earlier in this chapter in the steps showing how to change the authentication method used by IIS. See the “.NET Passport Authentication” topic in the IIS 6.0 documentation for more information on configuring .NET Passport authentication for IIS 6.0. |
Using Forms-Based Authentication
Forms-based authentication allows developers to easily implement “roll-your- own” security in their applications. In classic ASP you would need to add an include file or component to every page to look for an authentication cookie, and then redirect to a login page if the cookie didn’t exist. ASP.NET Forms- based authentication takes care of all this for you.
All you need to do is create the login page, tell ASP.NET where to find it (via settings in Web.config), and set the desired authorization restrictions. In your login page, you can verify the username and password credentials entered by the user against a database, Windows 2000 Active Directory, or another credential store of your choice, such as an XML file. Once you’ve verified the user’s credentials, you can use the methods exposed by the FormsAuthentication class to set or remove an authentication cookie, redirect the user to the original page they requested, or renew the authentication cookie.
| Important | In Forms-based authentication, the username and password are sent as clear text. To ensure the security of this information, you should always use an SSL enabled connection for your login page. |
Let’s take a look at an example. We’ll create two pages—a login page and a page to display the username of the currently logged-in user—and we’ll add the necessary elements and attributes to Web.config, including authentication credentials against which we’ll authenticate requests.
Create a login page
-
Open Visual Studio .NET, and create a new ASP.NET Web Application project named Chapter_06.
-
Add a new Web Form. Type the name of the form as Login.aspx.
-
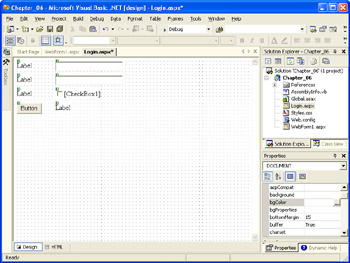
Use the Web Form toolbox palette to add four label controls, two textbox controls, a checkbox control, and a button control to the page. The result should look similar to the illustration on the following page. Note the glyphs in the upper left corner of each control. These indicate that the controls are server controls (as opposed to standard HTML elements that are simply rendered by the client).
-
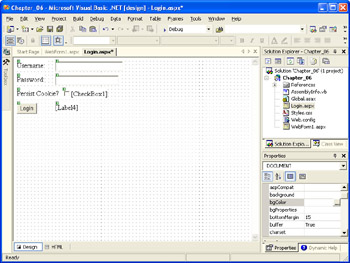
Make the following changes to the properties of the specified controls:
Control
Property
Value
Label1
Text
Username:
Label2
Text
Password:
Label3
Text
Persist Cookie?
TextBox2
TextMode
Password
Button1
Text
Login
Label4
Text
<blank>
The result should look similar to the following illustration.
-
Double-click the Button control in the designer. This will open up the code-behind module for the page and add the Button_Click event handler.
-
Add the Imports line to the top of the code-behind module, before the class declaration for the Login class, as shown here.
Imports System.Web.Security Public Class Login 'class code
This will allow you to use the methods of the FormsAuthentication class without explicitly naming the System.Web.Security namespace each time.
-
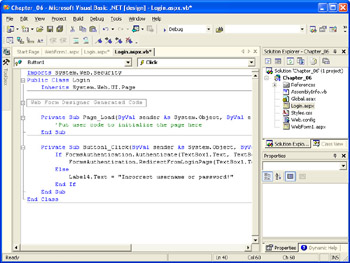
Add the following code to the Button_Click event handler. (The completed code-behind module should look similar to the illustration that follows the code.)
If FormsAuthentication.Authenticate(TextBox1.Text, TextBox2.Text) Then FormsAuthentication.RedirectFromLoginPage(TextBox1.Text, _ CheckBox1.Checked) Else Label4.Text = "Incorrect username or password!" End If
-
Save the page and code-behind module.
Configure Forms authentication
-
Open the Web.config file for the Chapter_06 project.
-
Modify the <authentication> and <authorization> elements of Web.config as follows, replacing <username> with the desired username and <password> with a hashed password of your choice. (A helper page for hashing passwords named HashPwd.aspx is included with the practice files for this chapter.)
<authentication mode="Forms"> <forms name="formsauth" loginUrl="login.aspx" protection="All" timeout="60"> <credentials> <user name="<username>" password="<password>"/> </credentials> </forms> </authentication> <authorization> <deny users="?" /> </authorization>
Note In addition to the attributes shown in the preceding example, the <forms> configuration element exposes several other attributes, including two new attributes introduced in ASP.NET version 1.1, requireSSL and slidingExpiration. The requireSSL attribute specifies whether a secure connection is required to protect data stored in the authentication cookie. If set to true, compliant browsers will return the cookie only if the request is made over an SSL connection. The slidingExpiration attribute specifies whether the timeout value for the authentication cookie is reset with each request in a given browser session. The default is false, which specifies that the cookie will expire after the interval specified by the timeout attribute. You can find out more about the attributes available in the <forms> element in Appendix B.
By default, you will need to know the password in order to use any page on the site because of the way it is secured. To avoid this and allow you to use the hashpwd.aspx page, add the following section to the Web.Config file just below the closing <system.web> tag:
<location path="hashpwd.aspx"> <system.web> <authorization> <allow users="?" /> </authorization> </system.web> </location>
This section allows the hashpwd.aspx file to be accessed by even unauthenticated users. The <location> tag is described more fully in “Authorizing Users and Roles” on page 175.
-
Save Web.config. The application is now configured to use Forms authentication and to refuse all requests from anonymous users.
Create a page to display the username
-
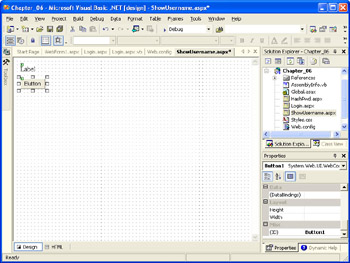
Add a new Web Form to the Chapter_06 project. Type the name of the form as ShowUsername.aspx.
-
Add a Label control and a Button control to the page. The result should look similar to the illustration on the following page.
-
Change the Text property of the Button control to Logout.
-
Double-click the Button control in the designer. This will open up the code-behind module for the page and add the Button_Click event handler.
-
Add the Imports line to the top of the code-behind module, before the class declaration for the Login class. This will allow you to use the methods of the FormsAuthentication class without explicitly naming the System.Web.Security namespace each time.
Imports System.Web.Security Public Class Login 'class code
-
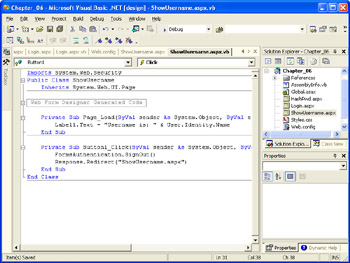
Add the following code to the Button_Click handler. The call to the Signout method of the FormsAuthentication helper class removes the forms authentication cookie, while the Response.Redirect call ensures that the user is redirected to the login page.
FormsAuthentication.Signout() Response.Redirect("ShowUsername.aspx") -
Replace the comment in the Page_Load event handler with the following code:
Label1.Text = "Username is: " & User.Identity.Name
-
Save the page and code-behind module. The completed code-behind module should look similar to the illustration on the next page.
Build and test the project
-
Build the project using the Build Chapter_06 command from the Build menu.
-
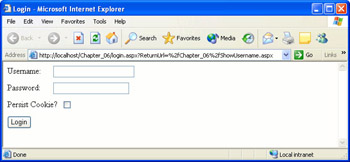
Right-click ShowUsername.aspx, then select Browse With, then select Microsoft Internet Explorer, and then click Browse. You should be automatically redirected to the login page, as shown in the following illustration. Note the ReturnUrl query string argument in the address box at the top of the browser, which contains the path to the page you originally requested.
-
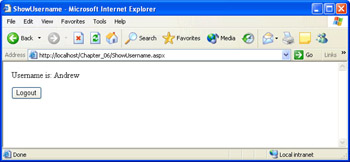
Enter the username and password (unhashed) that you configured in Web.config and then click Login. If you choose to check the Persist Cookie? check box, the forms authentication cookie will be a persistent, rather than session, cookie. Persistent cookies are cookies that will remain on the machine and will be there even after the browser session closes out. By persisting the authentication cookie, the user won’t need to login the next time they access the page (subject to the timeout limitations set in Web.config). Assuming the credentials you enter match those in Web.config, you will be redirected to ShowUsername.aspx, as shown in the following illustration. Otherwise, an error message will be displayed.
-
Click the Logout button. You will be redirected to the login page.
| Tip | For the sake of simplicity, we left the ID properties of the controls in the preceding example at their defaults (Label1, Button1, and so on). In a real application, it’s best to give controls more meaningful names, such as PasswordBox, LoginButton and so on. The MSDN documentation provides helpful guidelines for structuring your code and naming objects and variables. You can find these guidelines by entering the words coding conventions in the Index pane of the MSDN documentation window. |
| Note | In this example Web.config file, the URL for the login page is specified with the loginUrl attribute of the <forms> element. (For more information on all of the attributes of the <forms> element, see Appendix B.) However, if you leave this attribute out, ASP.NET supplies the name login.aspx (which happens to be the same as in the example) as the default. ASP.NET also supplies a default value of default.aspx for the redirect page when FormsAuthentication.RedirectFromLoginPage is called with no RedirectUrl query string argument. So in the preceding example, if you call the login page directly and authenticate successfully, ASP.NET will attempt to redirect you to default.aspx. If there’s no such page, you’ll get a “file not found” error. |
EAN: 2147483647
Pages: 126