Power Over Ethernet (PoE)
|
|
Common Access Point Configuration Parameters
Not all access points are alike, obviously, and it would be impossible to give detailed instructions on setting all the various configuration options you'll encounter on your AP's configuration screens. I'll summarize the most important ones here, so you'll at least have some idea of what they are and what different values might imply.
Be aware that different manufacturers sometimes call the same parameter by different names. SSID and ESSID, for example, mean precisely the same thing. 'Header type' and 'preamble type' are the same as well.
-
SSID: This is the Service Set Identifier, and it is the name of the network to which the access point belongs. It is not the name of the access point itself! (When there is only one access point in a network, that's an easy enough mistake to make.) All access points come with a default value like 'default' or 'linksys.' Definitely choose something and change it. Leaving the default in place makes you look like low-hanging fruit to hackers. The SSID is limited to 32 characters, but may contain spaces and punctuation.
-
ESSID: Extended Service Set Identifier, a slightly different name for SSID used by some manufacturers. The two terms mean the same thing, and the 'extended' is intended to emphasize that the SSID is the name of the network, and not an individual wireless device.
-
Access Point Name: Many (but not all) access points allow you to enter a descriptive name for the access point itself. It's actually the host name for your access point, and is usually blank by default. The access point name appears in DHCP client lists, and if you have multiple access points it is very handy to give each a different descriptive name so you can tell them apart when looking at the DHCP client list. Don't make this name the same as your SSID!
-
Channel: There are 11 frequency channels on which Wi-Fi gear may operate, and you're free to pick one. Which channel you use generally isn't important unless you install multiple access points (each of which must be on a channel that doesn't overlap that of adjacent access points) or have other networks nearby-like your neighbors' in the adjoining condo or townhouse. Only three channels are completely without frequency overlap: 1, 6, and 11. Nonetheless, if you must create a 'cloud' of wireless coverage with many access points, you can create a 'tessellation' of access points using channels 1, 6, and 11 such that no two wireless fields abut one another with overlapping channels. See Figure 4.5 in Chapter 4 for an illustration of how such tessellations are created.
-
LAN IP Address: This is the IP address to which the device responds, typically through a Web browser. If you embed this address in a URL and type the URL into a Web browser, the internal Web server in the device will display its configuration screen.
-
LAN Subnet Mask: A subnet mask indicates what part of an IP address specifies the network, and what part specifies the host (that is, a particular computer on the network.) I explained subnet masks in Chapter 3. If two devices (say, an access point and a router) have different subnet masks, they may not be able to coexist on the same local area network. This happens sometimes, and can be a problem when you mix hardware from different manufacturers on the same network. Still, unless you understand IP addressing thoroughly, do not change the LAN subnet mask. The best way to solve this kind of problem is to configure your access point to request its IP address and subnet mask from the network's DHCP server.
-
LAN Default Gateway: Your default gateway address is the IP address of the device that 'guards the gate' to the outer network world, typically the Internet. If you have a router (as you must if you are to have a home network) this is the IP address of your router. If your router is part of a wireless residential gateway, this is the IP address of the gateway.
-
LAN IP Address Static/Dynamic: This option (generally a radio button) determines whether the LAN IP address is static (entered into a field) or dynamic (pulled from a DHCP server). Virtually all low-cost access points default to a static IP address, which is listed in the user documentation so that you can type it in and bring up the configuration screens. Once you have your network assembled, it's better to change this to dynamic IP address, as I'll explain in Chapter 9.
-
WEP Enable/Disable: This option (generally a radio button) specifies whether the Wi-Fi encryption system is on or off. WEP (Wired Equivalent Privacy) keeps other people from reading or connecting to your network. Leaving it off for long periods of time is trouble. See Chapters 13 and 14 for detailed information on WEP and how to set it up.
-
WEP Key Length: Most access points and gateways support two and sometimes three levels of WEP encryption. These are usually 64-bit, 128-bit, and (more rarely) 256-bit. Only the 64-bit level is standard. Using longer key lengths in networks containing Wi-Fi gear from multiple manufacturers can be trouble. I discuss this in more detail in Chapters 13 and 14.
-
WEP Keys: Once you enable WEP you must enter encryption keys into your access point or gateway, as well as all the computers that will be part of your wireless network. This field (four fields, usually) is where those keys must be entered. I explain this process in detail in Chapters 13 and 14.
-
Authentication Type: This parameter specifies how clients are authenticated (that is, their identity verified) before the access point or gateway allows them to connect. Your options (generally radio buttons) are typically 'shared key,' 'open system,' and 'auto' or 'both.' Alas, there is a lot of confusion on what these actually mean. Although the greater 802.11 standard defines both terms, manufacturers seem to implement them in different ways. The default is invariably 'auto' or 'both' and I recommend leaving it there.
-
Access Point Mode: Many access points (but very few gateways) can operate in several modes. The default mode is access point, but other modes may include bridge mode, point-to-multipoint bridge mode, repeater mode, and client mode. I discuss bridge mode in Chapter 16. Unless you're doing something exotic (and know what you're doing) this option should be left alone.
-
DHCP Enable/Disable: This option (generally a radio button) selects whether the DHCP server inside the device is active or inactive. Virtually all wireless residential gateways contain a DHCP server. Many (but not all) access points do as well. The general rule is that there should be one DHCP server per local area network segment-and most home office networks have only one segment. It's good practice to use the DHCP server associated with your router or gateway. Unless you have no other DHCP server, leave any DHCP servers inside access points disabled.
-
DHCP Server Starting Address: When enabled, your DHCP server hands out IP addresses to devices on the local area network that require one. These addresses are issued sequentially from a starting value, which is the value in this parameter. Unless you know precisely what you're doing (and have an unusual need) there's no need to change the default value for this parameter.
-
DHCP Lease Time: Some devices that incorporate a DHCP server allow you to specify the 'lease time' used by the server. This is simply a time interval after which a DHCP-issued IP address expires and must be renewed. (I explained DHCP in Chapter 3.) The default is typically 1 hour, but for home networks there's not much point in changing this value, so whatever the default is, leave it unchanged.
-
DHCP Client List: This isn't something you have to set or change. It's a list of all the IP addresses that your DHCP server has handed out, along with their host names. Once you set your access point to request an IP address from a DHCP server, you look up its name in the DHCP clients list to find its IP address. You can then use this local IP address to bring up the AP's configuration screen.
-
Preamble Type: (Sometimes called 'header type.') Many access points and gateways allow you to choose between long preambles and short preambles. What a preamble is and why you actually have a choice is technical and difficult to explain, but if you configure all your wireless gear to use short preambles, you will achieve a small increase in throughput. Don't bother unless you're an enthusiast. The increase is minor.
-
SSID Broadcast Enable/Disable: Your access point or gateway broadcasts a notification of its presence every 100 milliseconds or so. This allows computers that don't know it's there to find it and associate with it. It also makes it easy for you to configure a newly installed Wi-Fi client adapter, by displaying a 'site survey' of available networks and selecting your network from the list. (I'll demonstrate this in Chapter 9.) Disabling the SSID broadcast means your network won't appear in a site survey list, and setting up new clients becomes all the more difficult. You can disable the SSID broadcast if you like, but it doesn't help you much, contrary to what the nontechnical press may say. Hackers do not need your SSID broadcast to find you. My recommendation is to leave this option alone.
-
Antenna Selection: On access points and gateways with dual antennas, you'll have an option to select diversity reception (using both antennas) or an option to select and use one or the other of the antennas exclusively. Diversity is the default, and should be left there unless you attach a gain antenna to the device. Then (obviously), you have to select which antenna jack is used for the gain antenna.
-
MAC Address Filters: Most access points and gateways allow you to enter a list of Media Access Control (MAC) addresses of computers permitted to connect to your network. This is supposedly a 'security' feature, but it is absurdly easy to 'sniff ' a permitted MAC address and 'spoof ' your way into the system using another computer's address. MAC address filtering is worthless. Don't bother.
-
Radio Output Power: A few of the higher-end access points and gateways allow you to select a power output level from a drop-down list of several. Most access points operate at about 30 to 35 milliwatts of power. Some will offer output as high as 100 milliwatts, but the really interesting options are those offering lower power levels. If your network is in a small house, townhouse, or apartment, you may be able to drop power without losing a top-rate connection among your networked devices. Reducing power makes it harder for people outside your walls to connect, and if those people are fairly close (as in adjacent townhouses) it becomes a worthwhile security precaution.
-
PPPoE Username and Password: Certain broadband Internet systems (typically those using ADSL) incorporate a technology called Point-to-Point Protocol over Ethernet, abbreviated PPPoE. Your Internet service provider (ISP) will tell you if you need to provide values for these parameters, which are used in authenticating your network before it is allowed to connect to the Internet through your ISP's network.
I will discuss the use of some of these parameters in Chapter 9, when we go through network implementation.
Firmware Updates
Updating your access point or client adapter's firmware can fix bugs and add whole new features, and sometimes crucially important ones. An early 2002 update to the firmware for the Orinoco Gold PCMCIA card added weak IV filtering, which I consider the most significant new feature to appear in Wi-Fi in the last year. Often a manufacturer will issue a firmware update to bring a Wi-Fi device into line with newly approved IEEE task group specifications. This field is moving quickly, and firmware updates allow you to keep your investment in hardware even when advances in technology might otherwise render it obsolete.
Firmware updates are generally packaged as executable archives with a .EXE extension. This makes it easy to do the update: You download the executable, run it, and follow instructions. The only decision you really have to make is whether your Wi-Fi device is already up-to-date or not, and that depends on its firmware release level.
The details vary by manufacturer, but in general terms firmware updates are done this way: You go to the manufacturer's Web site and check their list of firmware updates (often under the 'Downloads' item on their main page, products page, or support page) to see if any are available for your unit. If any updates are dated after you bought your unit, it's a sure thing: Download the update and install it. If updates are dated before you bought your unit, you'll have to check the firmware release level on your unit to see if it's older than the release level of the firmware update.
The easiest way to do this may well be to download the firmware update and attempt to install it. For most firmware updater utilities, the utility queries the Wi-Fi device to be updated and discovers its firmware release level. It displays this along with the release level of the update in an initial window (see Figure 6.6).
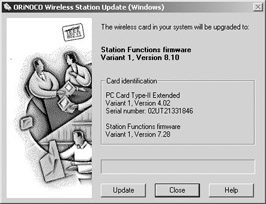
Figure 6.6: The Orinoco Firmware Update Utility.
In Figure 6.6, note the description of the current state of the client adapter in the 'Card identification' block. The existing firmware is version 7.28, and the update is to version 8.10. The device needs updating. Had the numbers been the other way around (or the same) updating would not be necessary. Some updater utilities allow you to 'go back' to an earlier firmware release level and some do not. I've never known this to be necessary, and you certainly don't want to do it by accident. Check those numbers!
Some updater utilities may not make it as easy as others. You may need to go into a client utility or other configuration screen (like the Web-based screens used by most recent access points) to find the current version of your firmware. It may take a little digging, but I've always managed to locate the firmware level without much trouble. Most modern access points, for example, update their firmware through their Web-based configuration screens.
Once the update begins, it may take a few seconds. Let the software run, and don't do anything else with the computer until it indicates that the update process has been completed.
Updating firmware is especially important when you buy used gear and don't know how old it might be. Firmware updates have been issued with surprising frequency in the last two years, and a year-old Wi-Fi client adapter or access point is already considered 'ancient.'
The D-Link firmware update process is not quite as automated as is that of the Orinoco Gold client adapter. The steps below will guide you through it. Important note:
Do not initiate a firmware update over a wireless link! Make sure the Web browser you use to configure your DWL-900AP+ is running on a computer connected to the DWL-900AP+ via cables. (This is typically your 'main' machine where your router/switch and broadband Internet connection are.)
-
Determine your current firmware level. Bring up a Web browser and enter the device's configuration address. Unless it's been changed since I wrote this, the address is http:// 192.168.0.50/ Log in and navigate to the Tools tab. Click the Firmware button in the left margin to reach the Firmware Upgrade screen. At the center of the screen will be the line reading 'Current Firmware Version:' followed by a number. That's your current version. Write it down.
-
Determine if a newer firmware release exists. Bring up a Web browser and go to the D-Link support Web site: http://support.dlink.com. Click the Products button in the button bar under the main D-Link logo. This will bring up a full-screen list of D-Link products. Find the 'D-Link Air Plus' line and click on DWL-900AP+. Scroll down to a subwindow entitled 'Firmware' and see what the level of the most recent firmware release is. If that level is greater than the current level of your DWL-900AP+, you can go ahead to Step 3 and download the firmware. If your unit is up to date from a firmware standpoint, there's nothing more to be done.
-
Download the firmware archive file to an empty directory. Click the 'Download Now' button for the latest firmware release listed. Your browser will begin a typical download process, allowing you to choose where to store the downloaded file. The file is a self-extracting ZIP archive, with a .EXE extension. Store it in an otherwise empty subdirectory.
-
Extract the firmware from the self-extracting archive. The firmware file itself is compressed inside the .EXE file you download. Using Windows Explorer, navigate to the directory where the archive is stored, and double-click on it to run it. The archive is set to extract to a default directory. You will probably have to navigate back to the directory where you stored the archive. Click Unzip and the archive will self-extract the .bin file to the directory that you specified.
-
Perform the firmware update. Return to the Firmware Upgrade screen in the DWL-900AP+ Web configuration screen. Click on the Browse button at the center of the screen and navigate to the directory where you stored the firmware .bin file. Highlight the file name and click Open. The path to the file will appear in the field to the left of the Browse button. Click the Apply button to kick off the actual firmware update. Don't do anything with the machine while the firmware update is working, which will take several seconds. When the update is finished, a new screen will appear with a Continue button on it. Click it…and you're done!
|
|
EAN: 2147483647
Pages: 181
- Enterprise Application Integration: New Solutions for a Solved Problem or a Challenging Research Field?
- The Effects of an Enterprise Resource Planning System (ERP) Implementation on Job Characteristics – A Study using the Hackman and Oldham Job Characteristics Model
- A Hybrid Clustering Technique to Improve Patient Data Quality
- Relevance and Micro-Relevance for the Professional as Determinants of IT-Diffusion and IT-Use in Healthcare
- Development of Interactive Web Sites to Enhance Police/Community Relations