Chapter 19: NetStumbler s Log Files
|
|
What You'll Need for Wardriving
Before I get started on the details, here's a checklist of what you'll need to pull together your wardriving rig:
-
A laptop or PDA. Wardriving is a facet of mobile computing, so you'll need a machine you can move around.
-
A 'stumbler' utility compatible with your mobile computer. There are several, but the very best is Marius Milner's Network Stumbler for Windows and PocketPC, which almost everyone calls NetStumbler. (The PocketPC version is called MiniStumbler.) Others include Kismet for Linux and dstumbler for BSD Unix. Not all stumbler utilities work with all operating systems, or all Wi-Fi client adapters. You'll have to read the fine print later in this chapter, and check with the stumbler utility Web sites for compatibility information.
-
A GPS receiver capable of NMEA-format output through a serial port (Optional). Note that 'serial port' is not the same as USB. NetStumbler has limited USB support, as I'll explain later.
-
An external antenna for your Wi-Fi client adapter (Optional). The built-in antennas on PCMCIA card client adapters are uniformly hideous. Almost any external antenna will increase your access point capture by 50%.
That's the essentials. Once you have logged some access points ('nodes' or 'stations' as people often call them) on a wardriving run, you can plot them on maps using various utilities like WiGLE and Stumbverter. I'll explain more about this in Chapter 19.
NetStumbler
It's officially called 'Network Stumbler' but no one (except its author) ever really calls it that. NetStumbler (as we all say) is a completely free application for 32-bit Windows, running under XP, 9x, ME, and 2000. (It has not been tested on Windows NT.) It was written and is being actively maintained by Marius Milner, and it is a remarkably useful thing-even if you never go out wardriving. It has a full-screen high-resolution field strength display, which I use for testing and adjusting antennas, plotting access point field coverage, and so on.
The key issue in using NetStumbler is whether it will in fact work with your Wi-Fi client adapter. Not all client cards are supported, though Marius adds support for additional products on a regular basis. I can't quote a list here, as it would be obsolete almost immediately. You need to download the NetStumbler package and peruse the readme.html file that comes with it to see what cards are currently supported. NetStumbler was originally written to support the Hermes Wi-Fi chipset, and most (but not all) Hermes-based client cards will work. Support for the industryleader Prism chipset is at this writing still a little thin-but there appears to be better support than Marius describes in the readme.html file. I was able to make NetStumbler recognize my Cisco Aironet 340 client adapter under Windows 2000 by downloading and installing the latest drivers from Cisco, even though Cisco clients are supposedly unsupported. Certainly you'll do best if you run Windows XP, which contains better support for Wi-Fi than any other version of Windows.
If you don't already have a Wi-Fi client adapter for your laptop, your safe choice would be one of Proxim's (originally Lucent's) Orinoco cards. All of these work with NetStumbler, and I have used an Orinoco Gold card with NetStumbler since I first discovered wardriving. The great advantage of the Orinoco cards is their external antenna connector, which most Wi-Fi PCMCIA client cards do not have. An external antenna is pretty important in wardriving; more on this later.
The NetStumbler Forums
If you're serious about taking up wardriving you should join the NetStumbler forums at www.netstumbler.com before you begin. Most of the current wardriving gurus hang out on the forums and answer questions, though neophytes should spend a few hours reading the FAQs and threads on the forum before asking simple and obvious questions. It's ever so easy to sound like a goof and you should do your best not to. There's a pretty good search feature on the forums site, and if you are considering a particular piece of Wi-Fi hardware or antenna, or GPS receiver, you can often find commentary and helpful tips on using the device by typing its name into the search field.
Like most sites of this type, you'll need to register (which is free) to access the forums. The custom is to operate under an assumed name, though not everyone does. Yes, the site isn't organized as well as it might be, but since it's all volunteer labor, complaining about this is gauche in the extreme. It's a fun site. Poke around. You almost can't avoid learning something.
Many of the most obvious questions about installing and using NetStumbler will be answered later in this chapter, so stay tuned.
Installing and Configuring NetStumbler
Download NetStumbler from the 'Downloads' page of NetStumbler.com:
http://www.netstumbler.com/
The file is a self-extracting installer suite; just run the .EXE and follow instructions. The default values will get you going. About all you have to explicitly configure is the COM port on which NetStumbler can find your GPS receiver. (More on this later, when I discuss GPS receivers.)
In addition to the wealth of information on the official NetStumbler site (especially the forums) NetStumbler author Marius Milner has his own site, which is organized as a blog, on which he posts some news pertinent to his ongoing NetStumbler development every few days:
http://www.stumbler.net/
Using NetStumbler
The most important thing about running NetStumbler is preparing your mobile system to pay attention to access points other than your own. If you've used your laptop at home or at the office, you've almost certainly configured it (probably through setting up profiles) to associate with a particular SSID at home and at the office. I can't speak for all makes and models of Wi-Fi client adapters, but all the clients I've used with NetStumbler will ignore all SSIDs but the ones it is configured to associate with. There is good reason for this, as you'll discover when you wardrive in a dense office district and literally dozens of access points may be within range. You don't want your laptop to guess which AP to associate with-there lies only trouble. Hence your profile instructs your wireless card to look for and associate with only your APs. This makes wardriving impossible. Your AP will be the only AP found.
What you must do, then, is create a separate profile for stumbling. This profile must have only one defining characteristic: It must leave the SSID field blank. (This field is called 'Network Name' on some profile editors, including that of the popular Orinoco PCMCIA cards.) You should also un-check the Enable Data Security option, so that WEP is not enabled. This may or may not be an issue, depending on the firmware in your particular client card, but it's a good idea in any event.
With a 'stumbling' profile created, you simply select that profile and run NetStumbler before you roar out of your driveway.
By default, NetStumbler will honk every time it senses and logs an access point. Other than that, it will sit quietly (ideally on your back seat, where you won't be tempted to be watching the display when you should be watching traffic!) and need no further attention from you. Running NetStumbler is no more difficult than that. The interesting stuff appears when you get back home and inspect your log to see what you've discovered.
NetStumbler's Main Display
NetStumbler is in effect a special-purpose database manager, with Wi-Fi machinery to discover, format, and add new records to the database. Although this isn't immediately obvious from the display, it adds a new record to the log every time the signal strength reading of an in-range access point changes. So if you're sitting at a light, or creeping past an office building full of access points in bad traffic, NetStumbler will be busily adding a record to the log every several seconds or so for each AP within range. This is one reason that NetStumbler's log files are as large as they are. On the other hand, if you're tooling down the road at 35 miles an hour, you may get only one record logged for the more distant and barely-reachable APs.
A screen shot of NetStumbler in action is shown in Figure 18.3 Let me run down the numerous display fields that NetStumbler shows on its main screen, from left to right. (Not all are shown in the screen shot-they won't fit on the screen all at once.)
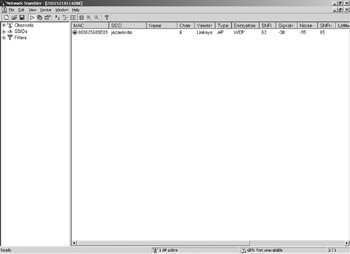
Figure 18.3: NetStumbler's Main Display.
-
At the left margin is a small circle. When an AP is within range, this circle will be colored: Green for good signal strength; yellow for so-so signal strength, and red for barely reachable. When an AP moves out of range, the circle goes to gray. If WEP is enabled, there will be a small padlock icon inside the circle.
-
The MAC Address field of the stumbled AP. This is the address that the AP is configured to send out with its beacon frame. By default it is the AP's 'real' MAC address, but most APs allow an arbitrary address to be entered in its place. Keep this in mind if you attempt to do statistical analysis on AP manufacturers by inspecting the MAC address. (MAC addresses are issued in blocks which are manufacturer-specific, so theoretically you can determine the manufacturer of an AP by looking at the first several digits of its MAC address.)
-
The SSID field shows the SSID of the stumbled AP.
-
The Name field will almost always be blank. Some APs allow an administrator to give the AP a descriptive name, which acts as an alias for the AP's MAC address. If NetStumbler can determine the name of the stumbled AP, it will place that name in the Name field. (Note that the name is not related to the SSID!) Few people give their APs names, and for some reason, NetStumbler cannot always discern the name of a stumbled AP, so you won't see text in this field very often.
-
The Channel field indicates what channel or channels the AP was operating on during the time it was within range of NetStumbler. This will virtually always be a single number, but if an AP's channel changes while it's in range, NetStumbler will add a new record to its log and display both channels. Some newer chipsets (most notably the Whitecap chipset) support a feature called 'channel agility,' which allows the AP to change channels if it encounters interference on its operating channel. It's hard to prove, but I suspect that any AP showing multiple channels in NetStumbler's display supports channel agility somehow.
-
The Vendor field shows the name of the AP's manufacturer, if NetStumbler can determine it. Note that this is not the same as the name of the chipset!
-
The Type field indicates what mode the AP is operating in. It will be 'AP' for infrastructure mode, or 'Peer' for stations operating in ad-hoc mode.
-
The Encryption field will show 'WEP' if WEP is enabled. It will otherwise be blank.
-
The SNR field will show the current signal-to-noise ratio, but only while the stumbled station is within range. If you only inspect the log after you're back home, this field will be blank for all stations. The SNR changes almost constantly as you move in an out of an AP's range, and this field is intended to be a 'snapshot' of how an AP is coming in now. For the best reading obtained while in range, see the SNR+ field.
-
The Signal+ field indicates the best signal strength reading obtained by NetStumbler while the AP was in range.
-
The Noise- field shows the 'best' (lowest) noise reading obtained by NetStumbler while the AP was in range. It's 'Noise-' because less noise is better, so the lowest reading received is what is reported in this field.
-
The SNR+ field shows the best signal-to-noise (SNR) reading obtained while the AP was in range.
-
The Latitude field shows the latitude reported by the GPS receiver (if you have one attached to your mobile machine) when the AP came into range.
-
The Longitude field shows the longitude reported by the GPS receiver (if present) when the AP came into range.
-
The First Seen field is the local time that the AP first came into range of NetStumbler.
-
The Last Seen field is the local time that the AP last went out of range of NetStumbler. Note that an AP can 'come and go' while you drive past it, as buildings or other obstructions interfere with the signal path. The Last Seen time is the last time that NetStumbler lost track of the AP during the time that particular log was open.
-
The Signal field shows the current signal strength reading. As with the SNR field further back on the list, this field will be blank except when the AP is within range. The best reading reported in this field while the AP is in range is reported in the Signal+ field.
-
The Noise field shows the current noise reading. As with the Noise- field further back on the list, this field will be blank except when the AP is within Netstumbler's range. The best (that is, the lowest) noise reading taken while the AP is within range is reported in the Noise- field.
-
The Flags field reports several technical parameters gleaned from the AP beacon. These definitely represent 'advanced topic' netstumbling, and I'll explain them in detail in the next chapter, on NetStumbler's log files.
-
The Beacon Interval field reports the beacon interval, in milliseconds, of the stumbled AP. This is the frequency at which the AP broadcasts its beacon frame. The default value is almost always 100 ms (milliseconds) but it can be changed, and you will occasionally see other (usually shorter) values.
Yes, the fields could be in a more intuitive order. Don't 'read in' significance to the order of the display fields. There is none. I would prefer that all the signal strength readings be grouped together, but that's just the way the software works.
Something to keep in mind as you examine your NetStumbler logs at the end of a long day of wardriving: The GPS coordinates listed for access points are not the coordinates of the access point-they are your coordinates, where you were located when NetStumbler first picked up the access point. This should be obvious on reflection, but it's an easy enough thing to forget. Furthermore, the precision of GPS these days (now that the GPS signals are now longer dithered to reduce their precision) is sufficient that a distance of as little as 100 feet will be significant most of the time. You'll see this with striking clarity if you plot your stumbled APs on a high-resolution city map with Stumbverter and MapPoint (see Chapter 19): Plotted APs seem to fall almost exclusively on street alignments. (This effect is especially vivid in anally rectilinear cities like Chicago.) This is simply because GPS was following your car and not the APs that you find.
NetStumbler Views and Filters
NetStumbler has two primary views and seven built-in filters that allow you to do certain simple 'canned' database queries on your logs of stumbled APs. These are found in the views tree on the left of the main display screen, under the Filters node. If you click on one of the filters, the display will change to include only those stations meeting that filter's criteria. To show the full list after selecting a filter, click on the root Filters node, and you'll see them all.
There are two primary views of NetStumbler's logged data:
-
1. The Channels view separates stumbled APs by the channels they were on. If a single AP was present on more than one channel, it will be seen in all channel views where it was logged during the time it was within NetStumbler's range.
-
2. The SSIDs view lists each separate AP by its SSID. Although this is middling uncommon, if you encounter an ESS (a network with multiple access points) and come into range or more than one of its APs, each AP will be listed separately under the same SSID. (In an ESS, all access points that belong to the same network will have the same SSID.) You can tell the APs apart because each will have a unique MAC address.
There are seven filters in the version current at this writing (version 0.3.30), which I'll quickly describe here:
-
The Encryption Off filter shows the stumbled APs for which WEP was not enabled.
-
The Encryption On filter shows the stumbled APs for which WEP was enabled.
-
The ESS (AP) filter shows the APs operating in infrastructure mode. This means all those APs for which the Type field holds the value 'AP.' This will be virtually all of them; in a year I've stumbled only one ad-hoc station other than the times I've set up an ad-hoc network at home.
-
The IBSS (Peer) filter shows APs operating in ad-hoc mode. Again, these will be vanishingly few.
-
The CF-Pollable filter shows those APs that have their CF-Pollable bits set. This bit is in the Flags field, as I'll explain in more detail in the next chapter. The CF (Coordination Function) bits support a feature allowing a station to request that it be told when other stations are quiet and it's safe to transmit. A station that can 'hear' its access point cannot necessary hear all the other stations associated with that access point, so the Coordination Function helps keep the various stations from transmitting at the same time and interfering with one another. This feature isn't seen often, and is usually used by larger networks incorporating higher-end access points.
-
The Short Preamble filter shows those APs that have their Short Preamble bits set. This bit, like the CF-Pollable bit, is in the Flags field, as I'll explain in the next chapter. Some access points support a feature allowing certain types of data (like Voice over IP and streaming media) to be sent using a 'short preamble' on their frames to boost throughput and improve the quality of the transmission. (Digitized voice and media are much more sensitive to variations in the rate of transmission than 'pure' digital data.) More and more APs will be seen using short preambles once the IEEE 802.11e task group completes and publishes its 'Quality of Service' specification. For now, they're still pretty scarce, and are usually Cisco products.
-
The Default SSID filter shows those APs that are using the default SSID values with which their manufacturer ships them. These include 'linksys' for Linksys products, 'tsunami' for Cisco Aironet products, 'Wireless' for Netgear products, and 'default' for several others, including D-Link and Acer. Table 18.1 lists all the default SSIDs of which I am aware.
Table 18.1: Default SSIDs by Manufacturer Manufacturer
Default SSIDs
Acer
default
Cisco Aironet
tsunami
Compaq
Compaq
D-Link
WLAN, default
Linksys l
inksys
Netgear
Wireless
SMC
WLAN
Symbol
101
The Signal Strength Display
One of the very best features of NetStumbler is its signal strength and noise display. This is practically a full-screen graph of the signal strength and noise performance of a particular AP, updated roughly once per second. You can display the graph for any stumbled AP by expanding either the Channels node or SSIDs node to display individual APs, and then click on the AP you want to monitor. See Figure 18.4.
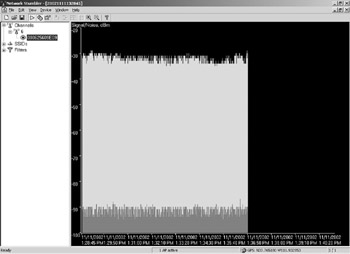
Figure 18.4: NetStumbler's Signal Strength and Noise Display.
If the AP is still in range, you can watch the signal and noise values march toward the right as new readings are taken. If an AP is no longer in range, you can see the graph for all readings that were taken while the AP was in range. For most APs gathered during a warscan run from a moving vehicle, this will be a relatively short sequence of readings. If you're auditing your own AP, looking for dead spots and weak spots, you may have a great many readings. Once there are more readings than will fit across your display, a scroll bar at the bottom allows you to scroll through the full run of readings.
NetStumbler automatically adjusts the vertical display scale so that the readings are always displayed over most the vertical range, allowing you to take maximum advantage of the precision inherent in the readings.
Even if you never go out wardriving at all, NetStumbler's field strength display can be extremely useful for determining the reach and the flaws of your access point's coverage. Just run NetStumbler at your home or office location, display the field strength screen for your access point, and walk around. You'll see very quickly where the field is weak or dead.
At this writing, the newest release (version 0.3.30) has a selectable audio feedback feature that plays musical notes as the signal-to-noise ratio goes up and down. As the ratio goes up, so does the tone of the musical note. As the ratio goes down, so does the tone. It's off by default, but you can turn it on from the View|Options|MIDI option. I'm still of two minds about how useful this is, but it has been of some help when I'm outside in bright sunlight and my laptop display is hard to read. I can hear myself heading into a deadspot by rapidly descending tones, and then when the music stops completely I know I'm out of range of my AP.
One final note about running NetStumbler: If you find you enjoy it and intend to make wardriving a regular activity, consider making a donation to the author, Marius Milner. You can do this through PayPal ( http://www.paypal.com) by sending something (I suggest $10) to mariusm@pacbell.net.
GPS
You don't need a GPS receiver to wardrive with NetStumbler, especially if you're just gathering statistics about Wi-Fi adoption growth and aren't going to plot maps or otherwise correlate the results to geographical locations. NetStumbler, however, will add GPS-discerned coordinates to its log files if a GPS receiver is available. With those GPS coordinates present, you can plot access points on maps using several methods, and get a bird's eye view of where the Wi-Fi clusters and deserts are.
NetStumbler's GPS requirements are straightforward:
-
It understands NMEA-formatted GPS data.
-
It requires that this GPS data be available at a serial port.
The National Marine Electronics Association (NMEA) has defined a data format for data received from GPS satellites. Other formats exist, but the NMEA 0183 format is a strong standard, and virtually all GPS receivers can emit it. (Still, you should check for NMEA 0183 compatibility before putting out money for a GPS receiver.)
The issue of a serial port is a little slippery. By 'serial port' I mean a COM port, not a USB port. True, USB (Universal Serial Bus) is a serial technology, but it uses an entirely different driver architecture under Windows, and USB ports are not accessible through the COM1-COM4 (or however many) serial devices available through Windows.
As often, there is an out: I use a USB-based GPS receiver with NetStumbler, even though at this writing NetStumbler is only beginning to have built-in USB support. The trick is that my GPS receiver comes with an installable driver that 'maps' the USB port to one of the standard COM serial ports that Windows understands. The receiver plugs into the physical USB port, but the data comes in (and NetStumbler grabs it) from one of the COM ports.
This is good, for a reason that seems trivial on the surface but matters a lot in the practical world: USB devices can draw their electrical power (up to half an amp!) right from the USB port. This eliminates a power cable in the car, when I already have too many wires lying around between the seats.
But that's a decision I leave up to you. Any GPS receiver that emits NMEA 0183 formatted data and can be read from a serial port will work with NetStumbler. Whatever GPS receiver you choose, you must tell NetStumbler what port to listen to for NMEA 0183 data. This is done by selecting View|Options and clicking the GPS tab. The screen is shown in Figure 18.5.
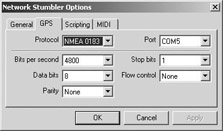
Figure 18.5: The NetStumbler GPS Configuration Tab.
Newer versions of NetStumbler also support the Garmin protocols (both text and binary) and TripMate. Older versions (prior to August 2002) support only NMEA.
The GPS device I use and recommend is an obscure receiver called the Holux GM-210. (See Figure 18.6.) It's tiny, self-contained, waterproof, and magnetic. It sticks to the roof of my car, with a single thin wire coming in the window. (I live in Arizona; being rain-tight is rarely an issue here.) If WAAS (Wide Area Augmentation System) is available in your area, it will automatically use the WAAS signals to refine the accuracy of the coordinates it emits. It comes with two selectable cables, allowing it to plug into either a USB port or a conventional DB-9 serial port.
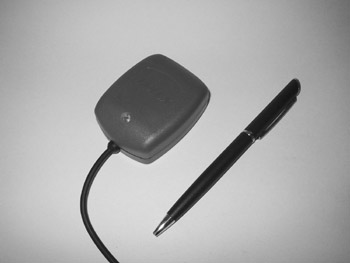
Figure 18.6: The Holux GM-210: GPS Receiver. (Photo courtesy of Holux.)
The Holux GM-210 is popular in Europe, but is only beginning to be widely distributed here. It is available through The GPS Store:
http://www.thegpsstore.com/site/
It worked perfectly the first time, configured easily, and has never given me any trouble.
External Antennas
NetStumbler does not require an external antenna. You can wardrive with the antenna built into your Wi-Fi PCMCIA client adapter. However, those 'bulge' antennas are totally miserable, and if you're serious about wardriving you should consider getting a client card with an external antenna connector and a matching antenna. You'll pick up a great many more access points with a better antenna, ideally one mounted outside your vehicle.
The antenna I use and recommend is the 5 dbi mag-mount omnidirectional mobile antenna from Fleeman, Anderson, & Bird (FAB). (See Figure 18.7.) Its magnetic base sticks to the roof of your vehicle, and the signal is brought in through nine feet of low-loss coaxial cable terminated in a female N connector. You will need a suitable (short) pigtail to connect the N female connector to the connector on your client card. These are also available from FAB. (I cover this and other types of commercial antennas in Chapter 8.)
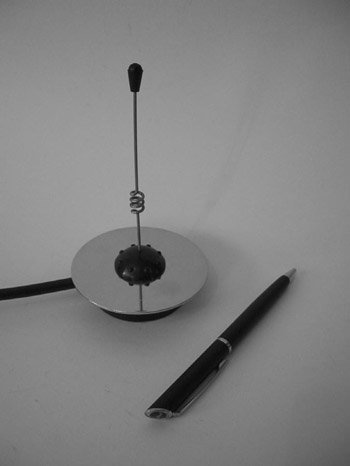
Figure 18.7: The FAB 5 dbi Magnetic-Mount Omnidirectional Antenna.
Admittedly, the total investment for an antenna of this type (including the pigtail) is almost $100. Less expensive things that I've tried include hanging a cheap blade antenna from a suction cup on the inside of one of my car's windows. This works far better than the built-in antenna on the client card, but nowhere near as well as an omnidirectional antenna on the roof of the vehicle. It also allows me to keep the windows rolled up, which matters in rainy cities like Chicago.
|
|
EAN: 2147483647
Pages: 181