Section 9.2. Creating the Layout
9.2. Creating the LayoutTo be precise about it, you don't actually place the content of your page into the layout table. The table itself is simply a container structure for layout cellsrectangular areas that sit inside the table. The cells form the layout, and you place your content inside them.
So drawing a layout table in Dreamweaver is a two-part process:
For most types of layouts, when you draw the cells of your table, Dreamweaver creates rowspans and colspans, which are HTML attributes that allow the table cells to straddle more than one row (in the case of rowspans) or more than one column (in the case of colspans) in the grid of the table. For instance, in the tracing image in Figure 9-1 and Figure 9-2, the table cell that represents the banner area has a colspan of 2, because the cell straddles two columns: the one with the sidebar and the one with the nav and content areas. The same holds true for the footer area. Similarly, the table cell that represents the sidebar has a rowspan of 2, because this cell straddles two rows: the one with the nav cell and the one with the content cell.
Colspans and rowspans are fine for data tables, the "good" tables by W3C standards, but they're frustrating as anything for layout tables (yet another reason that tables aren't suited for graphic design, many critics point out). When a layout table uses colspans and rowspans, the cells of the table often add space in the least convenient places in the design when you start inserting content. Fortunately, the technique of nested tables completely eliminates the need for colspans and rowspans in your layout. A nested table is a table that appears inside the cell of another table. That's rightthe cells of your layout table can hold anything: text, images, Flash movies, and, yes, even other tables. The trick works like this: you divide the layout into rows that stretch across the entire width of the design. (The layout areas inside each row should not contain any colspans or rowspans, either! Otherwise, you're defeating the purpose.) Then, you place a nested table inside every row that requires columns.
This technique is easier to show in a picture than explain in words, so don't worry if the above sounds like babble, and have a look at Figure 9-3 instead. To avoid colspans and rowspans, divide this table into four rows, calling them AD. The second row (B) divides the sidebar area, but that's unavoidable. Otherwise, you'd have a rowspan in the sidebar cell. Now you can build the columns of the layout in nested tables.
Figure 9-3. The thick grey lines indicate the four rows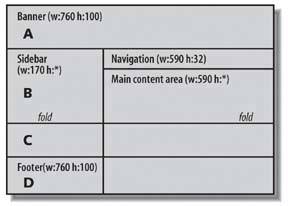 A nested table goes into every row that requires columns:
9.2.1. Drawing the Layout TableStart with the layout table. Go to the Insert panel again, and click the Layout Table object. This is the one immediately to the right of the Layout button, and looks like Figure 9-4. Figure 9-4. The Layout Table object iconMove the mouse pointer into the document window, and the pointer becomes a crosshairs. Position the crosshairs in the upper left corner of the document window, hold down the mouse button, and drag the mouse. Keep the mouse button held down as you draw. When the rectangle looks about the same size as your tracing image in the background, release the mouse button and Dreamweaver adds a green rectangle to your page to represent the layout table, as Figure 9-5 shows. Figure 9-5. The layout table appears in green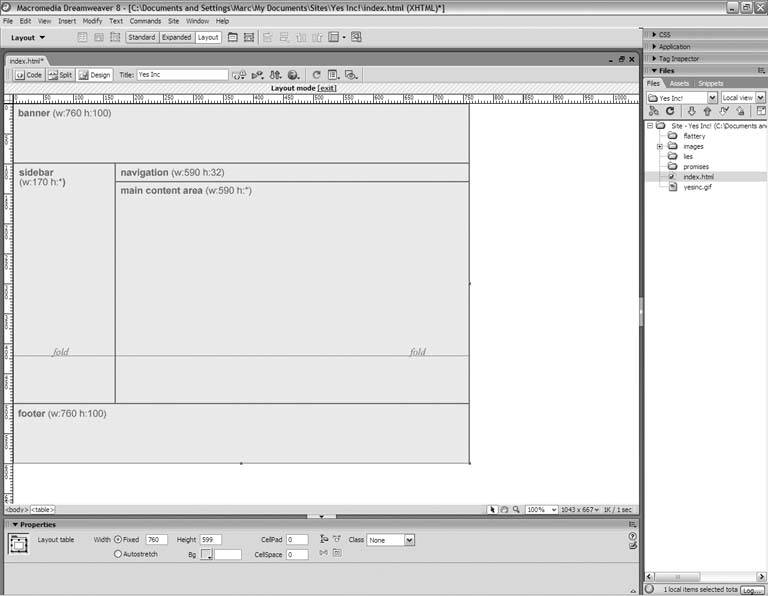 Eyeballing the size of the table based on your tracing image is fine, but you want to make sure that the table is exactly as wide as it needs to be. So get out the layout sketch that you drew way back in Chapter 4, and note the page width that you chose: 760 pixels, 955 pixels, or what have you. (If you're planning to create a liquid layout, choose the page width on which you based your initial design.) Then go to the Property Inspector (or, if you prefer, the Properties panel), which is directly below the document window. If you don't see it, choose Window
In the Width field of the Property Inspector, replace the current value with the precise page width, and press Enter or Return. The layout table is now exactly as wide as your design requires (see Figure 9-6). Whatever you do, don't change this number! If you find that you need more height to work comfortably, you can safely increase the Height value to whatever you like. The height of your table isn't as important as the width. In fact, the actual height of the table is subject to change, depending upon the amount of content on your page. But the width should hold firm at its current value. Figure 9-6. Adjust the layout table in the Property Inspector 9.2.2. Adding Layout Cells for the RowsYou have a layout table. Now you're ready to add the individual cells that represent the rows of the layout. Go to the Insert panel, and click the Draw Layout Cell icon, which Figure 9-7 shows. Figure 9-7. The Draw Layout Cell icon in the Insert panelMove the mouse pointer into the layout table, and the pointer becomes a crosshairs again. Position the mouse pointer in the upper-left corner of the table, hold down the mouse button, and drag the mouse to draw the first cell. Remember, you're drawing the rows that will contain the nested tables, so all your cells should stretch the entire width of the design at this stage of the game. When the height of the layout cell looks correct based on your tracing image or the layout sketch, release the mouse button, and Dreamweaver adds the cell to the table. You want to confirm the precise size of the cell, so click its outer edge to select it. The table cell turns blue, and the Property Inspector gives you its attributes. All good? Now go back to the Insert panel, and grab the Draw Layout Cell object again. Move the mouse pointer onto the layout table, and draw the next layout cell. Repeat until you have all the rows of your table, as Figure 9-8 shows. You don't want any channels or corridors of gray between the edges of two adjacent cells, so make sure that all the cells fit snugly against each other.
Figure 9-8. Draw layout cells for the rows of the design 9.2.3. Adding Nested TablesNow that you have the rows, you can add nested tables to those that require columns. Go to the Insert panel, and select the Layout Table object. Move the mouse pointer into the first cell that calls for columns, click the mouse button, and draw the table so that it fills the entire cell. If you have another row that requires columns, go back and get the Layout Table object again, and draw the next nested table. 9.2.4. Adding Layout Cells for the ColumnsThe cells for the columns go inside the nested tables. When you drew the nested tables, Dreamweaver automatically inserted a single cell into each, so your first job is to resize the existing cell so that it matches the width of one of the columns. As Figure 9-9 shows, click the border of the cell to select it, and drag the square handle to resize the column, adjusting the Width value in the Property Inspector as needed. Figure 9-9. Adjusting the width of the default cell in the nested table Now, with the Insert Layout Cell object, draw column cells to fill the rest of the row, as Figure 9-10 shows. Figure 9-10. Fill in the remaining columns of the row with the Insert Layer Cell object Continue on to the next row with a nested table. When you're finished adding the columns, your layout now matches your sketch or tracing image, as Figure 9-11 shows. Figure 9-11. Your layout (in green) matches the tracing image 9.2.5. Losing the Tracing Image
Now that you've built your layout, you can safely lose the tracing image. It has served its purpose well. Choose Modify Figure 9-12. After removing the tracing image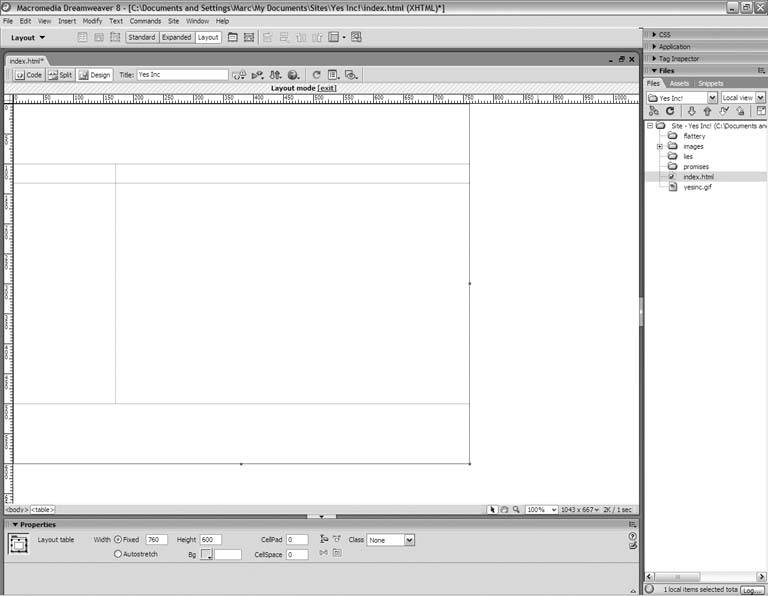 9.2.6. Labeling the CellsAt this point in the process, you might find it helpful to drop short text labels into each table cell for easy identification. Click the mouse pointer inside a layout cell of your choice, and a blinking cursor appears in the upper-left corner of the cell. Refer to your tracing image or layout sketch, and type the name of the area. Don't press Enter or Return afterwards; just type the name. Then click inside another layout cell, type its name, and repeat until you've labeled all the cells in the layout, as Figure 9-13 shows. Figure 9-13. After typing short text labels into each cell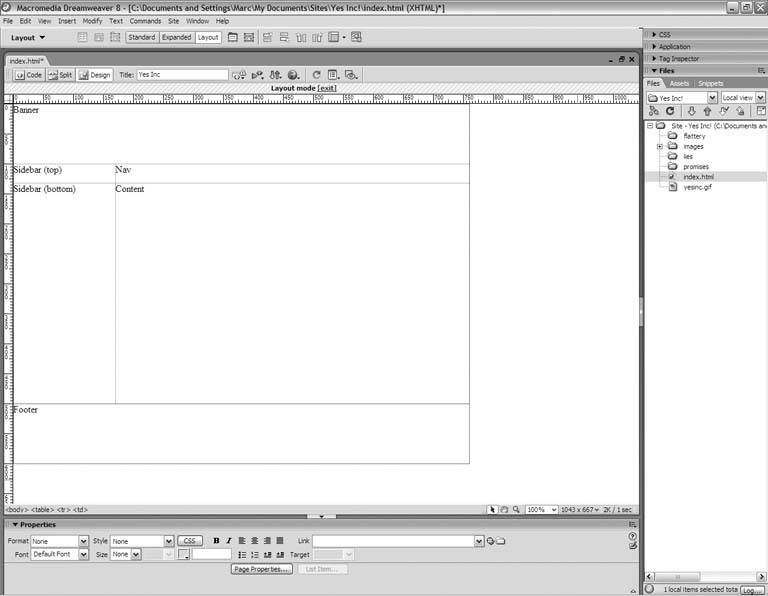 |
 Properties from the main menu to get the panel in Figure 9-6.
EAN: 2147483647
Pages: 154