Section 7.1. Defining the Site
7.1. Defining the SiteThe first step in creating a new site in Dreamweaver is to provide a few key details about your project, such as where to save your files and how to connect to your web host. In Dreamweaver lingo, this is defining your site. When you define a new site, you calibrate Dreamweaver, so to speakyou set up Dreamweaver to work with the site. While you don't have to define a site to start building and editing web pages, you should never skip this important step. Many of Dreamweaver's most useful features, such as checking for broken links and keeping track of your images, won't work unless you've defined your site. Also, if you manage more than one site at a time, your site definitions become all the more essential. Dreamweaver can handle multiple sites simultaneously, but it needs to know which site is which. Defining a site isn't hard. As a matter of fact, you did the hard work already when you planned your site in the first part of this book. What you want to do now is describe your plan to Dreamweaver. This chapter takes you through the process.
7.1.1. Starting with the BasicsTo begin your site definition, choose Site Figure 7-1. From the Manage Sites dialog, click New to define a site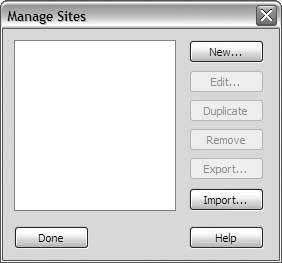 Figure 7-2. Use the Site Definition dialog box to define a new site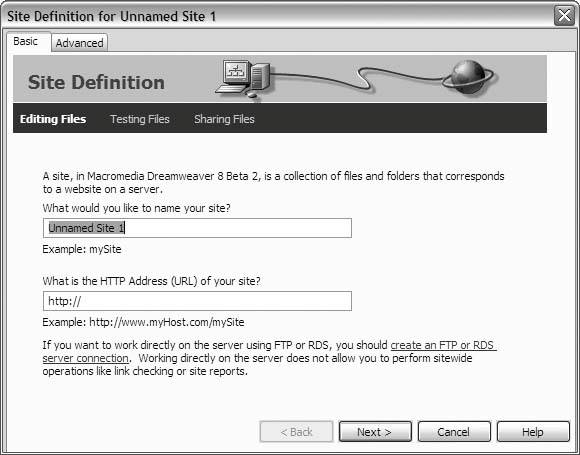
Notice the two tabs at the top of the Site Definition dialog box: Basic and Advanced. Basic mode works very much like a wizard, in that Dreamweaver takes you through the most important parts of the site definition step by step. This is an excellent way for beginners to start, so click the Basic tab if it isn't already selected. First, type a name for your site in the specified field. This can be the domain name of your site, but it doesn't have to be. Choose whatever name you like, and feel free to use spaces to separate the words. You don't have to give something that looks like a filename. Also, the site name isn't written in stone. You can edit or change it at any time, even after your site is complete. The next field asks for the site's URLthe Universal Resource Locator, which is just another name for the web address, which is the same as your domain name. You reserved your domain name in Chapter 2, so you know your URL. Type it here, including the http:// part, and click Next. The next screen in the Site Definition dialog box asks if you're building a site with server technology such as ColdFusion or PHP, as shown in Figure 7-3. You know from Chapter 1 that server-side technology is essential for building dynamic, database-driven sites, but with that extra power comes a host of extra responsibilities and new technical challenges. For your first Dreamweaver site, client-side-only is the preferable option, so choose No if it isn't already selected, and click Next.
Figure 7-3. Specify whether your site uses server-side technology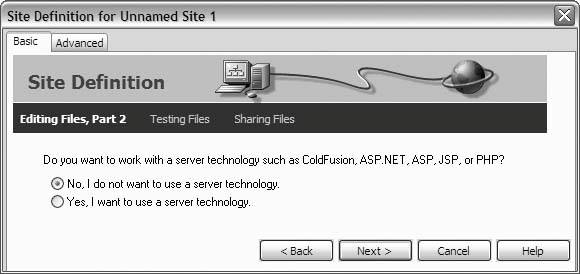 Now Dreamweaver asks about your production setup, as in Figure 7-4. The exact text of this screen changes depending upon your previous selection, but unless you're sharing site files over a local area network or working with a remote testing server, you want to select the option for editing locally. Local editing means that you store your site files on your personal computer. You make changes to your web site offline, and then, to publish your changes, you upload the revised pages to your web host. Figure 7-4. Choose your production setup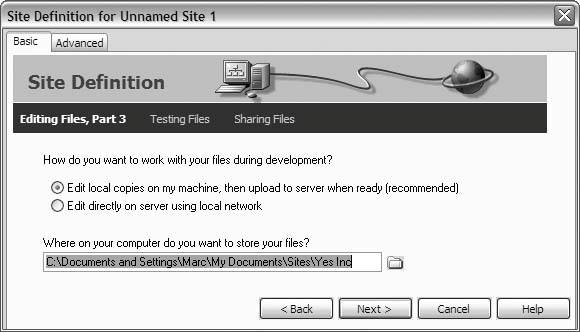 The second part of this screen asks you about the local root folder, or the folder on your personal machine in which you store the files for your site. Dreamweaver supplies a default location and automatically creates the folder for you. On Windows computers, Dreamweaver creates the local root folder in My Document, an eminently convenient place. If you want to choose something else, click the folder icon, and navigate to your preferred location. Otherwise, go with the Dreamweaver default, and click Next. The next screen in the site definition asks about your connection to the remote server. Remember that a remote computer is a computer other than your local, personal machine. In this context, the remote server is your web host. Unless you own a web server and host your site yourself, choose FTP from the drop-down menu. The appropriate fields appear in the Site Definition dialog box, as Figure 7-5 shows. To fill out this screen, refer to the "Important Account Information" email that you received from your web host when you first signed up. If you can't find this email or never received one, visit your host's web site and look for the information there. If you still can't find it, get on the phone with customer service.
Figure 7-5. Supply information about your web host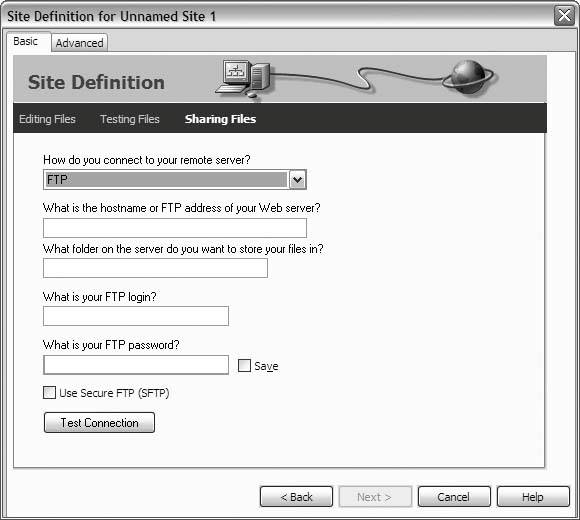
Pay special attention to the field labeled, "What folder on the server do you want to store your files in?" Here, Dreamweaver is asking for the remote root folder. Just as the local root folder is the folder on your personal machine in which you store your private site files, the remote root folder is the folder on your web host in which you store your live site filesthe ones that your visitors actually browse when they come to your site. Your web host may require you to store your remote files in a particular location. If so, give that location here. Otherwise, leave this field blank. Don't automatically type the name of your local root folder! The folder names don't necessarily (and probably won't) match.
When you're done, click Test Connection. If Dreamweaver can't connect, double-check the information from your web host, and make sure that you've entered it exactly as your host recommends, down to the last dot and slash.
Click Next to go to the next screen, where Dreamweaver asks you about Check In/Check Out, as in Figure 7-6. This feature is handy if you're working as part of a design team and you need to prevent multiple team members from editing the same web page at the same time. If you're a one-person production house, then Check In/Check Out doesn't make much sense, so choose No. Figure 7-6. Specify your preference for the Check In/Check Out feature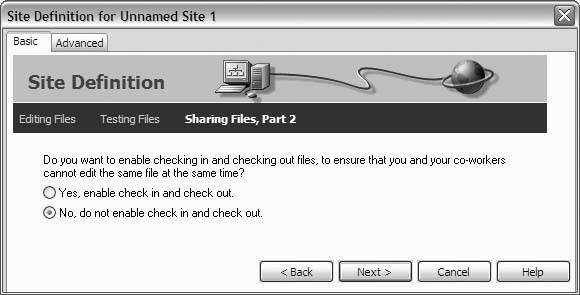 When next you click Next, you get a summary of your site definition, as Figure 7-7 shows. Review this information for accuracy. If you need to make any changes, click the Back button to step through the various screens in reverse order. Before you click Done, though, continue to the next section of this book, because you're not quite finished with the site definition.
Figure 7-7. Review your site definition so far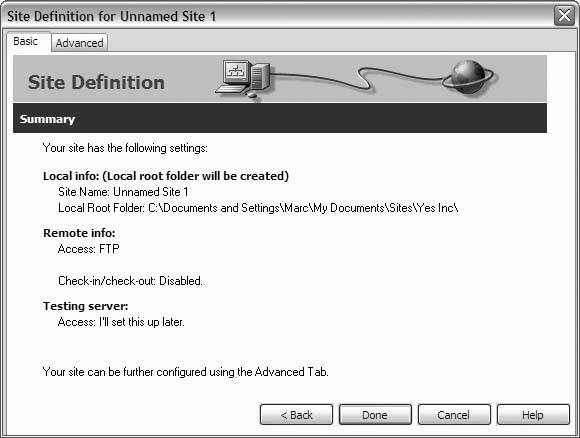 7.1.2. Filling in the GapsWhile the Basic method of defining a site hits all the mission-critical categories, it doesn't ask you about every Dreamweaver feature that you might want to enable or disable. Therefore, after you arrive at the summary screen but before you click Done, switch to the Advanced view of the Site Definition dialog box by clicking the Advanced tab, as shown in Figure 7-8. Figure 7-8. Fine-tune your site definition from Advanced view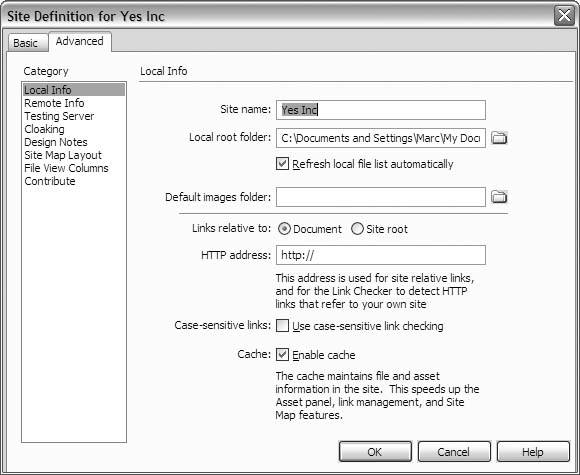 As you can see, Advanced view isn't a step-by-step wizard. Instead, you pick categories from a list, and the appropriate fields appear in the dialog box. By working through the Basic method, you've already supplied a lot of this information, so there's no need to revisit each category. You'll jump around a bit here. Start by selecting the Local Info category. Then, toward the bottom of the dialog box, look for the Use Case-Sensitive Link Checking checkbox. Enabling this feature looks for discrepancies in the casing of your links (like products.html in the code when the actual filename is Products.html). Mismatched cases may cause problems with some web servers.
Directly below this option, find the Cache checkbox, which should also be checked. The cache is Dreamweaver's internal record of your site's assetslinks, images, multimedia files, scripts, templates, and so on. Enabling the cache speeds up site management operations. Now switch to the Cloaking category, and the Site Definition dialog box changes to the screen in Figure 7-9. Under Options, make sure that the Enable checkbox is checked. Cloaking, in essence, hides certain file types from Dreamweaver. If you store these files in your local root folder, Dreamweaver ignores them, which is very convenient for files that you don't want to upload to your web host but that belong in your local root folder anyway. Figure 7-9. Cloaking hides certain types of files in your local root folder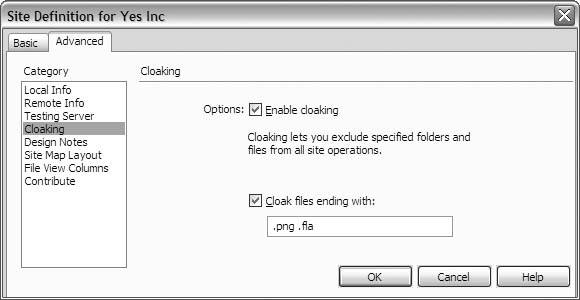 Click the Cloak checkbox, and you see that Dreamweaver is preset to ignore FLA and PNG filesFlash and Fireworks documents, respectively. (Remember that Fireworks uses the PNG image-file format for its production files.) You may edit this list as your needs require. Just remember to separate file types with a single space, and don't forget the dot at the beginning of each file type. Table 7-1 lists some of the most common file types to cloak.
Finally, select the Design Notes category, and the Site Definition dialog box changes to the screen in Figure 7-10. Design Notes is a system for attaching comments to the pages that you build. This feature is helpful if you're working on a production team. You can share ideas, make constructive criticism, and submit pages for approval through Design Notes. In addition, Dreamweaver uses Design Notes internally to improve the level of integration with two other pieces of web design software, Fireworks and Flash. If you don't have Fireworks or Flash, and if you work alone, you should uncheck the Maintain Design Notes checkbox. Figure 7-10. Enabling Design Notes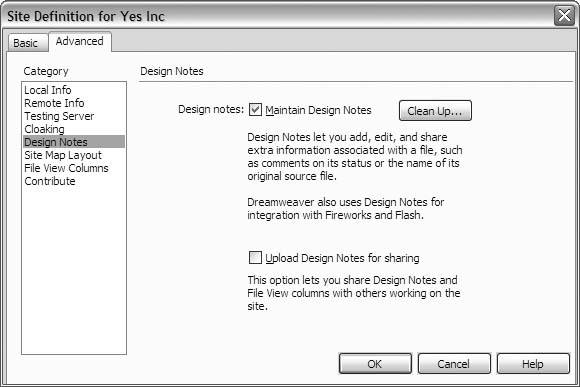 After you've reviewed the status of these features, you're finished with your site definition, so click OK. The Site Definition dialog box closes, and Dreamweaver adds your new site to the Manage Sites dialog box. 7.1.3. Backing Up Your DefinitionYour data are valuable, and storage is cheap, so get into the habit of making backup copies of everything, including your site definition. To do this, click Export on the Manage Sites dialog box. (If the Manage Sites dialog box isn't already open, choose Site Figure 7-11. Back up your site definition with the Exporting Sites dialog box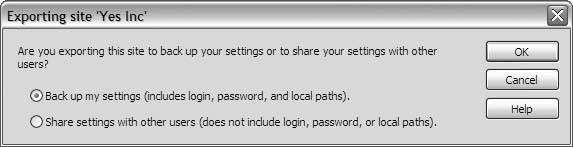 Dreamweaver stores your site definition in a special file of the STE type. Browse to a convenient location on your computer, and click Save in the Export Site dialog box to make your backup. If you ever need to recover a lost site definition, choose Site Now that you've backed up your definition, click Done in the Manage Sites dialog box.
|
 Manage Sites from the main menu. The Manage Sites dialog box appears, as Figure 7-1 shows. Click New, and from the drop-down menu, choose Site. This gives you the Site Definition dialog box shown in Figure 7-2.
 New Site. But see "Backing Up Your Definition later in this chapter for a good reason why you might want to keep the Manage Sites dialog box handy.
EAN: 2147483647
Pages: 154