Case Study for a Computational Web Service
One of the real advantages of Visual Studio .NET is the ease with which you can create your custom Web services and then write clients for those services so that others can use them. This section presents a case study that illustrates the steps for creating a Web service to compute the number of days until the end of the month from an input date. Then, the case study shows you how to build a Windows client from the same workstation as well as how to revise that client for use on other workstations.
Building the DaysTilEOM Web Service
To start building a Web service, you need access to an IIS server, just as you do when you build a Web application with the ASP.NET Web Application project template. However, choose the ASP.NET Web Service project template (instead of the one for an ASP.NET Web Application project). This creates an empty project folder on the IIS server that you select, which can be your local IIS server (localhost), as you develop and test your Web service. The project folder resides in the wwwroot subdirectory of the Inetpub directory of the Web server, which is the Inetpub directory of your workstation when you designate localhost as your IIS. For this demonstration, I assigned the name DaysTilEOM to the project folder to convey that the Web service computes the number of days until the end of the month from an input date. As with an ASP.NET Web application, this process creates two folders: one on the Web server and a second folder in the default location for your Visual Studio .NET projects. This second folder contains the .sln file so that you can open the project in Visual Studio .NET for editing.
| |
A Web service has a variety of handles to which you can apply names. This sidebar reviews several of the names that you need to manage as you assign names to your Web service.
First, you have the name for the project folder on the Web server. By default, Visual Studio .NET assigns WebService1 as the project folder name for the first Web service. Subsequent Web services will have project folders named WebService2, WebService3, and so on. You can override any default name by designating an alternate name when creating a new ASP.NET Web Service project with Visual Studio .NET. Just type over the default name, such as WebService1, with your new name, such as DaysTilEOM. This same name applies to the second folder for the project that holds the .sln file, which Visual Studio .NET uses to edit the project.
Second, when a Web service project initially opens, it opens in Design view. This Design view represents the WebService class for the Web service. The class s default name is Service1 . You can assign a more meaningful name by selecting Design view and then updating the Name property for the WebService class in the Properties window. For example, I assigned the name DaysTilEOM to the class for the Web service in the DaysTilEOM project folder.
Third, the start page for a Web service project has an .asmx extension instead of the .aspx extension found in a Web application project. By the way, in a typical Web service project, the start page is the only page in the project. This start page does not appear as it does in a Web application. Instead, the start page runs code to implement the Web methods for the Web service. The default name for a Web service start page file is Service1.asmx. You can assign a new name for the Web service s start page file in Solution Explorer by right-clicking the file and choosing Rename.
Finally, every Web service has a namespace associated with it. The name for this namespace identifies the Web service much as the .NET Framework namespaces identify groups of classes. By default, Visual Studio .NET assigns the same name ( http://tempuri.org ) to the namespace for all Web services. You should change this default name before attempting to consume the Web service. Each Web service should have a unique name for its namespace. You assign the name for a Web service s namespace in the Namespace setting of the WebService attribute of the class implementing the Web service.
| |
When a Web service project initially opens in Visual Studio .NET, the project s Design view appears. You can click a link in the view to switch to the Code view for the project. In general, you should not design a user interface inside a Web service because there will be no user to respond to the interface. A Web service should typically accept one or more arguments from a client application and perform an operation. The client application for the Web service manages all interactions with users.
When you open the Code view for a new Web service, you will see a class with the name of the WebService class from the Design view. The class declaration in the Code view has the same name as the one you assigned to the WebService class in Design view. The class declaration starts with a WebService attribute declaration. This attribute takes two settings, one of which is designated by default. This is the Namespace setting. You should always change this setting to a unique name before consuming the Web service with a client application. The Description setting for a WebService attribute does not appear by default, but it is good practice to designate a description anyway. Both the Namespace and Description property assignments are String values.
Below the class declaration is a commented sample for a Hello world Web service. This section illustrates the basic syntax for the WebMethod attribute, which you must assign to all procedures that you expose from the class implementing the Web service. Procedures without this attribute are available exclusively from within the Web service.
The Code for the DaysTilEOM Web Service
The following listing presents the code for the DaysTilEOM Web service. The automatically generated code from the Web Services Designer is not shown, but a marker indicates where this code appears within the class listing. You can see from the WebService attribute declaration that the attribute class belongs to the System.Web.Services namespace. The attribute shows the syntax for assigning the Namespace and Description settings.
The DaysTilEOM Web service has a single Web method named DaysTilEOM . The procedure implementing the Web method has a WebMethod attribute tag. The tag applies to a Function procedure that returns an Integer value and takes two String arguments. The first argument is the input date. This is the start date from which the Web service computes the number of days to the end of the month. The second argument is a String value denoting a valid UserID for authorizing use of the Web service. The UserID must have a length of four digits representing a numeric value greater than 100 and less than 500. Therefore, the leading digit must be 0. If the UserID fails either or both of its tests, DaysTilEOM exits without computing the number of days until the end of the month and passes back a value of -1. This is a simple demonstration of how to validate a user. You can use any code-processing techniques to more extensively identify and authenticate a user.
After validating that a user has authority to use the Web method, the procedure converts the String value representing a date to a serial DateTime value and stores it in the startdate variable. Then, the procedure computes in three steps the last day of the month for the date in the startdate variable. The first step uses the DateAdd function to compute the same day of the next month ( samedaynextmonth ). The second step uses the DateSerial function to compute the first day of the next month ( firstdaynextmonth ). In the third step, a DateAdd function subtracts one day from the first day of the last month to return the last day of this month ( lastdaythismonth ). Finally, the DateDiff function computes the difference in days between the startdate and lastdaythismonth variable values. A Return statement passes back the number of days to the application invoking the DaysTilEOM Web method in the Web service with the same name.
<System.Web.Services.WebService(Namespace:= _ "http://www.databasedevelopersgroup.com/DaysTilEOM", _ Description:="Days til end of month.")> _ Public Class DaysTilEOM Inherits System.Web.Services.WebService #Region " Web Services Designer Generated Code " ... Web service to compute the days to the end of the month <WebMethod()> Function DaysTilEOM(ByVal indate As String, _ ByVal userid As String) As Integer Authenticate user; Userid must be four digits long, greater than 0100 and less than 0500 If Not (Len(Userid) = 4 _ And CInt(Userid) > 100 And _ CInt(Userid) < 500) Then Return -1 Exit Function End If Compute datetime value based on indate string Dim startdate As DateTime = DateValue(indate) Compute same day next month as indate Dim samedaynextmonth As DateTime = _ DateAdd(DateInterval.Month, 1, startdate) Compute first day next month Dim firstdaynextmonth As DateTime = _ DateSerial(Year(samedaynextmonth), _ Month(samedaynextmonth), 1) Computer last day this month Dim lastdaythismonth As DateTime = _ DateAdd(DateInterval.Day, -1, firstdaynextmonth) Return days until end of month Return DateDiff(DateInterval.Day, startdate, _ lastdaythismonth) End Function End Class
Testing the Web Service
Visual Studio .NET supports built-in testing of a Web service without building a client application. You can invoke the built-in testing capability by right-clicking in Solution Explorer the .asmx file for the project, which has the name DaysTilEOM.asmx in the current Web service, and then choosing Build And Browse. This opens a Browse tab that displays the name of the Web service (for example, Service1 or DaysTilEOM), followed by the Description setting for the WebService attribute. The preceding listing shows this setting to be Days til end of month . Finally, the Web methods appear. In this case, just a single method named DaysTilEOM exists. However, a single Web service can have multiple Web methods.
Click the name for a Web method to open a second window that replaces the initial one on the Browse tab. The new Browse window contains a test page. The excerpt of the Browse window shown in Figure 12-4 displays two text boxes and an Invoke button. The test page contains a text box for each input value to the Web method being tested . Clicking the Invoke button after entering values in the text boxes causes the Web service to execute its Web method and return a value as an XML document to another Browse tab. The tab caption for the new Browse window specifies the values for the text box entries. The contents of the new Browse window show the return value in XML format corresponding to the input values in the tab caption. If you return to the test page, you can input a new set of input values and click Invoke to generate another new Browse window with its input values on the tab caption and a return value in the window.
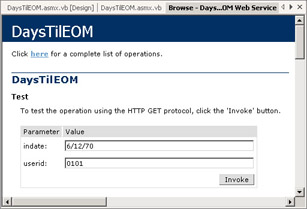
Figure 12-4: The built-in testing dialog box for the DaysTilEOM Web method in the DaysTilEOM Web service
Figure 12-5 shows the Browse window with the return value for the input values that appear in Figure 12-4. The month of June has 30 days, so 18 days separate June 12 and the end of the month. The XML document with the return value shows the number 18 between opening and closing int tags. The opening int tag shows the Namespace name for the Web service that appears in the WebService attribute from the preceding listing.
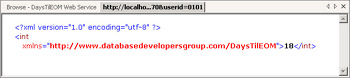
Figure 12-5: A return value window from the DaysTilEOM Web method for the test values shown in Figure 12-4
Building a Client Application on the Localhost
Building a client for a Web service involves the integration of three distinct elements. First, you must add a Web reference to a proxy that points at the Web service for which you are building a client application. Second, you must design a user interface for gathering input and displaying return values (if any exist). This step populates the controls of a Windows Form class instance. Third, you need to write code behind the form to invoke the Web service and process any return values from the Web service. This section drills down on each of these steps.
Adding a Web Reference
You can start to add a Web reference by choosing Project, Add Web Reference from within your Windows application project. In the Add Web Reference dialog box, enter the name and path to the Web service in the Address box. For this example, you type in http://localhost/DaysTilEOM/DaysTilEOM.asmx . Remember that we created a folder on the local Web server named DaysTilEOM. This name accounts for the first occurrence of DaysTilEOM. The .asmx file in the folder with the name DaysTilEOM refers to the Web service name.
| Note | As you know, a one-to-one relationship exists between a Web service and an .asmx file in the Web server hosting one or more Web services. Therefore, you can discover the Web services hosted on a localhost by performing a search for all the .asmx files in the wwwroot subdirectory of the Inetpub folder. |
After entering the address and clicking Enter, Visual Studio .NET revises the Available References pane of the Add Web Reference dialog box to show two links labeled View Contract and View Documentation. The pane to the left of Available References initially opens so that you can test the Web service. This view of the Web service corresponds to the View Documentation link in the Available References pane because clicking the View Documentation link retains the view. This is also the same screen as the one presented in response to right- clicking the .asmx file in Solution Explorer for the Web service project and choosing Build And Browse. Clicking the View Contract link causes the left pane to display the .wsdl file for the Web service. As discussed earlier, the .wsdl file defines the input and output arguments for the Web methods in a Web service.
By clicking the Add Reference button below the Available References pane in the Add Web Reference dialog box, you can add a reference for the selected Web service. This is a necessary precursor for declaring and instantiating a proxy variable that enables the use of Web methods from a Web service. Clicking the Add Reference button creates a Web References folder if one did not exist before and populates the folder with a reference to the DaysTilEOM Web service. If this is the first reference in a Web service on the local Web server, the reference appears under a heading of localhost. By expanding the Web reference labeled localhost in Solution Explorer, you see individual references pointing at the .wsdl and .disco files for DaysTilEOM as well as a Reference.map file for the Web service. When you declare and instantiate a proxy variable pointing at the DaysTilEOM Web service, Visual Studio .NET takes advantage of the content in these files in the Web reference to implement an instance of the proxy class. The proxy class instance enables your application to send values to and retrieve them from a Web method in the Web service pointed at by the proxy variable.
The Client User Interface
Figure 12-6 shows Form1 from the WindowsDaysTilEOMClient project both in Design view and after processing a date. The left window reveals that Form1 consists of a pair of TextBox controls, three Label controls, and a Button control. The operational view of Form1 in the right window shows the processing of an input date. The top text box contains a date (January 6, 1950), and the bottom text box contains a valid UserID value (0123). The label below the bottom text box shows the number of days between the date in TextBox1 and the end of the month. The Text property for the Label control is a String expression that combines the return value from the DaysTilEOM Web method with a String constant.
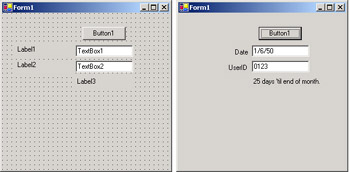
Figure 12-6: Design and operational view of a Windows client for the DaysTilEOM Web service
Form1 shows a little control formatting ” especially for the labels. For example, the two labels for the text boxes have their content right-justified. In addition, Label3 , which is below TextBox2 , automatically expands its width to fit the length of its Text property setting. This is not the default behavior for a Label control on a Windows form.
The Code Behind Form1
The code behind Form1 consists of just two procedures: Form1_Load and Button1_Click . The Form1_Load procedure handles the layout and formatting of the controls on the form. For example, this procedure right-aligns the Text property values for Label1 and Label2 . In the addition, the procedure sets the AutoSize property for Label3 to True . This setting for the property permits Label3 to expand as necessary to accommodate the width of its Text property setting. The first two lines in the Form1_Load procedure assign nondefault values to the Text property for TextBox1 and TextBox2 . The assignment for TextBox1 is a reminder of the format for inputting a date. TextBox2 does not receive an assignment, but invoking the Clear method is similar to assigning a zero-length string to the Text property for the TextBox control.
The Button1_Click procedure is the procedure that puts the Web service to work. The Dim statement declares wsc1 as a proxy variable for the DaysTilEOM Web service. For this statement to compile properly, you need a Web reference for the Web service in the project. The second line in the procedure invokes the DaysTilEOM Web method within the Web service by using the Text property values for TextBox1 and TextBox2 as arguments. The statement saves the return value from the method in the int1 variable. Finally, the procedure processes the return value by exiting with an error message if the return value is -1 or assigning a String expression for the number of days from the date in TextBox1 through the end of the month to the Text property for Label3 .
Private Sub Form1_Load(ByVal sender As System.Object, _ ByVal e As System.EventArgs) Handles MyBase.Load Prompt with date format for date text box and clear userid text box TextBox1.Text = "mm/dd/yy" TextBox2.Clear() Assign Text property values for labels Label1.Text = "Date" Label2.Text = "UserID" Align Text property settings Label1.TextAlign = ContentAlignment.MiddleRight Label2.TextAlign = ContentAlignment.MiddleRight Set Label3 to grow with contents Label3.AutoSize = True End Sub Private Sub Button1_Click(ByVal sender As System.Object, _ ByVal e As System.EventArgs) Handles Button1.Click Instantiate DaysTilEOM on localhost Dim wsc1 As New localhost.DaysTilEOM() Save the return value from the DaysTilEOM Web method in the int1 variable Dim int1 As Integer = _ wsc1.DaysTilEOM(TextBox1.Text, TextBox2.Text) Process the return value from the Web method If int1 = -1 Then MsgBox("Invalid UserID; denied access to Web Service.") Else Label3.Text = int1.ToString & " days til end of month." End If End Sub Building a Client Application on Another Workstation
The same application will work from another workstation with a couple of modifications. You can demonstrate this by starting a new Windows application on a second computer that has the .NET Framework installed. Then, add a new Web reference to the Web service. Next, change the Dim statement for the proxy variable pointing at your new Web reference.
When adding a Web reference to a Web service on another computer, you will not be able to discover it on your local Web server unless you have permission to search for .asmx files on the host computer. If you are not trusted with this information, my advice is to manually discover the Web server name, project folder name, and Web service name. Do this by asking the author of the service. In any event, you will not typically try to use a Web service unless you have some information about the Web service from an author. When connecting to a Web service on a local intranet, you can add a Web reference by typing the following URL in the Address box of the Add Web Reference dialog box:
http:// servername /projectfoldername/webservicename.asmx
For example, if the Web server with the Web service has the name ccs1 and the Web service has the name DaysTilEOM and is located in a project folder with the same name, you can enter the following:
http://ccs1/DaysTilEOM/DaysTilEOM.asmx
This shows the initial screen for testing the Web service. Click the Add Reference button to add a reference for the Web service to your Windows application. This adds a new Web reference with the name ccs1 to Solution Explorer. Inside the Web reference, you will notice the same three filenames from the preceding sample: DaysTilEOM.disco, DaysTilEOM.wsdl, and Reference.map. However, the content of these files shows that this project links to a Web service on a remote Web server, ccs1.
| Note | You might need to reference a proxy server for your browser to discover a Web service on a LAN. You can do this by choosing Tools, Internet Options in Microsoft Internet Explorer. Select the Connections tab in the Internet Options dialog box. Then, click LAN Settings. In the Proxy Server group , select the check box with a label that begins with Use A Proxy Server For Your LAN. Populate the Address box with http://servername and the Port box with 80. Replace servername with the name of the Web server hosting the Web service that you want to discover. These steps are necessary only for discovering a Web service on a LAN. I recommend you remove them by clearing the Use A Proxy Server For Your LAN check box after discovering the Web service. |
After creating the Web reference for the Web service on another computer, you need to update the Dim statement for the proxy variable so that it points at the new Web reference. In particular, you must update the statement from
Dim wsc1 As New localhost.DaysTilEOM()
to
Dim wsc1 As New ccs1.DaysTilEOM()
Once you make the modification, you can run the revised application. For example, choose Debug, Start to launch the application. Input a date and a UserID . Then, click the Button control on the form ( Button1 ). The application links to the Web service on the remote Web server and returns the number of days until the end of the month.
EAN: 2147483647
Pages: 111