Chapter 06 : Programming Windows Forms: Building on Fundamentals
This chapter builds on the introduction to Microsoft Windows forms and controls presented in Chapter 5 by focusing on how to populate controls with Microsoft Access database information using graphical ADO.NET development techniques. The programming samples in this chapter emphasize how to make form controls interact with ADO.NET components that you drag to your form either from Server Explorer or the Data tab of the Toolbox. The sample code also highlights techniques for making form controls interactive by managing their property settings and handling their events. In addition, you will learn how to process the data behind your controls on Windows forms.
A significant portion of the chapter demonstrates several ways to work with an Access database by using the Data Form Wizard. This powerful wizard enables you to graphically create data-bound forms. With the wizard, you can generate forms with two types of data-bound controls in various configurations that draw on both tables and queries from Access databases. In addition, you can create a main/sub form. One of the major advantages of using the Data Form Wizard is that you do not have to write code for forms, data access, or data manipulation. However, the wizard generates Windows forms that enable the display and manipulation of data via standard Microsoft Visual Basic .NET and ADO.NET programming techniques. Therefore, by examining the code behind the forms that the wizard generates, you can see programming samples of data access and manipulation as well as form layout. Access developers can tap these samples as a helpful starting point for developing their own custom solutions.
Navigation and Data Source Assignment Issues
Forms are the windows into your Access database applications. Users interact with forms to view data and change it. Chapter 5 introduced techniques based on the ADODB library and the COM Interop feature for working with data through forms. This section shows you another way ”one based on ADO.NET ”to enable your forms to perform data access tasks . Although the samples in this section do use code, the easiest approach to creating ADO.NET objects is almost exclusively graphical. Visual Basic .NET merely manages the controls on a form and determines how those controls interact with ADO.NET objects.
Switchboard Form for Samples
One way to appreciate the scope of this section and to reinforce skills introduced in Chapter 5 is to start by reviewing the switchboard form for the five samples in this section. All the projects in the section reside in the NavigationandAssignment project. Figure 6-1 shows Form1 , the project s startup object. As you can see, the application opens to a series of LinkLabel controls on the startup switchboard form. The form includes links to five other forms that demonstrate selected data source navigation and assignment issues. The switchboard form in Figure 6-1 enables a user to open each sample form as a dialog box. When the user clicks a link on the switchboard to open a sample form, the switchboard form hides and the sample form replaces it on the user s desktop. Then, when the user closes a sample form, the switchboard form is displayed again and the selected link for the previously opened sample form has the appearance of a visited link.
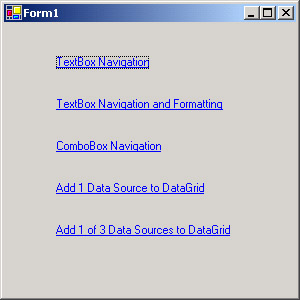
Figure 6-1: The switchboard form for the NavigationandAssignment project
This switchboard application differs slightly from the sample at the close of Chapter 5. (See Form6 in the FormControlSamples project.) In that chapter s switchboard sample, the switchboard form did not become invisible when a sample opened. Neither switchboard design ”the one in this chapter and the one in Chapter 5 ”is right. The two switchboard samples merely illustrate different ways of tackling the same problem. The design in this chapter forces the focus on one sample at a time by using the ShowDialog method to open a sample form. The design in Chapter 5 used the Show method for opening a sample form. Using the ShowDialog method in combination with hiding the switchboard form draws attention to a sample form. This coding technique makes the sample form the only form to appear on the desktop. No other form can have focus until the user closes the sample form.
The full listing makes it easy for you to see the steps for designing this kind of application in context. Because this sample borrows many design guidelines from the switchboard sample in Chapter 5, the listing that follows uses boldface to highlight two special sections of the code. First, the Text property assignments for the LinkLabel controls succinctly remind you of the topics that the remaining samples in this section tackle. The form in Figure 6-1 reflects these assignments. Second, the PassandRecoverControl procedure in this sample replaces the HandleLocalForms procedure from the corresponding sample at the close of Chapter 5. The PassandRecoverControl procedure manages the appearance of forms for the NavigationandAssignment project.
Private Sub Form1_Load(ByVal sender As System.Object, _ ByVal e As System.EventArgs) Handles MyBase.Load Loop through LinkLabel controls to reposition and resize each control, and assign a custom Text property value. Dim mylinklabel As LinkLabel Dim ctl1 As Control For Each ctl1 In Me.Controls If Mid(ctl1.Text, 1, 9) = "LinkLabel" Then mylinklabel = ctl1 mylinklabel.Left = 50 mylinklabel.Width = 225 Select Case mylinklabel.Text Case "LinkLabel1" LinkLabel1.Text = _ "TextBox Navigation" Case "LinkLabel2" LinkLabel2.Text = _ "TextBox Navigation and Formatting" Case "LinkLabel3" LinkLabel3.Text = _ "ComboBox Navigation" Case "LinkLabel4" LinkLabel4.Text = _ "Add 1 Data Source to DataGrid" Case "LinkLabel5" LinkLabel5.Text = _ "Add 1 of 3 Data Sources to DataGrid" End Select End If Next End Sub Private Sub LinkLabel1_LinkClicked( _ ByVal sender As System.Object, _ ByVal e As _ System.Windows.Forms.LinkLabelLinkClickedEventArgs) _ Handles LinkLabel1.LinkClicked Dim frm1 As New Form2() PassandRecoverControl(frm1, LinkLabel1) End Sub Private Sub LinkLabel2_LinkClicked( _ ByVal sender As System.Object, _ ByVal e As _ System.Windows.Forms.LinkLabelLinkClickedEventArgs) _ Handles LinkLabel2.LinkClicked Dim frm1 As New Form3() PassandRecoverControl(frm1, LinkLabel2) End Sub Private Sub LinkLabel3_LinkClicked( _ ByVal sender As System.Object, _ ByVal e As _ System.Windows.Forms.LinkLabelLinkClickedEventArgs) _ Handles LinkLabel3.LinkClicked Dim frm1 As New Form4() PassandRecoverControl(frm1, LinkLabel3) End Sub Private Sub LinkLabel4_LinkClicked( _ ByVal sender As System.Object, _ ByVal e As _ System.Windows.Forms.LinkLabelLinkClickedEventArgs) _ Handles LinkLabel4.LinkClicked Dim frm1 As New Form5() PassandRecoverControl(frm1, LinkLabel4) End Sub Private Sub LinkLabel5_LinkClicked( _ ByVal sender As System.Object, _ ByVal e As _ System.Windows.Forms.LinkLabelLinkClickedEventArgs) _ Handles LinkLabel5.LinkClicked Dim frm1 As New Form6() PassandRecoverControl(frm1, LinkLabel5) End Sub Sub PassandRecoverControl(ByVal frm1 As Form, _ ByVal mylinklabel As LinkLabel) Me.Hide() frm1.ShowDialog() Me.Visible = True mylinklabel.LinkVisited = True End Sub
Navigation with Text Boxes
The sample in this section demonstrates how to navigate through a table in an ADO.NET dataset with text boxes and four buttons for moving to the first, previous, next, or last row. The focus is on the form design and application management issues as opposed to the database issues. This is because the book reserves an in-depth look at ADO.NET until Chapters 7 through 9. To make the discussion of forms and their controls as relevant as possible to Access developers, I cover the topic relative to the familiar Northwind Access database.
Chapter 5 presented a sample form (Form1 in the FormControlSamples project) for navigating through data with text boxes, but this sample form deviates from that chapter s sample in a couple of ways. The first ”and by far the most important ”way this sample differs from the one in the previous chapter is in the style of connecting to a data source. The sample in Chapter 5 uses the ADODB library through the COM Interop feature. Therefore, it connects to the Northwind database via an ActiveX Data Objects (ADO) Connection object and pulls data from an ADO Recordset object. The corresponding sample in this chapter binds the form to the Northwind database via OleDbConnection and OleDbDataAdapter objects. The OleDbConnection object links the form to the Northwind database. The OleDbDataAdapter object can transfer data back and forth between the remote database file and a local DataSet object. You can optionally program an OleDbDataAdapter instance to serve as a one-way or a two-way link between a database file and your form. Actually, the form does not bind to a data source within an Access database file. Instead, the form binds to a local DataSet object populated by the OleDbDataAdapter object.
The second way that this sample differs from its Chapter 5 counterpart is by using a different data source within the Northwind database. The data source for this sample is the Orders table, while the sample in the previous chapter used the Shippers table. By performing data access with various objects, you reinforce and grow your mastery of Visual Basic .NET data processing techniques.
ADO.NET features two approaches to binding a data source to the controls on a Windows form: simple binding and complex binding . With simple binding, a property for a control binds to an element in a dataset, such as a column of values in a table. With complex binding, you can link multiple elements from a dataset to a control, such as a DataGrid control. Unlike simple binding, complex binding allows you to link more than one DataSet element with a control.
The Design View of the Sample Application
The sample in this section demonstrates simple binding. A Windows form ( Form2 ) with two text boxes, corresponding labels, and four buttons enables basic navigation features, such as moving to the next row. See the Design view of the form in Figure 6-2. I will describe later other windows appearing in the figure besides the one containing Form2 . Two text boxes, one for OrderID and a second for freight charges, can show values from DataSet elements bound to them. Nothing in the Design view of the form indicates what values a text box shows. The management of the form controls occurs in the code behind the form.
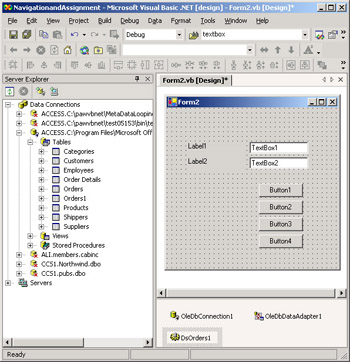
Figure 6-2: The Design view of a form for basic navigation through DataSet elements bound to the Text property of each TextBox control
Although you can manually edit a form in Design view (as you can see by looking at Server Explorer and the ADO.NET objects in the tray below the form), performing the tasks with code offers important advantages. Using the code behind the form allows you to document design features in an easy-to- read format that travels with the form. In addition, using code is more flexible than manually editing because you can dynamically change the DataSet element at run time to which a control links.
| Note | To link a control such as TextBox1 to a DataSet element at design time, you need to know the name of the dataset and the table within it containing the column that you want to link to the control. For example, you might want to link the OrderID column from the Orders table in a dataset named DsOrders1 . Select a text box such as TextBox1 to make its properties available through the Properties window. Then, expand the DataBindings property, and click the down arrow across from the control s Text property. Click OrderID from the Orders branch of the DsOrders1 root. This enters DsOrders1 “ Orders.OrderID as the DataBinding expression for the Text property of TextBox1 . The default DataBinding property for the Text property of a TextBox control is (None) . |
The code in this sample depends on three ADO.NET objects that you create graphically in the Form2 Design view. These objects are instances of the OleDbConnection , OleDbDataAdapter , and DataSet classes. You can add OleDbConnection and OleDbDataAdapter instances by dragging a table or view from Server Explorer to your form. Choose View, Server Explorer to open Server Explorer. For this sample application, select the Orders table in the connection for the Northwind database. If you do not already have a connection to the Northwind database, see the Adding a Data Connection to Server Explorer sidebar in Chapter 2 for step-by-step instructions on how to create a new connection for an Access database file. After selecting the table in the Server Explorer window, drag the table and drop it in Form2 . This adds OleDbConnection and OleDbDataAdapter instances to a tray below your form. If these steps create the first instance for each object, they will have the names OleDbConnection1 and OleDbDataAdapter1 .
You can create a DataSet object instance by right-clicking OleDbDataAdapter1 and choosing Generate Dataset. In the text box next to the radio button with a label of New, enter DsOrders and click OK. This adds the DsOrders1 object variable to the tray below Form2 , and it adds a DataSet object named DsOrders to Class view in Solution Explorer. The DsOrders1 object in the tray points at the dataset depicted in Solution Explorer. Figure 6-2 shows the Server Explorer window to the left of the Design view for Form2 immediately after the addition of the DsOrders1 object variable to Form2 .
The Code View of the Sample Application
The code module behind the form appearing in Figure 6-2 includes five event procedures: one for each of the navigation buttons below the two text boxes, and a form load event procedure that sets up the application. The form load event procedure performs two kinds of tasks. First, it makes the data available for the application. Second, the procedure assigns Text property settings to the buttons and labels on the form.
You should be familiar with the process for making Text property assignments by now, but the process of linking form controls to a data source is relatively new at this point in the book. Before I describe the code, note that you need to have the OleDbConnection1 , OleDbDataAdapter1 , and DsOrders1 objects created by a process similar to the one just described . You ll learn how to create these objects programmatically in Chapter 7.
With any ADO.NET application using a disconnected dataset, such as the one that the DsOrders1 variable points at, you need to start by populating the dataset. Use the Fill method for the data adapter that services the dataset. In this case, the OleDbDataAdapter1 object provides data to the DsOrders dataset. The Fill method creates a table named Orders in the dataset with the same column values as the Orders table in the Northwind database file. The dataset contains a snapshot of the Orders table from the database file taken at the time that your application invokes the Fill method.
| Note | ADO.NET features disconnected datasets to improve scalability. The disconnected aspect of a dataset has several important implications for how you use it, which Chapter 7 discusses more completely. For now, just realize that this application sets up a local dataset containing a copy of the Orders table from the Northwind database file. |
After creating a local version of the Orders table, the application needs to link form controls to the OrderID and Freight columns in the table. You can accomplish this task with the Add method for the ControlBindingsCollection class, which is accessible through a control s DataBindings property. Each data binding element specifies the link between a form control and a data source element. Data binding elements hierarchically relate to form controls, such as text boxes. By invoking the Add method for the DataBindings collection property, the procedure specifies a new data binding element for a control. In the case of TextBox1 , the procedure links the OrderID column in the local Orders table to the Text property value. The procedure also links the Text property for TextBox2 to the Freight column.
The BindingContext class applies to a control container, such as a Windows Form instance. Although you apply a data binding element to an individual property for a control, the BindingContext class can refer to the whole form ”not the individual controls on the form. Any one form can have multiple BindingContext class instances; the .NET documentation refers to these individual instances as BindingManagerBase objects. The BindingContext property for a control, such as Me.BindingContext , returns a BindingManagerBase object. This sample uses a single BindingContext instance based on the Orders table in the dataset at which the DsOrders1 variable points. The sample code uses the Position property of the BindingManagerBase object representing the BindingContext instance to specify navigation for the values that appear in the TextBox controls on the form. Position property values extend from 0 through 1 minus the Count property value for a BindingManagerBase object. Therefore, assigning a value of 0 to the Position property moves the current object to the first row in the Orders table. Similarly, setting the Position property to the Count property value of the BindingContext instance minus 1 moves the current object to the last row in the Orders table. Adding or subtracting 1 to or from the Position value moves the current object forward or backward one row in the Orders table.
| Note | When writing expressions for ADO.NET navigation, you do not need an out-of-bounds trap as you do with the ADO Recordset objects. |
Private Sub Form2_Load( _ ByVal sender As Object, _ ByVal e As System.EventArgs) _ Handles MyBase.Load Fill DsOrders1 dataset. OleDbDataAdapter1.Fill(DsOrders1) Add data binds to Text property of each text box. TextBox1.DataBindings.Add( _ "Text", DsOrders1, "Orders.OrderID") TextBox2.DataBindings.Add( _ "Text", DsOrders1, "Orders.Freight") Assign Text property values to buttons. Button1.Text = "First" Button2.Text = "Previous" Button3.Text = "Next" Button4.Text = "Last" Assign Text property values to labels. Label1.Text = "OrderID" Label2.Text = "Freight" End Sub Private Sub Button1_Click(ByVal sender As Object, _ ByVal e As EventArgs) Handles Button1.Click Move to first position. Me.BindingContext(DsOrders1, "Orders").Position _ = 0 End Sub Private Sub Button2_Click(ByVal sender As Object, _ ByVal e As EventArgs) Handles Button2.Click Move to previous position. Me.BindingContext(DsOrders1, "Orders").Position _ -= 1 End Sub Private Sub Button3_Click(ByVal sender As System.Object, _ ByVal e As System.EventArgs) Handles Button3.Click Move to next position. Me.BindingContext(DsOrders1, "Orders").Position _ += 1 End Sub Private Sub Button4_Click(ByVal sender As System.Object, _ ByVal e As System.EventArgs) Handles Button4.Click Move to last position. Me.BindingContext(DsOrders1, "Orders").Position = _ Me.BindingContext(DsOrders1, "orders").Count - 1 End Sub
The Solution in Action
You can launch the navigation application in Form2 by running the NavigationandAssignment project. This automatically starts the switchboard form shown in Figure 6-1. Click the first hyperlink to start the text box navigation sample in Form2 . The window on the left in Figure 6-3 shows how the sample opens. It displays the OrderID and Freight column values in the first row of the Orders table. Clicking the Next button navigates to the second row. From that point, a click to the Last button moves the current object for the BindingContext class instance to the final row in the Orders table.
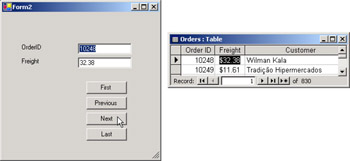
Figure 6-3: The text box navigation sample based on a dataset in operation with comparison values from the Northwind database
The window on the right in Figure 6-3 displays the first pair of rows in the OrderID and Freight columns from the Orders table in the Northwind database. This Datasheet view from Access should help you recognize the OrderID and Freight values in Form2 . Unless these values or those in the dataset get modified after the sample application populates the Orders table in the dataset, the Orders column values in both sources will be identical. Because this sample makes no changes, you can confirm the form values by checking them against the values from the Orders table datasheet in the Northwind database.
Adding Formatting to TextBox Navigation
The preceding sample demonstrates the basics of navigation through a dataset, but most applications require more than that sample delivers. The next sample refines the preceding one in a couple of ways. First, it formats the content of both text boxes so that they appear right justified. Second, the application presents the contents of the text box showing Freight column values formatted based on the Currency specification in the Regional Options or Regional Settings dialog box of your Windows installation. Understanding the code behind these two simple design enhancements will provide you with the foundation you need to begin making a broader range of adjustments to your form applications.
| Note | You can modify the currency format for the Freight column values by altering settings of the Regional Settings in Control Panel for a Windows installation. If you have an international application, you need to account for the likelihood that these regional settings will vary by country. |
The form design for this application is identical to the one in the preceding sample. The difference is in how the data looks on the form; this is because of the code behind the form. Figure 6-4 shows the refined application as it opens. Notice this application resides on Form3 . You can launch it from the second option on the switchboard application on Form1 in the NavigationandAssignment project. Contrast the window in Figure 6-4 with the top left one in Figure 6-3. The right justification and the currency formatting are typical of a normal database development project.
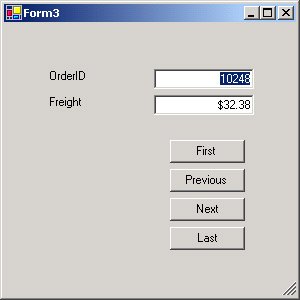
Figure 6-4: The text box navigation sample enhanced with right justification and currency formatting
Before you can run the code, you must add the connection, data adapter, and DataSet object variables to the form. If you already created these objects for Form2 , you can select them on that form and paste them into Form3 . This opens a tray below Form3 for the three ADO.NET objects. The DsOrders1 object variable in Form3 points at the same DsOrders DataSet object as the one in Form2 . You can share a DataSet object across multiple forms throughout a project.
The following listing shows the code behind Form3 . The refinements to the code behind Form2 appear in boldface. The two formatting refinements have different points of application. You implement justification via a TextBox control property. Specifically, you assign a value to the TextAlign property for a TextBox control. Use the HorizontalAlignment enumeration to designate that text alignment at the left, center, or right of a TextBox control. Once you set the alignment for a text box, the setting remains until you designate a new one. Both the list of properties for a control and the range of enumeration values available for setting a property pop up automatically in a code window because of IntelliSense. Look up the TextBox class in the Microsoft Visual Studio .NET documentation for summaries of all its class members . Links let you drill down and get more detailed information, which occasionally includes code samples.
The sample application makes the HorizontalAlignment.Right assignment in the form load event. This position for the alignment assignment allows the setting to persist throughout the lifetime of the form instance or until another assignment statement resets the TextAlign property. The Format function in the form load event procedure serves a slightly different purpose. This function applies to the current Text property setting of a text box. When the application assigns a new value to the Text property setting, you need to reassign the Format function if you want the result to appear with the regional currency settings. Therefore, the Format function appears in the form load event to assign currency formatting to the value appearing in TextBox2 when Form3 initially opens. In addition, the Format function appears in the click event procedure for each button on the form. This assigns currency formatting to the new value appearing in TextBox2 after the BindingContext instance repopulates the text box with a new row from the Orders table within the dataset that the DsOrders1 variable points at.
Private Sub Form3_Load( _ ByVal sender As Object, _ ByVal e As System.EventArgs) _ Handles MyBase.Load Fill DsOrders1 dataset. OleDbDataAdapter1.Fill(DsOrders1) Add data binds to Text property of each text box. TextBox1.DataBindings.Add( _ "Text", DsOrders1, "Orders.OrderID") TextBox2.DataBindings.Add( _ "Text", DsOrders1, "Orders.Freight") Format text boxes. TextBox1.TextAlign = HorizontalAlignment.Right TextBox2.TextAlign = HorizontalAlignment.Right TextBox2.Text = Format(TextBox2.Text, "Currency") Assign Text property values to buttons. Button1.Text = "First" Button2.Text = "Previous" Button3.Text = "Next" Button4.Text = "Last" Assign Text property values to labels. Label1.Text = "OrderID" Label2.Text = "Freight" End Sub Private Sub Button1_Click(ByVal sender As Object, _ ByVal e As EventArgs) Handles Button1.Click Move to first position and format for currency. Me.BindingContext(DsOrders1, "Orders").Position _ = 0 TextBox2.Text = Format(TextBox2.Text, "Currency") End Sub Private Sub Button2_Click(ByVal sender As Object, _ ByVal e As EventArgs) Handles Button2.Click Move to previous position and format for currency. Me.BindingContext(DsOrders1, "Orders").Position _ -= 1 TextBox2.Text = Format(TextBox2.Text, "Currency") End Sub Private Sub Button3_Click(ByVal sender As System.Object, _ ByVal e As System.EventArgs) Handles Button3.Click Move to next position and format for currency. Me.BindingContext(DsOrders1, "Orders").Position _ += 1 TextBox2.Text = Format(TextBox2.Text, "Currency") End Sub Private Sub Button4_Click(ByVal sender As System.Object, _ ByVal e As System.EventArgs) Handles Button4.Click Move to last position and format for currency. Me.BindingContext(DsOrders1, "Orders").Position = _ Me.BindingContext(DsOrders1, "orders").Count - 1 TextBox2.Text = Format(TextBox2.Text, "Currency") End Sub
ComboBox Navigation
A common means of navigating through the rows in a data source is by using a combo box. Users can make a selection from a combo box. Then, the form populates text boxes with values that correspond to the selected value from the combo box. The sample in this section lets a user pick an OrderID value from a combo box. The code behind the form automatically populates the text boxes with the ShipCountry and Freight column values from the Orders table for the row with the selected OrderID value. The form initially opens with the combo box displaying the OrderID for the first row in the Orders table and the text boxes displaying the ShipCountry and Freight column values from that row. Figure 6-5 shows Form4 in the NavigationandAssignment project displaying values from the first row in the Orders table with a selection for the third row in process. After the selection, the combo box will display 10250, and the text boxes will show ShipCountry and Freight column values from the third row in the Orders table.
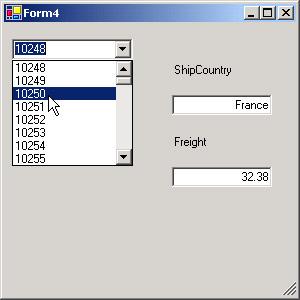
Figure 6-5: Enabling navigation with a combo box can provide your Visual Basic .NET applications with a popular feature.
The Design view for the application includes form controls in a layout corresponding to the arrangement in Figure 6-5. You can drag the controls from the Windows Forms tab of the Toolbox to the form. In addition, you need ADO.NET connection, data adapter, and DataSet objects on the form. You can copy these objects from either of the preceding two sample applications or create the objects from scratch if this is the first sample you are implementing. See the discussion of the immediately preceding sample for directions on copying the objects and the discussion of the earlier sample for directions on creating the object references from scratch.
The ComboBox control has a different form of data binding than the TextBox control. With a ComboBox control, you implement complex binding. Despite its name, complex binding is easy to program. All you have to do is set the DataSource property for the control equal to the table in the local dataset that you want to use as the source of data for a form. You must additionally specify which column from a data source the combo box should display when a user expands that combo box. Use a ComboBox control s DisplayMember property to specify a display column from the data source for a combo box.
After you initialize a combo box, the .NET Framework offers many members that help you control and monitor the performance of a combo box on a Windows form. One of the most important of these is the SelectedIndex property. This zero-based value reflects the row corresponding to the currently selected item. When you open a new instance of Form4 , as in Figure 6-5, the SelectedIndex property value is 0. After completing the selection depicted in the figure, the SelectedIndex property changes to 2. Once a user makes a selection from a combo box, the ComboBox raises the SelectedIndexChanged event. You can use this event to program actions that must take place after a selection is made from the combo box, such as the repopulating of the text boxes for ShipCountry and Freight.
The following listing shows the code behind Form4 to implement the features of the application. As is typical of ADO.NET applications, this application s code starts by invoking the Fill method for a data adapter. The OleDbDataAdapter1 object in the sample populates the Orders table in the dataset at which the DsOrders1 variable points. The OleDbConnection1 object (not visible in this code listing ”see the sample file for this setting) designates the Access database file that serves as the source for the local table.
| Note | All the graphical samples for specifying data adapters in this book use Server Explorer. You can also drag onto a form an unconfigured data adapter from the Toolbox. The Visual Studio .NET IDE includes a built-in Data Adapter Configuration Wizard for customizing the configuration of a data adapter from either source. Although this wizard works properly in certain circumstances, it fails reliably in others for Access databases. For example, you cannot create an inner join for three tables directly from the Data Adapter Configuration Wizard. (By the way, this problem does not exist for Microsoft SQL Server databases.) Therefore, you should consider building your queries within Access and then dragging them from Server Explorer. You can also create your queries with ADO (or the ADODB library) directly with Jet SQL. |
After populating the local Orders table in the form load event procedure, the code assigns the table to the DataSource property for ComboBox1 . To make the combo box function properly, you must designate a DisplayMember property value. The code uses the OrderID column values for this purpose. The syntax for the statement reveals that the Columns collection depends on the Tables collection within a DataSet object. (The DataSet object is part of the ADO.NET object model, which Chapter 7 explores much more thoroughly, but I ll briefly explain a few ADO.NET features used in this chapter as we go.
The form load event procedure invokes the PopulateTextBoxes procedure immediately after setting DataSource and DisplayMember property values for ComboBox1 . This procedure sets the two text boxes on Form4 . The procedure selects a row from the Orders table in the dataset at which the DsOrders1 variable points. The selection process involves saving a row from the Orders table in an ADO.NET DataRow object. By passing a value of 0 in the form load event procedure, the sample code assigns values for the first row in the Orders table. The ComboBox1_SelectedIndexChanged event procedure also invokes the PopulateTextBoxes procedure. In this second case, the event procedure passes the recently updated SelectedIndex property value for ComboBox1 . This single line of code in the event procedure synchronizes the text boxes with the combo box whenever a user makes a selection from the combo box.
Private Sub Form4_Load(ByVal sender As System.Object, _ ByVal e As System.EventArgs) Handles MyBase.Load Fill DsOrders1 dataset. OleDbDataAdapter1.Fill(DsOrders1, "Orders") Bind ComboBox1 and display first member. ComboBox1.DataSource = DsOrders1.Tables("Orders") ComboBox1.DisplayMember = _ DsOrders1.Tables("Orders").Columns("OrderID").ToString Populate text boxes with matching values. PopulateTextBoxes(0) Format text boxes. TextBox1.TextAlign = HorizontalAlignment.Right TextBox2.TextAlign = HorizontalAlignment.Right TextBox2.Text = Format(TextBox2.Text, "Currency") Assign Text property for labels. Label1.Text = "ShipCountry" Label2.Text = "Freight" End Sub Private Sub ComboBox1_SelectedIndexChanged( _ ByVal sender As System.Object, _ ByVal e As System.EventArgs) _ Handles ComboBox1.SelectedIndexChanged Populate text boxes with matching values. PopulateTextBoxes(ComboBox1.SelectedIndex) End Sub Sub PopulateTextBoxes(ByVal RowID As Integer) Assign Text property values for text boxes based on RowID value for a row in the Orders table within the dataset at which the DsOrders1 variable points. Dim drw1 As DataRow = _ DsOrders1.Tables("Orders").Rows(RowID) TextBox1.Text = drw1("ShipCountry") TextBox2.Text = drw1("Freight") End Sub Dynamically Formatting a DataGrid Control
The DataGrid control offers many options for formatting its contents and display. The Visual Basic .NET DataGrid control behaves somewhat similarly to the Datasheet view for a table or query in Access and the DataGrid control from classic Visual Basic. However, both of these have important distinctions from the .NET DataGrid control. The DataGrid Control Changes in Visual Basic .NET topic in the Microsoft Visual Studio .NET documentation details a long list of specific changes. My recommendation is to approach the Visual Basic .NET DataGrid control as a new control with functionality you re already familiar with. Accept the fact that you have to learn how to use the control through its properties, methods , and events just as you would for any object. The next two samples will introduce you to some typical uses and techniques for manipulating the control.
The sample for this section opens a form without automatically populating any controls on the form with data. The form, Form5 , includes four controls ”a button, a pair of radio buttons, and a data grid. Clicking the button loads data into the grid. In fact, whenever you click the button, the application automatically refreshes the contents of the DataGrid control with the most current data from the Access database file supplying the control with data through a local dataset. Although the Button control lets a user modify the contents of the DataGrid control, the RadioButton controls enable a user to alter the look of the data in the DataGrid control by adding or removing a background color to every other row.
Figure 6-6 shows Form5 when the sample application for this section opens. Notice that the data grid below the Button control and the two RadioButton controls is not populated. The DataGrid control fills when the user clicks the Load Grid button. This window also has its RadioButton controls disabled. Because you can t modify the appearance of the data in the grid until after the data appears, it makes sense to disable a set of controls that modify the look of the application.
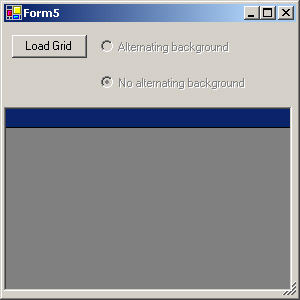
Figure 6-6: The DataGrid is initially empty to show that you can dynamically populate and modify the formatting for a DataGrid control on a form with code behind other controls on a form.
After a user clicks the Load Grid button, Form5 looks like the top window in Figure 6-7. Notice that the grid dynamically expands to show all the columns in its data source and that the form is widened to avoid cropping the grid control. Initially, the grid formats without an alternating background. Therefore, Form5 opens with the No Alternating Background radio button selected. This radio button and the one immediately above it work together to control the AlternatingBackColor property for the DataGrid control. Clicking the Alternating Background radio button selects it and deselects the No Alternating Background radio button. (See the bottom window in Figure 6-7.) Equally important, clicking the top radio button changes every other row in the grid from the default background color to cyan. Clicking the No Alternating Background radio button toggles the look of the form so that all rows appear again in the default background color. In summary, these are the two main features of this application:
-
Dynamically populates a DataGrid control with data on the user s command
-
Alters the formatting of a DataGrid control
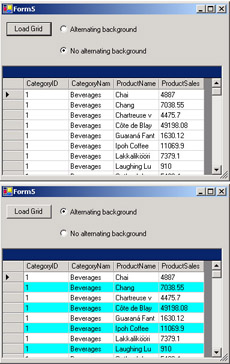
Figure 6-7: You can dynamically change the appearance of a DataGrid control.
The code behind Form5 consists of three event procedures and a module- level variable. The module-level variable, mycolor , tracks the default background color for DataGrid1 . Notice that the .NET Framework has a Color type. The type is actually a structure. The Color structure features shared members. These members include a long list of specific color names as well as operators for determining whether two colors are equal or unequal . You cannot use standard equality (=) or inequality (<>) operators for determining whether two colors are the same. The initial declaration of mycolor sets it equal to an empty color. When a user clicks the Load Grid button ( Button1 ), the click event procedure for the button checks to see whether mycolor is still empty. If so, the procedure assigns the current alternating background color to mycolor .
If the color is not empty, a Color value was previously assigned to the mycolor variable. The mycolor variable is empty just once within a session ” before the procedure assigns a Color value to it. Later, when a user clicks either of the RadioButton controls, Visual Basic .NET raises the CheckedChanged event for RadioButton1 . The RadioButton1_CheckedChanged procedure, which handles this event, toggles the AlternatingBackColor property for DataGrid1 between the value of mycolor and Color.Cyan .
The load event procedure for Form5 is simple but nevertheless important. It starts with a few Text property assignments for Button1 and the two RadioButton controls. Next, the load event procedure disables both radio buttons. Because of the design of this program, we need to take this precaution to prevent a user from undermining the ability of the application to toggle the color of alternating background rows in the grid. The closing statement of the load event procedure assigns RadioButton2 s Checked property a value of True . This selects the control when the form opens (although it is disabled so that a user cannot change the selection). Then, when the user clicks Button1 for the first time, the correct radio button will already be selected.
Notice that I have made no explicit mention of populating the DataGrid control so far. This is because this function is now an interactive feature that the user can control while the form is open, instead of being tied to the opening of the form. The Button1 click event procedure starts by filling the Sales By Category table in the DsSalesbyCategory dataset. (The DsSalesbyCategory1 variable points at the dataset.) The next step is to assign the dataset s Sales By Category table to the DataSource property of DataGrid1 . Because a DataGrid control can display multiple columns, you do not need to designate an individual column for a DisplayMember property.
Next, the click event procedure widens the DataGrid control to accommodate the display of all the columns in the Sales By Category table and widens the form to accommodate the DataGrid control. Then, the procedure moves on to assigning a value to the mycolor variable if it has not already set the variable s value in the current session. Finally, the event procedure enables both radio buttons. These last assignments permit users to toggle the color of alternating rows in the DataGrid control.
Dim mycolor As Color = Color.Empty Private Sub Form5_Load(ByVal sender As System.Object, _ ByVal e As System.EventArgs) Handles MyBase.Load Set Text property values. Button1.Text = "Load Grid" RadioButton1.Text = "Alternating background" RadioButton2.Text = "No alternating background" Disable radio buttons to preserve setting of mycolor until the user initially populates DataGrid1 with values. RadioButton1.Enabled = False RadioButton2.Enabled = False Check RadioButton2. RadioButton2.Checked = True End Sub Private Sub Button1_Click(ByVal sender As System.Object, _ ByVal e As System.EventArgs) Handles Button1.Click Populate DataGrid1 with Sales by Category query. OleDbDataAdapter1.Fill _ (DsSalesbyCategory1, "Sales by Category") DataGrid1.DataSource = _ DsSalesbyCategory1.Tables("Sales by Category") Resize form and grid to accommodate sales data. DataGrid1.Size = _ New System.Drawing.Size(368, 184) Me.Size = _ New System.Drawing. Size (384, 300) Save color of default background for grid. If Color.op_Equality(mycolor, Color.Empty) Then mycolor = DataGrid1.AlternatingBackColor End If Enable buttons for toggling alternating background color for grid. RadioButton1.Enabled = True RadioButton2.Enabled = True End Sub Private Sub RadioButton1_CheckedChanged( _ ByVal sender As System.Object, _ ByVal e As System.EventArgs) _ Handles RadioButton1.CheckedChanged Toggle alternating background color for grid. If RadioButton1.Checked Then DataGrid1.AlternatingBackColor = Color.Cyan Else DataGrid1.AlternatingBackColor = mycolor End If End Sub Loading One of Three Data Sources into a DataGrid Control
The preceding sample creates a dataset based on the Sales By Category query in the Northwind database. This query performs an aggregation of the extended prices by product within category for orders in 1997; the expression for extended price is UnitPrice*Quantity*(1-Discount/100)*100 . Although a query returns a result set without actually holding the values, this makes no difference to Visual Basic .NET. Whether you download a table or a query to populate controls on a form, Visual Basic .NET creates the same end result ”a local table with actual values in a dataset.
Using the graphical techniques this chapter highlights, you cannot process an Access parameter query with Visual Basic .NET. (Don t worry, Chapter 8 shows how to process parameter queries with code.) However, we can create multiple queries without parameters within an Access database that are identical except for one element. Then, a Visual Basic .NET application can transfer one of those queries to a local dataset for viewing in the controls on a Windows form. The sample for this section illustrates a three-step approach to performing this task:
-
Create queries that parallel one another in an Access database. For example, you can create separate Sales By Category queries for 1996, 1997, and 1998 with the data in the Northwind database.
-
Allow a user to designate with a form control which query she wants to download for populating one or more other controls on the form. One way to perform this second step is to let a user enter the name of the query, or a nickname for it, in a text box.
-
After verifying a valid entry for the query, your application can create a local dataset based on the Access data source and populate one or more controls on a Windows form.
Although the second and third steps are logically distinct, you are likely to perform both in a single module behind a Windows form. The first step can take place in any of several locations. However, the graphical query designer in Access is one especially easy place to perform this step.
Creating Three Sales by Category Queries in the Northwind Database
Because you already know how to process sales by category, it is an especially convenient place to start building three separate, parallel queries. The Northwind built-in Sales By Category query returns extended price results by product within category for one year: 1997. Therefore, it is relatively easy to modify this base query to create three more queries named Sales By Category 1996, Sales By Category 1997, and Sales By Category 1998. Figure 6-8 shows the SQL view for the Sales By Category 1996 query. This query is identical to the built-in query for Sales By Category, except for replacing the year 1997 with the year 1996. This replacement is necessary twice on the third line from the bottom in Figure 6-8. After making the update, save the query with the name Sales By Category 1996.
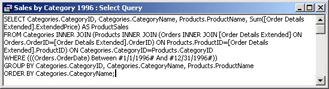
Figure 6-8: A SQL view of one of three parallel queries created for the Northwind database
You can create the Sales By Category 1998 query in a nearly identical fashion to the technique used for creating the Sales By Category 1996 query. In short, replace 1997 in the original Sales By Category query with 1998 and save the edited query with the name Sales By Category 1998.
Creating the Sales By Category 1997 query is the easiest of all. Open the original Sales By Category query. Then, use the File, Save As command to save the query with the name Sales By Category 1997. This process preserves the original query and makes another just like it with a new name.
Creating a Form for the Sample
You are likely to perform the second and third steps on page 275 together when selecting one of many parallel queries in an Access database. Both of these steps require a form. The second step requires a form to accept a value from a user designating which query to process into a local table within a dataset on a Windows workstation. The third step requires a form with one or more controls for displaying the dataset that corresponds to the query that a user designates in the second step.
When dragging queries from the Views collection of an Access database in Server Explorer, you will end up with one OleDbConnection object but three data adapters. Each data adapter manages one local dataset holding a table based on one of the three queries created in the first step listed on page 274. The same connection to the Northwind database can service each of the three data adapters. Visual Studio .NET presents a Data Adapter Configuration Error dialog box about not creating Update and Delete statements. These statements are inconsequential for this sample and earlier samples in this chapter because the forms are meant for viewing data, not updating it.
The next subsection presents a graphical form design technique that creates forms capable of editing data, and Chapter 8 and Chapter 9 present code- based approaches to data manipulation with ADO.NET and Visual Basic .NET. Right-click each data adapter and choose Generate Dataset to create a matching dataset. Name the datasets DsSalesbyCategory1996 , DsSalesbyCategory1997 , and DsSalesbyCategory1998 . Visual Studio .NET responds by adding object variables to a tray below the form with the same names as the datasets (except for an appended 1 ).
Figure 6-9 shows the Design view for Form6 in the NavigationandAssignment project. The form includes a Button control to enable users to specify when to start populating a local dataset from the Access database. A TextBox control with a corresponding Label control allows a user to designate a nickname that specifies which query to use for populating a local dataset. The populated dataset serves as the DataSource property for the form s DataGrid control. Below the form in a tray are the ADO.NET object variables: OleDbConnection1 points at the Northwind database. OleDbDataAdapter1 through OleDbDataAdapter3 point at the three queries added to the Northwind database. These variables represent data adapters as well as point at local datasets. The variables DsSalesbyCategory19961 through DsSalesbyCategory19981 point at local datasets. The Solution Explorer in Figure 6-9 depicts the DsSalesbyCategory1998 dataset highlighted.
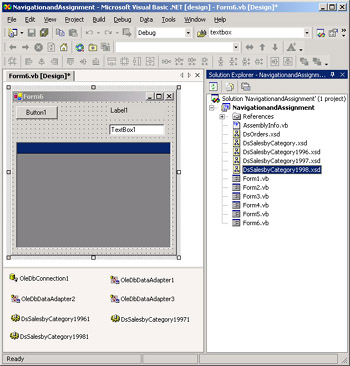
Figure 6-9: A Windows form that lets a user populate a DataGrid with one of three different datasets based on various queries in the Northwind database
Code Behind the Form
The following listing shows the code behind Form6 . The listing consists of just two event procedures. The load event procedure for Form6 performs the typical functions of assigning Text property values for controls and related setup activities. Comments describe the role of each block of code within the load event procedure. In this case, the third block of code is particularly interesting because it dynamically sizes and positions the Label control relative to the TextBox control. First, the code assigns the Width property setting from the TextBox control to the Label control. (TextBox controls are narrower by default.) Second, the code positions the Label control so that it is left aligned with the TextBox control and its bottom edge is 3 pixels above the top edge of the TextBox control.
The click event procedure for Button1 manages the data for the application. With a Select Case statement, the code runs one of four blocks of code depending on the Text property value for TextBox1 . The legitimate values for TextBox1 are 1996, 1997, or 1998. Any other value generates a reminder to the user to enter one of these three values, and the label above the text box indicates the need to enter one of the three legitimate values. The code for each year has the same form, but each draws on a different query and local dataset. For example, a value of 1996 fills the dataset at which the OleDbDataAdapter1 points from the Sales By Category 1996 query in the Northwind database. After filling the dataset, the procedure assigns the dataset to the DataSource property for DataGrid1 .
Private Sub Form6_Load(ByVal sender As System.Object, _ ByVal e As System.EventArgs) Handles MyBase.Load Set Text property values for button and text box. Button1.Text = "Load Grid" TextBox1.Text = "" Set Text property and alignment for label. Label1.Text = "Enter 1996, 1997, or 1998" Label1.TextAlign = ContentAlignment.MiddleRight Position and size label so that it: has the same Width property as the text box, has the same Left property as the text box, and is three pixels above the text box. Label1.Size = _ New System.Drawing.Size( _ TextBox1.Width, Label1.Height) Label1.Left = TextBox1.Left Label1.Top = TextBox1.Top - Label1.Height - 3 Resize form and grid to accommodate sales data. DataGrid1.Size = _ New System.Drawing.Size(368, 184) Me.Size = _ New System.Drawing.Size(384, 300) End Sub Private Sub Button1_Click(ByVal sender As System.Object, _ ByVal e As System.EventArgs) Handles Button1.Click Before running this procedure, you need to create three queries in the Northwind database based on the Sales by Category query for product-within-category sales by year (1996, 1997, and 1998). Set the DataSource property for DataGrid1 based on the year entered in the text box. Select Case TextBox1.Text Case "1996" OleDbDataAdapter1.Fill( _ DsSalesbyCategory19961, "Sales by Category 1996") DataGrid1.DataSource = _ DsSalesbyCategory19961. _ Tables("Sales by Category 1996") Case "1997" OleDbDataAdapter2.Fill( _ DsSalesbyCategory19971, "Sales by Category 1997") DataGrid1.DataSource = _ DsSalesbyCategory19971. _ Tables("Sales by Category 1997") Case "1998" OleDbDataAdapter3.Fill( _ DsSalesbyCategory19981, "Sales by Category 1998") DataGrid1.DataSource = _ DsSalesbyCategory19981. _ Tables("Sales by Category 1998") Case Else MsgBox("Please enter 1996, 1997, or 1998 " & _ "in the text box.", MsgBoxStyle.Exclamation) End Select End Sub You can run this application just as you would any of the other samples in this section. Open Form1 in the NavigationandAssignment project. Click the bottom link label. This opens Form6 with empty DataGrid and TextBox controls. Entering a value such as 1996 and clicking the Load Grid button populates the grid with values for the year showing in the text box. Figure 6-10 presents the results for 1996 in the text box.
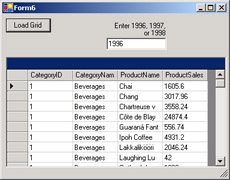
Figure 6-10: Using simple graphical techniques and elementary Visual Basic .NET code, you can dynamically specify at run time the values to populate a control such as a DataGrid on a Windows form.
EAN: 2147483647
Pages: 111