Programmatically Creating PivotCharts
Creating PivotCharts involves processing a form's ChartSpace object, which is returned by the form's ChartSpace property. Once you have a reference to the ChartSpace object, you can set parameters for that object and its hierarchically dependent objects to format a PivotChart for the data specified in the form's Record Source property. As with PivotTables, you can make the PivotChart view the default view for a form so that when a user opens the form, the chart immediately displays. Alternatively, you can leave the Form view as the default view and let users select the PivotChart view for the form when they need it.
Adding a PivotChart View to a Custom Form
The first PivotChart sample we'll examine builds on the PivotTable samples from the previous section and explores the basics of creating a simple bar chart in a form's PivotChart view. This sample involves a main procedure that calls three other procedures. These three procedures create a custom query in an Access database file, base a new form on the custom query, and design a PivotChart view for the new form.
The main procedure, CreateAPivotChartBasedOnACustomQuery , starts by assigning names to two string variables. One of these variables represents the custom query's name , qryExtPriceByShipper . The second string denotes the name of the form based on the query frmqryExtPriceByShipper . Next , the procedure defines the SQL string for a custom query. This query statement uses the Invoices query as a record source. It totals ExtendedPrice by date, shipper, and product name. In addition, the custom query filters out all records containing orders placed on or after May 1, 1998. This is because the data ends in May 1998, and the Invoices query data is incomplete for that month. The field labels for shipper and product name directly originate from corresponding fields in the Invoices query. The date field has the name YearMonth . This field uses the built-in DateSerial , DatePart , and Month functions to transform the OrderDate field in the Invoices query so that all dates assume a value of the first day of the month in which they occur. This kind of transformation is useful when you want to plot data by month, as you'll see in the code sample to follow.
After defining the SQL string for the custom query, the procedure calls three other sub procedures that perform most of the work in the sample. Let's take a look at the main procedure first:
SubCreateAPivotChartBasedOnACustomQuery() DimstrSQLAsString DimstrQNameAsString DimstrFNameAsString 'Assignnamesfornewqueryandform strQName= "qryExtPriceByShipper" strFName= "frmqryExtPriceByShipper" 'AssignSQLforcustomqueryandcreatequery strSQL= "SELECTDateSerial(DatePart(" & """" & "yyyy" & """" &_ ",[OrderDate]),Month([OrderDate]),1)ASYearMonth, " &_ "Invoices.Shippers.CompanyName,Invoices.ProductName, " &_ "Sum(Invoices.ExtendedPrice)ASExtPriceFROMInvoices " &_ "GROUPBYDateSerial(DatePart(" & """" & "yyyy" & """" &_ ",[OrderDate]),Month([OrderDate]),1), " &_ "Invoices.Shippers.CompanyName,Invoices.ProductName " &_ "HAVING(((DateSerial(DatePart(" & """" & "yyyy" & """" &_ ",[OrderDate]),Month([OrderDate]),1))<#5/1/1998#))" CreateCustomQuerystrSQL,strQName 'UsequeryasrecordsourceforformwithvalueofstrFName CreateFormBasedOnQuerystrFName,strQName 'CreatePivotChartfordatabehindform CreateChartstrFName EndSub The procedure for creating a custom view accepts the SQL string and query name as arguments. This procedure requires a reference to the Microsoft ADO Ext. 2.x for DDL and Security library. This is because the sample uses the ADOX Catalog and View objects. The procedure begins by instantiating a catalog and assigning its ActiveConnection property to the current project. Then, the project attempts to delete any prior query that has the name of the view that it plans to create. If there is no prior view with the same name, the procedure ignores the resulting error. The On Error GoTo 0 statement restores normal error behavior by Access. The procedure's last block of code starts by instantiating a new ADO Command object. Next, it assigns the SQL string passed to the procedure to the CommandText property for the command. Finally, the procedure uses the Catalog object to append a new view with the name of the query passed to the procedure and the SQL statement associated with the Command object. See Chapter 4, "Jet SQL, the ADOX Library, and Queries," for a more thorough review of the techniques for creating custom queries.
SubCreateCustomQuery(strSQLAsString,_ strQNameAsString) Dimcat1AsADOX.Catalog Dimcmd1AsADODB.Command Dimvew1AsADOX.View 'Createareferencetothecatalogforthecurrentproject Setcat1=NewADOX.Catalog cat1.ActiveConnection=CurrentProject.Connection 'Removeaquerybeforecreatinganewcopyofit OnErrorResumeNext cat1.Views.DeletestrQName OnErrorGoTo0 'Appendaselectqueryasaviewtothecurrentproject Setcmd1=NewADODB.Command cmd1.CommandText=strSQL cat1.Views.AppendstrQName,cmd1 'Cleanupobjects Setcmd1=Nothing Setcat1=Nothing EndSub
The procedure for basing a form on the custom query also illustrates an approach for assigning a custom name to a form. This sample illustrates one way to avoid accepting the default name for a form as all the preceding samples in this chapter do. The CreateFormBasedOnQuery procedure accepts two string arguments. One designates the name of the new form, strFName , and the other denotes the name of the query to serve as a record source for the form, strQName . This procedure uses the function procedure, FormName , for creating a custom form that we discussed earlier in the chapter. The sample starts by iterating through the members of the AllForms collection. This iteration searches for an existing form with the same name as the new form the procedure will create. (Chapter 5 discusses the AllForms collection and describes several samples that demonstrate how to use it.) If the iteration discovers a form with the same name as the new form, the sample uses the SelectObject method of the DoCmd object to select the form. Then, the procedure invokes the DoCmd object's DeleteObject method to remove the form from the current project.
After eliminating a prior version of the form (if one exists), the sample calls the FormName function procedure and passes it the name of the custom query. This creates a new form with an arbitrary name, such as Form2 . The procedure saves the name of the new form returned by the function procedure. Then, the sample uses DoCmd object methods to select the form and give it a new custom name as specified by the argument to the procedure. Before saving the form to commit the changes, the procedure uses the conPivotChartDefaultView constant to assign a value of 4 to the form's DefaultView property. This causes the form to open automatically with its PivotChart view. Here's the procedure:
SubCreateFormBasedOnQuery(strFNameAsString,strQNameAsString) Dimobj1AsAccessObject DimstrDefaultNameAsString Dimfrm1AsAccess.Form ConstconPivotChartDefaultView=4 'Deleteanypriorformwiththenameofthenewone(ifoneexists) ForEachobj1InCurrentProject.AllForms Ifobj1.Name=strFNameThen DoCmd.SelectObjectacForm,obj1.Name,True DoCmd.DeleteObjectacForm,obj1.Name ExitFor EndIf Nextobj1 'Createaformwithcontrolsforallthefieldsin 'thecustomquery strDefaultName=FormName(strQName) 'Renameformfromdefaultnameandassigna 'defaultviewofaPivotChartformanualopening DoCmd.SelectObjectacForm,strDefaultName,True DoCmd.RenamestrFName,acForm,strDefaultName DoCmd.OpenFormstrFName,acDesign Setfrm1=Forms(strFName) frm1.DefaultView=conPivotChartDefaultView DoCmd.CloseacForm,frm1.Name,acSaveYes EndSub
Finally, you're ready to create the PivotChart view for the custom form. The CreateChart procedure that accomplishes this starts by opening the custom form and assigning a reference to it, frm1 . Next, the procedure invokes the SetData method twice. The first application of the method sets the CompanyName field of the record source to be represented by the bars in a chart that plots a series. The second application specifies the ExtPrice field as the series that gets plotted across the CompanyName field values represented by the bars. Recall that CompanyName refers to the three shippers that transport goods in the Northwind sample. After setting the fields for the chart to plot, the procedure turns off the DisplayFieldButtons property. The display field buttons serve as drop areas for adding fields to a chart. This essentially prevents users from easily changing the chart by adding new fields.
| Note | Users can reverse a setting of False for the DisplayFieldButtons property by resetting the Field Buttons/Drop Zones check box on the Show/Hide tab of the PivotChart's Properties dialog box. A developer can use the techniques for creating a custom startup and programming custom command bars, as illustrated in Chapter 8 to prevent access to the Properties dialog box. |
The SetData method enables you to designate the data for a chart, including a form's ChartSpace object. This object represents a chart workspace where you can programmatically define a form. The SetData method takes three arguments. The first argument (the Dimension argument) designates the chart object to which the method will assign the data. The sample that follows illustrates the setting for a bar chart and the series it plots. The SetData method has 15 possible settings for this argument, which enable you to assign values to different axes of various kinds of charts, such as stock, bubble, and bar charts . The appropriate setting varies according to the type of chart and the chart axis you use. The second argument (the DataSourceIndex argument) specifies how the chart object connects with the data source. The third argument (the DataReference argument) can name the data source. When working with a database as a data source, this argument typically will be a field name, such as CompanyName or ExtPrice .
| Note | You can discover the argument settings for the SetData method as well as for other properties and methods from the Office 2003 Web Components Help file (owcvba11.chm). This Help file resides in the local resource folder of the \Program Files\Common Files\Microsoft Shared\Web Components\11\ path . For those installing the English-language version of Office 2003, this folder is 1033. In addition, you can use the Object Browser to explore the objects, methods, properties, events, and enums in the Office 2003 Web Components library after you make a reference to the Microsoft Office Web Components 11.0 library. |
After assigning data to the chart, the procedure moves on to format the chart. This formatting assigns values to the chart that the PivotChart view displays. For example, the procedure assigns string values to the title captions for the vertical and horizontal axes ” Axis(0) and Axis(1) , respectively. To assign a caption to the chart's overall title, you must specify that the chart has a title. Do this by setting the chart's HasTitle property to True . The default value is False . Next, assign a string to the Caption property for the chart's title. The Font property is another especially useful chart title property. This property returns a Font object that you can use to set the chart title's font style, size , and name. The sample that follows illustrates the syntax for designating a 14-point font.
The last step the procedure takes is to close the form and save the changes to the PivotChart view. This action is essential for preserving the settings so that they're available the next time a user opens the form.
SubCreateChart(strFNameAsString) Dimfrm1AsAccess.Form 'OpenformtocontainPivotChart DoCmd.OpenFormstrFName,acFormPivotChart Setfrm1=Forms(strFName) Withfrm1.ChartSpace 'OpenPivotChartwithoutdropareas,andsetitscategoriesandvalues .SetDatachDimCategories,chDataBound, "CompanyName" .SetDatachDimValues,chDataBound, "ExtPrice" .DisplayFieldButtons=False 'Assignandformattitlestoaxesandoverallchart With.Charts(0) .Axes(1).Title.Caption= "Sales($)" .Axes(0).Title.Caption= "Shippers" .HasTitle=True .Title.Caption= "SalesByShipper" .Title.Font.Size=14 EndWith EndWith 'CloseformandsavePivotChartview DoCmd.CloseacForm,strFName,acSaveYes EndSub
Figure 7-8 shows the PivotChart view created by the CreateChart procedure. Notice that this view has just three bars ”one for each of the shippers. A bar chart automatically aggregates the series into its bars. In addition, the bar chart specification automatically gives the bars names that correspond to the CompanyName field values. As you've seen, explicit programming actions create the titles for the chart's two axes and the chart as a whole.
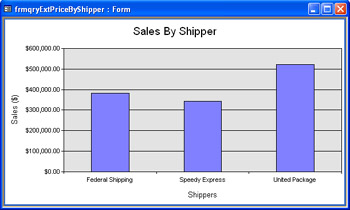
Figure 7.8: The PivotChart view created by the CreateChart procedure.
Updating a Bar Chart to a 3-D Bar Chart
The bar chart shown in Figure 7-8 effectively conveys the differences among the values of goods transported by various shippers. Yet charts can be even more powerful when given a dramatic presentation. Your clients won't always seek drama, however; sometimes they'll just want a bit of variety. In any event, by learning to implement all the style variations that PivotCharts offer, you'll be equipped to accommodate your clients ' needs for content as well as style.
You can determine the style of a chart by assigning a ChartChartTypeEnum value to its Type property. The Type property has more than 65 enum settings. The full list is available in the Object Browser. A setting of chChartTypeBar3D can transform the two-dimensional bar chart shown in Figure 7-8 into a 3-D bar chart, as shown in Figure 7-9. The syntax for this transformation is very straightforward. Just assign the enum constant to the chart's Type property.
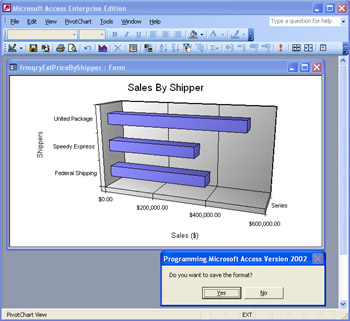
Figure 7.9: The display that results from running the Format3DBarChart procedure.
The following sample demonstrates this syntax. The sample also allows a user to conditionally save the change if they like the appearance of the altered view. The procedure starts by opening the frmqryExtPriceByShipper form. Next, the sample assigns the 3-D bar chart constant to the Type property. Then, the sample opens a message box that asks the user whether he wants to save the new format. Clicking Yes updates the form's PivotChart view with the new 3-D format, but clicking No preserves the original format.
SubFormat3DBarChart() Dimfrm1AsAccess.Form 'OpenaforminitsPivotChartview DoCmd.OpenForm "frmqryExtPriceByShipper",acFormPivotChart Setfrm1=Forms("frmqryExtPriceByShipper") 'Assign3DBarChartFormatandblankSeriesaxis frm1.ChartSpace.Charts(0).Type=chChartTypeBar3D 'Promptforwhethertosavewiththenewformat IfMsgBox("Doyouwanttosavetheformat?",vbYesNo,_ "ProgrammingMicrosoftAccess2003")=vbYesThen DoCmd.CloseacForm, "frmqryExtPriceByShipper",acSaveYes Else DoCmd.CloseacForm, "frmqryExtPriceByShipper",acSaveNo EndIf EndSub Figure 7-9 shows the reformatted PivotChart view. Notice the message box in the lower left corner. With this message box, a user can preserve the new format or revert to the original two-dimensional format that appears in Figure 7-8.
Creating a Time-Based Line Chart
A line chart is similar to a bar chart in two important respects. Therefore, your understanding of the preceding chart sample can help you develop a line chart in a form's PivotChart view. The first similarity is that a line chart contains categories. These categories are the values for grouping a series. When you create a line chart, the categories normally possess some natural order, as is the case with dates. Note that you will often have more categories in a line chart than in a bar chart. The second similarity is that a line chart aggregates a series into its individual categories ”just like a bar chart aggregates a series into its bars. Each point along a line chart represents the total of the series for that point. Therefore, if your series is ExtPrice , each date (or point) represents the total of ExtPrice values for that point.
The main differences between line and bar charts stem from the way each chart type represents aggregated category values. A bar chart uses a bar to signify a category value, whereas a line chart uses points to represent its categories' points, which the chart subsequently connects with a line.
Because of their similarities, you can create a line chart almost the same way that you create a bar chart. Be aware that your category values must have a natural progression and you must group them prior to referencing them with the SetData method. For example, the qryExtPriceByShipper query created by the preceding sample transforms OrderDate field values to create a new YearMonth field that reflects just the year and month of the OrderDate field value. If you were to use the ungrouped OrderDate field values from the Invoices query, a line chart would group its series in a PivotChart by day, instead of by month. After you correctly transform the categories, which you can do with a query, you reference the grouped values with a SetData method and set the chart's Type property to one of the variations of line charts.
The following sample shows the syntax for creating a line chart that displays aggregated ExtPrice values by month from the qryExtPriceByShipper query. The code starts by naming the source query for the chart and the source form. The PivotChart accesses the data in the query through the form. Next, it creates a form based on the query. This sample uses the same CreateFormBasedOnQuery procedure shown earlier in this chapter in the initial sample for creating a bar chart. In this case, the name of the form differs from that of the preceding sample, but the query name remains the same.
After creating the form, the procedure opens it and hides the field buttons for manually adding fields to a PivotChart. Then, the procedure invokes the SetData method twice. The first time this sample invokes the SetData method, it references the YearMonth field as the chart's categories axis. The YearMonth field is the transformed field for the OrderDate field from the Invoices query. The YearMonth field value is always the first day of a month. The month and year for the YearMonth field correspond to the OrderDate field on which it is based. The second time the sample invokes the SetData method, the procedure adds the ExtPrice field to the line chart the same way it did for the bar chart.
Aside from the first invocation of the SetData method, there is one more critical distinction between the processes used to create the bar chart and the line chart. The initial bar chart sample did not specify a chart type. That's because the default type for a chart that assigns values to chDimCategories is a bar chart. When you want to create a line chart, you must therefore explicitly assign a value to the chart's Type property. The appropriate setting for a line chart with markers for the points is chChartTypeLineMarkers .
The formatting for the line chart follows the same pattern as for the bar chart. The only distinction is that different strings define the chart title and the axis title for the categories dimension. Here's the procedure:
SubCreateTimeBasedLineChart() Dimfrm1AsAccess.Form DimstrQNameAsString DimstrFNameAsString 'Assignnamesforqueryandform strQName= "qryExtPriceByShipper" strFName= "frmqryExtPriceByShipper1" 'Createaformbasedonquery CreateFormBasedOnQuerystrFName,strQName 'OpenaforminitsPivotChartview DoCmd.OpenFormstrFName,acFormPivotChart Setfrm1=Forms(strFName) frm1.ChartSpace.DisplayFieldButtons=False Withfrm1.ChartSpace 'OpenPiovtChartwithoutdropareas,andsetitscategoriesandvalues .SetDatachDimCategories,chDataBound, "[YearMonth]" .SetDatachDimValues,chDataBound, "ExtPrice" .Charts(0).Type=chChartTypeLineMarkers 'Assignandformattitlestoaxesandoverallchart With.Charts(0) .Axes(1).Title.Caption= "Sales($)" .Axes(0).Title.Caption= "Dates" .HasTitle=True .Title.Caption= "SalesByMonth" .Title.Font.Size=14 EndWith EndWith 'CloseformandsavePivotChartview DoCmd.CloseacForm,strFName,acSaveYes EndSub
Figure 7-10 shows the line chart created by the CreateTimeBasedLineChart procedure. Notice that it has a single point for each month. Those points represent the total sales during each month. The single line in the chart represents the sales made by all three shippers.
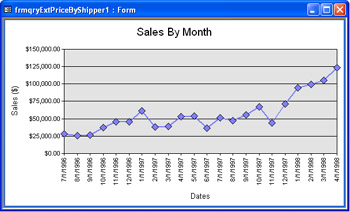
Figure 7.10: The PivotChart that results from running the CreateTimeBasedLineChart procedure.
Creating a 3-D Line Chart
This chapter's concluding sample modifies the basic line chart shown in Figure 7-10 in two ways. First, it adds a new series dimension to the chart. The new dimension represents the shippers ”namely, the CompanyName field in the qryExtPriceByShipper query. This new dimension does not replace either of the dimension assignments from the preceding sample. Instead, it refines those dimension assignments. The modified chart contains three lines instead of just one. Each line denotes the sales over time for a different shipper. As a result of the new three-line format, the new chart includes a legend so that viewers can easily identify the shippers. Second, the chart uses a 3-D format for drawing lines. Some users might find that the 3-D lines make it easier to distinguish among the shippers than the two-dimensional line in the preceding sample.
Since this sample modifies an existing chart instead of creating a new one, the code begins by referencing a form and opening it in its PivotChart view. As with the preceding sample, the code hides the Field buttons. Next, the code invokes the SetData method to add a new dimension, which represents the CompanyName field. This new dimension enables the chart to use a separate line to display the sales transported by each shipper. The line of code after the one invoking the SetData method assigns a value of True to the chart's HasLegend property. Then, the code sets the chart's Type property to chChartTypeLine3D . This draws a 3-D line for each shipper. The final portion of the sample permits the user to accept the new format or reject it in favor of the original line chart format.
SubUpdateTimeBasedLineChart() Dimfrm1AsAccess.Form DimstrFNameAsString 'Formtoupdate strFName= "frmqryExtPriceByShipper1" 'OpenaforminitsPivotChartview DoCmd.OpenFormstrFName,acFormPivotChart Setfrm1=Forms(strFName) frm1.ChartSpace.DisplayFieldButtons=False Withfrm1.ChartSpace 'AddCompanyNameseriestothechart,draw3-Dlines,and 'addalegend .SetDatachDimSeriesNames,chDataBound, "CompanyName" .Charts(0).HasLegend=True .Charts(0).Type=chChartTypeLine3D EndWith 'Promptforwhethertosavewiththenewformat IfMsgBox("Doyouwanttosavetheformat?",vbYesNo,_ "ProgrammingMicrosoftAccess2003")=vbYesThen DoCmd.CloseacForm,strFName,acSaveYes Else DoCmd.CloseacForm,strFName,acSaveNo EndIf EndSub Figure 7-11 shows the final chart sample. Take a look at the 3-D line formatting. Do you like being able to easily tell the difference between shippers? Regardless of whether these aesthetic choices appeal to you personally , it's helpful to know how to implement them for your clients.

Figure 7.11: The display that results from running the UpdateTimeBasedLineChart procedure.
EAN: 2147483647
Pages: 144