Action Queries
Access offers four action queries that you can use by means of the user interface as well as programmatically. These are update, append, delete, and make-table queries. As an intermediate level developer, you'll find that action queries are very interesting since they provide a quick and relatively easy way to build "action" into your Access applications.
An earlier section in this chapter reviewed action query functionality without focusing on how to implement them. This section describes how to incorporate action queries into your custom applications. The query design grid has special extensions that support the unique functionality of each action query type. This section illustrates these queries as it reveals how to design and use them.
Update Queries
Use update queries to revise field values in the record source for a query. You begin creating an update query just as you would a select query. After double-clicking the Create Query In Design View option in the Database window, add one or more record sources to the query with the Show Table dialog box. Although the dialog box's name is Show Table, you can add one or more tables or queries. You will typically want to join all tables and queries that you include in your update query design after closing the Show Table dialog box. (You can manually remove any undesired record sources by selecting them and pressing the Delete key on the keyboard.)
In order to create an action query, you must choose its type. Do this by choosing Update Query from the Query Type button on the Query Design toolbar. The button's face will then display the update query icon (a pencil followed by an exclamation mark). Notice this adds an Update To row on the query design grid, and it removes the Sort and Show rows. Next, add one or more fields to the Field row of the query design grid. You should include the field that you plan to update. Other fields can be in the query for identification purposes or to help specify criteria for determining which records to update.
After selecting the fields for your update query, enter a value or expression in one cell of the Update To row. The entry in this cell determines the new, replacement values. If there are no criteria, running the query revises all records in the query's record source. Including one or more criteria restricts the update action to just rows satisfying the criteria.
Once you run an update query, you cannot undo the changes with just the click of a single key. You must either restore the whole table from a backup copy or run one or more other update queries to restore the original values. The View button on the Design view toolbar lets you examine which records a query will alter without actually performing the update. When you have the proper records selected, you can click the Run button to run the query. This opens a message box announcing how many records the query will update. You can cancel the update action at this point by clicking No. If you click Yes, the update will proceed. If the field is not updateable, Access issues a message box to that effect instead.
Access will present an additional message box if you attempt to run the update query from outside of Design view. You can decline the option to change field values or you can proceed. If you proceed, the next dialog box is like the first one in the Design view. It indicates how many records will change and gives you a second and final chance to alter the records.
Update queries can revise many fields in their record sources. You can always update the fields in a record source so long as you have permission to revise the data source and it is available. Data from a one-to-many relationship is often, but not always updateable. For example, you cannot revise the primary key if cascading updates are not enabled. Calculated fields and values in crosstab queries are similarly not updateable. If a field is calculated, action queries cannot revise its values. The online help offers detailed descriptions of fields that can and cannot be updated.
The top window in Figure 4-22 shows the query design grid for a basic update query that revises two field values in the FamilyMembers table. This query changes the value of the Relation field to spouse if the prior field value is me or wife. The bottom two windows in Figure 4-22 show two additional update queries that restore the original values of the record source. These queries indicate one approach to structuring update queries so that you can restore initial values. Notice that it takes two queries to undo what the first query did. Also, observe that the criteria are compound in all three cases. The compound criteria help to better target the records to update.

Figure 4-22. Three update queries.
Running the restore queries has a couple of problems. First, you have to run both of them. Second, Access asks you to confirm that you want to run each query (it asks twice if you're running them from the Database window). If you were making many kinds of updates, it would be useful to automate the process to save time and improve accuracy. The following subprocedure performs the update. All the user has to do is invoke it.
Sub RestoreMeAndWife() DoCmd.SetWarnings False DoCmd.OpenQuery "qupRestoreSpouseToMe" DoCmd.OpenQuery "qupRestoreSpouseToWife" DoCmd.SetWarnings True End Sub |
The code uses four lines to run two update queries. The SetWarnings method disables the warning dialog boxes. The OpenQuery method is used twice to invoke the two queries. The last line re-enables warning dialog boxes.
Append Queries
Append queries add new records from a source recordset to a target recordset. The target recordset can be either a single table or the tables behind an updateable select query. The source recordset can be a table or select query with fields that match at least some of those in the target recordset. The source recordset must reside in the current database. The target recordset can reside in any Access database file.
An append query does not have to add records that contain every field in the target, but it must at least include one required field. If the target table has a primary key, be sure that the values for the primary key are unique in both recordsets. The append query will fail to add records with nonunique primary key values.
You begin designing an append query by adding the source recordset to the query's Design view. Next, add fields from the source to the Field row of the query design grid. Then, open the Query Type button on the toolbar and choose Append Query to display the Append dialog box. This dialog box simplifies the task of designating another table in the current database as the target. You can also indicate that you want to add records to a table in another Access database file by selecting the Another Database radio button and entering the path and file name for the other database. After selecting a database, the Table Name drop-down list box lists the tables in that file. Specify a target recordset by selecting a table name from that list box. If you want to add records to a select query, you must manually code the action query (see Chapter 2 for samples that accomplish this task using ADO and SQL).
After choosing a target record source, Access revises its query design grid to include an Append To row. It also automatically matches as many fields as it recognizes in the target recordset to those in source recordset. You can override the automatic selections. For those fields that Access does not match, you can insert a matching field (for example, one with a different name, but the same data type). Click in the Append To row of a column and choose the corresponding field name from the drop-down list of target recordset field names.
The top window in Figure 4-23 is an append query in Design view that has fields already added to the Field and Append To rows and the Append dialog box open. This append query adds records from the AdditionsToFamilyMembers table to the FamilyMembers table. After closing the Append dialog box, click the Run button to run the query. As with any other action query, click the View button on the toolbar to show the records the query will affect without running the query.
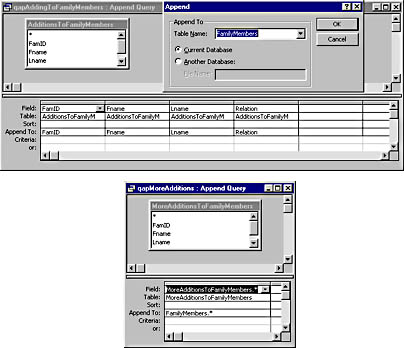
Figure 4-23. The top window is an append query that individually lists all the fields to add to the target record source. The bottom window is an append query that uses the asterisk to designate all the fields from both the target and source recordsets.
The bottom window in Figure 4-23 shows a variation of the append query in the top window. The bottom query copies all the fields from the MoreAdditionsToFamilyMembers table to the FamilyMembers table. I dragged the asterisk from the source recordset field list to the Field row in the query design grid. Similarly, I chose the asterisk from the drop-down list in the Append To row. Both queries append all the existing fields from the source to the target record source. However, the bottom one is more flexible. This is because it automatically includes any new fields that you will add to both tables. When you explicitly list the fields, you are limited to those fields until you manually revise the entries in the Field and Append To rows.
NOTE
In some cases, Access may not immediately redraw the display of a table after it completes an append query. Therefore, the query can actually update the target recordset without the display reflecting the changes. You can rectify this problem by changing the target recordset's display to Design view and back again to Datasheet view. (Shift+F9 also redraws the display for a recordset.)
Delete Queries
Delete queries permanently remove records from a target recordset. For that reason, you should be exceptionally careful when using delete action queries. Always use the View button to verify the records that you will be removing before invoking the query. Delete queries can also delete records in other recordsets besides the target. This is true when your target is on the one side of a one-to-many relationship with cascading deletes selected. In this situation, deleting a record on the one side removes matching records on the many side as well.
You should generally protect your data sources when using action queries, but this is especially true with delete queries because of their ability to permanently remove large sets of records from a record source. Consider maintaining a backup copy of your record source so that you can automatically restore it in the case of inadvertent activation of a delete query. Another strategy for delete queries is to make them hidden in the Database window, which will reduce the chance of a user accidentally invoking a delete query. (You can still programmatically invoke action queries that you elect to hide.) Hidden database objects are not displayed unless you choose to reveal them by choosing Options from the Tools menu and selecting Hidden Objects on the View page of the Options dialog box.
NOTE
To hide an action query, right-click on it in the Database window and choose Properties from the shortcut menu. Select the Hidden check box on the Property sheet and click OK. (You might need to unselect the Hidden Objects check box on the View page of the Options dialog box as well.)
You begin designing a delete query by double-clicking the Create Query In Design view option in the Database window. From the Show Table dialog box, add the record source from which you want to delete records. Specify rows that you want to delete by dragging fields from a field list to the Field row in the query design grid. Insert entries in the design grid's Criteria row to specify target records for deletion. If you want the delete query to remove all records from the target source, place an asterisk (or any field name) in the Field row and do not insert any criteria. You must have at least one entry in a Field row for the delete query to operate.
Figure 4-24 shows the design of a pair of delete queries. The top query deletes all the records from the FamilyMembers table; it has no Criteria row entries. If you knew the FamID values for the specific records that you want to delete you could insert them in the Criteria rows before invoking the query.
If you do not know what rows to delete at design time, you can create the delete query as a parameter query. The bottom window in Figure 4-24 shows this type of query. The prompt is the parameter query prompt that appears at run time. A user can then input a FamID value to delete all records that contain a FamID value greater than or equal to the specified value.
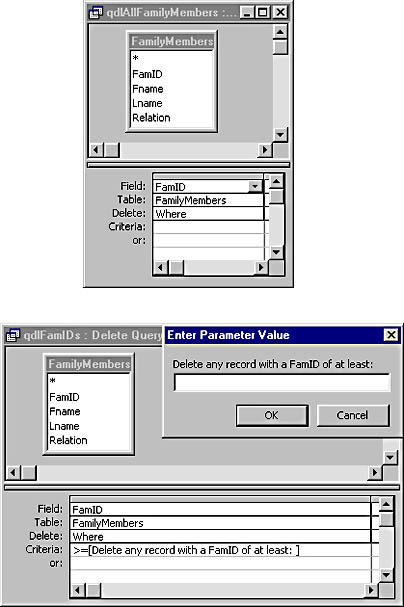
Figure 4-24. Two delete queries.
The following procedure pulls together some information about both delete and append queries. The procedure optionally deletes or restores all the records in the FamilyMembers table. When the procedure ends, the table is open and available for viewing. If you hide the qdlAllFamilyMembers and qapRestoreAllFamilyMembers queries, your only way to invoke them will be through code, as shown here.
Sub ActionQueryDemo() Dim varYesNo 'Prompt to delete all records. varYesNo = MsgBox("Do you want to remove all records?", _ vbYesNo, "Programming Microsoft Access 2000") 'If answer is yes, remove them all. If varYesNo = vbYes Then DoCmd.SetWarnings False DoCmd.OpenQuery "qdlAllFamilyMembers" DoCmd.SetWarnings True End If 'Prompt to restore all records. varYesNo = MsgBox("Do you want to restore all records?", _ vbYesNo, "Programming Microsoft Access 2000") 'If answer is yes, restore them all. If varYesNo = vbYes Then DoCmd.SetWarnings False DoCmd.OpenQuery "qapRestoreAllFamilyMembers" DoCmd.SetWarnings True End If 'Closing and opening table redraws it 'while making the table available for viewing. DoCmd.Close acTable, "FamilyMembers" DoCmd.OpenTable "FamilyMembers" End Sub |
The procedure starts with a MsgBox function that asks the user whether he or she wants to remove all records from the FamilyMembers table. If the user clicks Yes, the procedure invokes the qdlAllFamilyMembers query that appears at the top of Figure 4-24. (Notice that ActionQueryDemo contains a pair of statements that turn warning dialog boxes off and then on.) Next, the procedure prompts to find out whether it should restore all the records in FamilyMembers. If the user clicks Yes, the code invokes the qapRestoreAllFamilyMembers query to add records from a backup copy of the table back into FamilyMembers.
Before exiting, the procedure closes and then opens the FamilyMembers table, which ensures that the table will show the most recent modification, and leaves the table open in Access for easy viewing.
Make-Table Queries
Make-table queries, unlike the other three action queries, do not change, add to, or delete an original data source. The sole purpose of a make-table query is to create an Access table based on a record source. Any combination of data that you can link in a select query can qualify as a valid record source from which to make a table.
Several common application scenarios call out for make-table queries. First, you can use a make-table query to make backup copies of critical tables. This is particularly true just before it is time to delete records from the active system's data store. Second, a make-table query can preserve the state of a table or a joined set of tables at a fixed point in time. Third, you can make a copy of data in one database file for the purposes of another database application. While it is always possible to link (and you can get fresher data by linking), you can achieve faster performance with a table in a file than with a linked table from another file. Fourth, queries can become too complex for Access to process or their processing can take an excessive amount of time. In these situations, replace the offending complex query with a table generated by a make-table query. This will circumvent the too complex error message and will result in better performance.
Since a make-table query is at its core an action query, it is substantially easier to create a table with a make-table query than with ADO, SQL, or DAO. You begin creating a make-table query by opening a blank query in Design view, adding other tables and queries as resources for the new table, joining inputs as necessary, and choosing Make-Table Query from the Query Type button list. Next, drag the fields that you want in your new table to the Field row of the query design grid. Click the Run button to create the new table. If a table already exists with the name for the target table, Access asks whether you want to delete the old version before creating a new one.
Figure 4-25 shows a simple make-table query that makes a backup copy of the FamilyMembers table. The Make Table dialog box appears when you run a make-table query. You can use the dialog box to specify a table name within the current database file or the path and filename of another database. Then, you can use the Table Name drop-down list box to select a table to copy.
The sample in Figure 4-25 targets the FamilyMembersCopy table in the current database as the destination for the database. The Field row entry in the query design grid specifies that all the fields in the FamilyMembers table contribute to the new table. There are no criteria for including or excluding rows from the source recordset.
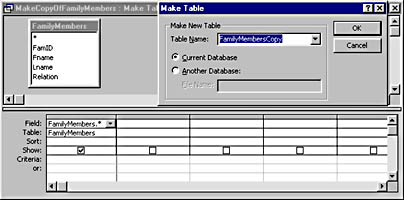
Figure 4-25. A simple make-table query.
EAN: 2147483647
Pages: 97