Conditional Logic and Looping Constructs
Conditional code execution and looping are at the heart of many code-based solutions. VBA offers a rich choice of options for implementing this kind of logic. The following sections review the major statement types that enable conditional program execution and looping and provide practical examples.
If...Then
Many procedures cannot achieve their objective by progressing sequentially through lines of code. It is often desirable to execute code conditionally—to skip some lines and perform others. One flexible and robust way to achieve conditional execution in VBA procedures is with the If…Then statement. There are actually three major variations of this basic statement. The first variation conditionally performs a simple block of code. The syntax is
If condition Then 'Statements End If |
One or more statements can reside within an If…End If block. The terminating End If marks the end of the block. VBA executes the statements within the block only when the condition evaluates to True. You can nest multiple If…End If blocks within one another.
A second variation of the If…Then statement enables your code to execute either of two blocks of code. It has this syntax:
If condition Then Statements1 Else Statements2 End If |
This form of the statement executes one of two blocks of code. When the condition is true, the statements in the first group execute. Otherwise, the statements in the second block execute.
While this design is more flexible than the first format, it's still limiting because you have only two options. You can, in fact, nest If…Then statements to enable more options, but VBA offers a third design that simplifies execution of any one of three or more statement blocks. The syntax is
If condition1 Then 'Statements ElseIf condition2 Then 'Statements Else 'Statements End If |
This form of the If…Then statement incorporates multiple conditions and three or more groups of statements. You can easily add new statement groups and conditions by inserting new ElseIf clauses with their own conditions and statements. This design is more powerful than the second variation not only because it can accommodate more conditions but because it restricts the execution of each statement block (except the last) to the case in which there is a precise match to a condition test. The second If…Then statement executes its second statement block whenever the condition for the first statement block is not true. When failing a match to the first condition does not automatically serve as a basis for executing the second statement block, you need the third style of the If…Then statement.
Consider the form shown in Figure 1-15. The form includes a text box, an option group, and a command button. The option group allows a user to designate a square or a cube operation on the numerical value in the text box. To compute the square of a number, you type the number in the text box, select Square It in the Compute Type option group, and then click Compute.
Figure 1-15. A form for calculating squares or cubes of numbers.
The following code shows the two procedures that make this squaring operation possible. The cmdComputer_Click event procedure responds to the click. If the option group (opgComputeType) equals 1, the user selected the Square It option button. The procedure calls MySquarer when the option group equals 1. Otherwise, it ends without performing any computations.
Sub cmdComputer_Click() If opgComputeType = 1 Then MySquarer txtInput.Value End If End Sub Sub MySquarer(MyOtherNumber As Double) dblResult = MyOtherNumber * MyOtherNumber MsgBox dblResult, vbInformation, _ "Programming Microsoft Access 2000" End Sub |
This cmdComputer_Click procedure uses the first If…Then structure. It merely conditionally executes a single statement block. In this case, the block consists of just one line. If the user selects Square It, MySquarer multiplies the text box's value by itself and presents the result in a message box.
If the user selects Cube It before clicking the command button, the code does nothing. The option group returns a value of 2, but there is no condition to detect this. In fact, it is all or nothing when the option group equals 1. The following code shows a new version of the event procedure along with the code to handle the situation in which the user does not select Square It.
Sub cmdComputer_Click() If opgComputeType = 1 Then MySquarer txtInput.Value Else MyCuber txtInput.Value End If End Sub Sub MyCuber(MyOtherNumber As Double) Dim dblResult As Double dblResult = MyOtherNumber ^ 3 MsgBox dblResult, vbInformation, _ "Programming Microsoft Access 2000" End Sub |
The cmdComputer_Click procedure uses the second form of the If…Then statement. It calls MySquarer if opgComputeType equals 1 but otherwise calls MyCuber. This works correctly if the user selects Cube It. However, at least one problem remains: The form opens with neither option button selected. If a user enters a number in the text box and then clicks the command button, the form returns the cubed value of the number despite the fact that the user selected neither option button. The fault lies in the design of the If…Then statement. We need the third variation with two separate conditions—one for squaring and the other for cubing. The following code shows this design:
Sub cmdComputer_Click() If opgComputeType = 1 Then MySquarer txtInput.Value ElseIf opgComputeType = 2 Then MyCuber txtInput.Value Else MsgBox "Click a computation type", _ vbCritical, _ "Programming Microsoft Access 2000" End If End Sub |
This sample includes two conditions. One tests whether the option group equals 1, and the other tests whether the option group equals 2. If the option group fails both tests, the procedure displays a message box reminding the user to click a computation type. If you add new option buttons to the option group for different computations, you can easily accommodate them. Just insert a new ElseIf clause with a special condition for each new button.
As you can see, the If…Then statement is very flexible. You can use it to handle many possible options, but it handles one or two items even more easily. Its syntax also changes slightly depending on what you are trying to accomplish.
Select Case
The Select Case statement does one thing: It evaluates an expression and conditionally executes one block of statements. When you work with more than one or two conditional options, the Select Case statement can be simpler to set up and easier to maintain than the If…Then statement. The general syntax for Select Case is
Select Case test expression Case expression list-1 'Statements Case expression list-2 'Statements Case Else 'Statements End Select |
Notice that Select Case evaluates an initial test expression. This can be as simple as a passed parameter or as complicated as a rocket science expression. expression list-1 and expression list-2 are ranges (or specific values) for the test expression. Some options for specifying expression lists include constants, delimited items in a series, or expressions that evaluate to True or False. When an expression list is true because it matches the test expression, the corresponding block of statements execute. The syntax sample above shows just two lists, but you can add more by inserting additional Case statements. The Case Else clause is optional, but it is good programming practice. This option captures any test expression values not trapped by the preceding Case clauses. You can nest Select Case statements within each other; each instance must start with Select Case and terminate with End Select.
Figure 1-16 shows a Select Case statement used in a function procedure. This procedure can perform one of four numerical operations on a pair of numbers passed to it. A string argument specifies the operation, and the Immediate window shows the result of the operation. As you can see from the Immediate window, the expression list tests are not case sensitive.
A misspelled operation causes the Case Else clause to operate. In this situation, the function prints a message in the Immediate window announcing that the operation is not valid.
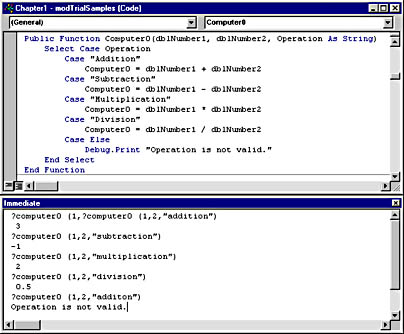
Figure 1-16. A function procedure and output illustrating the use of the Select Case statement.
For...Next
The For…Next statement is most obviously used for looping through a block of statements a known number of times. Since you can conditionally branch out of this kind of loop with an Exit For statement, you can also use the For…Next statement when you are not sure how many times to run before stopping. However, you must specify a maximum number of loops. The general syntax for the statement is
For counter = start To stop Step step 'Statements If condition Then Exit For End If 'Statements Next counter |
The For loop extends from the For counter line to the Next counter line. The For…Next statement initializes counter to the value of start and then executes the statements between For and Next. The flow of execution then returns to the top of the For loop, where counter is incremented by the optional step. (counter is incremented by 1 if step is not specified.)
The statements in the For loop are executed repeatedly until the value of counter exceeds stop (or when counter is less than stop if step is a negative number). Control then passes to the statement immediately following the Next counter statement. The optional Exit For statement causes the For loop to terminate prior to counter exceeding stop.
You can nest For…Next statements within one another. An inner loop passes control to an outer one when counter exceeds stop. VBA can generate a run-time error if it encounters a Next statement without a matching For statement, but you are likely to get a syntax error as you design your procedures.
The CountFor procedure (see below) applies For…Next logic while reinforcing techniques for working with arrays and Static declarations. (The array aryMyArray has five elements. Recall that array indexing begins with 0 unless your code explicitly specifies otherwise.) Next, the code declares an Integer variable to serve as a counter. The For…Next statement successively assigns the values 1_5 to the counter variable, intIndex.
Two statements execute for each pass through the loop. First the value of an element in aryMyArray accumulates the current value of intIndex to its current value. Since the code declares aryMyArray with a Static statement, the array elements retain their values on successive runs through the procedure. After the first pass through the procedure, the array elements are the successive values of intIndex. After the second pass through the procedure, aryMyArray elements are twice the successive values of intIndex—and so on for each successive pass through the procedure. The second statement prints the current value of intIndex and the associated element of the array. Recall that you can reinitialize the value of the array elements to 0 by choosing Run-Reset from the VBE Run menu.
Sub CountFor() Static aryMyArray(4) As Integer Dim intIndex As Integer For intIndex = 1 To 5 aryMyArray(intIndex - 1) = _ aryMyArray(intIndex - 1) + intIndex Debug.Print intIndex, aryMyArray(intIndex - 1) Next intIndex Debug.Print vbLf End Sub |
Figure 1-17 shows Immediate window output for three successive runs through the procedure. The first column shows the successive values of intIndex, and the second column shows the corresponding values of the array elements. On the first run through the procedure, the array elements exactly match intIndex. On the second and third passes, the array element values are twice and three times the intIndex values. This accumulating outcome shows the impact of a Static variable declaration. The values of intIndex and aryMyArray exactly match each other on all passes through the procedure if you change the Static keyword in the aryMyArray declaration to Dim.
Figure 1-17. The Immediate window showing the result of running the CountFor procedure three successive times.
For Each...Next and With...End With
The For Each…Next and With…End With statements can work together nicely for form data validation and classic enumeration tasks. For Each…Next iterates through any collection (such as the controls on a form) or array. It does not require that your application know the number of elements in the collection or array. The With…End With statement can complement For Each…Next by simplifying how you code multiple controls in a statement block.
The For Each…Next statement is both similar to and slightly less complicated than the For…Next statement. It is similar to For…Next in that its loop starts with a line that begins with For and ends with a line that begins with Next. However, the design of the For and Next lines are different for both versions of the For loop. The For Each…Next statement is less complicated than the For…Next statement because you do not have to track three separate parameters (counter, start, and stop) or worry about a positive or negative step value. The For Each…Next statement always starts at the beginning and loops forward until it reaches the end of a collection or the elements in an array. The general syntax for the statement is
For Each element In group 'Statements If condition Then Exit For End If 'Statements Next element |
The group term in the first line of the For Each…Next statement refers to the collection or the array name. The element in both the first and last lines designates individual objects in a collection or elements in an array.
The For Each…Next statement repetitively executes the statements in its body for each element in the specified collection or array. You will often want an Exit For or other conditionally executed statement somewhere in the body of the For loop. This enables your code to respond dynamically to a special outcome in its environment. The condition test identifies this special outcome, and the Exit For or other conditionally executed statements engage only when the outcome occurs.
As with the For…Next statement, For Each…Next statements can nest inside one another. At the conclusion of a For Each…Next loop, control passes to the first statement following the loop.
The With…End With statement simplifies the referencing of several different properties or methods of the same object. You specify the object whose properties or methods you want to reference in the beginning With line, and you close the reference to that object with the End With line at the end of the block. Between the With and the End With lines you can access the object's properties or methods without specifying the object name. The following code shows the general syntax of the With…End With statement:
With object .propertyname1 = "new value1" .propertyname2 = "new value 2" .method1 .method2 End With |
object is the name of an object, a reference to an object, or an array name. propertyname1 and propertyname2 are properties of the object, and method1 and method2 are methods of the object. As you can see, the With…End With statement facilitates access to an object's properties and methods.
Figures 1-18, 1-19, and 1-20 show a data validation form in action. Although the form has only a pair of text boxes that require validation, the form's code uses a For Each…Next loop that can be expanded to accommodate more text box controls. You can make a slight change to include other types of controls in the validation procedure. Figure 1-18 shows the layout of the basic Input form with a pair of text boxes and a command button.
Clicking the Do It! command button invokes an event procedure that checks the text boxes to make sure they do not contain Nulls. If either control contains a Null, the event procedure displays a message box reminding the user to enter information in both text boxes.
The event procedure also calls a procedure that changes the background of each text box that contains a Null from white to yellow. The procedure also moves the focus to the last text box that contains a Null. The background stays yellow until the user updates the data in the text box.
Figure 1-19 shows a text box that contained a Null but now contains 1. The background of the text box changes back to white as soon as the user enters some information and moves the focus off the text box. Figure 1-20 shows the form after the new value updates the text box's value.
The following pair of procedures—named cmdSubmit_Click and MarkFieldsToEdit—examines the text boxes and yellow-highlights any text box that contains a Null. The Click event procedure for the command button loops through all the controls on the form. This includes text box as well as non_text box controls. The event procedure uses a TypeOf keyword to detect which control is a text box. Failure to take this measure can result in a run-time error because not all controls have a Value property. If the event procedure detects a text box control, it queries the control's Value property to determine whether it contains a Null. Any control with a Null triggers the code inside the If…Then statement. This code displays the message box and calls the procedure to highlight the control with the missing entry.
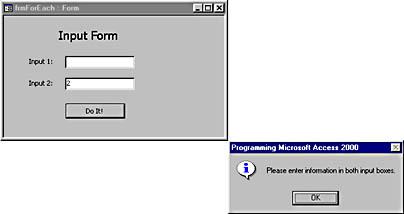
Figure 1-18. The result of clicking the Do It! command button when at least one text box contains a Null.
Figure 1-19. A yellow-highlighted text box that contained a Null but now contains 1.
Figure 1-20. After the user enters information and moves the focus, the text box's background color is reset to white.
Private Sub cmdSubmit_Click() 'Check for valid entries. For Each ctl In Screen.ActiveForm.Controls If TypeOf ctl Is TextBox Then If IsNull(ctl.Value) Then MsgBox "Please enter information " _ & "in both input boxes.", _ vbInformation, _ "Programming Microsoft Access 2000" MarkFieldsToEdit Exit For End If End If Next ctl End Sub Public Sub MarkFieldsToEdit() For Each ctl In Screen.ActiveForm.Controls If TypeOf ctl Is TextBox Then If IsNull(ctl.Value) Then With ctl .BackColor = RGB(255, 255, 0) .SetFocus End With End If End If Next ctl End Sub |
The MarkFieldsToEdit procedure also uses the TypeOf keyword to identify text boxes. When it detects a text box that contains a Null, it uses a With…End With statement to change the control's background color and moves the focus to the control. This ensures that the last text box that contains Null has the focus at the end of the procedure.
Each of the event procedures in the code below fires on the AfterUpdate event. Each procedure uses a With…End With block to change the associated control's background color back to white if the background color is currently yellow. The AfterUpdate event occurs independently for both text boxes, but the code in each procedure is identical except for the name of the associated object (either txtInput1 or txtInput2).
Private Sub txtInput1_AfterUpdate() With txtInput1 If .BackColor = RGB(255, 255, 0) Then .BackColor = RGB(255, 255, 255) End If End With End Sub Private Sub txtInput2_AfterUpdate() With txtInput2 If .BackColor = RGB(255, 255, 0) Then .BackColor = RGB(255, 255, 255) End If End With End Sub |
Do...Loop
The Do…Loop statement is yet another variety of looping statement available with VBA. The Do…Loop statement is a more flexible alternative to the While…Wend statement—it has all the functionality of the While…Wend statement and more. VBA retains While…Wend for backward compatibility.
You can use a Do loop to repeatedly execute a group of statements until a condition evaluates to either True or False. The Do…Loop statement syntax explicitly supports performing its test of a condition either before executing a block of statements or immediately after executing the block. As with the other looping statements, there is also a special statement for exiting a block in the midst of its execution. The two variations of syntax for the Do…Loop statement are as follows:
Do {While | Until} condition 'Statements If condition Then Exit Do End If 'Statements Loop |
And:
Do 'Statements If condition Then Exit Do End If 'Statements Loop {While | Until} condition |
The first variation performs its condition evaluation before executing the statements in the loop. The other format evaluates the condition immediately after executing the statements. The condition test can use either a While keyword or an Until keyword. The While keyword causes the loop to continue executing as long as the condition is true; the Until keyword causes the loop to continue executing as long as the condition is false. Most experienced Access developers have written many Do loops for navigating through the records in a recordset until the detection of an EOF (end of file) or a BOF (beginning of file). As with the other VBA looping statements, you can exit Do loops in the middle of a statement block by using an Exit Do statement.
Figure 1-21 shows a pair of function procedures and their output to illustrate how to program Do loops. The DaysToNextMonth function accepts a date and returns the number of days from that date to the first of the next month. If you enter the current date, the procedure counts it as one of the days to the beginning of the next month. For example, there are two days (2/28/2000 and 2/29/2000) from 2/28/2000 to the first day of the next month. The function starts by computing dtmNextMonth, which is the input date plus one month. (In this sample in Figure 1-21, the date is 3/28/2000.) The procedure then sets the function's name, which serves as a counter variable, equal to 0. The third line launches a Do loop with a condition that tests for the inequality of the next month vs. the input date plus the quantity in the function's name. As long as they are unequal, the loop executes its block, which consists of one statement that increments the function's value by 1.
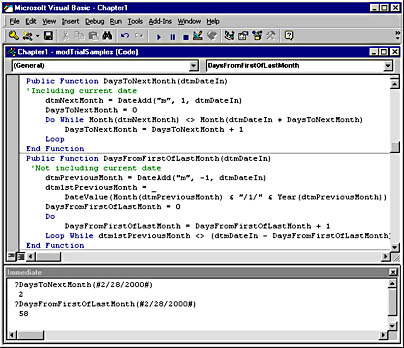
Figure 1-21. A pair of function procedures that use condition tests at the beginning and end of a Do loop.
The DaysFromFirstOfLastMonth function shows the effect of a condition test at the end of a Do loop. The output shows the number of days from 2/28/2000 to the first day of the previous month (1/1/2000). This equals 58 days, based on the 28 days in February and the last 30 days in January. This function begins by computing the previous month for the specified date. The function then passes that month to the DateValue function to determine the first day of that previous month. Just before starting the Do loop, the code sets DaysFromFirstOfLastMonth to 0. The code enters the loop without a condition test and increments DaysFromFirstOfLastMonth by 1. The condition test on the Loop line permits another pass through the loop as long as the input date minus DaysFromFirstOfLastMonth is less than the first of the previous month. In this way, the function counts 58 days from the input date to, but not including, the previous month's first day.
EAN: 2147483647
Pages: 97