Erasing Files Securely
When security and privacy are not concerns, there's really nothing wrong with using the built-in Windows Vista methods to delete files and folders. However, there's also a good chance that your computer stores all sorts of sensitive information that you would rather have erased permanently. From old business records to personal financial statements, there's no question that some files are just more sensitive than others. Any time that you want to securely erase data once and for all, you need to move beyond the native capabilities that Windows Vista offers.
Thankfully, a number of programs exist for the purpose of securely erasing files. One of the most popular options on this front also happens to be free - Eraser, available from http://www.heidi.ie. When you install Eraser and select the option to erase a file or folder, this tool doesn't just delete the item's partition table entry. Instead, it overwrites the physical disk space that the files occupy a number of times, to the point where recovering the original data is extremely difficult, if not impossible.
Setting Eraser Defaults
In its default configuration, Eraser offers four different methods to overwrite disk space and thus erase files:
-
Gutmann. This default file erasing method overwrites the disk space that the file used a whopping 35 times.
-
US DoD 5220.22-M (8-306. / E, C and E). This method, named after a U.S. Department of Defense standard, overwrites the disk space used by a file seven times.
-
US DoD 5220.22-M (8-306. / E). This method, also named after a U.S. DoD standard, overwrites the disk space used by a file three times.
-
Pseudorandom Data. This method overwrites the disk space that the files used only once.
In addition to the Eraser default options, you can also define custom erasing settings to meet your own personal needs or preferences.
| Tip | If you're interested in the deep, dark, and very technical details behind securely deleting data from disk drives, read Peter Gutmann's Secure Deletion of Data from Magnetic and Solid-State Memory paper at http://www.cs.auckland.ac.nz/~pgut001/pubs/secure_del.html. |
Follow these steps to configure erasing preferences with Eraser:
-
Select Start → All Programs → Eraser → Eraser.
-
Select Edit → Preferences → Erasing. The Preferences: Erasing window opens, as shown in Figure 15-3.
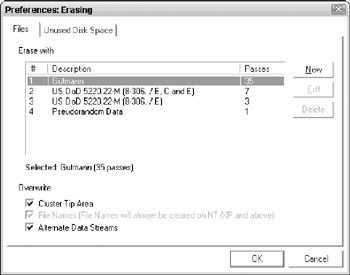
Figure 15-3: Eraser includes four predefined erasing methods, but you can also define your own. -
On the Files tab, select the erasing method you want to use, such as the US-DoD 5220.22-M method that overwrites data using seven passes.
-
Click the Unused Disk Space tab.
-
Click the erasing method that you want to use to overwrite free disk space, as shown in Figure 15-4.
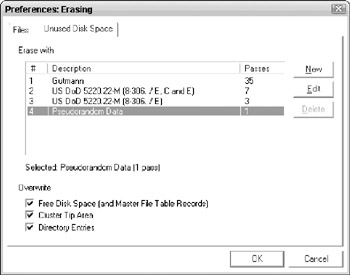
Figure 15-4: Eraser overwrites unused disk space in a single pass by default. -
Click OK to save your changes.
Erasing a File with Eraser
Follow these steps to securely erase a file with Eraser:
-
Select Start → Computer.
-
Browse the folder that contains the file you want to securely erase.
-
Right-click the file and select the Erase option, as shown in Figure 15-5.
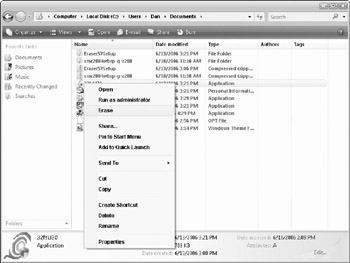
Figure 15-5: To erase a file permanently, select Erase from the shortcut menu in Windows Explorer. -
When the Confirm Erasing dialog box appears (see Figure 15-6), click Options. This opens the Preferences: Erasing window, allowing you to configure (if necessary) specific erase settings for the file that you are currently erasing.

Figure 15-6: The Confirm Erasing dialog box allows you to configure specific erasing settings and confirm that you want to permanently erase a file. -
Select your preferred erasing method for this file, and click OK.
-
On the Confirm Erasing dialog box, click Yes. The Eraser dialog box shows the progress of the overwriting process, as shown in Figure 15-7.
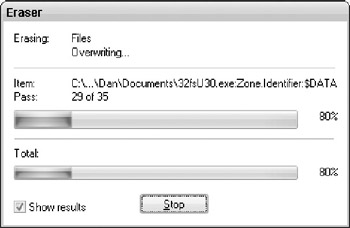
Figure 15-7: Eraser overwrites files with 35 passes by default. -
When the erasing process has finished, the Eraser Report window outlines information about the process, as well as the details of any errors, as shown in Figure 15-8. If necessary, click Save As to save details of the report to a text file. Otherwise, click Close.
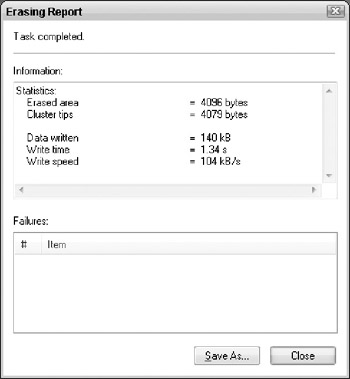
Figure 15-8: The Erasing Report window lets you know whether the erasing process was successful.
If you want to continue to use the Recycle Bin as a temporary storage location for deleted files, by all means do. With Eraser installed, you can right-click the Recycle Bin icon on your desktop at any time and select Erase Recycle Bin (rather than Empty Recycle Bin) to securely delete its contents, once and for all.
It may not seem necessary, but allowing Eraser to overwrite your system's unused disk space is a good idea from a security perspective. Even though a particular area of free space on a partition may not currently hold any data, that doesn't mean that it never did. In fact, it's more than likely that areas of the disk that Windows Vista currently considers to be empty hold at least portions of the files that were once stored there.
To help ensure that all of these bits and pieces of old files are completely removed, Eraser is configured to overwrite free disk space in a single pass. Although using a single pass is not the most secure option, it is used by default in the interest of speed. However, you can select any of the built-in erasing methods as alternatives. You can even specify your own custom settings (like overwriting data nine times using a particular set of patterns) if that's what you prefer.
When installed, Eraser automatically creates and schedules a new job that erases free space on drive C: every day at 12 A.M. To view or change the details of this job, click the Scheduler button in the Eraser window and then right-click the job and select Properties, as shown in the following figure.
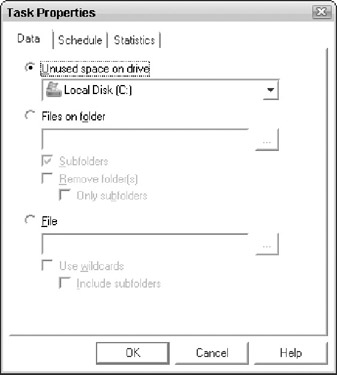
From the Task Properties window, you can change what is erased on the Data tab, the time and frequency of the job on the Schedule tab, and review details pertaining to each time the job has run on the Statistics tab.
If your hard disk includes more than one partition on which you want to erase free space from all drives as part of this scheduled job, select the Local Hard Drives option from the Unused Disk Space On Drive menu on the Data tab. When the Local Hard Drives option is selected, the unused disk space on all partitions is overwritten, instead of free space on drive C: alone.
Alternatively, you can create new scheduled tasks for Eraser by selecting File → New Task and then configuring settings to meet your needs. You can run a scheduled task at any time by right-clicking its entry on the Scheduler tab and selecting the Run option.
EAN: 2147483647
Pages: 135