Securing Internet Explorer
The development of high-speed Internet connections has given rise to a whole slew of new and dynamic web technologies and with them, the forces of evil (so to speak). In fact, in many cases users need to do nothing more than visit a web site programmed to include malicious code in order to find their computer infected by threats like Trojan horse programs, spyware, relentless pop-up advertising windows, and even cookies that track their every move on the Internet for (primarily) market research purposes. In effect, the hacking, cracking, and general bad guy communities online have taken advantage of the usability features of web browsers to infect and infest computers with a wide variety of objects that present very real risks to the security and privacy of Internet users.
Perhaps the worst thing about browser-based threats is that as a user, you really don't need to do anything more than click a (seemingly) harmless link or open the wrong web page to end up with a computer rife with security and privacy threats. Unfortunately, these browser-based threats tend to sneak by not only antivirus software packages, but also personal firewall programs. With the majority of Windows computers infected by some form of malware (AKA malicious software), the security and privacy risks to the web surfers of today are both very real and incredibly common. With that in mind, it's absolutely imperative that you take the steps necessary to configure your browser so that the threats posed by web-based pests don't put the security of your PC and your own personal privacy at risk.
As the native web browser included with Windows Vista (as well as previous Windows versions), it's little surprise that Internet Explorer is the most popular web browser in use on the Internet. Where once Netscape Navigator was a surfer's browser of choice, Internet Explorer has firmly established its dominance amongst the web surfing public - for better or worse.
As the most popular web browser in use, Internet Explorer has also become the prime target for all manner of security-related threats. This is especially true of malware objects, which have found their way onto the majority of Windows systems by way of (historically) lax security settings in Internet Explorer. With support for all major web-scripting languages, interactive components like ActiveX controls, and its own Java virtual machine, Internet Explorer has arguably been the perfect vehicle for malware developers looking for a way to infect and infest Windows users' PCs. Effectively, those aiming to compromise the security of Windows systems made Internet Explorer's focus on usability as a gateway to compromise system security and user privacy. Thankfully, Microsoft recently made a newfound commitment to system security and developed a number of improvements to Internet Explorer with the release of IE7.
To its credit, Internet Explorer is a highly configurable web browser that includes a number of helpful and effective security-related features and components. These include the capability to:
-
Divide web sites into different web content zones, and apply different security-related settings to each.
-
Configure privacy options globally, or for individual web sites.
-
Prevent browser pop-up windows, and manage add-on components designed to extend the capabilities of Internet Explorer.
-
Protect against phishing-related threats.
Each of these Internet Explorer security and privacy features is explored in more detail in the following sections.
Configuring IE Zone Security Settings
One of the most powerful security features available in Internet Explorer is the ability to categorize web sites into what are referred to as web content zones. Internet Explorer has four of these zones,
three of which you can customize to include the sites you specify. The benefit of this zone-based approach is that you can configure different zones to different levels, applying a set of security settings to all sites that are members of the zone. This enables you to place web sites with high potential risk factors into a zone with very restrictive security settings, and place sites you consider safe into zones with more permissive settings.
The four Internet Explorer web content zones include:
-
Internet. The Internet zone is the default web content zone in which all sites that you do not specifically add to other zones reside. The default security level assigned to sites in the Internet zone is Medium-high.
-
Local intranet. The Intranet zone is a special zone designated to all web sites that reside on your private network. For example, if you have a web server running on a computer on your home network, it's considered part of the Local intranet web content zone. The default security level assigned to sites in the Local intranet zone is Medium-low.
-
Trusted sites. The Trusted sites zone is a manually configured list of web sites and domains that you explicitly trust. For example, you might add your bank's web site address to this list, as well as others like the address of your web mail provider, preferred online news sources, and other trusted sites you visit frequently. The default security level assigned to the Trusted sites zone is Medium.
-
Restricted sites. The Restricted sites zone is a manually configured list of web sites and domains that you do not trust. All less secure browsing features are disabled when you visit a site on this list. The default security level assigned to the Restricted sites list is High.
Internet Explorer enables you to assign one of four different pre-configured security levels for any of its web content zones, or to define your own custom settings. The four pre-configured security levels that you can assign to web content zones include:
-
Low. This is the least secure level that you can configure for a web zone, but also the most functional. Minimal safeguards and warning prompts are provided at this level, and most types of content from sites are downloaded and run without issue.
-
Medium-low. This security zone level is effectively the same as the medium level, but with fewer prompts. Most types of content are downloaded and run without issue, although unsigned ActiveX controls are not downloaded. This level is most appropriate for the Local intranet zone.
-
Medium. This security zone level tries to strike a reasonable balance between browsing functionality and security. This level prompts the user before potentially unsafe types of content are downloaded, and never downloads unsigned ActiveX controls. This setting is most appropriate for the Trusted sites zone.
-
Medium-high. This level prompts the user before potentially unsafe types of content are downloaded, and never downloads unsigned ActiveX controls. This setting is most appropriate for the Internet zone.
-
High. This security zone level is the most restrictive from a security standpoint, but also the least functional. All less-secure features are disabled at this level in a bid to stop dangerous content from infecting or impacting your system. This setting is most appropriate for the Restricted sites zone.
Although the pre-configured security level settings typically meet the needs of most users, custom level settings can also be assigned to any zone. To define custom level settings for a zone, select the zone's icon and then click the Custom Level button. This opens the Security Settings window, as shown in Figure 5-1.
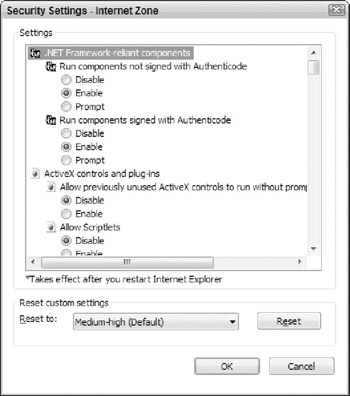
Figure 5-1: Configuring custom security settings.
When you configure custom settings for a web content zone, the ability to choose a new security level via the slider tool is disabled. However, you can return to any site's default settings (and regain access to the security level slider) at any time by selecting the zone in question and clicking the Default Level button.
As a general rule, you do not need to change the security level settings associated with a given web content zone when using IE7. Instead, add specific web sites to a suitable web content zone. For example, add a site that you trust (http://www.google.com, for example) to your Trusted sites list, and add potentially dangerous sites (like http://www.coolwebsearch.com) to your Restricted sites list. These sites then inherit the security settings applied to its parent zone.
Follow these steps to add a web site to your Trusted sites list:
-
Click Start → Internet Explorer → Tools → Internet Options → Security.
-
On the Security tab (as shown in Figure 5-2), click Trusted Sites, and then click the Sites button.
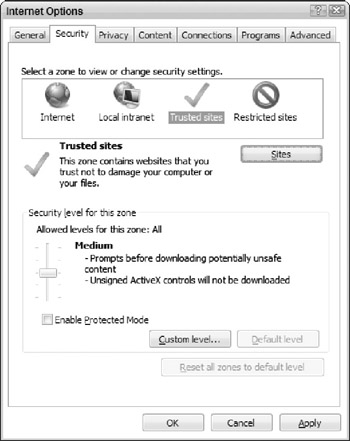
Figure 5-2: The Internet Explorer Security tab. -
In the Trusted sites window, enter the address of the trusted web site in the Add This Website To The Zone text box, as shown in Figure 5-3. Click Add.
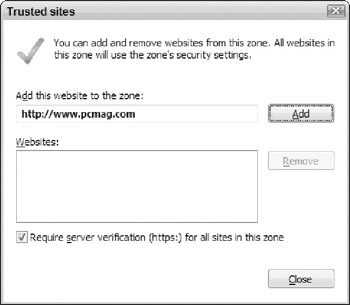
Figure 5-3: Adding a web site to the Trusted sites web content zone. -
Add additional sites to the Trusted sites zone as necessary, and then click Close once complete.
| Note | You can add web sites to your Restricted sites list in exactly the same manner you add others to the Trusted Sites zone. However, the process of individually adding each and every site that you consider dangerous is a huge undertaking. Thankfully, a utility named IE-SPYAD2 can do all of the dirty work for you. IE-SPYAD2 is a tool that adds a comprehensive list of web sites and domain names associated with online advertisers, marketers, and malware developers to the Internet Explorer Restricted sites list. This tool is free, and the list is updated with new site and domain details on a regular basis. You can download IE-SPYAD2 for free from http://www.spywarewarrior.com/uiuc/resource.htm. |
Protecting your Windows Vista system from the dangers associated with malware objects is not a matter of configuring web browser security settings alone. Every Windows Vista system should also have a suitable antimalware program installed to remove malware threats as they're discovered - or better still, prevent them for finding their way onto your PC in their first place. You'll learn more about the techniques and programs used to fight malware threats in Chapter 10.
Configuring IE Privacy Settings
The capability to completely block access to potentially dangerous web sites by adding them to the Restricted sites web content zone is great, and certainly helps to improve Internet Explorer (and by extension Windows Vista) security when used correctly. However, you also need to give some serious thought to your personal privacy when surfing the web - specifically about whether you should allow the sites you visit to identify you, and whether you should allow those sites to collect certain types of information. A banner ad displayed on a web page may seem harmless enough, but it's not uncommon for online advertisers to place a special file (known as a cookie) on your computer to track the sites you visit for marketing or research purposes.
Internet Explorer includes three main features to improve your personal privacy online. These include:
-
Configurable privacy settings that enable you to control how your computer deals with cookies. Cookies are files that web sites create (and store on your computer) that often contain information about your personalization preferences for web sites, but can also include username or e-mail address information. It's important to recognize that the vast majority of cookies are not malicious - they're often required to visit secure sites like those associated with online banking, for example.
-
Privacy alert messages that appear when you attempt to access a site that doesn't meet the privacy criteria you've configured.
-
The capability to view a web site's P3P privacy policy. Many web sites now include P3P documents that outline exactly how they use any information that they collect when you access the site, or exactly what details are stored in their cookies.
Follow these steps to configure Internet zone privacy setting in Internet Explorer:
-
Click Start → Internet Explorer → Tools → Internet Options → Privacy.
-
The Privacy tab displays details of the current security level, as shown in Figure 5-4. Use the slider to configure a higher security level according to your preferences. As a general rule, do not set the Internet zone's privacy settings any lower than Medium.
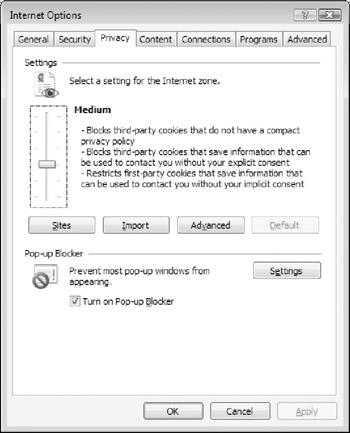
Figure 5-4: The Internet Explorer Privacy tab. -
If you don't feel that any of the Privacy tab's pre-defined settings meet your needs, you can also click the Advanced button to define custom settings as shown in Figure 5-5.
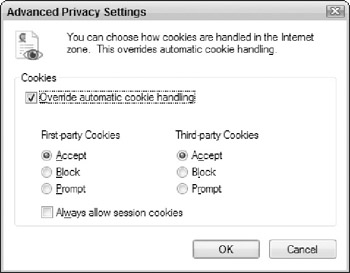
Figure 5-5: Configuring Advanced Privacy Settings.
| Note | Most of the major online advertising and marketing entities have designed sites such that their cookies are allowed even if you configure the Internet Explorer privacy option to the High setting. If you absolutely want to ensure that your computer does not receive cookies from a certain web site or online advertiser, then block its address on the Per Site Privacy Actions screen accessible via the Sites button on the Privacy tab. |
Follow these steps to allow or deny cookies from a particular web site:
-
Click Start → Internet Explorer → Tools → Internet Options → Privacy.
-
Click the Sites button. At the Per Site Privacy Actions screen, enter the web site address or domain name from which you want to allow or deny cookies in the Address Of Website text box.
-
With the web site address or domain name entered, press the Block or Allow button. This adds the site to your Managed Web sites list, as shown in Figure 5-6. Click OK when you add all sites you want to allow or block.
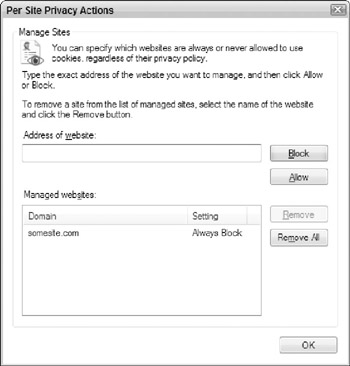
Figure 5-6: Blocking cookies from a web site.
| Caution | If you configure Internet Explorer's privacy settings to block all cookies, you may not be able to access secure web sites that require your computer to accept cookies in order to function. To block most cookies, configure your web browser to use the High privacy setting, and then click the Advanced button to add individual web sites or domains for which cookies should always be allowed, such as your online banking web site. |
Follow these steps to view a web site's privacy policy settings:
-
Click Start → Internet Explorer. Browse to a web site of your choice. The web site visited in this example is the P3P Public Overview web page at http://www.w3.org/P3P.
-
Click Page → Web Page Privacy Policy. This opens the Privacy Report dialog box, as shown in Figure 5-7.
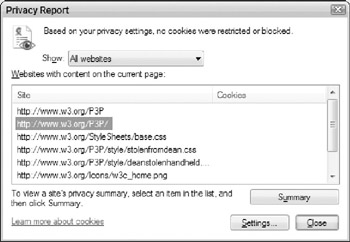
Figure 5-7: The Internet Explorer Privacy Report dialog box. -
Click the address of the web site in this list and then click Summary to view the Privacy Summary document for the site, as shown in Figure 5-8. The summary provides key details on how the site collects and users information about its visitors.
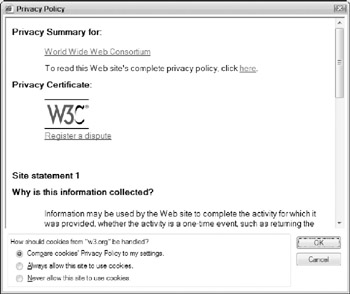
Figure 5-8: Reviewing a web site's Privacy Summary.
| Note | Although it would be great if every web site published Privacy Policy information, the vast majority of sites still do not - in other words, it's not unusual to visit a web site with Internet Explorer and then receive a "Could not find a privacy policy for" message when you select the Page → Web Page Privacy Policy menu option. For more details about Privacy Reports and the P3P project, visit http://www.w3.org/P3P. |
Managing Access to Web Content
As great a resource as the Web is, it certainly contains no shortage of potentially offensive content. From sites that include inappropriate language and violent content to those that contain materials of a sexually explicit nature, even a basic web search can lead you to pages that many people find inappropriate.
To help address this issue and give you more control over the types of web sites that Internet Explorer users can access, Internet Explorer includes Content Advisor settings. These settings (which are effectively disabled by default) enable you to control the types of content that users can gain access to according to defined levels. For example, you can configure Content Advisor settings to allow users to access web sites that contain mild expletives, while denying them access to sites containing graphic depictions of sex, violence, or nudity.
To control access to potentially offensive web sites, Internet Explorer's Content Advisor feature relies on what are known as content ratings. By default, Internet Explorer includes the built-in ratings capability that the Internet Content Rating Association (ICRA, formerly known as RSACi) supplies. However, you can also install ratings from other Internet rating systems to better suit your specific content filtering needs.
Beyond simply filtering out potentially offensive content, the Internet Explorer Content Advisor settings also allows you to define lists of approved sites (ones that are never subject to filtering settings), and protect settings with a supervisor password to ensure that other users cannot make changes to the filtering settings that you've configured.
Follow these steps to configure Content Advisor settings in Internet Explorer:
-
Click Start → Internet Explorer → Tools → Internet Options → Content.
-
On the Content tab's Content Advisor section, click Enable.
-
When the User Account Control dialog box appears, click Continue.
-
On the Ratings tab (shown in Figure 5-9), click one of the category listings (such as Language) and then adjust the slider to specify the types of content in that category that users are allowed to view.
-
Click the Approved Sites tab, shown in Figure 5-10. If you add a site's address in the Allow This Web Site text box and click Always or Never, the setting you choose applies to the site, regardless of the settings configured on the Ratings tab.
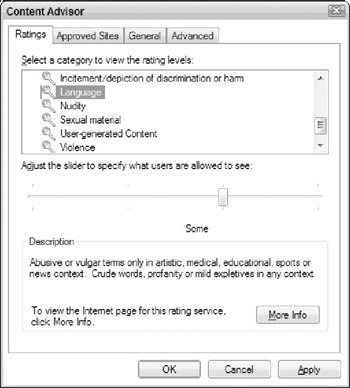
Figure 5-9: Configuring Content Advisor Ratings in Internet Explorer.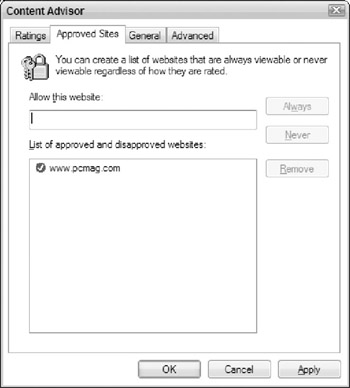
Figure 5-10: Configuring the Approved Sites settings in Internet Explorer. -
Click the General tab as shown in Figure 5-11. Configure settings in the User options section according to your preferences, and then click the Create Password button in the Supervisor section to configure a password that you will need to enter when you want to make changes to Content Advisor settings or allow users to access a restricted web site.
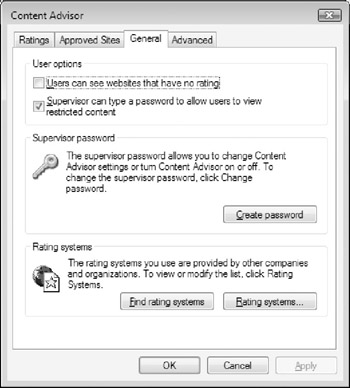
Figure 5-11: Configuring the General Content Advisor settings.
| Cross Reference | Although the Internet Explorer Content Advisor settings can help you to regulate what users can access on the web, these capabilities are no match for dedicated content filtering techniques like the new Parental Control feature built into Windows Vista. You'll learn more about making the Internet safer for your family with the help of parental controls in Chapter 6. |
Internet Explorer Security Features
One of the easiest ways to improve the security of Internet Explorer is to ensure that you're running the latest version, IE7. This shouldn't be difficult, because it's already built into Windows Vista. IE7 includes a number of security-related features and capabilities that were originally introduced in IE6 once Windows XP Service Pack 2 was installed, making it less susceptible to threats like malware and providing you with more control over how your browser responds when the sites you visit attempt to download elements like files or ActiveX controls.
Many of the core security features integrated into IE7 are behind-the-scenes in nature and require little in the way of user interaction. However, there are four key features that you should be familiar with. These include:
-
The capability to manage Internet Explorer add-ons.
-
A new integrated pop-up window blocker.
-
The new information bar that informs you when a site tries to download a file, install an ActiveX control, or display a pop-up window on your PC.
-
Phishing Filter, a feature designed to minimize the chance that you'll fall prey to phishing threats.
Each of these features is explored in more detail in the following sections.
MANAGING BROWSER ADD-ONS
One of the most powerful features of Internet Explorer is that users can extend and enhance IE7 capabilities by installing any of hundreds of different third-party browser add-ons. For example, if you install Adobe's Acrobat Reader software, its browser add-on component makes it possible to open and view PDF files from within the Internet Explorer browser window. Other add-ons are designed to add useful features to your browser by way of installing new toolbars. For example, you can use the Google toolbar to perform Internet searches without visiting the Google web site first, and you can highlight the term you've searched for in a resulting page, to easily find the information you're looking for.
Although there's no denying that adding a wide range of new features and capabilities to Internet Explorer is a very powerful option, not all browser add-ons are helpful. In fact, many Internet Explorer add-ons have more malicious intents in mind such as monitoring your web surfing activities, collecting personal information about you, or even displaying annoying pop-up ads. In some cases, these add-ons quietly hide in the background and go about their business in an almost completely transparent manner. In others, they add their own dedicated toolbar to your Internet Explorer window, and appear as though they allow you to perform some useful function (like performing and saving web searches).
It can be difficult to determine whether a browser add-on is legitimately useful or malicious in nature, and sometimes even tougher to figure out which add-ons are actually installed and running on your system. The appearance of a new toolbar (that you didn't purposely install) in Internet Explorer is usually a sign that malware or some other pest has found its way onto your PC. Thankfully, the Manage Add-ons feature can help you to determine which add-ons are present on your system, while allowing you to selectively enable, disable, or even update individual items.
To view the Internet Explorer add-ons installed on your system, click Tools → Manage Addons → Enable or Disable Add-ons. The Manage Add-on window displays a list of all browser addons that have been installed, giving you information about the add-on's name, publisher, status, and file details (see Figure 5-12).
Some add-ons are fairly easy to recognize, like the Shockwave Flash Object - if this is present in your browser, you almost certainly installed the Adobe Flash plug-in to view Flash-based web sites. You may find it more difficult to determine the origin or purpose of other objects, especially in cases where a long number (like {}, a number known as a CSLID) is shown as the add-on name. To enable or disable an add-on, simply click its name and select the appropriate option from the Settings section of the Manage Add-ons window, as shown in Figure 5-13. As a general rule, you should disable any add-on that you don't recognize or feel completely comfortable with until you can gather more information about any potential threats that it may pose. If you find that you've disabled a legitimate tool that you want or need to use, you can always re-enable it from the Manage Add-ons window as a later time.
| Note | Windows Vista includes a safer version of Internet Explorer with all add-on components disabled by default. To open it, select Start → All Programs → Accessories → System Tools → Internet Explorer (No Add-ons). |
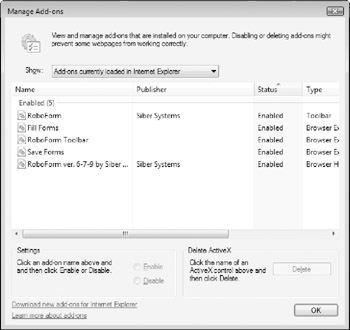
Figure 5-12: The Internet Explorer Manage Add-ons window.
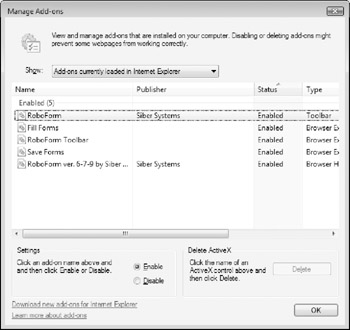
Figure 5-13: Disabling a browser add-on.
A great resource to help you determine whether an Internet Explorer add-on is legitimate is the CLSID/BHO List/Toolbar Master List available at the CastleCops web site at http://www.castlecops.com/CLSID.html. You can use this site to search for browser add-ons by name or CSLID number. When the name or CLSID is found, the site displays details about the add-on, including whether it's a legitimate tool or one that represents a security/privacy threat to your PC (as is often the case with add-on malware objects).
| Cross Reference | The Internet Explorer capability to manage add-ons is helpful, but it's important to note that simply disabling an add-on doesn't completely remove it from your Windows Vista system. Although they may no longer present a viable threat while disabled, you should still take the steps necessary to remove potentially dangerous add-ons from your computer by uninstalling them completely (using Add Or Remove Programs in Control Panel), or employing the services of an antispyware program. You'll learn more about dealing with malware-related threats in Chapter 10. |
BLOCKING POP-UP WINDOWS
Internet marketers and advertisers are always dreaming up new ways to gain exposure for their various products and services on the Internet. Although advertising methods like banner ads are now widely accepted (and basically expected) as a necessary evil on free web sites, ads that pop up in their own smaller browser windows are still largely reviled. In some cases, these pop-up ads are no more than an annoyance, easily dismissed by simply closing the offending browser window. In other cases, however, the onslaught of pop-up ads is relentless - even if you close one such window, another two may appear in its place.
The pop-up windows that close cleanly are a legitimate (although generally considered annoying and intrusive) form of online advertising, and can be easily controlled. You can configure IE7 to block all pop-up windows from opening, or to only allow pop-ups from certain web sites. A number of third-party Internet Explorer add-ons also include pop-up blocking capabilities, such as the Google and Yahoo! toolbars. The pop-up blocker you choose to use is largely a matter of personal preference - for the most part, they all perform the same basic function. With IE7, the pop-up blocker feature is enabled by default. Select Tools → Pop-up Blocker → Pop-up Blocker Settings to configure pop-up blocker settings, as shown in Figure 5-14.
Although a pop-up blocker may put an end to the annoyance that is pop-up advertising, it's important to recognize that this capability offers little in the way of any security-related functionality. For example, if your Windows Vista system is infected by malware designed to display pop-up windows as part of its programming, simply blocking the pop-up doesn't mean that your computer is any more safe or secure. In fact, chances are good that the malware component (now sans pop-ups) is still doing its thing silently in the background, while continuing to represent a security and privacy threat to you and your PC.
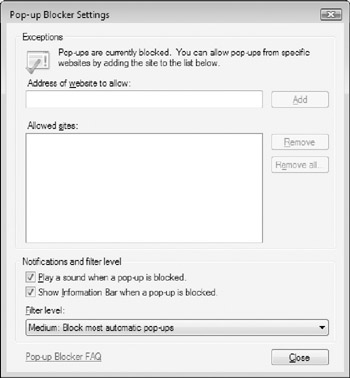
Figure 5-14: Configuring the Internet Explorer Pop-up Blocker Settings.
Although there's no denying that pop-up blockers are a helpful solution to an annoying problem, always keep in mind that these tools are designed to stop an annoying behaviour, not remove or prevent security threats from your PC. Like sweeping dirt from a floor under a rug, don't rely on a popup blocker to solve what may actually be the signs of a bigger problem, such as a spyware infection. As annoying as they may be, a relentless onslaught of browser pop-up windows is one of the best clues that something more dark and dangerous may be lurking on your PC.
THE INFORMATION BAR
The information bar is a visual feature that appears just below the Internet Explorer address bar for the purpose of displaying information about downloads, blocked pop-up windows, potential security risks, and more. For example, if you have turned on the Internet Explorer pop-up blocker and a site attempts to launch a pop-up window, the information bar appears and displays a message alerting you to the fact that a pop-up was blocked.
The information bar keeps you informed about potential risks encountered when you surf the web with Internet Explorer. Whenever this bar appears, you can click the message it contains to display a shortcut menu with additional options, such as allowing the stated action or configuring related settings. An example of this shortcut menu is shown in Figure 5-15.
![]()
Figure 5-15: An example of the shortcut menu that appears when you click the Internet Explorer information bar.
Ultimately, the Internet Explorer information bar feature informs you of potential security risks to your PC as you browse the web. It's important to note, however, that the information bar is just that - a feature that gives you with information about potential risks, but one that also leaves you in control of the actions taken as a result of the details it gives. The information bar does not stop you from downloading a potentially dangerous file or ActiveX control if you explicitly tell it to allow the action - in other words, keep an eye on the details that the information bar provides, read the messages you encounter carefully, and then make an informed decision on how you want to proceed.
PHISHING FILTER
Phishing Filter is a new security feature in IE7. Phishing (pronounced like fishing) is a technique whereby a malicious web site attempts to steal personal details like username and password combinations under the guise of being a legitimate web site. For example, a typical phishing attempt begins with an e-mail message (purporting to be from eBay or PayPal) that suggests that you need to log on to the web site to confirm your account details. When you click the link supplied in the official-looking message, you're actually taken to a bogus web site that looks entirely legitimate. If you submit your username and password details, you've effectively supplied a malicious user with everything they need to access your account. In other words, your personal information has been phished.
The IE7 Phishing Filter attempts to limit your exposure to phishing threats in three primary ways:
-
It maintains a list of safe sites on your PC, and compares all sites you visit to this list.
-
It alerts you to any suspicious phishing-like characteristics on the web sites you browse - for example, if Phishing Filter detects that a site is impersonating eBay, it alerts you to the threat.
-
You can configure the Phishing Filter to send details of suspect sites (with your permission) to Microsoft for further analysis.
In its default configuration, Phishing Filter automatically checks all of the web sites you visit for phishing-like characteristics. If you turn it off, Phishing Filter displays a notification icon on the status bar that you need to click to check whether a web site exhibits any phishing-like traits. If you want to change the Internet Explorer Phishing Filter settings, you can do so at any time by selecting Tools → Phishing Filter → Phishing Filter Settings. As shown in Figure 5-16, Phishing Filter settings are configured from the Advanced tab under Internet Options.
You can also use the Phishing Filter menu item to check the phishing status of the web site you're currently viewing by selecting Tools → Phishing Filter → Check This Website. That opens a dialog box similar to the one shown in Figure 5-17.
If you want to get more involved in the fight against phishing web sites, IE7 makes it easy. If you happen upon a site that appears to be a little, well, "phishy", head to Tools → Phishing Filter → Report This Website and enter details about the site for analysis.
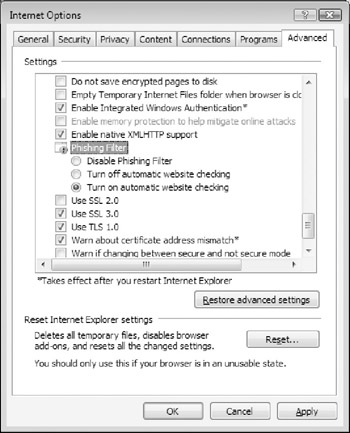
Figure 5-16: Configuring the Phishing Filter settings.
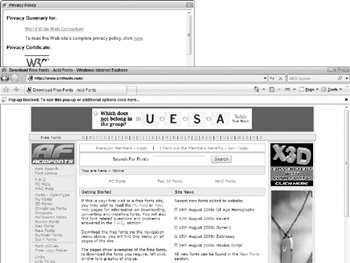
Figure 5-17: Phishing Filter makes it easy to check for phishing-related web sites.
| Caution | If you suspect that details from one or more of your online user accounts have been phished, you should immediately change the password or PIN associated with the account, place a fraud alert on your credit reports, and contact the bank or online merchant associated with the account. For more specific details on phishing threats and how to deal with them, visit http://www.anti-phishing.org. |
EAN: 2147483647
Pages: 135