Chapter 4: Maintaining .NET Framework-Based Applications
Application deployment isn't over once applications have been successfully installed on the target computers. Your applications may receive minor or major updates, new applications may be installed alongside existing applications, and new versions of the Framework may be installed. All of these can present challenges, and you need to be aware of the issues involved.
In this chapter we start by looking at updating applications, using the methods for deployment already discussed in the previous chapters — no-touch deployment, Windows Installer deployment, and deploying a simple collection of build objects, plus a methodology specifically aimed at providing automatic updates to your applications. Then we examine the various scenarios you are likely to encounter when running multiple applications alongside each other, and multiple versions of the Framework.
Upgrading .NET Framework-based Applications
Occasionally, you need to upgrade Framework applications that have already been deployed to the production environment. Typically, applications are upgraded in order to:
-
Apply bug fixes to remedy problems with your application.
-
Provide enhancements to existing features.
-
Provide new features or capabilities.
In some cases you will decide to upgrade an application to take advantage of the new functionality of a new release of the Framework. For example version 1.1 makes some enhancements in the area of code access security. You may wish to adjust your code to take advantage of this.
One of the major advantages of the .NET architecture is that it provides comprehensive support for modifying or upgrading applications after they have been deployed.
Planning an Upgrade Strategy
In many cases you will upgrade your solutions using similar mechanisms to those with which you originally deployed your application. For example, if you originally packaged your application in a Windows Installer file, then you will typically upgrade application files with an updated Windows Installer file or a Microsoft patch (.msp) file, managed by Windows Installer. If you distribute that solution with SMS, you will often re-deploy your solution using the same approach. However, there will undoubtedly be some situations a different deployment strategy is appropriate for an upgrade. For example, it is possible that a change to a configuration file or Web file might best be implemented simply by copying the new version, even though the application might originally have been packaged in a Windows Installer file and distributed with Active Directory Group Policy for software deployment.
| Note | Chapter 2, "Planning the Deployment of .NET Framework-based Applications" provides information to help determine a deployment strategy for your application. You can also use this information to help you choose the correct deployment strategy for your upgrade. |
Levels of Upgrade
Your upgrade strategy may vary depending on the scale of the update. Upgrades are categorized into three different levels:
-
Major upgrades. These contain new features or significant changes. A major upgrade of Appv1.0 would generally be known as Appv2.0.
-
Minor upgrades. These contain minor product changes. A minor upgrade of Appv1.0 would typically be known as Appv1.1.
-
Small updates. These contain patches or bug fixes. Typically a version number will not be incremented by a small update.
You can use the version numbers of applications to manage certain aspects of their deployment. For example, in some cases there is a particular order in which updates to an application need to be applied. By defining version numbers it is easy to differentiate between version numbers and therefore define the appropriate order for updates. You may also use version numbers to ensure that older versions of an application are not installed over newer ones, or that an upgrade removes previous versions of an application. This is most easily achieved if you use Windows Installer packages for your applications and application updates. For more details, see the Windows Installer section later in this chapter.
Upgrade Options
There are four major choices when it comes to deploying an application upgrade. These are:
-
No-touch deployment
-
Windows Installer package deployment
-
Deploying a simple collection of build outputs
-
Configuring Automatic Updates
We will look at each of these in turn:
No-Touch Deployment Upgrades
One of the main benefits to an application using no-touch deployment is how easy it is to upgrade the application. If you change any files on the Web server, the next time the client launches the application, it will automatically update, downloading the newer files as needed. This happens because the .NET Framework automatically checks the timestamp of files that are called, to see if they need to be downloaded again or if they can simply be run from the assembly cache download folder or the Temporary Internet Files folder.
You have two options for updating an application deployed by no-touch deployment:
-
Manually copy any modified files onto the Web server.
-
Recompile the application with the build output set to be the production Web server.
Generally the first option is most suitable when just a few files are modified. However, for more significant changes, it often is more sensible to simply redeploy the application by recompiling it.
Application code is automatically updated when the user makes a request back to the Windows Form. The .NET Framework will automatically check the timestamp of the assembly to see if it needs to download again or if it can simply be run from the user's assembly download cache.
Although issuing updates using a no-touch deployment method is generally very straightforward, clients may potentially have problems during an upgrade. If you update the directory while clients are using the application, it is possible that a client could download old code initially and then attempt to download further code which has since been updated. This will lead to unpredictable results and will often cause your application to fail. To get around this problem, the simplest solution is to deploy any significant updates to a separate directory on the Web server and when deployment is complete, change any pointers to the new location.
Upgrading Using Windows Installer
Windows Installer offers the most comprehensive solution for updating .NET-based applications. It contains some functionality specifically aimed at solving some of the problems of updating applications, including version control.
Windows Installer Upgrade Strategies
If you are planning to upgrade your application using Windows Installer technology, you have three choices for implementing the upgrade:
-
Create a completely new deployment project and add your project outputs and other files, just as you did for the first release of the application.
-
Upgrade the existing deployment project by ensuring changes to your application are reflected in the setup, and then rebuild that version.
-
You can build a patch package (.msp) and apply it to the currently installed application.
We will discuss each of these in turn:
Creating a New Deployment Project
In cases when you are creating a significant change to an application, it may be most appropriate to create a brand new deployment project rather than trying to modify an existing one. In some situations the changes to your deployment project will be so substantial that it is easier to start again than try to modify what is already there. However, there are some issues with creating a completely new project in this way.
Probably the most significant is the relationship between your new deployment project and the previous one. Windows installer uses various versioning and upgrade properties and GUIDs to associate Windows Installer files with applications that are already installed. If you create a new setup project, then Visual Studio .NET assigns new GUIDs, which prevents upgrade management features (such as removing earlier versions and preventing earlier versions from installing over later ones) from working. You can, of course, apply the original GUIDs to your new setup project, but this is an error-prone process, because of the format of the GUIDs.
The actual process of creating a new deployment project for a latest version of the application is no different to creating a deployment project for the first version. For more details on creating deployment projects, see Chapters 2 and 3 of this guide.
Updating an Existing Deployment Project
For most minor upgrades and many major upgrades, updating an existing deployment project is easier than creating a completely new one. For example, you will already have designed the user interface, registry settings, file associations, custom actions, launch conditions, and so on, for your original application. If you are simply shipping new versions of your executable file or DLLs, you will not want to step through these processes again. Instead, you can simply update your project output or individual files, and those other features that do not need changing will remain in place. In this case the correct GUID is associated with the application, and so upgrade management features should work properly without you having to modify the package.
Patch Packages
Patch packages, as the name suggests, are most suitable for minor upgrades or small updates. The main advantage of a patch package over a Windows Installer package (new or modified) is that patch package only contains changes to your application and is therefore normally much smaller. This can be particularly useful when the original application is very large or in low-bandwidth environments.
Windows Installer can use a patch package to patch both local and administrative installations. A patch package is a storage file, similar to a descriptor file, and has an .msp file name extension and its own class identifier (CLSID). A patch package does not include a database like a regular installation package. Instead it contains at minimum one database transform that adds patching information to the database of its target installation package. The installer uses this information to apply the patch files that are stored in the patch package.
Visual Studio .NET does not currently support patching an installed application using Windows Installer technology. You need to use Windows Installer Platform SDK tools (such as Orca.exe and MsiMSP.exe), or third-party utilities, to create patch files that can be applied to an application that was originally installed with a Visual Studio .NET setup project.
Developers create a patch package by generating a patch creation file and using the Msimsp.exe tool to call the UiCreatePatchPackage function in Patchwiz.dll. Both Msimsp.exe and Patchwiz.dll are provided in the Windows Installer SDK.
Because the application of a patch to a Windows Installer package results in a new .msi file installing much of the original code, the new .msi file must remain compatible with the layout of the original source. This means that when you create a patch package you must follow the following guidelines:
-
Use an uncompressed setup image to create a patch. For example, an administrative image or an uncompressed setup image from a CD. This is because the patch creation process is unable to generate binary patches for files compressed in cabinets.
-
Do not change the primary keys in the file table between the original and new .msi file versions.
-
Do not move files from one folder to another.
-
Do not move files from one CAB file to another.
-
Do not change the order of files in a CAB file.
-
To create a patch package
-
Create an uncompressed setup image from either a CD or administrative installation.
-
Copy that uncompressed setup image to a second location, creating a second uncompressed image.
-
Add the additional files, components and settings to the second uncompressed image.
-
Create a Patch Creation Properties File (*.pcp). (A blank patch creation properties file, template.pcp, is provided with the Windows Installer SDK.)
-
Use the Orca.exe tool to modify the .pcp file.
The following database tables are required in every .pcp file:
-
Properties Table
-
ImageFamilies Table
-
UpgradedImages Table
-
TargetImages Table
The following are optional tables:
-
UpgradedFiles_OptionalData Table
-
FamilyFileRanges Table
-
TargetFiles_OptionalData Table
-
ExternalFiles Table
-
UpgradedFilesToIgnore Table
-
-
Run the Msimsp.exe tool (also in the Windows Installer SDK) using the following command line: Msimsp.exe -s <pcpfilepath> -p <mspfilepath>.
-
At this point you now have an .msp file that is the difference between the first and second uncompressed installation images.
To apply the patch package to a local installation the following command line can be used:
msiexec /p <*.msp> REINSTALL=ALL REINSTALLMODE=omus
For more information on patch packages, see "A Small Update Patching Example" on MSDN.
For more information on Windows Installer SDK tools, see the Windows Installer Development Tools portion of the Platform SDK on MSDN.
For more information on .pcp file properties see the UpgradedImages Table (PATCHWIZ.DLL) portion of the Platform SDK on MSDN.
Versioning Installer Packages
The versioning features of Windows Installer files provide solutions to many of the issues associated with managing and upgrading multiple versions of the same application. By versioning your Windows Installer packages, you can ensure that older versions of an application are not installed over newer versions, and you can also make sure that previous versions of an application are removed when a new one is installed.
It is important to note that version numbers on Windows installer packages are maintained separately to version numbers of the applications they install, and can therefore be different. However, to avoid confusion as to which application version is contained within which .msi file, you should consider using the version number of each released application to identify the associated installer. For example, if your application has versions 1.0, 1.5, 1.51, and 2.0, you can use those same numbers for the version property of the Windows Installer file in which they are packaged. This makes it easier for you to determine which installer should be used for which application version.
The full version number of a Framework application is formatted in the following way:
<major version>.<minor version>.<build number>.<revision>
However, Windows Installer will only recognize the first three numbers when differentiating between versions.
Developers that build applications will often just specify the version number to be of the form:
<major version>.<minor version>.*
This causes the build number and revision numbers to be created automatically to reflect the number of days since Jan 1st 2000, and the half the number of seconds since midnight respectively. This kind of versioning is very appropriate when an application is in development, but is often not appropriate for the final build of a particular version.
The versioning properties of Windows Installer files built with Visual Studio .NET 2003 Deployment projects are described in Table 4.1 on the next page.
| Property | Description |
|---|---|
| Version | Represents the version of your Windows Installer file. Because the version property is used by Windows Installer to manage upgrades, you should change this property for each released version of your installer (unless you are creating a small update. When you change the Version property, Visual Studio prompts you that you should also update the ProductCode and PackageCode properties and can automatically update these two other properties for you. However, you will not always want to do so. |
| ProductCode | Specifies a unique identifier for an application, represented by a string GUID. You should update this property when you release a major upgrade version of your application; otherwise, it prevents the DetectNewerInstalledVersion and RemovePreviousVersions properties from working properly. Windows Installer uses the ProductCode to identify an application during subsequent installations or upgrades so no two major versions of an application should have the same ProductCode. To ensure a unique ProductCode, you should never manually edit the GUID — instead, you should use the GUID generation facilities in the ProductCode dialog box available from the Properties window. |
| PackageCode | The package code is a GUID identifying a particular Windows Installer package. The package code associates an .msi file with an application. The PackageCode property is not accessible in the Visual Studio .NET Properties window — instead it is created and managed when you build your setup project. This property manifests itself as the revision number of the file — you can view this revision number on the Summary tab of the properties sheet for your Windows Installer file in Windows Explorer. When you rebuild your project, Visual Studio .NET also changes the PackageCode property for you. |
| UpgradeCode | Specifies a unique identifier that is shared by multiple versions of the same application. The UpgradeCode should be set for the first version and should never be changed for subsequent versions of the application. Changing this property prevents the DetectNewerInstalledVersion and RemovePreviousVersions properties from working properly. (see Note) |
| DetectNewerInstalledVersion | Specifies whether to check for later versions of an application during installation on a target computer. The UpgradeCode and ProductCode are used to determine if a later version is present on the target computer. If this property is set to True and a later version number is detected at installation time, this version is not installed over the later version. |
| RemovePreviousVersions | Specifies whether an installer will remove earlier versions of an application during installation. If this property is set to True and an earlier version is detected at installation time, the earlier version's uninstall function is called. The installer checks UpgradeCode and ProductCode properties to determine whether the earlier version should be removed. The UpgradeCode must be the same for both versions, whereas the ProductCode must be different for the earlier version to be uninstalled. |
Exactly which of these properties you alter will depend to a large extent on the nature of the upgrade you are installing.
| Note | If you modify the UpgradeCode from the value used to install the original version of your application; you cannot use the upgraded .msi file to upgrade that installation. Windows Installer service identifies and manages upgrades for installed applications by the UpgradeCode property. If you change the UpgradeCode in the upgraded Installer package, the Windows Installer service does not upgrade your existing application when you run it — instead, it installs a new application that is separate from the one already present. Consequently, properties such as DetectNewerInstalledVersion and RemovePreviousVersions have no effect. |
Versioning Major Upgrades
Major upgrades are distinguished by a new version number, along with both a new ProductCode property and a new PackageCode. To create a major upgrade, you update the Version property for your Windows Installer file. Visual Studio .NET 2003 then prompts you that the PackageCode and ProductCode properties should also be updated and offers to do this for you. You should accept this offer if you want to create a major upgrade. However, as for all upgrade types, you should never update the UpgradeProperty of your Windows Installer file.
The reason for changing the Version property is to allow Windows Installer to differentiate between different versions of your application. This allows Windows Installer can do that, to manage the order in which updates can be applied. For example, if you create an upgrade to update version 1.0.0 of your solution to 2.0.0, and then you create another upgrade to update version 2.0.0 to version 3.0.0, Windows Installer can enforce the correct order by checking the version before applying the upgrades. You can also prevent the upgrade for updating version 2.0.0 to 3.0.0 from being applied to version 1.0.0.
The reason for changing the ProductCode is to allow Windows Installer to implement features such as automatically removing earlier versions of your application as you install the new version.
Versioning Minor Upgrades
Minor upgrades will have a new version number. A minor upgrade requires that you change both the Version and PackageCode properties, but not the ProductCode or the UpgradeCode. When you change the Version property, Visual Studio .NET prompts you that you should also change the PackageCode and ProductCode and offers to do so for you. You should decline this offer. The PackageCode will still be updated when you rebuild the solution, but the ProductCode (and UpgradeCode) properties will remain unchanged.
| Note | It might seem sensible that changing the version from 1.0 to 1.1 constitutes a minor upgrade whereas changing from 1.0 to 2.0 represents a major upgrade. However, while you will often choose your version numbers to reflect this numbering scheme, the elements of the Version property you change are irrelevant to the type of upgrade you are supplying — the difference between a minor and major upgrade is actually whether the ProductCode property changes as well the Version. |
Because the ProductCode property is not changed, you must adhere to some strict requirements if you are to provide a minor upgrade. For a list of these requirements, see "Changing the Product Code" on MSDN.
Also, because the ProductCode will not have changed for a minor upgrade, you cannot simply run the upgraded Windows Installer file to update your application. If you attempt this, the Windows Installer service detects that the product has already been installed and displays the message "Another version of this product is already installed. Installation of this version cannot continue. To configure or remove the existing version of this product, use Add/Remove Programs on the Control Panel." However, if you run your Windows Installer file from the command line, and provide certain switches, you do not need to use the Add/Remove Programs utility to uninstall the application before running your upgrade. The following is an example of a typical command line that a user (or deployment tool such as SMS) needs to specify to run a minor upgrade without first uninstalling the application:
Msiexec /i d:\MyApp.msi REINSTALL=ALL REINSTALLMODE=vomus
Effectively, this command line reinstalls the existing product, rather than treating it as a major upgrade (because the ProductCode is the same). Crucially, the reinstall is performed with your new Windows Installer package, rather than the original one that will have been cached by the Windows Installer service. The "v" in the vomus switch specifies that the installation should be run from your new source, rather than from the cached Windows Installer file that was originally used to install the application, and it also specifies that your new Windows Installer file should replace the original installer in the cache.
For more information about the command-line switches, see the following topics in the Windows Installer Platform SDK:
-
REINSTALL property
-
REINSTALLMODE Property
Versioning Small Updates
To create a small update, you change the PackageCode property of the installer, but not the ProductCode, the Version, or the UpgradeCode properties. You can create a small update by rebuilding a modified Windows Installer file using Visual Studio .NET. Rebuilding an .msi file with Visual Studio .NET automatically creates a new PackageCode for the installer, regardless of whether you have changed the Version or ProductCode properties.
Because small updates do not change the Version or the ProductCode properties of an installation, you can use them only if your modifications comply with some strict requirements. For a list of these requirements, see "Changing the Product Code" on MSDN.
As with minor upgrades, you cannot simply run a small update and have it replace your existing application. This is, again, because the ProductCode has not changed and Windows Installer detects that the product has already been installed. As for minor upgrades, Windows Installer displays the message "Another version of this product is already installed. Installation of this version cannot continue. To configure or remove the existing version of this product, use Add/Remove Programs on the Control Panel." Again, as for minor upgrades, you can reinstall the application from the command line, using the following syntax:
Msiexec /i d:\MyApp.msi REINSTALL=ALL REINSTALLMODE=vomus
There will undoubtedly be many situations where small updates will not suit your needs. For example, you may want to develop a series of upgrades that can be applied in sequence (which cannot be achieved with small updates because the Version property will not have been changed). In this case, you should consider creating either a major or minor upgrade for your application. Furthermore, if you have made modifications that do not comply with the requirements for retaining the ProductCode property, you cannot create a small update — you should instead create a major upgrade for your solution.
Upgrading Merge Modules
Unlike Windows Installer files, merge modules (.msm files) are not installed on their own. Instead, they are included in Windows Installer files. The components and setup logic you add to your merge module are incorporated with that of the Windows Installer file when the installer is built. Therefore, your merge modules do not interact directly with the Windows Installer service.
If you modify the components you have included in a merge module, you need to:
-
Update and rebuild the .msm file.
-
Make the new .msm file available to developers for inclusion in their .msi files.
The developers who use your merge module then need to replace the previous version with your new .msm file. Because their application has essentially been modified by the inclusion of your new .msm file, they will need to rebuild and redistribute their installer to the production environment in order for changes to take effect. Depending on the nature of the change, the developer should then decide whether this is a major upgrade, minor upgrade, or small update and you will need to update the properties for the Windows Installer package appropriately.
Merge modules have their own versioning properties, independent from .msi files. These are:
-
ModuleSignature. Each released version of a merge module must have a unique ModuleSignature in order to avoid versioning problems when they are added to .msi files. You should never manually edit the GUID portion of this property. Instead you should use the GUID generation facilities in the Module Signature dialog box, accessible from the Properties window in Visual Studio .NET.
-
Version. Each time you update and rebuild your merge module, you should update the Version property.
The Version property is useful for allowing the developer to distinguish between different releases of your merge module. The ModuleSignature property is used by Visual Studio and other installer creation tools to uniquely identify the merge modules when they are incorporated in .msi files.
Upgrading CAB Files
CAB files are used to package .NET managed controls (or ActiveX controls). CAB files are typically referenced from a Web page. They are automatically downloaded, and their controls extracted and installed, by Web browsers. As such, they are not installed as applications with the Windows Installer service. When you update the controls that have been distributed in this way, you will need to rebuild your CAB file. Like .msi and .msm files, CAB files support the Version property. To avoid version conflict, you should update this property for every new release of your CAB.
Distributing Upgrades
As with initial deployment, there are a number of ways in which you can distribute your upgrades. These are:
-
Group Policy functionality of Active Directory
-
Systems Management Server (SMS)
-
Other Methods (including placing files on a network server, Web server or distributing media)
We will discuss each of these in turn:
Group Policy Functionality of Active Directory
If you originally deployed your application using a Windows Installer file and are publishing or assigning software to users or computers using Group Policy, you can redistribute your upgraded application using a similar approach. You can upgrade your applications by:
-
Creating a new msi for your application, modifying an existing msi, or applying a patch package to an existing msi.
-
Using Group Policy Software Installation to specify that your new package is an upgrade to the existing package.
-
Choose whether the existing package should be uninstalled, or whether the upgrade package can upgrade over the existing package. Typically, the uninstall option is for replacing an application with a completely different one. The upgrade option is for installing a later version of the same product while retaining the user's application preferences, document type associations, and so on.
-
Choosing whether or not the upgrade is to be mandatory.
For more information about deploying and updating applications with Group Policy, see the Step-by-Step Guide to Software Installation and Maintenance.
Systems Management Server (SMS 2.0)
If you originally deployed your application using a Windows Installer file by using SMS, you can redistribute your upgraded application using the same mechanism.
To upgrade a Windows Installer application, you need to complete two processes:
-
Create a new image for your application, either by patching the original source files, or by creating a new software package. Then update the package's distribution points to propagate the new version of the source files. Any clients installing the application after you upgrade the source files and update the package's distribution points will install the upgraded application.
-
Upgrade existing clients by creating a new program in the existing package. Then, send an advertisement for this new program to a collection of clients that have installed the original version of the application.
For more information about deploying and updating applications with SMS, refer to the SMS product documentation and the white paper, "Deploying Windows Installer Setup Packages with Systems Management Server 2.0."
Other Methods
There are a number of other methods that are used to distribute upgrades in the form of Windows Installer packages. The following table outlines their uses:
| Method | Description | Comments |
|---|---|---|
| Web/FTP/Network Server | New Installer package (or a patch) is placed on a server and the link sent out to users so they can download it. | If you are creating a fresh or updating an existing msi, you can replace the old files with the new ones, or create a fresh share for the new installation. If you are using a patch package, you can direct the users to a share containing the patch, or in the case of an administrative install, apply the patch directly to the application by using the msiexec command line tool. This will ensure that anyone installing the application later will also be installing the updates as well. |
| | New Installer package or patch package sent using e-mail. | Sending the package or patch by e-mail is not recommended since this increases the workload on your e-mail system and security filters may not allow you to pass certain types of files using e-mail. Instead you should send a link to a location where the user can apply the patch or install the new msi. |
| CD/DVD | New Installer package or patch burned to CD/DVD. | May be the most appropriate method where bandwidth is low. |
Updating a Simple Collection of Build Outputs
If you distributed your application to the production environment as a collection of build outputs and other files, you can generally upgrade your solutions by copying the new build outputs or files to the appropriate locations. However there are some issues you should be aware of when updating a collection of build outputs.
Using Shadow Copy Functionality
The .NET Framework supports shadow copying, a process in which .NET copies each assembly into a temporary shadow copy directory before opening the assembly (.dll or .exe) file. This mechanism gives you the ability to recompile or to re-deploy new versions of assemblies while the application is in use. The new versions of your assemblies will be used the next time the user starts the application.
In ASP.NET applications, all that happens automatically—the ASP .NET worker process does the work for you. So to update a Web application you can simply copy the updated files to the correct location, and ASP.NET automatically handles shutting down the running application and copying the shadow files. (It's only that seamless as long as your application doesn't use any assemblies requiring registration for COM interoperability, or assemblies that must be registered in the global assembly cache.)
Updating Assemblies
You can normally update private assemblies by simply copying the new version of the assembly over the old one. However, although you can use simple copy operations for the initial deployment of a strong-named assembly, it is not possible to update it in this way and have your application (or other assemblies) use it automatically. The strong name of the assembly is stored in the manifest of any assembly that references it, and different versions of a strong-named assembly are considered to be completely separate assemblies by the CLR. Unless you specify otherwise, the CLR does not load a different version of a strong-named assembly than the one your application was originally built against. For more details on how to update strong named assemblies, see Running Assemblies Side by Side later in this chapter.
Distribution Strategies for an Upgrade to a Collection of Build Outputs
Although you may have to consider the update of strong named assemblies separately, for the most part, upgrading a collection of build outputs can be achieved in the same way that they are initially deployed. You can copy the new files to their destination folder using any of the following mechanisms:
-
Using Microsoft Application Center 2000 (for Web farm deployment).
-
Copy Project functionality of Microsoft Visual Studio .NET 2003 (only suitable for Web-based applications)
-
File copy distribution
We will discuss each of these in turn:
Application Center
Application Center provides broad support for updating your server environments. You can update content, configuration settings, and COM+ applications on the cluster controller, and then have Application Center synchronize the other members of your cluster with the controller.
For ease of administration, you can have Application Center automatically synchronize both content and configuration settings on the members of your cluster. You can use either of the two following automatic synchronization methods:
-
Change-based synchronization. Application Center detects when content or configuration settings have changed on the cluster controller, and automatically replicates those changes to the other members of the cluster immediately. COM+ applications are not automatically updated.
-
Interval-based synchronization. You can set a synchronization interval that governs when Application Center replicates changes that have occurred on the cluster controller to the other members of the cluster. The default interval is 60 minutes.
If you need a finer level of control over the synchronization of your clustered server environment, you can use the manual synchronization features of Application Center. There are three different types of manual synchronization:
-
Cluster synchronization. All cluster members in the synchronization loop are synchronized with the controller and all applications are synchronized (except for COM+ applications).
-
Member synchronization. Only the specified cluster member is synchronized with the controller. All applications (except for COM+ applications) are synchronized.
-
Application synchronization. A specified application on all cluster members in the synchronization loop is synchronized with the cluster controller.
For more information about synchronization and synchronization loops, see the Application Center documentation.
Updating COM+ Applications with Application Center
When you update COM+ applications or COM components, you need to stop any process that is currently using those components. This is because processes lock components they are using. After you update your COM component or COM+ application, you typically restart the process that you previously stopped, so that it can it resume its operations and take advantage of your updated functionality. In the Web environment, this typically means stopping and restarting the IIS Web service when you update COM/COM+ applications. These steps need to be taken for all COM/COM+ applications, regardless of how you have updated them.
You can use Application Center to ease the process of stopping and restarting services when you update COM+ applications. Application Center deploys COM+ applications to member servers when they are initially added to the cluster. However, rather than automatically synchronizing COM+ applications across your cluster when subsequent changes are made, Application Center allows you to defer this synchronization to off-peak periods. By deferring the synchronization of COM+ applications, you can minimize the effect of stopping and restarting the services on your cluster members.
To upgrade COM+ applications with Application Center, you can deploy them using the New Deployment Wizard or with Application Center command line operations. You should schedule this deployment for off-peak periods, because the Web service will be stopped and started on the cluster members, effectively leaving only the cluster controller available to respond to requests while synchronization takes place.
For more information about deploying and synchronizing COM+ applications, see the Application Center documentation.
Visual Studio 2003
If you are upgrading a Web application, you can use the Copy Project command in Visual Studio .NET 2003 to update the Web application on a target server. You may choose to modify the location of the files so that the new application can exist alongside the old, or you may wish to copy the files over the original location. Copy Project will not remove old files from the target directory, so you may need to do some manual cleanup after using the Copy Project command. For files that you are overwriting, you will be prompted to choose to overwrite them or not.
File Copy
In many cases where the updates to an application are relatively simple, file copy can be one of the most effective approaches for updating your application. If this is the case, deploying an update is simply a case of copying over the new files and removing any old files that are no longer required. For more details on using file copy as a deployment method, see Chapters 2 and 3 of this guide.
Configuring Automatic Updates
One alternative to the various approaches for patching, repackaging, and updating applications is to move the responsibility of updating the application from administrators or users to the application itself. In this case, the client application can be designed to automatically download and install updates from a server. To achieve this, a developer can include code with an application so that it:
-
Automatically checks for updates.
-
Downloads updates if available.
-
Upgrades itself by applying those updates.
In order to manage updates in this way, the automatic updater needs to know:
-
When to check for updates. This can be defined by creating a thread that polls the server periodically for updates, on a time basis or when an event occurs.
-
Where to check for updates. This can be defined by adding a path directly in the application or referring to a Web service that specifies the path.
-
How to check for updates. The developer can force the application to check timestamps that have changed, or refer to a Web service that stores the files that are changed.
-
How to apply updates. This is the real challenge of automatically updating applications. The application needs to update its own files while it is running — but those files will be locked because the application is running. The only way to unlock the files is to stop the application, but if you stop the application, it cannot perform the update.
The Application Updater Application Block
Designing your applications for automatic updates is a potentially complex area, so to help you configure applications for automatic updates, Microsoft has created some sample code that you can use as a basis for designing your own automatic updates solution. The Application Updater Application Block is an evolution of the MSDN AppUpdater.
There are a number of solutions to the problem of defining how the application should be updated. The Application Updater Application Block assumes you will follow one of two strategies:
-
Using a Windows service.
-
Using a shim or fa ade EXE with self-update capability built into the application itself.
We will discuss each strategy in turn:
Using a Windows Service
This method is suitable in situations where you are responsible for updating more than one application, as a single service can be responsible for maintaining multiple applications. It is also appropriate for updating other Windows services or nonclient applications, as it functions independently of the applications themselves.
This method is useful if you want to update functionality within an application, but without the application being aware of any changes. You can use this method for updating even nonclient applications, for example, Windows services.
The downside to this method is that you have to set up and maintain a service. Services need to be registered, so a simple file copy is not appropriate to install them. For more details on how to achieve this, see Chapter 3, "Implementing the Deployment of .NET Framework-based Applications." The Windows services method is not recommended if you are sending a smart client application to unknown customers over the Internet (for example, MSN Messenger). In this scenario the application itself is unable to determine that updates are available, and security considerations are likely to prevent you being able to push that information out to the client.
The following diagram shows how the Windows service is responsible for updating applications:
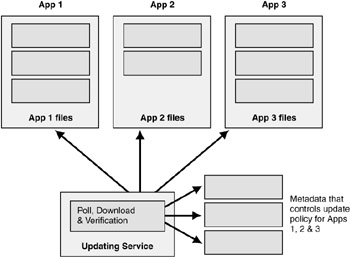
Figure 4.1: Using a Windows service to update applications
Using a Fa ade Executable
In this case, the user actually launches the fa ade executable, which is responsible for launching the real application, and relaunching it after updates have occurred. The fa ade application is much easier to deploy than a Windows service and can generally be done just by using a file copy method. In this scenario the application itself is responsible for obtaining the updates. As key files will often be locked the application generally does need to be shut down and restarted by the fa ade application.
This method gives you full control over the update of the application, including all functionality with the potential for integrating the polling of updates and notifications, and downloading updates in the application itself. However, unlike the case of a Windows service, a restart of the application is needed to complete the update.
The following diagram shows upgrade functionality built into the application.
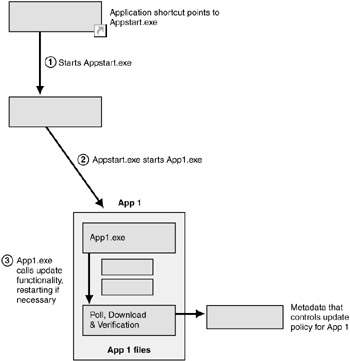
Figure 4.2: Using a fa ade application
| Note | For more information, see the white paper ".NET Applications: .NET Application Updater Component" on the windowsforms.net site. This white paper provides sample code for a component that you can incorporate into your own applications. You will need to set a few properties, such as the location to check for updates, but apart from those minor modifications, you can actually use the sample component as is. |
Other Solutions for Automatic Updates
You may choose your own solution to the problem of configuring automatic updates, sometimes using the Application Updater Application Block as a starting point. For example, you may wish to produce a solution that does not involve having to restart the application post updates. Two possible solutions to this include:
-
Using a fa ade application to perform the checks for updates.
-
Using a shadow copy technique for the application update.
We will look at each of these in turn:
Using a Fa ade Application to Perform the Checks for Updates
In this case, the fa ade application checks for updates before launching the true application. There is no file locking as the application has not yet been launched, and so once updates are complete, the true application can be run. If the fa ade application also checks for updates when the application is running — the application would still need to be restarted to resolve any file locks.
This solution is particularly useful when you cannot modify the source code of the application itself and do not wish to use a Windows service to perform the updates.
The diagram shows how the fa ade application can be used to check for updates.
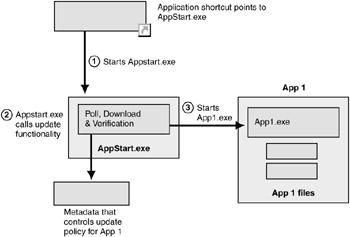
Figure 4.3: Using a fa ade application to check for updates
Using a Shadow Copy Technique for the Application Update
If you get the application to shadow copy the appropriate files and use those copies, the originals can be updated without needing to restart the application.
The main barrier to using this method is one of complexity. However it does provide the ability to do updates on the fly with little or no notice to the user in most cases.
The following diagram shows how shadow copy functionality can help prevent the application from being restarted.
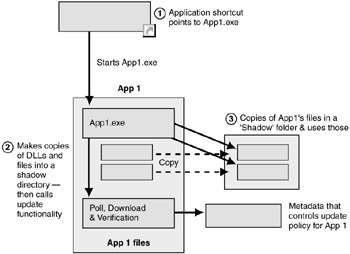
Figure 4.4: Using shadow copy functionality to keep the application from being restarted
EAN: N/A
Pages: 53