Section 3.3. Creating A Console Application in Visual Basic Express
3.3. Creating A Console Application in Visual Basic ExpressNow that we have presented our first console application (Fig. 3.1), we provide a step-by-step explanation of how to create and run it using Visual Basic 2005 Express. Creating the Console ApplicationSelect File > New Project... to display the New Project dialog (Fig. 3.3). Click Console Application to ensure that it is selected in the section labeled Visual Studio installed templates. In the dialog's Name field, type Welcome1. Click OK to create the project. The IDE now contains the open console application, as shown in Fig. 3.4. Note that the editor window contains four lines of Visual Basic code provided by the IDE. The code coloring scheme used by the IDE is called syntax-color highlighting and helps you visually differentiate program elements. Keywords appear in blue and other text is black. When present, comments are colored green. In this book, we syntax shade our code similarlybold italic for keywords, italic for comments, bold gray for literals and constants and black for other text. One example of a literal is the string passed to Console.WriteLine in line 8 of Fig. 3.1. You can customize the colors shown in the code editor by selecting Tools > Options... and clicking the Show all settings checkbox. Then click the plus sign, +, next to Environment and select Fonts and Colors. Here you can change the colors for various code elements. Figure 3.3. Creating a Console Application with the New Project dialog.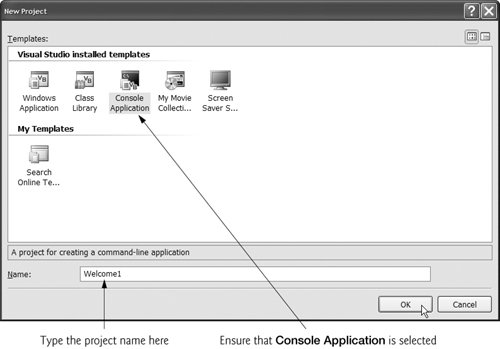 Figure 3.4. IDE with an open console application.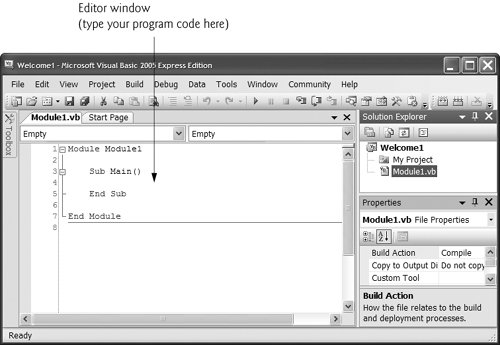 Modifying the Editor Settings to Display Line NumbersVisual Basic 2005 Express provides many ways to personalize your coding experience. In this step, we specify how to change the settings so that your code matches that of this book. To have the IDE display line numbers, select Tools > Options.... In the dialog that appears (Fig. 3.5), ensure that the Show all settings check box in the lower left corner of the dialog is unchecked. In the Text Editor Basic category of the left pane, select Editor. On the right, check the Line Numbers check box. Keep the Options dialog open for the next step. Figure 3.5. Modifying the IDE settings.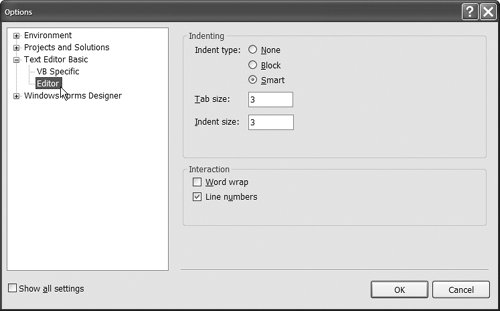 Setting Code Indentation to Three Spaces per IndentIn the Options dialog that you opened in the previous step, enter 3 for both the Tab Size and Indent Size fields (Fig. 3.5). Any new code you add will now use three spaces for each level of indentation. Click OK to save your settings, close the dialog and return to the editor window. Note that lines 3 and 5 (Fig. 3.4) are still indented four spaces because this code was created before we changed the indentation settings. Go to line 3 and move the code back one space to conform to our new convention, then move the cursor to the next line of code. After you do this, line 5 updates its indentation to match that of line 3. As you create applications in this book, Visual Basic Express will often update code to conform to various code conventions and the latest settings specified in Visual Basic Express. Changing the Name of the Program FileFor programs in this book, we change the name of the program file (i.e., Module1.vb) to a more descriptive name for each application we develop. To rename the file, click Module1.vb in the Solution Explorer window. This displays the program file's properties in the Properties window (Fig. 3.6). Change the File Name property to Welcome1.vb. Figure 3.6. Renaming the program file in the Properties window.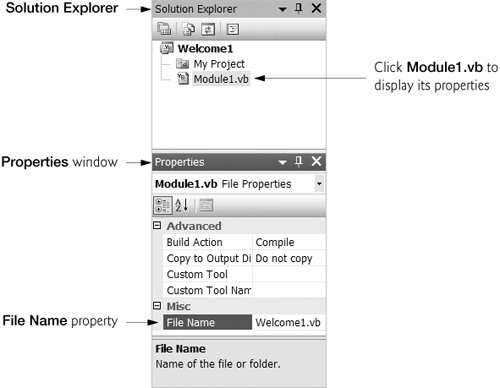 Changing the Name of the ModuleChanging the name of the program file does not affect the module name in the program code. Module names must be modified in the editor window. Do so by replacing the identifier Module1 in the code with FirstWelcome. Setting the Startup ObjectEach Visual Basic project has a startup object that specifies where the application begins executing. Now that we have modified the name of the module where Main resides, we need to update the application's startup object as well. In the Solution Explorer window, double click the My Project item (near the top of Fig. 3.6). A page appears (Fig. 3.7) where you can set several properties of your application. Select FirstWelcome (our new module name) from the Startup object drop-down list. Figure 3.7. Setting the startup object.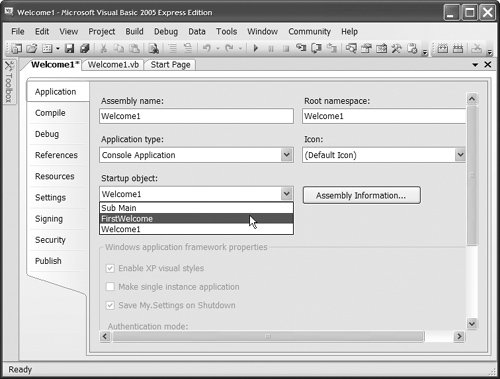 Writing CodeClick the Welcome1.vb tab in the IDE to view the editor window. In the editor window (Fig. 3.4), add the comments from lines 1 and 2 of Fig. 3.1. Then type the code contained in line 8 of Fig. 3.1 between the lines Sub Main() and End Sub. After you type the class name and the dot separator (i.e., Console.), a window containing a scrollbar is displayed (Fig. 3.8). This IDE feature, called IntelliSense, lists a class's members, which include method names. Note that tabs (All and Common) are provided so that you can view either all available class members or only those that are commonly used. As you type characters, Visual Basic Express highlights the first member that matches all the characters typed, then displays a tool tip containing a description of that member. You can either type the complete member name (e.g., WriteLine), double click the member name in the member list or press the Tab key to complete the name. Once the complete name is provided, the IntelliSense window closes. When you type the open parenthesis character, (, after Console.WriteLine, the Parameter Info window is displayed (Fig. 3.9). This window contains information about the method's parameters. We'll see in Chapter 7 that there can be several versions of a methodthat is, a class or module can define several methods that have the same name as long as they have different numbers and/or types of parameters. Generally, these methods all perform similar tasks, although they are not required to. The Parameter Info window indicates how many versions of the selected method are available and provides up and down arrows for scrolling through the different versions. For example, there are 18 versions of the WriteLine methodwe use one of these 18 versions in our program. The Parameter Info window is one of the many features provided by the IDE that help you develop programs. The Parameter Info window is especially helpful when you want to see the different ways in which a method can be used. From the code in Fig. 3.1, we already know that we intend to display a string with WriteLine, so you can simply close the Parameter Info window by pressing the Esc key. Finish entering line 8, as well as the comments in lines 10 and 12 of Fig. 3.1. Figure 3.8. IntelliSense feature of Visual Basic Express.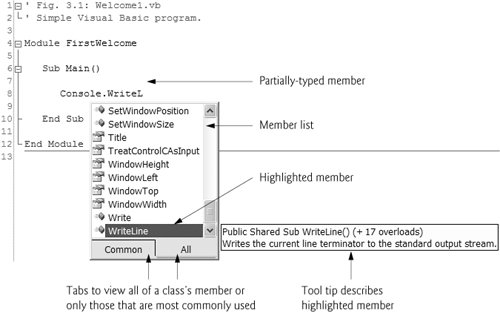 Figure 3.9. Parameter Info window.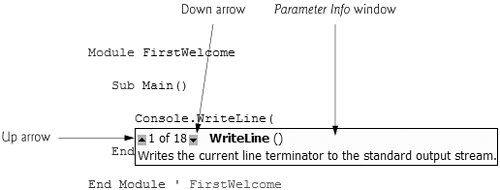 Saving the ProgramSelect File > Save All to display the Save Project dialog (Fig. 3.10). In the Location text box, specify the directory where you want to save this project. We choose to save the project in the MyProjects directory on the C: drive. Select the Create directory for Solution check box, and click Save. Figure 3.10. Save Project dialog.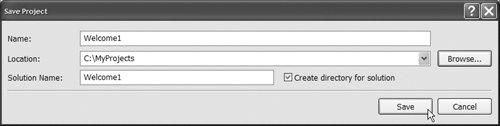 Compiling and Running the ProgramYou are now ready to compile and execute your program. To compile the program, select Build > Build Welcome1. This creates a new file (named Welcome1.exe, in the project's directory structure) that contains the Microsoft Intermediate Language (MSIL) code for the program. The .exe file extension indicates that the file is executable. To execute this console application (i.e., Welcome1.exe), select Debug > Start Debugging, which invokes the Main method. The statement in line 8 of Main displays Welcome to Visual Basic!, however, the window disappears immediately. Figure 3.11 shows the results of the program's execution. To enable the window to remain on the screen so you can view the results, you can use the Debug menu's Start Without Debugging option. This option is not in the menu by default, so you must add it. To do so, select Tools > Customize.... In the Commands tab of the dialog that appears, select Debug from the Categories pane, then locate Start Without Debugging in the Commands pane. Drag the Start Without Debugging option over the Debug menu in the IDE (which will open the menu), then position the mouse just below the Start / Continue option and release the mouse button. Click Close to dismiss the Customize dialog. You can now execute the program using the select Debug > Start Without Debugging option. The window showing the results will remain on the screen until you press a key or click the window's close box. Leave the application open in Visual Basic Express, as we will return to it later in this section. Figure 3.11. Executing the program shown in Fig. 3.1.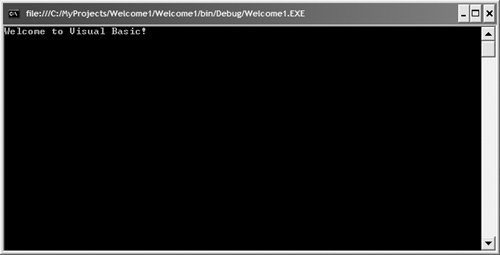 Running the Program from the Command PromptAs we mentioned at the beginning of this chapter, you can execute applications outside the IDE in a Command Prompt. This is useful when you simply want to run an application rather than open it for modification. To open the Command Prompt, click the Windows Start button, then select All Programs > Accessories > Command Prompt. The window (Fig. 3.12) displays copyright information followed by a prompt that indicates the current directory. By default, the prompt specifies the current user's directory on the local machine (in our case, C:\Documents and Settings\deitel). On your machine, the folder name deitel will be replaced with your username. A flashing cursor appears at the end of the prompt to indicate that the Command Prompt window is waiting for you to type a command. Enter the command cd (which stands for "change directory") followed by the directory where the application's .exe file is located (i.e., the bin\Release directory of your application). For example, the command cd C:\MyProjects\Welcome1\Welcome1\ bin\Release (Fig. 3.13) changes the current directory to the Welcome1 application's bin\Release directory. The next prompt displays the new directory followed by the flashing cursor. After changing to the proper directory, you can run the compiled application by entering the name of the .exe file (i.e., Welcome1.exe). The application will run to completion, then the prompt will display again, awaiting the next command. To close the Command Prompt, type exit and press Enter. [Note: Many environments show Command Prompt windows with black backgrounds and white text. We adjusted these settings in our environment to make our screen captures more readable.] Figure 3.12. Executing the program shown in Fig. 3.1 from a Command Prompt.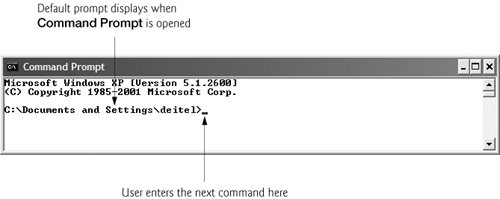 Figure 3.13. Executing the program shown in Fig. 3.1 from a Command Prompt.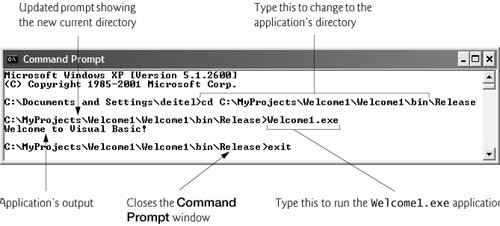 Syntax Errors, Error Messages and the Error List WindowGo back to the application in Visual Basic Express. When you type a line of code and press the Enter key, the IDE responds either by applying syntax-color highlighting or by generating a syntax error. When a syntax error occurs, the IDE underlines the error in blue and provides a description of the error in the Error List window. If the Error List window is not visible in the IDE, select View > Error List to display it. In Fig. 3.14, we intentionally omitted the first parenthesis in line 8. The first error contains the text "Method arguments must be enclosed in parentheses." and specifies that the error is in column 25 of line 8. This informs the programmer that one or more parentheses are missing in line 8. The second error"End of statement expected."specifies that this error is in column 50 of line 8. This error message appears when the compiler thinks that the line contains a complete statement, followed by the beginning of another statement. Visual Basic allows only one statement per line. Although we are attempting to include only one statement in line 8, the missing parenthesis causes the compiler to incorrectly assume that there is more than one statement on that line. Figure 3.14. Syntax error indicated by the IDE.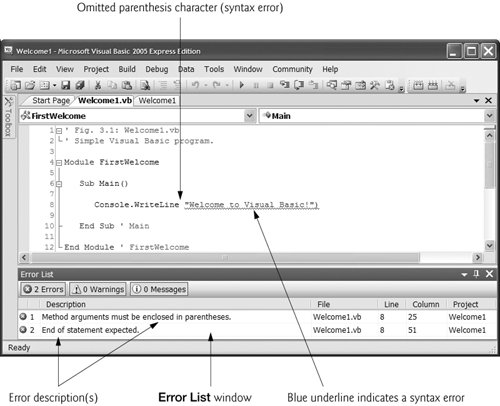 Error-Prevention Tip 3.1
|
EAN: 2147483647
Pages: 435