Visual Basic
Microsoft’s retail Visual Basic product consists of four components, as shown in the References dialog box in Figure 21-5. (You can open the References dialog box by selecting Project | References.) The first component is Visual Basic for Applications, the same programming language found in Access and the other Office applications. The second, described as “Visual Basic runtime objects and procedures,” is a runtime module. The third, described as “Visual Basic objects and procedures,” consists of Visual Basic forms and controls. The fourth is OLE Automation, which makes it possible to connect to other components and access their object models. Two of these references—to VBA and to OLE Automation—are present in Access projects as well as in Excel projects.

Figure 21-5: The Visual Basic References dialog box
Since access to data residing in databases is central to application programming, it is not surprising that Visual Basic provides a rich collection of tools for supporting data access while reducing the need for coding. These include
-
The Data Control, a service component that retrieves a DAO recordset and provides individual records from it to other bound data controls. (A service component is a control whose primary purpose, rather than to provide an interface, is to provide some service—in this case to distribute data—to other controls.)
-
The DBList and DBCombo controls, which bind to a Data Control and display an entire column of a recordset in a list box or combo box, respectively.
-
The ADO Data Control, another service component that retrieves an ADO recordset and provides individual records to other bound data controls.
-
The DataList and DataCombo controls, which bind to an ADO Data Control and display an entire column of a recordset in a list box or combo box, respectively.
-
The DataGrid control, which displays an entire recordset using a spreadsheet-like interface.
In addition, most of the intrinsic Visual Basic controls include support for data binding through their properties, which can be set using the Properties dialog box as well as programmatically.
Data binding using Visual Basic is an extensive topic that has been the focus of entire books. This section will simply attempt to show you how easy it is to use the ADO Data Control to retrieve and update Access data.
When you launch Visual Basic, it first displays the modal New Project dialog box. When you select the Standard EXE option, Visual Basic opens a form in a design window in the center of the interface, as Figure 21-6 shows. The left side of the Visual Basic window is occupied by a toolbox containing Visual Basic controls, while the Project Explorer appears on the upper right and the Properties window on the lower right. This is a good time to use the Properties window to change the form’s Caption property from “Form1” to “Customer Database.”

Figure 21-6: A Standard EXE project in Visual Basic
Since the ADO Data Control is not an intrinsic Visual Basic control, you’ll have to add it to your project. To do this, select Project | Components from the Visual Basic menu. When the Components dialog box opens, make sure the Controls tab is selected; then find and check Microsoft ADO Data Control in the list box, as Figure 21-7 shows. An icon representing the ADO Data Control will appear in the toolbox, which now resembles Figure 21-8. Double-click on it, and Visual Basic will place the control on the form.
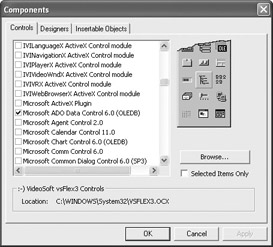
Figure 21-7: Controls tab of the Components dialog box
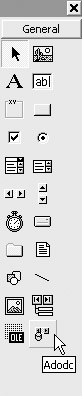
Figure 21-8: Toolbox with the ADO Data Control added
Visual Basic automatically assigns a name of Adodc1 to the control. You can leave the name unchanged, but you should set the properties of the ADO Data Control as shown in Table 21-1.
| Property | Value |
|---|---|
| BackColor | Button Face |
| Caption | <blank> |
| CommandType | 1 – adCmdText |
| CursorLocation | 3 – adUseClient |
| CursorType | 2 – adOpenDynamic |
| EOFAction | 2 – adDoAddNew |
| LockType | 2 – adLockPessimistic |
| Mode | adShareDenyNone |
| RecordSource | SELECT * FROM tblCustomer |
The final property whose value needs to be set is the ConnectionString. Visual Basic makes this easy and also helps to make sure that your connection string is correct. When you select the ConnectionString property and click on the button with the ellipsis to the right of the property’s text box, Visual Basic opens the Property Pages dialog box shown in Figure 21-9. Select the Use Connection String option button, and then click on the Build button. Visual Basic opens the Data Link Properties dialog box with the Provider tab selected, as Figure 21-10 shows. Select the Microsoft Jet x.x OLE DB Provider, and click on the Next button. Visual Basic takes you to the Connection tab.

Figure 21-9: The first step toward building a connection string
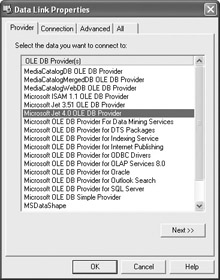
Figure 21-10: Selecting a data provider
In the Connection tab, shown in Figure 21-11, you can select the name of the database you’d like to connect to. If you’re uncertain of its name and location, you can click on the ellipsis to the right of the text box. This opens the Select Access Database dialog box, a standard File Open dialog box that lets you navigate the file system and select your database file. You can provide a user name and password, if access to your database requires them. And finally, once you’ve finished, you can click the Test Connection button to see if the ADO Data Control can build a correct connection string based on the data you’ve provided.
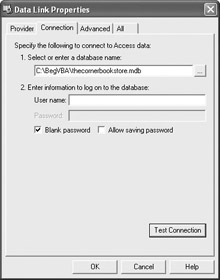
Figure 21-11: Selecting a database for the connection
The values assigned to the data control’s properties merit some further explanation. First, as you can see from the finished form shown in Figure 21-12, the ADO Data Control’s interface consists of four scroll buttons and a text area whose contents are defined by the control’s Caption property. You could hide the control completely by setting its Visible property to False (True is the default), or you could use it to display some additional information about the record being displayed. But instead, we’ve chosen to simply delete its caption (which by default is set to Adodc1) and change the text area to be the same color as the scroll bars. Second, note that we’re using the control to create a dynamic recordset that should reflect changes to the Access database made by other users. (If you don’t remember what a dynamic recordset is, see the discussion of the CursorType property in Chapter 12.)
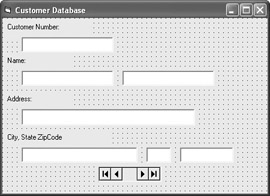
Figure 21-12: The finished form in design mode
Next, add four Label controls and seven TextBox controls to the form by clicking on each control in the toolbox and then “drawing” and sizing each control on the form. (The Label control appears as an icon with the letter A in the toolbox; the TextBox control is to the right of the Label control.) Again, you should place them on the form so that they resemble Figure 21-12.
Once all of the controls are positioned on the form, select all of the text boxes by clicking on the first, then clicking on each successive text box while you hold down the CTRL key. This allows you to change all common properties of these controls to a single value. In the properties window, change the DataSource property to Adodc1, the name of the ADO Data Control. Then select each of the controls individually and change their properties, as shown in Table 21-2.
| Control | Property | Value |
|---|---|---|
| Label1 | Name | lblCustNo |
| Caption | Customer Number: | |
| Text1 | Name | txtCustNo |
| Text | <blank> | |
| DataField | txtCustNumber | |
| Label2 | Name | lblName |
| Caption | Name: | |
| Text2 | Name | txtFirstName |
| Text | <blank> | |
| DataField | txtCustFirstName | |
| Text3 | Name | txtLastName |
| Text | <blank> | |
| DataField | txtCustLastName | |
| Label3 | Name | lblAddress |
| Caption | Address: | |
| Text4 | Name | txtAddress |
| Text | <blank> | |
| DataField | txtAddress | |
| Label4 | Name | lblCityState |
| Caption | City, State ZipCode: | |
| Text5 | Name | txtCity |
| Text | <blank> | |
| DataField | txtCity | |
| Text6 | Name | txtState |
| Text | <blank> | |
| DataField | txtState | |
| Text7 | Name | txtZipCode |
| Text | <blank> | |
| DataField | txtZipCode |
When you’re finished, your form should resemble the one shown in Figure 21-12.
Next, run the form by selecting Run | Start or clicking on the Start button on the toolbar. The result should resemble Figure 21-13.
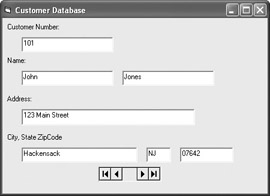
Figure 21-13: The finished application
This is a little more cumbersome than creating a bound Access form, but nevertheless it is quite easy. And although you defined some property values and used a series of property sheets to have the ADO Data Control create your ADO connection string, you haven’t done any coding. Just as if you were working with an Access form, you could, if you wanted, use VBA to attach code to some of the controls’ events, but you already have a fairly functional application.
EAN: 2147483647
Pages: 214