It is best to change your settings before you start to add files to the production so there is no question that the settings are universally applied.
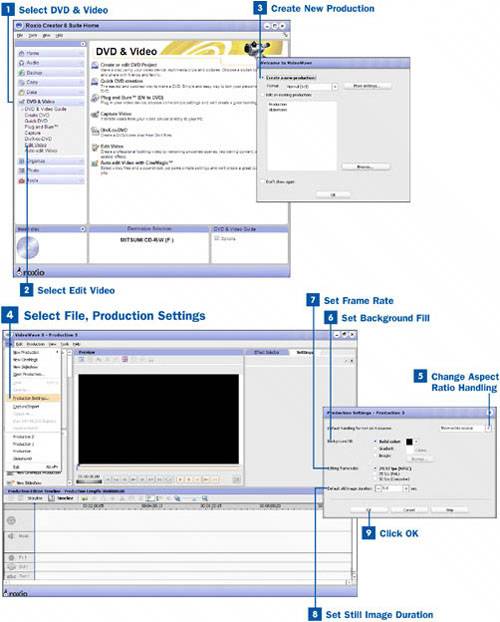
 Select DVD & Video
From the Easy Media Creator project pane, select DVD & Video to open up the menu.
 Select Edit Video
From the DVD & Video menu, select Edit Video. This launches VideoWave.
 Create New Production
When VideoWave has launched, you are given the option to create a new production or edit an existing one. Select Create a new production and set your aspect ratio in the Format drop-down menu. Change the aspect ratio of your slideshow to fit your TV. Standard TVs are 4:3; widescreen TVs are 16:9. Click OK.
 Select File, Production Settings
After you are in the main interface for VideoWave, click on the File drop-down menu at the top of your screen and select Production Settings. This opens the Production Settings window.
 Change Aspect Ratio Handling
From the Production Settings window, you can change four settings. The first is to change the way files that are not in the aspect ratio of your production are handled. In other words, if you selected a 16:9 aspect ratio but you are planning to import video files that are in a 4:3 aspect ratio, how do you want them handled? If you want the entire image to show, with bars to either side of it to create a 16:9 ratio, choose Show entire source from the drop-down menu. If you would prefer the 4:3 image to be cropped on the top and bottom so the image fills the entire screen with no bars to either side, choose Fill screen. Keep in mind that this also applies to any photos you add to the production.
 Set Background Fill
If you are planning to show the entire source, adding a fill to the areas that the image doesn't cover, you want to select a background fill. You can select a solid color, a gradient, or an image.
Tip
If you have an everyday photo in mind, adding an image as a background fill seems silly. But if you take a picture of a group of flowers, a piece of wood, or any other interesting color or texture, you have a very nice background fill.
 Set Frame Rate
Set your frame rate to NTSC for North America and PAL anywhere else.
Key Term
Frame rate The number of frames that appear in every second of video.
 Set Still Image Duration
When you import photos and add color panels to your production, they are given a duration time inside the production. Set the duration to the number of seconds you would like each still shot to be on the screen.
Note
The transitions you add to your production shave about half a second from each side of your images, but the transition itself lasts half a second. So if you have three images together, all set to a five-second duration, the first is four-and-a-half seconds long and has a half-second transition into the next image, which is four seconds long and followed by a half-second transition. The last panel is four-and-a-half seconds long.
 Click OK
When you are done with your settings, click OK to take you back to the VideoWave interface. You are ready to add files.