| Now that you understand the components involved in ZENworks for Servers 3 traffic analysis, you are ready to begin setting up traffic analysis on your network. Setting up LAN traffic analysis for ZENworks for Servers 3 involves establishing normal activity for your LAN, and then making the necessary configuration changes for the management console to be able to communicate with the management server. The following sections discuss creating a baseline document of normal LAN activity to use as a measurement, selecting the preferred RMON agent, and setting the necessary SNMP parameters for the management console to access the RMON agent. Creating a Baseline Document The first step in setting up ZENworks for Servers 3 LAN traffic analysis on your network is to create a baseline document that describes the normal activity and usage of your network. The baseline document should show the normal levels of the most common statistics segments monitored by ZENworks for Servers 3. After you create the baseline document, you can use it to identify parts of your network that are experiencing problems, need to be balanced, or need to be upgraded. The following is a list of the most common network statistics that should be used to create a baseline document: Bandwidth utilization. The bandwidth utilization statistic indicates the percentage of network bandwidth used. Because the network bandwidth tends to be higher at heavy usage times, your baseline document should account for those times for example, when users are logging on in the morning. Packets per second. The packets-per-second statistic indicates the raw number of packets that are being transferred on the network. This gives you the best indication of how heavy your network traffic really is. Network error rates. You should also set a baseline for network error rates. This is also based on heavy usage, so your baseline should take into account periods of the day when heavy usage would cause errors. This helps you identify times when network errors are atypical. Kilobytes per second. The kilobytes-per-second statistic indicates the raw amount of data that is being transferred on the network. This gives you the best indication of how heavy your network throughput really is. Active servers. You should keep track of the three most active servers on the network. This helps you understand where loads need to be balanced and where network upgrades must take place.
Selecting the Preferred RMON Agent After you create your baseline document, you need to select which remote monitor (RMON) agent you want to monitor each managed segment. The RMON agent is set on the RMON Agent property page for the segment in ConsoleOne.The RMON property page displays the following information, shown in Figure 10.1, about the RMON agent: Preferred. Checked if this server is set as the preferred RMON agent server for the segment. Agent Name. Displays a list of all the servers on which the RMON agent is installed. Version. Displays the dynamically obtained version number of the RMON agent installed on this server. It is left blank if ZENworks for Servers 3 is unable to contact the server to get a version number. Status. Displays the current status of the RMON agent on the selected segment. MAC Address. Displays the MAC address of the server. Interface Index. Displays the number of interface indexes to which a server can connect through its network card. Each interface corresponds to a segment. Available RMON Services. Displays the list of RMON services available from the selected agent (RMON, RMON Plus, or RMON2).
Figure 10.1. RMON Agent property panel for a segment object in ConsoleOne. 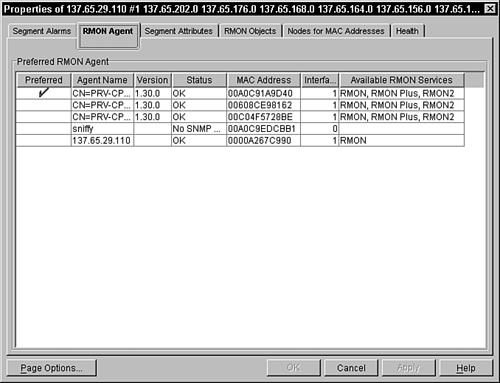
Follow these steps to set an RMON agent as the preferred agent to monitor a segment: Right-click the segment object in ConsoleOne and select Properties from the pop-up menu. Click the RMON Agent tab, as shown in Figure 10.1. Choose a server or workstation name from the list displayed in the properties page, and then choose which server acts as the RMON agent for the segment. Click the Apply button to save the settings.
Setting Up SNMP Parameters After you set the preferred RMON agent for each segment, you need to set up the SNMP parameters for the servers hosting your RMON agents. When you request that dynamic information be displayed at the management console, you obtain that information from the monitoring server agents by using SNMP. Initially, the SNMP communication between the management servers and the management console is based on default SNMP settings; however, you may want to modify the following settings, as shown in Figure 10.2: Secure Get (also known as SNMP get). Encrypts the packets sent by the monitoring agent to the management the agent. Secure Set (also known as SNMP set). Encrypts the packets sent by the management agent to the monitoring agent. Community Strings. Community name of the node requesting dynamic data from the agent. Number of Retries. Number of times you want the management server to retry connecting to the monitoring agent. Timeout in mS. Maximum duration in milliseconds for which the management server should wait for a response from the monitoring agent. Port Number. Port on which the management server contacts the monitoring agent.
Figure 10.2. SNMP Settings tab for a server object in ConsoleOne. 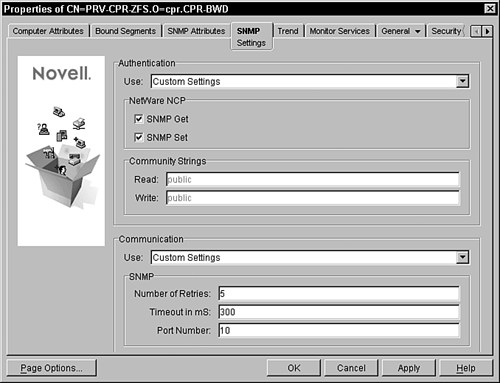
Follow these steps to modify the default SNMP communication for your management servers: Right-click the server object that is hosting the RMON agent for the segment and select Properties from the pop-up menu. Click the SNMP Settings property panel, as shown in Figure 10.2. Modify the Authentication and Communication settings. Click the Apply button to save your settings.
|