Setting Properties for the Application Object
Once you have created the Application object, you need to set the Application object's properties to define how it will behave. The following sections cover using ConsoleOne to define the identity, distribution behavior, run behavior, availability, fault tolerance, and existence of the Application Object. Setting Up the Application Object IdentificationThe first step in setting up the Application object in ConsoleOne is to access the Identification property page to control the application icon, description, folders, contacts, and notes that are used to define the application. Use the following steps to select which set of options you want to modify:
From the Application object's Identification property tab, you should access the individual property panels to configure the application identity options described in the following sections. Setting Application Icon PropertiesFirst, select the icon property panel from the Identification tab. A panel similar to the one shown in Figure 6.4 is displayed and you can configure the following options for the Application object. Figure 6.4. The Application icon property panel in ConsoleOne.
Configure the Application Icon TitleType the title you want to use for the application in the Application Icon Title box. The application icon title, which is mandatory, can be different from the Application object name (the name that eDirectory* uses to identify the application) and might contain periods and other special characters. You can also use the Description property page for longer descriptions of the application. The title you select here is displayed to users when they access the Application object (for example, it's the name that appears in the Start menu if the application is set to appear there). TIP If icon titles do not appear in their entirety, you might need to increase your icon spacing in Windows. After you have adjusted the icon spacing in Windows, exit Application Launcher or Application Explorer and restart for the changes to take effect. You can also use the Description property page for longer descriptions of the application. Configure the Application Icon TitleNext you should use the Application Icon option to assign an icon for the Application object. The icon you choose appears in Application Launcher or Application Explorer, depending on what you specified on the Applications property page. If you do not specify an icon, a default Application Launcher icon is used. Configure the Disconnectable OptionThe disconnectable option enables you to control what happens to the icon when the user disconnects from the network. If this option is set, the icon remains present when the user disconnects; otherwise, it does not appear. Configure the Wait on Force Run OptionThe Wait on Force Run option enables you to specify whether the icon appears before the application has been run, if the force run option is set. If you enable this option, the icon won't appear until the force run is complete. Configure the Order Icon DisplayFrom this window, you can set the order icons and set the force run sequence. This option performs two very useful functions. First, it organizes the icons in Application Launcher and Application Explorer. Second, it dictates the order in which Application objects that are set as force run are used. To set ordering, enter a numeric value into the Icon Order text box. All Application objects you want to order must have a numeric value. The value of zero gives the icon the highest priority and thus the highest prominence in the list. The maximum value is 999. If you do not order Application objects, they are ordered alphabetically (the default order). For example, suppose that you have 10 icons (applications A, B, C, D, E, F, G, H, I, and J) that you want to organize in Application Launcher. You specify an order number of 0 for application G, 1 for application F, 2 for application E, and 3 for application D. You specify an order number of 4 for applications C, B, H, and I. You do not order the remaining applications, A and J. The result is that the first four applications are ordered with G being the first in the list followed by F, E, and D. After this, applications C, B, H, and I are gathered together and arranged alphabetically. The last two icons, A and J, come at the end of the list and are arranged alphabetically (the default order). If users associated with these Application objects run Application Launcher, they will see a list of icons according to this order. If these applications have all been set to force run, they will run in this order as soon as Application Launcher has loaded itself into memory. NOTE Ordered and force run applications run in sequential order without waiting for the last force run application to terminate. Configure the Show Progress OptionThe last thing you can configure from the icon property panel is the Show Progress option. You should select this option if you want an easy-to-read progress bar to be displayed to users the first time they distribute an application to their workstations. TIP Turn off this option if you are distributing only a small change to the application, such as a Registry modification. Turn it on if you are distributing a large application and want to give the user a general idea of how long the distribution will take. By default, this option is on. Setting Application DescriptionThe second setting available for Application object identification is the capability to enter text into the Description property panel to give users more complete information than the application icon caption allows. Select the description property panel from the Identification tab. A panel similar to the one shown in Figure 6.5 is displayed and you can set the description for the Application object. Figure 6.5. The description property panel for Application objects in ConsoleOne.
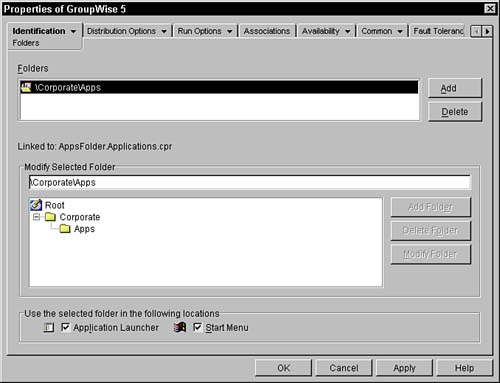
Once the description is set, users can right-click an Application object in Application Launcher or Application Explorer to see these details. The descriptive name of the application and the more lengthy description both appear here. An example of when to use the description option for Application objects is when you have additional information about the application that users need. This might include information such as which new features are available in the application. NOTE The text you type in the Description property page is the same text the user sees if you have enabled the Prompt User Before Distribution option on the Distribution property page. Setting Up Application FoldersThe next setting available for Application object identification is the Folders property panel. The Folders property panel lets you specify the folder object you want the application to reside in for the Application Launcher and Start menu. Select the Folders property panel from the Identification tab. A panel similar to the one shown in Figure 6.6 is displayed and you can set up the application folder for the Application object. Figure 6.6. The folders property panel for Application objects in ConsoleOne.
Once you are at the Folders property panel, you can determine which folders the application icon will reside in by using the following steps:
You can select multiple application folder objects for the application to reside in by following the previous steps. You might want to do this if a difference exists in behavior or availability defined in different application folders. For example, you have an application folder for accounting, development, and sales but you only want the application to appear for accounting and sales. You handle this by adding the accounting and sales folders, but not the development folder, to the application. That way the application does not appear in the developer's Start menu, but it does appear for the accountants and sales persons. Contact Setting for ApplicationsFrom the pull-down list under Identification for Application objects, you can also specify a contact list for help if a problem occurs when deploying the application. To create the contact list, simply click the Add button and then type in the username or select the user object by browsing the eDirectory tree. Adding Administrator Notes to ApplicationsFrom the pull-down list under Identification for Application objects, you can also specify administrator notes for users to view when deploying the application. This can be very useful in describing to users why the application is being deployed, when it remains available, and other important information. To create administrator notes, simply type in the message you want users to see when they view the information about applications available through the Application Launcher. Viewing MSI Package Information for MSI ObjectsApplication objects that were created from an .MSI file enable you to select package information from the Identification drop-down menu. The package information panel for MSI Application objects displays the following information about the MSI package:
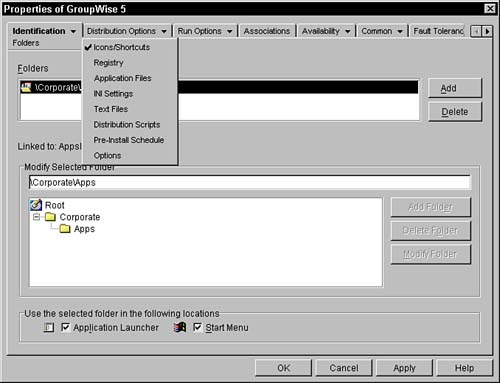
Setting Distribution Options for Application ObjectsOnce you have set up the Application objects identification, the next step in setting up the distribution options for the Application object in ConsoleOne is to configure the applications shortcuts, Registry settings, files, .INI settings, text files, distribution scripts, and pre-install schedule. Use the following steps to select which set of options you want to modify:
From the Application object's Distribution property tab, access the individual property panels to configure the application distribution options described in the following sections. NOTE If this Application object has been distributed previously, note that many of the changes on distribution will not go into effect until you change the Version Stamp value discussed in this chapter in the section, "Use Version Stamp to Trigger Redistribution." Changing the Version Stamp value signals Application Launcher to redistribute the application. Configuring Application Icons/ShortcutsThe top panel accessible from the Distribution tab is the Icons/Shortcuts panel. The Icons/Shortcuts property panel enables you to add, change, or delete the Program Groups, Program Group Items, and Explorer shortcut icons that appear in Windows Explorer (Windows98, Windows NT 4.x, and Windows 2000/XP) when the application distributes to workstations. You have to specify the following settings for Explorer shortcuts items:
One example of when you might modify the icons and shortcuts for an Application object is if you wanted to use special icons for all applications that users run on their workstations. Using the Icons/Shortcuts property page for this Application object, you can change icons of other applications that might not have anything to do with this Application object. Configuring Application Registry SettingsThe next panel that's accessible from the Distribution tab is the Registry Settings property panel. This panel enables you to add, change, and delete Registry keys and values when the Application object distributes to the workstation. Several Registry types are supported, including binary format, default strings, DWORD values, expand strings (REG_EXPAND_SZ), and multivalue strings (REG_MULTI_SZ). You can import and export Registry settings, either as .AOT or .AXT files, or using the standard Registry (.REG) format. For each Registry setting you create, you can specify the following options:
NOTE You should make certain you need to track changes before checking the track distribution per user box. Tracking too many items can waste resources and it can be difficult to wade through the data to gather the information you do need. Configuring Application FilesThe next panel accessible from the Distribution tab is the Application Files property panel. This panel is used to add, change, or delete application files and directories. You can also import new template information about files and directories. From the Application Files window, you click add and then select a file or directory. If you are adding a directory, you will be prompted to enter a directory name and specify whether the directory should be deleted first. If you are adding a file, you will be prompted to enter a source and target path and specify whether the target file should be deleted first. For each file entry you create, you can specify the following options:
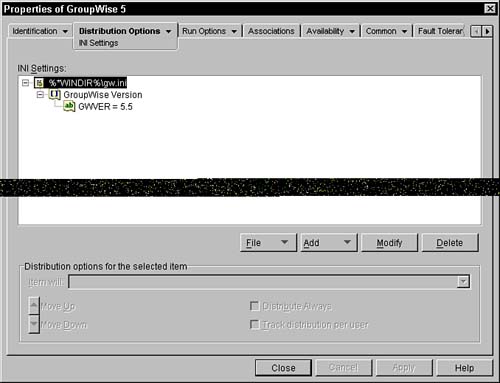
Configuring .INI File Settings for ApplicationsThe next panel accessible from the Distribution tab is the .INI Settings property panel. This panel enables you to add, change, and delete .INI files, sections, and values when the Application object distributes to the workstation. Not only can you order the changes within the .INI file, you can also import or export .INI files and settings using the .AOT or .AXT file format or the standard .INI file format. For each .INI entry you create, you can specify the following options:
.INI file configuration changes can be useful if you want to add a specific version stamp that can be read later by the application to determine its current version. For example, Figure 6.8 shows that a specific version for the GroupWise Application object of 5.5 is made to the GW.INI file in the windows directory when the application is distributed. The next time GroupWise runs, it can use the version stamp to determine its current revision. Figure 6.8. The .INI settings property panel for Application objects in ConsoleOne.
Configuring Text File OptionsThe next panel accessible from the Distribution tab is the Text Files property panel. This panel enables you to add, change, or delete workstation text files (such as CONFIG.SYS and AUTOEXEC.BAT). Once you add a file to be modified, you can specify an entry by selecting the file and clicking on the Add button. The Edit Text File window will allow you to specify whether to simply add the text to the file, remove the text from the file, or find and replace the text in the file. If you choose to add text, you can specify whether to add the text at the beginning or the end of the file. If you choose to delete text, you can specify whether to simply search for the text in the file or search for an entire line in the file. If you choose find and replace, you can specify whether to search for text, search by line and replace text. For each text file change, you can specify whether the workstation will need to reboot if the change is made. One example of when to use the Text Files properties page to modify the Application object is when users are experiencing problems due to an incorrect text string found in their workstation's CONFIG.SYS file. Rather than visit and change each workstation or run the risk of users incorrectly and inconsistently implementing a change, you can set up a text file that finds, deletes, modifies, or adds text strings to the text file of your choice. The text file implements the changes the next time the application runs. NOTE If you set the Prompt User for Reboot setting on the Distribution property page to Always, that setting overrides the setting you make here. Configuring Application Distribution ScriptsYou can set up distribution scripts that are executed automatically each time the application is distributed to a workstation. Unlike environment parameters, scripts can overwrite existing drive mappings and printer ports. The two types of distribution scripts are the Run before script and the Run after script. Run before distribution scripts are executed before the application is distributed. Run after distribution scripts are executed after the application is closed and before the network resources are cleaned up. Distribution scripts enable you to provide dynamic mappings beyond those defined, run other applications, log in to other servers or eDirectory trees, and perform other tasks that must be done before and after an application is distributed. The scripts support the same commands and syntax as the Novell client. However, ZENworks for Desktops allows you to specify your own script engine and file type extension. This allows you to create much more extensive and powerful scripts by using another script engine, such as a Perl parser. To set up distribution scripts, use the following steps:
NOTE On Windows NT/2000/XP, distribution scripts run in the secure system space, which means that users do not see any of the script commands or the command results. Therefore, you should not use any commands that require user interaction because the script will be halted at that point. Configuring a Pre-Install Schedule for ApplicationThe next option to control distribution is setting up a pre-install schedule for local availability for the application. The pre-install can be extremely useful in deploying applications to a lot of workstations. For example, if you have an application that needs to go out to 1,000 workstations all on the same day, having ZENworks for desktops deliver the application all at the same time could cause the network and server to be over utilized. If you know in advance that you need to deploy the application, you can set up a pre-install schedule to deliver the application to the workstations over a period of time before the day it needs to be installed. After this, all 1,000 workstations can install the application at the same time, without causing network problems, because they have a local copy of the application to work from. To configure an application pre-install, select Pre-Install Schedule from the Distribution tab drop-down list, and the Schedule panel appears. If you want to have the application pre-installed prior to having it deployed, select the Pre-Install application box. The next step is to specify the schedule type you want to use for the pre-install. The None option is selected by default, however, you can configure the Application object to pre-install the application to workstations based on a set of specific days or a range of days as described in the following sections. Set Schedule by Specified DaysYou can schedule application pre-installs by specifying the Specified Days option as shown in Figure 6.10. This enables you to select specific dates during which you want the application to be available for pre-install. Figure 6.10. The pre-install schedule availability for specified days property panel in ConsoleOne.
The application is only visible to be pre-installed to workstations on the specific dates and times you specify in this option. For example, if you select the dates June 7, 2003 and June 10, 2003, and start and end times of 8:00 a.m. and 5:00 p.m., the application is available to be pre-installed to a workstation from 8:00 a.m. to 5:00 p.m. on each of the days selected. The application is not available to be pre-installed to the workstation at any other time. Set Schedule by Range of DaysYou can set a schedule by specifying a range of days to make the application available for pre-install, as shown in Figure 6.11. An example is if you select a start date of June 12, 2003 and an end date of June 16, 2003, with a start time of 6:00 a.m. and an end time of 6:00 p.m. The Application object icon can be pre-installed to workstations from June 12th at 6:00 a.m. until June 16th at 6:00 p.m. Figure 6.11. The pre-install schedule availability for a range of days property panel in ConsoleOne.
Spread from Start TimeYou can also specify a spread of time in which the application becomes available to users. This is useful when you don't want all users to run the application at the same time for fear that the load and traffic might bring down the network. The spread option literally "spreads out" user access times over the number of minutes specified so they don't all run the application at once. An example of how to use the spread from Start Time option is to set it to 120 minutes; the application then becomes available, on a random basis, between the hours of 10:00 a.m. and 12 noon. This spreads the demand for the application out over a longer period of time and network traffic is minimized. NOTE If users access applications after the spread time is expired but before the end time of the Application object, they access the application at that time and the spread variable has no effect. GMT (Greenwich Mean Time)The final option you have available on the scheduling panels is to specify that all application scheduling that you do with the Application property page is based on the workstation's timezone. In other words, if your network spans different timezones and you schedule an application to run at 4:00 p.m., it would normally run at 4:00 p.m. in each timezone. However, by selecting the GMT check box, workstations run applications at the same time worldwide (according to GMT). Although, you should be aware that GMT time is not available if you are filtering out days of the week when in the Specified Days mode. Configuring General Application Distribution OptionsThe next panel accessible from the Distribution tab is the Option property panel. This panel, shown in Figure 6.12, enables you to configure the following general distribution options for Application Objects. Figure 6.12. The Options property panel for Application objects in ConsoleOne.
Distribute AlwaysUse the Distribute Always option to force a distribution of the entire Application object every time the user runs the application or the application is set for a force run on the workstation (see the user or container object's Applications property page). This option is useful to ensure that all application settings are updated every time the application runs. You can also update settings on a case-by-case basis. For example, if you want to always distribute a particular Registry key and value, you can set the Distribute Always option on the Registry Settings property page for that particular key and value. The Distribute Always option on the Distribution property page overrides the Distribute Always option on the Registry Settings, .INI Settings, Application Files, Icons/Shortcuts, andText Files property pages. Prompt User Before DistributionNext, use the Prompt Before Distribution option to display a message to users after they have clicked an Application Launcher-distributed application for the first time. This message asks them to confirm that they want to distribute the application to their workstation. This option is off by default. TIP To better inform users, the text that you write in the Application object's Description property page is displayed in this distribution confirmation dialog box. For example, you might write a note to the user such as "This is an essential application for your workstation that takes approximately 10 minutes to distribute. Please answer Yes to distribute it now." Prompt User for RebootNext, use the options in the Reboot group box to control how a workstation reboot should occur according to the following options:
Use Version Stamp to Trigger RedistributionUse the version stamp option to trigger a redistribution of the application. A version stamp is simply a text string representing the version of the application that is used to customize the Application object's GUID. In fact, any change you make to the version stamp is like changing the GUID. NOTE The version stamp might not have anything to do with the actual version of the software. It is a tool to help you upgrade applications. It helps you control the version of an Application Launcher-delivered application. If the Run Once option is checked and you change the version stamp, the Run Once option causes the application to run again once. This is useful when upgrading application software to a new or different version. For example, suppose you purchased new application software and want to update an Application object. By changing the version stamp number and selecting the Run Once option, the application runs once after installation even though a previous version might have already run once. Use Application's GUID (Globally Unique Identification) for TroubleshootingThe application GUID is stamped in the workstation's Registry when ZENworks for Desktops distributes an application to a workstation. The GUID is a randomly generated number for tracking, such as {5A0511440-77C5-11D1-A663-00A024264C3E}. TIP Use GUIDs to track and troubleshoot distributed applications. For example, if you want to ensure that a particular application has been distributed to a workstation, you can compare the GUID as recorded in the Application object's Distribution property page with the GUID that is currently stamped in the workstation's Registry. You can make several Application objects use the same GUID by using the Synchronize Distributed GUIDs option. This is useful if you are distributing a suite of applications. You can also "regenerate" or "re-randomize" the GUIDs for those same applications. Setting Run Options for Application ObjectsOnce you have set up the distribution options for an application, you need to set the run options. Setting the run options for an Application object enables you to control the behavior, environment, and licensing of an application as it is distributed to users. To access the options on the Run Options property tab, use the following steps to select which set of options you want to modify:
From the Application object's Run options property tab, access the individual property panels to configure the application run options described in the following sections. Configuring Application Run OptionsThe top panel accessible from the run options tab is the Application panel. The Application property panel enables you to set the path, parameters, and behavior of an executable that needs to run when the application is distributed. Use this panel, shown previously in Figure 6.13, to configure the following options. Install Only (No Executable Needed)If you just want users to install an application, but not run it, you should check the Install Only option. An example of this is if Application object's purpose is to just update some files on the workstation. When you select the Install Only option, the software is installed but not run. Set Path to Executable FileIf an executable file exists that needs to be run for the application distribution, select this option. Next set the path in the Path to Executable text box to the executable that is to be run when an Application object icon is double-clicked in Application Launcher or Application Explorer. Use the Browse button to browse the file directory structure to find the executable you want. UNC pathnames are permitted. For example:
NOTE If you don't want to run an application (for example, this Application object's purpose might be to just update some files on the workstation), use the Install Only option and do not specify a path. Specify ParametersYou can specify parameters to be passed into the executable file specified in the path to the executable field. This can be extremely useful in controlling the application being executed. For example, if you wanted the application to run silently and that option is controlled by a command-line parameter, you could specify that parameter in this field to force silent execution. Specify Working DirectoryYou can also specify a working directory for the application to be started in. For example, if you wanted to use a temporary location for the application to use as its base directory, you could specify a temporary directory such as c:\temp. Run Applications OnceThe final option you have from the object identification properties window is the run once option. It runs the application once and then removes the icon from the workstation. You should check this option when an Application object's purpose is to install software to a workstation. It can be confusing and annoying to users if an install icon remains in the Application Launcher window or in Application Explorer after the software has already been installed. NOTE If you selected Run Once and also specified a version stamp for this application, the application runs once until the next time you change the version stamp, whereupon the application runs one more time. This latter method is useful for upgrading applications. Configuring Environment Options for Running ApplicationThe next run option configurable for Application objects is the Environment option. The Environment panel, shown in Figure 6.14, is where you set up information about the environment the application runs in. Figure 6.14. The environment options property panel in ConsoleOne.
The Run section on the environment options property panel enables you to select one of the following window types with which to deploy the application:
The Windows NT/2000 section of the environment property panel lets you specify whether 16-bit applications are run in Shared or Separate mode. It also enables you to configure the following application security levels:
The environment property panel also lets you select the Clean Up Network Resources option. If this is selected, any mapped drives or ports that are made by the application deployment are cleaned up when they are finished. Configuring Application Launch ScriptsThe next run option configurable for Application objects is launch scripts that are executed automatically each time the application is launched on a workstation. Unlike environment parameters, scripts can overwrite existing drive mappings and printer ports. The two types of launch scripts are the run before launch script and the run after termination script. Run before launch scripts are executed before the application is launched. Run after termination scripts are executed after the application is closed and before the network resources are cleaned up. Launch scripts enable you to provide dynamic mappings beyond those defined, to run other applications, to log in to other servers or eDirectory trees, to perform special termination options, and to perform other tasks that must be done before and after an application is launched. The scripts support the same commands and syntax as the Novell client. However, ZENworks for Desktops allows you to specify your own script engine and file type extension. This allows you to create much more extensive and powerful scripts by using another script engine, such as a Perl parser. To create launch scripts, use the following steps:
Configuring Environment Variables for Application LaunchThe next run option configurable for Application objects is the environment variable option. The environment variable panel lets you add variables to be applied to the workstation environment when the application is deployed. For example, if you have an application install that needs a temporary path variable name to be set to a specific location, you can add that variable name and path to the Application object. When the application is deployed, the path variable is inserted in the environment on the workstation, thus enabling the install to take place without user intervention. Configuring Licensing and Metering for ApplicationsThe next run option configurable for Application objects is the licensing/metering variable option. The licensing/metering variable panel enables you to specify that you want to use Novell licensing and metering to run the application. If you want to use licensing, you can simply click the browse button and select the license certificate you want to use from the eDirectory tree. You can also specify that you do not want to run the application if NLS is not available. Configuring Application DependenciesZENworks for Desktops allows you to define applications that the Application object is dependent on before it can be executed on a workstation. This can be a very useful feature to verify the software requirements for a workstation. One example of when you might need to define an application dependency is if an application required a specific Windows support pack. You could create an Application object for the support pack and then use it as a dependency for any application that required it. Another example of when you might need to define an application dependency is if you have an application upgrade that will only install on a workstation with the original software installed. You could create an Application object for the original application and use it as a dependency for the upgrade. Other examples might include the need for an Oracle client to be installed on the workstation before the Oracle database application is run. The Application Launcher will ensure that the client is installed properly before running the database application. ZENworks allows for the nesting of chained applications. For example, application A can depend on B, who depends on C and D, and so on. When A is launched, the Application Launcher verifies that all of the dependent applications up the chain are installed. ZENworks allows you to define the following options for application dependencies:
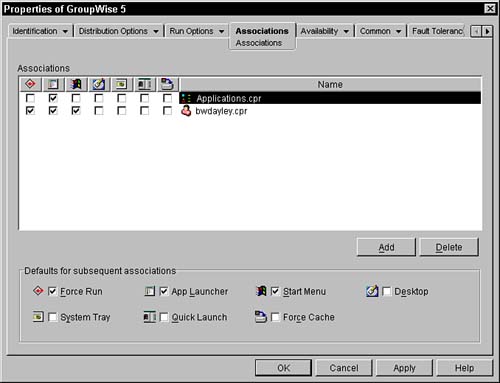
Setting Application Object AssociationsOnce you have set up the run options for an application, you need to set the Application object associations. Setting the associations for an Application object enables you to associate the application with a user, container, workstation, and control the behavior and visibility of the application as it is distributed to users. To access these options, select the Associations tab on the Application object. A screen similar to the one in Figure 6.16 is displayed. Figure 6.16. The Associations tab on the Application object.
From the Application object associations panel, you can click the Add button and then navigate the tree to add objects to which you want to associate the application. If you specify a container object, you can specify whether to associate the Application object to all users within the containter, all workstations within the container, or both users and workstations in the container. Once the objects are added, you can check the following items for each object in order to control the behavior and visibility of the application:
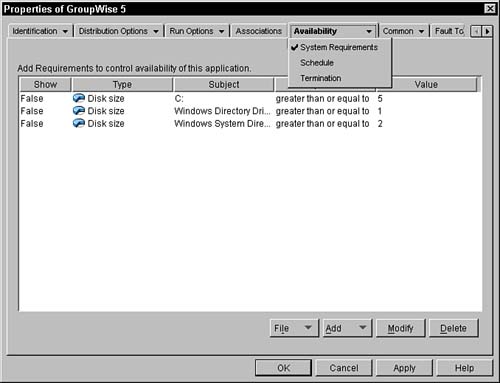
Setting Application AvailabilityOnce you have set up the association options for an application, you need to set the availability options. You can use the Availability tab to modify these settings. This feature depends on the settings you have set up for the Application Launcher on a User, Workstation, Organizational Unit, Organization, or Country object. You should be aware of those settings before trying to set up scheduling for the Application object. A good example of how to use the advanced feature is if you want to force run a virus detection application on a user's workstation at a certain time, and only one time. You can force users to run the virus check by scheduling the appearance of the application using the Schedule property page and designating the application as Force Run. NOTE Scheduling cannot deny access to an application outside of the schedule because file rights might still exist. Use the following steps to select which set of options on the Availability property tab you want to modify:
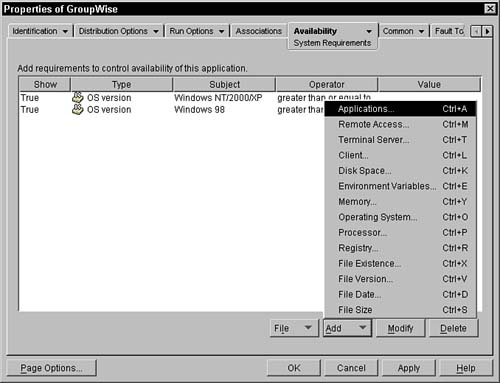
From the Application object's Availability property tab, you should access the individual property panels to configure the application availability options described in the following sections. Configuring System Requirements for ApplicationsThe top panel accessible from the availability tab is the System Requirements panel. The System Requirements property panel enables you to choose which applications are available to workstations by making certain that the workstation meets the criteria specified. The System Requirements tab enables you to set requirements on installed applications, disk space, environment variables, memory, operating system, processor, Registry entries, and file requirements. If workstations do not meet the criteria you specify, the icons do not appear on that workstation. For example, suppose you want a GroupWise 5.5 application icon to appear only on workstations that have at least 32MB of RAM, a Pentium processor, 5MB of free disk space on the C: drive, and 100MB of free disk space on a temp drive. You can set up those options by clicking the Add button, shown in Figure 6.18, to select and configure the requirement options described in the following sections. Figure 6.18. The system requirements property panel for Application objects in ConsoleOne.
ApplicationsThe System Requirements tab for Application objects enables you to filter applications based on the existence of other applications on the client. To filter workstations by installed applications, click the Add button from the System Requirements panel and then select Application from the pop-up menu. A window is displayed which enables you to navigate the directory services tree to find specific applications that should or should not exist. To filter on a specific application, simply navigate to that Application object in the eDirectory tree and then select it. Next, click the Application Object Is Installed or the Application Object Is Not Installed option. You want to use this option if an application is dependent on the existence of another one. For example if you want to deploy an application update, you can check for the existence of the original application before making it available to the workstation. Remote AccessThe System Requirements panel of Application objects enables you to filter applications based the type of remote access that they have. You can filter on whether they have a LAN connection or remote access connection. To filter on the remote access connection type, select Remote Access from the menu shown in Figure 6.18. From the pop-up window, select LAN connection or remote access connection. Then select the criteria option of true or false. Terminal ServerThe system requirements panel for Application objects enables you to filter applications based the availability of a terminal server. This can be extremely useful for applications that require a terminal server. To filter on terminal server availability, select Terminal Server from the menu shown in Figure 6.18. From the pop-up window, select Terminal Server Required or Terminal Server Not Required. Then select the criteria option of true or false. ClientThe System Requirements panel for Application objects enables you to filter applications based the availability of Novell client. This can be extremely useful for applications that require a Novell client connection. To filter on terminal server availability, select Client from the menu shown in Figure 6.18. From the pop-up window, select Connection is Using Novell Client or Connection is Not Using Novell Client. Then select the criteria option of true or false. Free Disk SpaceThe system requirements panel for Application objects enables you to filter applications based on the amount of free disk space available to the client. You can filter disk spaced on local drives and mapped network drives, as well as the following specific locations:
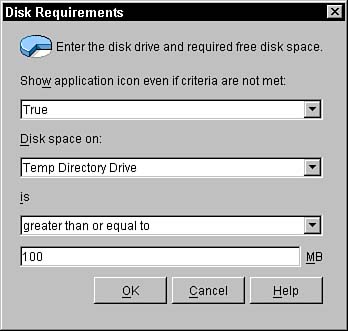
To filter workstations by disk space available, click the Add button from the system requirements panel and then select Disk Space from the pop-up menu. A screen similar to the one in Figure 6.19 appears. From this screen, first select the location disk, in which space is needed, from the top drop-down list. Next type the MB of disk space needed to install and run the application. Next, you can specify one of the following logical requirements:
Figure 6.19. The disk requirements box from the system requirements panel for Application objects in ConsoleOne.
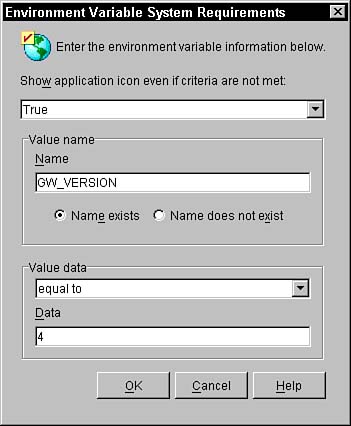
You can specify multiple locations that require disk space by performing the same steps again. An example of when to use this is when the application requires a minimum of 5MB free on the Windows directory drive and 100MB free on the TEMP drive. If you specify these settings, the Application object icon will only appear on workstations that contain enough free disk space in all three locations. Environment VariablesThe System Requirements panel for Application objects also enables you to filter applications based on specific environment variable settings on the client. To filter workstations by environment variables, click the Add button from the system requirements screen and then select Environment Variables from the pop-up menu. A screen similar to the one in Figure 6.20 appears. From this screen, first type the name of the variable then select whether the name should exist. You can also filter on the value of the variable by typing a value and selecting a logic operation such as equal to. Figure 6.20. The environment variables box from the system requirements property panel for Application objects in ConsoleOne.
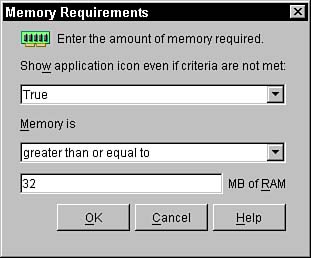
You can specify multiple environment variables to check for before displaying and installing the application by following the same process again. One example of when to use this is when some users use Netscape as their browser and some use Internet Explorer. If you only want users who use Netscape to receive the Netscape object, you can set up a browser environment variable on the workstations and then specify that variable be present from the system requirements property panel. Another example of when to filter on environment variables is if you wanted to apply an update to users with GroupWise 4 on their systems. You could check the version environment variable on those systems to make certain that GroupWise is installed and that its version is equal to 4. MemoryThe system requirements panel for Application objects enables you to filter applications based on the amount of memory installed on the client. To filter workstations by memory installed, click the Add button from the system requirements panel and then select Memory from the pop-up menu. A screen similar to the one in Figure 6.21 appears. From this screen, first type the MB of RAM needed to install and run the application. Next, you can specify one of the following logical requirements:
Figure 6.21. The memory requirements box from the system requirements property panel for Application objects in ConsoleOne.
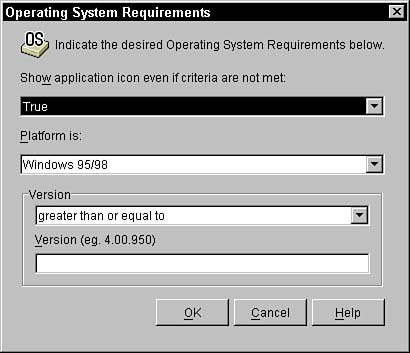
An example of when to use this option is if the application requires 32MB of RAM; select true, memory is greater than, and then enter 32 in the text box. The Application object will not appear on workstations that do not have at least 32MB of RAM. Display Applications on a Particular Operating SystemThe system requirements panel for Application objects enables you to filter applications based on the operating system installed on the client. To filter workstations by operating system, click the Add button from the system requirements panel and then select Operating System from the pop-up menu. A screen similar to the one in Figure 6.22 appears. From this screen, first select true or false for availability based on your criteria. Next, select the desired Windows platform. Figure 6.22. The operating system requirements box from the system requirements property Panel for Application objects in ConsoleOne.
Then you can specify a specific version of the operating system by specifying a version number as well as one of the following logical requirements:
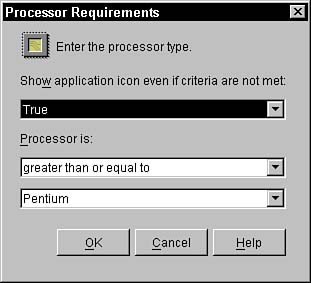
An example of when to use the operating system option is if you create an Application object for an application that does not run on Windows NT 4.0 workstations. You can specify specific criteria by selecting Windows NT, typing 4.0 in the Version text box, and selecting the equal to option. Finally, select false for the availability option. The application will not show up on Windows NT 4.0 workstations. ProcessorThe system requirements panel for Application objects enables you to filter applications based on the speed of the processor installed on the client. To filter workstations by processor, click the Add button from the system requirements panel and then select Processor from the pop-up menu. A screen similar to the one in Figure 6.23 appears. From this screen, first select the minimum processor needed to install and run the application from the following list:
Figure 6.23. The processor requirements box from the system requirements property panel for Application objects in ConsoleOne.
Next, you can specify one of the following logical requirements:
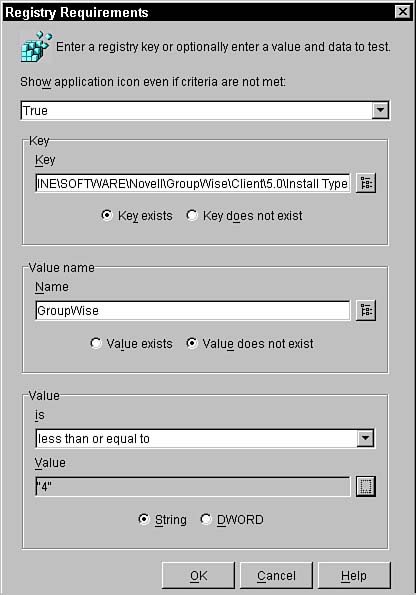
Registry EntriesThe system requirements panel for Application objects enables you to filter applications based on specific Windows Registry settings on the client. To filter workstations by Registry settings, click the Add button from the system requirements screen and then select Registry from the pop-up menu. A screen similar to the one in Figure 6.24 appears. From this screen, first navigate the Registry to find the specific Registry key to filter on. Type the name of the Registry entry or browse to find it. Then set the value of the entry, the data type (string or DWORD), and the logical operation to perform on it. You can filter based on the following criteria:
Figure 6.24. The Registry settings box from the system requirements property panel for Application objects in ConsoleOne.
You can specify multiple environment variables to check for before displaying and installing the application by following the same process again. FilesThe system requirements panel for Application objects enables you to filter applications based on specific files installed on the client. To filter workstations by files, click the Add button from the system requirements panel and then select Files from the pop-up menu. Another pop-up menu appears which enables you to select one of the following file filtering options:
Configuring Availability Schedule for ApplicationOnce you have configured the system requirements for application availability, you can move on to setting up a schedule for availability for the application. Select Schedule from the Availability tab drop-down list and the schedule panel appears. The None option is selected by default; however, you can configure the Application object to be available only to workstations based on a set of specific days or a range of days as described in the following sections. Set Schedule by Specified DaysYou can schedule application availability by specifying the Specified Days option as shown in Figure 6.25. This option enables you to select specific dates during which you want the application to be available. Figure 6.25. The schedule availability for specified days property panel in ConsoleOne.
The application is only visible to users during the specific dates and times you specify in this option. For example, if you select the dates June 7, 2003, June 10, 2003, July 2, 2003, and July 7, 2003, and start and end times of 8:00 a.m. and 5:00 p.m., this makes the application available from 8:00 a.m. to 5:00 p.m. on each of the days selected. The application is not available on any other days or at any other time. You select no more than 350 specific dates for this option. NOTE When scheduling applications, you can also force them to run at the scheduled time (in addition to merely displaying them). Because the Force Run option is available on a per-association basis, you must select it from the Applications property page located on a User, Group, Organization, or Organizational Unit object. If the association is not set up for a Force Run, the application icon is displayed according to the location specified by the association. Set Schedule by Range of DaysYou can set a schedule by specifying a range of days to make the application available as shown in Figure 6.26. For example, you select a start date of June 12, 2003 and an end date of June 16, 2003, with a start time of 6:00 a.m. and an end time of 6:00 p.m. The Application object icon would be visible to workstations from June 12th at 6:00 a.m. until June 16th at 6:00 p.m. Figure 6.26. The schedule availability for a range of days property panel in ConsoleOne.
Another useful way to use the range of days option is to make applications available only on certain days of the week within a given range of dates. You do so by combining start and end dates and times with the Days Available buttons. For example, suppose you select the dates June 2, 2003 and July 2, 2003, and start and end times of 6:00 a.m. and 6:00 p.m. You also select the Tuesday and Thursday buttons. This combination makes applications available on all Tuesdays and Thursdays that fall within the given date. Applications are available on Tuesdays and Thursdays from 6:00 a.m. until 6:00 p.m. Spread from Start TimeYou also can specify a spread of time in which the application becomes available to users. This is useful when you don't want all users to run the application at the same time for fear of load and traffic bringing down the network. The spread option literally "spreads out" user access times over the number of minutes specified so they don't all run the application at once. For example, consider a spread from start time option set to 120 minutes; the application becomes available, on a random basis, between the hours of 10:00 a.m. and 12 noon. This spreads the demand for the application out over a longer period of time and network traffic is minimized. NOTE If users access applications after the spread time is expired but before the end time of the Application object, they access the application at that time and the spread variable has no effect. GMT (Greenwich Mean Time)The final option you have available on the scheduling panels is to specify that all application scheduling that you do with the Application property page is based on the workstation's time zone. In other words, if your network spans different timezones and you schedule an application to run at 4:00 p.m., it would normally run at 4:00 p.m. in each timezone. However, by selecting the GMT check box, workstations run applications at the same time worldwide (according to GMT). Although, you should be aware that the GMT time is not available if you are filtering out days of the week when in the Specified Days mode. Configuring Application Termination OptionsThe final option you have available from the Availability tab is to set termination options for application availability. To configure the termination behavior, select Termination from the drop-down menu on the Availability tab. A panel similar to the one in Figure 6.27 appears. Figure 6.27. The termination property panel for Application objects in ConsoleOne.
From this panel, you can configure the following options that control the behavior terminating the application once it has been executed at the workstation. NoneThis option (default) enables users to close the application on their own without any intervention from ZENworks. If you require the application to be closed for any reason (such as updates or database indexing), don't use this option because you will not be able to force users to close the application. Send Message to Close ApplicationThis option prompts users, at a specified interval, to close the application on their own until the application closes. For example, if you set an interval of five minutes, ZENworks sends a message (if one is active) to the user every five minutes until the application is closed or the message has been sent the configured amount of times. To set this option:
Send Message to Close Then Prompt to Save DataThis option gives users a specified period of time to close the application on their own (this action is optional). When that period of time expires, the Application Launcher attempts to close the application. If users have not saved data, they are prompted to save it. Users can choose not to close the application. If users have no unsaved data, the application closes. Once the application has closed, users are not able to re-open it. To set this option:
Send Message to Close, Prompt to Save, and Then Force CloseThis option prompts users to close the application on their own. When that period of time during which users are prompted expires, ZENworks for Desktops can close the application that is prompting users, at specified intervals, to save their work. If users have still not closed within a specified period of time, the application is forced to close. To set this option:
Send Message to Close Then Force Close with ExplanationThis option prompts users to close the application on their own. When that period of time during which users are prompted expires, the application is forced to close. To set this option:
Setting Common Options for Application ObjectsOnce you have set up the availability options for an application, you need to set some common options to control some general behavior and configure the Application object. To access the options on the Common property tab, use the following steps to select which set of common options you want to modify:
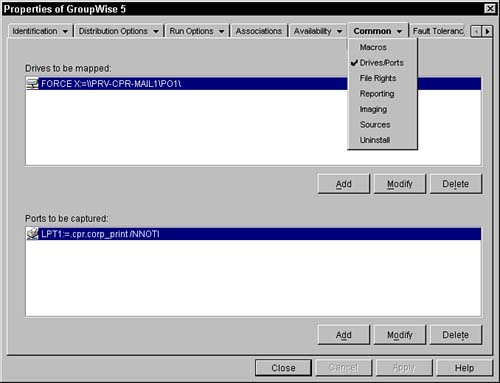
From the Application object's Common options property tab, you should access the individual property panels to configure some common options for the application as described in the following sections. Configuring Application Drives and PortsThe first advanced option available for Application objects from the Common tab pull-down menu is the Drives/Ports property panel. The Drives/Ports panel enables you to specify drives and ports that need to be mapped when the application launches on a workstation. To add a drive to be mapped for the application launch, click the Add button under the Drives to be mapped window. The drive mapping box, as shown in Figure 6.29, appears. From this box, you can perform the following options:
Figure 6.29. The drive mapping box for common options in ConsoleOne.
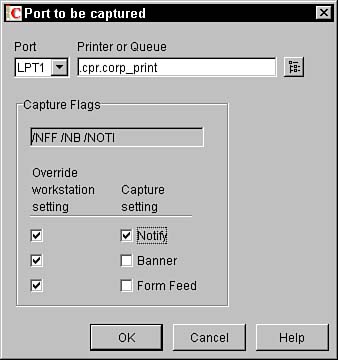
To add a port to be captured for the application launch, click the Add button under the Ports to be captured window. The port capturing box appears, as shown in Figure 6.30. From this box, you can perform the following options:
Figure 6.30. The port-capturing box for common options in ConsoleOne.
Configuring File Rights for Application LaunchThe next advanced option available for Application objects from the Common tab pull-down menu is the File Rights property panel. The File Rights panel enables you to grant rights to files, directories, and volumes. This is used when this Application object is associated with a User object or with a Group, Organizational Unit, Organization, or Country object with which the user is already associated. Use the following procedure to grant file rights to users when Application object is associated with them:
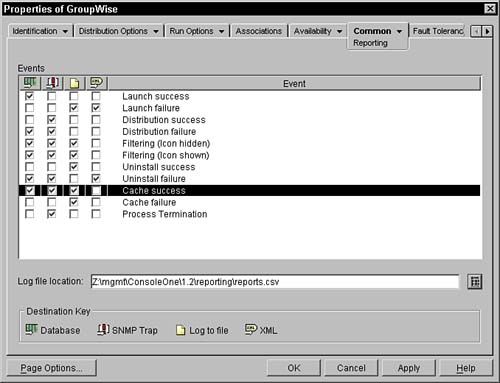
Configuring Application ReportingThe next advanced feature available from the Common tab pull-down menu is the Reporting option. When an application is distributed to the workstation, the Application Launcher records if the application was properly distributed. A successful distribution is recorded as well. Finally, errors are recorded along with the reasons for the failure in the distribution. This record of distribution is recorded on a local file, and results in an event being sent to the centralized database that is also used for hardware and software inventory. These distributions can be set up through the Reporting property panel in ConsoleOne. To access the Reporting Property panel, follow these steps:
From the Reporting property panel, you can select from the four following destination keys for various events that occur during application deployment:
You can specify these event keys for the following list of events:
Configuring Launch MacrosOne way to automate Application objects is to use the Macros property panel to set up special macros that can be used during object distribution and launch. These macros enable you to set up Application objects even when the user has a different system setup than what is expected by the administrator. To access the Macro Property panel:
The following sections describe the special macros that can be added to an Application object for use in distribution and launching. String MacrosThe first type of macro available for Application objects is the string macro. The string macro can retain a value that remains static during application distribution and launching. To set up a string macro, access the Macros property panel, using the steps described previously, from within ConsoleOne to select Add, String Value. You can set up the following options for the string macro:
Prompted Drive MacrosThe next type of macro available for Application objects is the prompted drive macro. The prompted drive macro enables you to prompt the user for a drive that will be used for application distribution and launching. For example, users might want to put an application on a different drive than what was described in the Application object. Prompted macros enable you to request that the user be prompted for the information. By using the prompted macros feature, you can request the destination drive from the user so that the resulting distribution goes to the specified drive. To set up prompted drive macros and access the Macros property panel, use the preceding steps from within ConsoleOne. Select Add, Prompted, Drive. A window similar to the one shown in Figure 6.33 is displayed. From the prompted macro window, you can set up the following options:
Figure 6.33. The prompted drive macro information window for Application objects in ConsoleOne.
Prompted String MacrosThe next type of macro available for Application objects is the prompted string macro. The prompted string macro enables you to prompt the user for a string that is used for application distribution and launching. For example, you want to ask the user for the user ID they use to access a corporate database; the macro can then be used by the application install to access the database and retrieve information necessary for the install. To set up prompted string macros, access the Macros property panel using the preceding steps from within ConsoleOne to select Add, Prompted, String; now you can set up the following options for the prompted string macro:
Configuring Application Object ImagingThe next advanced feature available from the common pull-down menu is the object imaging option. ZENworks enables you to create an image of the application by selecting the location of the image file, as shown in Figure 6.34, and then clicking the Create Image button. That image can later be applied to a newly imaged workstation as part of the imaging process discussed in Chapter 14, "Imaging a Workstation." Figure 6.34. The imaging property panel for Application objects in ConsoleOne.
Configuring Application SourcesAnother advanced feature available from the Common tab pull-down menu is the Sources option. The Sources option enables you to specify network volumes and directories that ZENworks for Desktops uses to find application packages for the application during distribution and launching. You can add volumes or directories to the list by clicking the Add button and typing the UNC path, or using the Browse button and navigating the eDirectory tree. Configuring Application UninstallOne of the most powerful features in ZENworks for Desktops application distribution is the capability to uninstall applications that were previously delivered. This provides you with control over which applications users have. Use the following steps to access the application uninstall options panel for Application objects and configure the uninstall behavior:
From the uninstall options panel, you can set the following options:
The following sections describe the options available to specifically control how the uninstall is performed on files, shortcuts, .INI files, and Registry entries. Files UninstallFrom the Application Uninstall panel, you can specify the precise criteria of how files are uninstalled. Click the Files tab; a screen similar to the one in Figure 6.35 is displayed. From this screen, you can specify to uninstall files with any of the following attributes set:
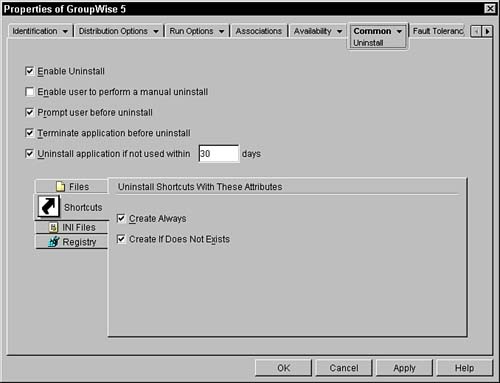
Shortcuts UninstallFrom the application uninstall panel, you can specify how shortcuts are uninstalled. Click the shortcuts tab; a screen similar to the one in Figure 6.36 is displayed. From this screen you can specify to uninstall shortcuts with any of the following attributes set:
Figure 6.36. The shortcuts uninstall property panel for Application objects in ConsoleOne.
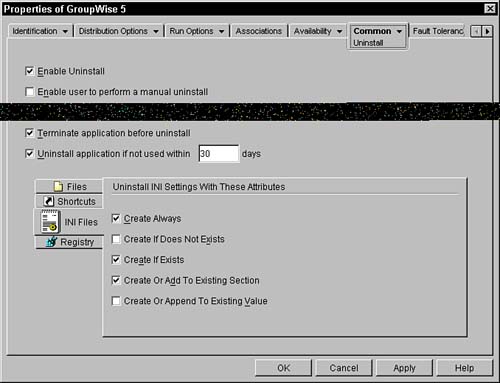
.INI Files UninstallFrom the application uninstall panel, you can specify how .INI files are uninstalled. Click the .INI files tab; a screen similar to the one in Figure 6.37 is displayed. From this screen you can specify to uninstall .INI files with any of the following attributes set:
Figure 6.37. The .INI files uninstall property panel for Application objects in ConsoleOne.
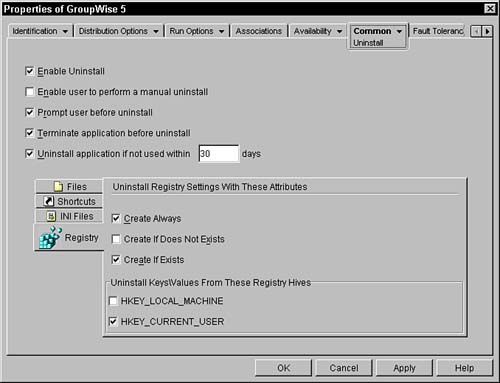
Registry UninstallFrom the application uninstall panel, you can specify how Registry entries are uninstalled. Click to show the Registry tab and a screen similar to the one in Figure 6.38 is displayed. From this screen, you can specify how the uninstall of Registry entries with any of the following attributes set will be handled:
Figure 6.38. The Registry uninstall property panel for Application objects in ConsoleOne.
Configuring Properties for MSI ObjectsIf the Application object was created from an .MSI file, there will be a properties option available from the common pull-down menu. This option enables you to configure any public property that is configured inside the MSI package. Configuring these options enables you to control more tightly how the application is distributed to users. The properties can be anything configurable for an MSI package, for example an environment variable or a destination path. Use the following steps to reconfigure a property in the .MSI file:
Configuring Transform Files for MSI ObjectIf the Application object was created from an .MSI file, there will also be a transforms option available from the common pull-down menu. This option enables you to configure a list of transform files that will be applied to the MSI package before it is distributed to users. Adding transform files to this list enables you even tighter control on the MSI Application object. These transform files modify the behavior of the MSI package install and therefore enable you more flexibility for application distribution. The transform file must be created using one of the approved methods. Use the following steps to add a transform file to be applied to an MSI package prior to install:
Setting Up Application Fault ToleranceAnother powerful feature in ZENworks for Desktops application distribution is the capability to provide fault tolerance and load balancing to application delivery. The fault-tolerance panel enables you to control the availability of applications to users. Use the following steps to access the fault-tolerance options panel for Application objects and configure the uninstall behavior:
The following sections describe setting up application fault-tolerance and load-balancing options from the fault tolerance panel. Configuring Application Fault Tolerance OptionsThe first option available from the drop-down menu under the fault-tolerance tab is to set up fault tolerance. The fault-tolerance feature enables you to specify alternative forms of the Application object to make the application available even if a problem with the current one exists. From the fault-tolerance options panel, you can enable fault tolerance and then set up the following fault-tolerance options. Use Source ListYou can define a list of application package sources to use if the current Application object is unavailable for any reason. To add other application package source locations, click the Add button. A window displays the sources that have been defined for this Application object (see "Configuring Sources" earlier in the chapter). Select the sources you want to use and click OK to add them to the source section of the fault tolerance panel. Use Application ObjectsYou can also define Application objects to be used as backup Application objects if the current object is unavailable. To add Application objects to the list, simply click the Add button. Then navigate the eDirectory tree to add the backup Application objects. Configuring Application Object Load BalancingThe next option available from the drop-down menu under the fault tolerance tab enables you to set up load balancing. The load-balancing feature enables you to specify alternative forms of the Application object to balance the use for a number of users. This increases the reliability and availability of applications for busy networks. From the load-balancing options panel, shown in Figure 6.39, you can enable load balancing for the application and then set up the following load-balancing options. Figure 6.39. The fault-tolerance load-balancing property panel for Application objects in ConsoleOne.
Use Source ListYou can define a list of application package sources to distribute the use of the current Application object. To add application package source locations, click the Add button. A window displays the sources that have been defined for this Application object (see "Configuring Sources" earlier in the chapter). Select the sources you want to use and click OK to add them to the source section of the load-balancing panel. Use Application ObjectsYou can also define Application objects to be used as load-balancing options for the current object. To add Application objects to the list, click the Add button. Navigate the eDirectory tree to add the backup Application objects. Configuring a Site List for Application ObjectsThe next option you can define is additional sites for the Application object. If you need your application to be highly available for users, you should create multiple copies of the Application object and link them to the original object by clicking the link button in this window. That way you can maintain a list of compatible application sources to use for fault tolerance and load balancing. Configure Remote FailoverThe final option you can define is an application to failover to if you are remote and unable to execute the current one. To add a failover Application object, simply click on the browse button and locate the remote backup. You can also select Always Use the Remote Failover Application When Remote if you want all remote users to use the failover application. An example of when to use this feature is if you have an application that requires a high-speed connection such as a database application. Normally the user, when connected, would launch this application over the LAN connection. You can make an Application object that will run the same database application on a Terminal Server. Then you can hook the Terminal Server version into the failover field. When the user is connected over a slow link, the system will automatically connect the user to a terminal services version of the application. This way, your users get to their applications no matter where they are connected! Setting Up MSI-Specific Options for Application ObjectsZENworks for Desktops provides special options for MSI Application objects in addition to the standard ones mentioned earlier in this chapter. The following sections discuss those options and how to configure them. Configuring and Viewing the Package InformationThe first MSI-specific option for Application objects is the package information panel located under the Identification tab of the Application Object Properties window (see Figure 6.40). The following information is provided about the .MSI Application object:
Figure 6.40. The MSI tab menu for Application objects in ConsoleOne.
Configuring the Transform ListThe first MSI-specific option for Application objects is the transforms list located under the MSI tab of the Application object, shown in Figure 6.40. You can add multiple transform (.MST) files to be applied the Application object. This allows you to add to the MSI object without having to create a new one. Configuring the MSI PropertiesThe next MSI-specific option for Application objects is the properties list located under the MSI tab of the Application object, shown in Figure 6.40. The properties list allows you to add and customize properties of the MSI Application object. The properties available depend on the vendor that created the .MSI file. They include things like readme or copyright files, macro data, environment variables, and so on. To add a property to an MSI Application object, click the Add button. Then select the property value name from the drop-down menu. Finally, set the correct value of the property and click OK. The property will now appear in the properties list. Configuring the MSI Verify OptionsThe next MSI-specific set of options for Application objects is the verify options panel located under the MSI tab of the Application object, shown in Figure 6.40. From this panel you can customize the methods ZENworks will use, during application distribution, when verifying different aspects of the MSI application install. The following is a list of the verification settings for MSI Application objects:
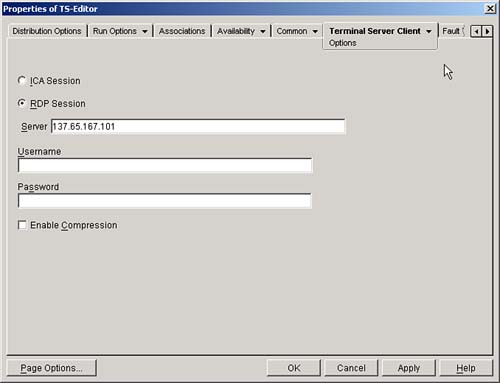
Configure the MSI Patches ListThe final MSI-specific option for Application objects is the patches list located under the MSI tab of the Application object, shown in Figure 6.40. You can add multiple patch (.MSP) files to be applied the Application object. This allows you to add updates/patches to the MSI object without having to create a new one. Setting Up Terminal Server-Specific Options for Application ObjectsZENworks for Desktops provides special options for Terminal Server Application objects in addition to the standard ones mentioned earlier in this chapter. The following sections discuss those options and how to configure them. To access the Terminal Server options, select the Thin Client tab as shown in Figure 6.41. Figure 6.41. The Thin Client tab for Application objects in ConsoleOne.
Configuring Session Options for a Terminal Server Application ObjectThe first Terminal Server-specific option for Application objects is the options panel located under the Thin Client tab, shown in Figure 6.41, of the Application object properties window. From the options tab, you must first specify whether the client will use an ICA or RDP session. Next you need to specify a name of the terminal server. You can specify a user login name and password to access it. If you do not specify the login name, the terminal server prompts the users for their login. You also can enable compression and/or encryption. Configuring Window Options for a Terminal Server Application ObjectThe next Terminal Server-specific option for Application objects is the window panel located under the Thin Client tab, shown in Figure 6.41, of the Application object properties window. From the window tab, you can define the behavior and look of the Terminal Server session. You can define either to open the desktop or to open an executable file. If you select Open this Executable File, you have to provide the location of the file in the field provided. You can also define the width and height of the session window. Setting Up Web-Specific Options for Application ObjectsZENworks for Desktops provides a special option for Web Application objects in addition to the standard ones mentioned earlier in this chapter. If you select the Web URL property panel from the Run Options tab of the Application objects properties window, you can configure the location of the Web application. You can also click the Test the URL button to check the behavior in the local browser. |


EAN: 2147483647
Pages: 198