Setting Up a Server Policy Package
To create a Server Policy Package do the following:
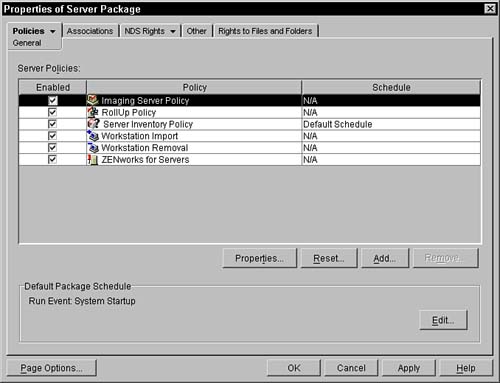
The following subsections describe each of the fields and property pages that are available in the Server Policy Package. The Policies Property PageAll of the policies for users are activated within the policies property page. Initially, the page is on the general policies. As other platforms are selected additional policies are displayed. You can select which platform to display by mousing over the small triangle to the right of the word Policies. This activates a drop-down menu that enables you to select which platform specific page you want to display. The following sections briefly discuss each of the policy pages; subsequent sections cover the specifics of each policy. General PoliciesWhen you first go into the properties of the Server Policy Package, you are presented with the Policies Property page. The policy page first displays the general category. The policies activated in the general category are active for all server platforms supported by ZENworks for Desktops 4 and associated to the server. Figure 12.1 shows a snapshot of the initial property page of the Server Policy Package. Figure 12.1. Server Policy Package policies general property page.
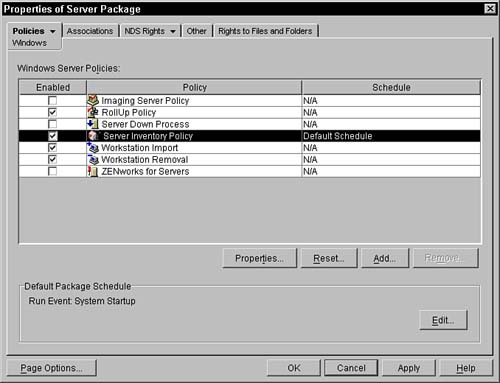
As you can see in Figure 12.1, four policies are available to all of the platforms supported by ZENworks for Desktops 4. They are Imaging Server Policy, Workstation Import Policy, Workstation Removal Policy, and RollUp Policy. These, as well as all of the other policies, are discussed later in this chapter. In order to activate a policy, you simply need to select it. You can then go into the details of the policy and set additional configuration parameters on that specific policy. Windows PoliciesWithin the policies tab you can select the Windows Servers policy page. This page displays the policies that are available for your Windows Servers. These policies include Imaging Server Policy, Workstation Import, Workstation Removal, and RollUp Policy. See Figure 12.2 for a sample of the Windows policies page. Figure 12.2. Server Policy Package Windows polices property page.
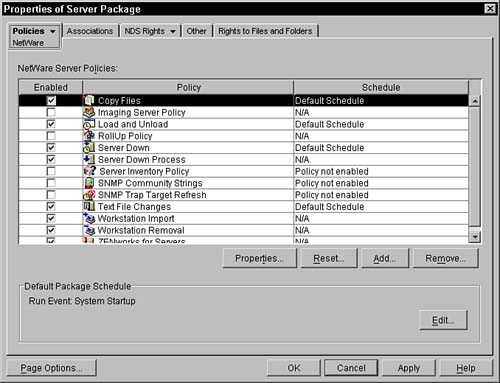
As you can see, the same policies appear in the General and the Windows policies pages. When you select a policy in the Windows page it supercedes any selections made on the General tab. The policies will not be merged; only the platform-specific policy is used. For example, if the Workstation Import policy is selected in the General tab and the Workstation Removal policy is selected in the Windows tab, agents on a Windows Servers system use the general import policy and the Windows removal policy is activated. NetWare PoliciesWithin the policies tab you can select the NetWare policy page. This page displays the policies that are available for NetWare servers. These policies include Imaging Server Policy, Workstation Import, Workstation Removal, and RollUp Policy. See Figure 12.3 for a sample of the NetWare policies page. Figure 12.3. Server Policy Package NetWare polices property page.
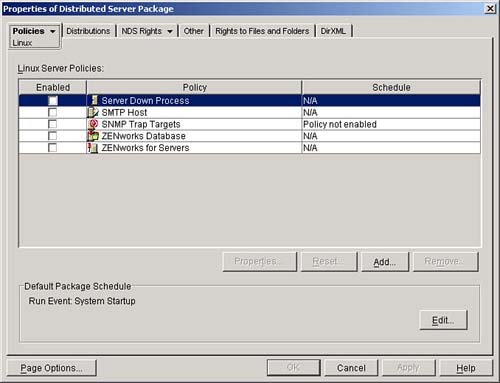
As you can see, the same policies appear in the General and the NetWare policies pages. When you select a policy in the NetWare page, it supercedes any selections made on the General tab. The policies will not be merged; only the platform specific policy is used. For example, if the Workstation Import policy is selected in the General tab and the Workstation Removal policy is selected in the NetWare tab, agents on a NetWare system use the general import policy and the NetWare removal policy is activated. Linux PoliciesWithin the policies tab you can select the Linux policy page. This page displays the policies that are available for Linux servers. These policies include Imaging Server Policy, Workstation Import, Workstation Removal, and RollUp Policy. See Figure 12.4 for a sample of the Linux policies page. Figure 12.4. Server Policy Package Linux polices property page.
As you can see, the same policies appear in the General and the Linux policies pages. When you select a policy in the Linux page, it supercedes any selections made on the General tab for that platform. The policies will not be merged; only the platform specific policy is used. For example, if the Workstation Import policy is selected in the General tab and the Workstation Removal policy is selected in the Linux tab, agents on a Linux system use the general import policy and the Linux removal policy is activated. Solaris PoliciesWithin the policies tab, you can select the Solaris policy page. This page displays the policies available for Solaris servers. These policies include Imaging Server Policy, Workstation Import, Workstation Removal, and RollUp Policy. See Figure 12.5 for a sample of the Solaris policies page. Figure 12.5. Server Policy Package Solaris polices property page.
As you can see, the same policies appear in the General and the Solaris policies pages. When you select a policy in the Solaris page, it supercedes any selections made on the General tab. The policies will not be merged; only the platform specific policy is used. For example, if the Workstation Import policy is selected in the General tab and the Workstation Removal policy is selected in the Solaris tab, agents on a Solaris system use the general import policy and the Solaris removal policy is activated. Associations Property PageThe Associations Page of the Server Policy Package displays all of the locations in the tree (containers) where the policy package has been associated. These associations do not necessarily reflect where the policy package is located in the directory. The agents that are associated with users or workstations that are in or below those containers have this policy package enforced. The Add and Remove buttons enable you to add or remove containers in the list that are associated with this policy. NDS Rights Property PagesThe NDS Rights property page is made up of three pages. You can get to each of the pages by clicking on the small triangle to the right of the page name, and then selecting the desired page to be displayed. These pages enable you to specify the rights that users have to this object in the directory. The following subsections briefly discuss each of these pages. These NDS Rights pages are displayed for every object in the tree. Trustees of This Object PageOn this page, you can assign objects rights as trustees of the Server Policy Package. These trustees have rights to this object or to attributes within this object. If the user admin.novell has been added to the trustee list, this user has some rights to this object. To view the details of any trustee assignment (in order to modify the assignment), you need to press the Assigned Rights button. When you press the Assign Rights button, you are presented with a dialog box that enables you to select [All Attribute Rights] (meaning all of the attributes of the object) or [Entry Rights] (meaning the object, not implying rights to the attributes). From within the Assigned Rights dialog box, you can set the rights the object has on this package. You can set those rights on the object as well as any individual property in the object. The rights that are possible are the following:
If you want to add the object as a trustee to an attribute, you need to press the Add Property button to view a list of properties or attributes available for this object. From this list you can select a single attribute. This attribute is then displayed in the Assigned Rights dialog box. From there you can select the attribute and then set the rights you want the trustee to have for that property. A user does not require object rights in order to have rights on a single attribute in the object. Remember that rights flow down in the tree. If you give a user or an object rights at a container level, those rights continue down into that container, and any sub-containers until that branch is exhausted, or another explicit assignment is given for that user in a sub-container or on an object. An explicit assignment changes the rights of the user at that point in the tree. You can also use inheritance rights filters to restrict this flow of rights down into the tree. Inherited Rights Filters PageThis page enables you to set the IRF (Inheritance Rights Filter) for this object. This filter restricts the rights of any user who accesses this object, unless that user has an explicit trustee assignment for this object. You can think of the IRF as a filter that lets only checked items pass through unaltered. Rights that bump up against an IRF filter are blocked and discarded if the item is not checked. For example, consider a user with write privileges inherited at some point above the current container (they were explicitly granted that right at some container at or above the one they're in). This user runs into an IRF for an object or attribute that has the write privilege revoked (that is, unchecked). When this user gets to that object, their write privilege will be gone for that object. If the object is a container, the user will lose write privileges for all objects in that container or sub-container. You can effectively remove supervisor privileges to a portion of the tree by setting an IRF with the supervisor privilege turned off. You must be careful not to do this without someone being assigned as the supervisor of that branch of the tree (given an explicit supervisor trustee assignment at the container where the IRF is done). Otherwise, you'll make that part of the tree permanent (that is, you will never be able to delete any objects in that branch of the tree). ConsoleOne helps keep you from performing this action by showing an error dialog box that keeps you from putting an IRF on the [Entry Rights] of the object without having first given an explicit supervisor assignment on the same container. Effective Rights PageThe Effective Rights property page enables you to query the system to discover the rights that selected objects have on the object that you are administering. Within this page, you are presented with the Distinguished Name (DN) of the object whose rights you want to observe. Initially, this is your currently logged in user running ConsoleOne. You can press the browse button to the right of the trustee field and browse throughout the tree to select any object. When the trustee object is selected, you can then move to the properties table on the lower half of the screen. As you select the property, the rights box to the right changes its text to reflect the rights that the trustee has on that property. These rights can be granted via an explicit assignment or through inheritance. Other Property PageThis page might not be displayed for you, depending on your rights to the plug-in that now comes with ConsoleOne. This page is particularly powerful. People who do not have an intimate knowledge of the schema of the object in question and its relationships with other objects in the directory should avoid using it. The intention of this property page is to give you generic access to properties that you cannot modify or view via the other plugged-in pages. The attributes and their values are displayed in a tree structure, allowing for those attributes that have multiple types (are compound types that consist of, say, an INT and a distinguished name, or postal code that has three separate address fields). Every attribute in eDirectory is defined by one of a specified set of syntaxes. These syntaxes identify how the data is stored in eDirectory. For this page, ConsoleOne has developed an editor for each of the different syntaxes that is currently available in eDirectory. When an attribute is displayed on this page, the editor is invoked to display the data and then modify it should the user click the specific attribute. For example, if the syntax of an attribute were a string or an integer, an in-line editor enables the administrator to modify the string or the integer value on the screen. More abstract syntaxes, such as octet-string, require that an octet editor be launched, thus giving the administrator access to each of the bytes in the string, without interpretation of the data. The danger with this screen is that some applications require that there be a coordination of attribute values between two attributes within the same object or across multiple objects. Additionally, many applications assume that the data in the attribute is valid, because the normal user interface checks for invalid entries and does not allow them to be stored in the attribute. If you should change a data value in the other page, no knowledge of related attributes or objects or valid data values are checked because the generic editors know nothing about the intention of the field. Should you change a value without making all the other appropriate changes, or without putting in a valid value, some programs and the system could be affected. Rights are still in effect in the Other property page and you are not allowed to change any attribute values that are read-only or that you do not have rights to modify. Rights to Files and Folders Property PageThis page in the property book is present in all objects in the directory. This property page enables you to view and set rights for this object on the appropriate volumes. You must first select the volume that contains the files and folders to which you are interested. You can do this by pressing the Show button and then browsing the directory to the volume object. Selecting the volume object places it in the volumes view. When that volume is selected you can then go to the Add button to add a file or folder of interest. This brings up a dialog box enabling you to browse to the volume object; clicking on the volume object moves you into the file system. You can continue browsing that volume until you select the file or directory you are interested in granting rights. Selecting the file or folder in the lower pane displays the rights that the object has been granted on that file or folder. To modify the rights, you simply click on or off the rights that you want to have explicitly granted for the object. You can also see the effective rights that the object has on the files by pressing the Effective Rights button. This displays a dialog box, enabling you to browse to any file in the volume. The object's effective rights are displayed (in bold). These effective rights include any explicit and inherited rights from folders higher in the file system tree. Remember that whoever has supervisor rights to the server or volume objects automatically has supervisor rights in the file system. |

EAN: 2147483647
Pages: 198