Using Text and Entry Widgets and the Grid Layout Manager
Using Text and Entry Widgets and the Grid Layout Manager
In GUI programming, there will be times where you'll want a user to enter some text. Other times, you may want to display text to the user. For both of these occasions, you can use text-based widgets. I introduce you to two kinds. The Entry widget is good for one line of text, while the Text widget is great for multiline blocks of text. You can read the contents of either of these widget types to get user input. You can also insert text into them to provide the user with feedback.
Once you start throwing a bunch of widgets into a frame, you need a way to organize them. So far, I've used the Grid layout manager, but in only the most limited way. The Grid layout manager offers you a lot more control over the way your GUI looks. The manager lets you place widgets at specific locations by treating a frame as a grid.
Introducing the Longevity Program
The Longevity program reveals the secret to living to the ripe old age of 100, if the user enters the secret password (the highly secure "secret"). The user enters the password in the text entry and then clicks the Submit button. If the password is correct, the program displays the key to longevity in the text box. Figures 10.11 and 10.12 show off the program.
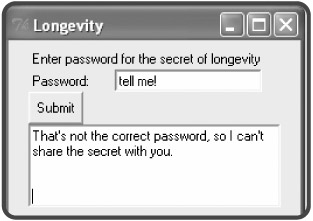
Figure 10.11: If the user fails to enter the correct password, the program politely refuses to divulge its secret.

Figure 10.12: Given the correct password, the program shares its invaluable knowledge to long life.
Setting Up the Program
I set up the program just like the last few:
# Longevity # Demonstrates text and entry widgets, and the Grid layout manager # Michael Dawson - 6/7/03 from Tkinter import * class Application(Frame): """ GUI application which can reveal the secret of longevity. """ def __init__(self, master): """ Initialize the frame. """ Frame.__init__(self, master) self.grid() self.create_widgets()
I import the Tkinter module and start to define the Application class. In the constructor method, I initialize the new Application object, make sure it will be visible, and invoke the object's create_widgets() method.
Placing a Widget with the Grid Layout Manager
Next, I start the create_widgets() method and create a label that provides instructions to the user:
def create_widgets(self): """ Create button, text, and entry widgets. """ # create instruction label self.inst_lbl = Label(self, text = "Enter password for the secret of longevity")
So far, nothing new. But in the next line, I use the Grid layout manager to be specific about the placement of this label:
self.inst_lbl.grid(row = 0, column = 0, columnspan = 2, sticky = W)
A widget object's grid() method can take values for many different parameters, but I only use four of them: row, column, columnspan, and sticky.
The row and column parameters take integers and define where an object is placed within its master widget. In this program, you can imagine the frame in the root window as a grid, divided into rows and columns. At each row and column inter-section is a cell, where you can place a widget. Figure 10.13 illustrates the placement of nine Button widgets, in nine different cells, using row and column numbers.
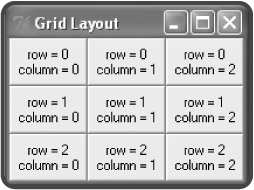
Figure 10.13: Each button is located in a unique cell, based on a row and a column number.
For my Label widget, I pass 0 to row and 0 to column, which puts the label in the upper-left corner of the frame.
If a widget is very wide (like the long instruction Label widget I have in this program), you may want to allow the widget to span more than one cell so that your other widgets are correctly spaced. The columnspan parameter lets you span a widget over more than one column. I pass 2 to this parameter to allow the long label to span two columns. This means that the label takes up two cells, the one at row 0, column 0, and the other at row 0, column 1. (You can also use the rowspan parameter to allow a widget to span more than one row.)
Even after you've established which cell (or cells) a widget occupies, you have the flexibility to justify the widget within the cell (or cells) by using the parameter sticky, which takes directions as values, including N, S, E, and W. A widget is moved to the quadrant of the cell (or cells) that corresponds to the direction. Since I pass W to sticky for the Label object, the label is forced to the west (left). Another way to say this is that the label is left-justified in its cells.
Next, I create a label that appears in the next row, left-justified:
# create label for password self.pw_lbl = Label(self, text = "Password: ") self.pw_lbl.grid(row = 1, column = 0, sticky = W)
Creating an Entry Widget
Next, I create a new type of widget, an Entry widget:
# create entry widget to accept password self.pw_ent = Entry(self)
This code creates a text entry where the user can enter a password.
I position the Entry widget so that it's in the cell next to the password label:
self.pw_ent.grid(row = 1, column = 1, sticky = W)
Then, I create a button that lets the user submit his or her password:
# create submit button self.submit_bttn = Button(self, text = "Submit", command = self.reveal)
I bind the activation of the button with the reveal() method, which reveals the longevity secret, if the user has entered the correct password.
I place the button in the next row, all the way to the left:
self.submit_bttn.grid(row = 2, column = 0, sticky = W)
Creating a Text Widget
Next, I create a new type of widget, a Text widget:
# create text widget to display message self.secret_txt = Text(self, width = 35, height = 5, wrap = WORD)
I pass values to width and height to set the dimensions of the text box. Then I pass a value to the parameter wrap, which determines how text in the box is wrapped. Possible values for the parameter are WORD, CHAR, and NONE. WORD, the value I use for this Text widget, wraps entire words when you reach the right edge of the text box. CHAR wraps characters, meaning that when you get to the right edge of the text box, the next characters simply appears on the following line. NONE means no wrapping. As a result, you can only write text on the first line of the text box.
Next, I set the text box so that it's on the next row and spans two columns:
self.secret_txt.grid(row = 3, column = 0, columnspan = 2, sticky = W)
Getting and Inserting Text with Text-Based Widgets
Next, I write the reveal() method, which tests to see if the user has entered the correct password. If so, the method displays the secret to a long life. Otherwise, the user is told that the password is incorrect.
The first thing I do is get the text in the Entry widget by invoking its get() method:
def reveal(self): """ Display message based on password. """ contents = self.pw_ent.get()
The get() method returns the text in the widget. Both Entry and Text objects have a get() method.
I check to see if the text is equal to "secret". If so, I set message to the string describing the secret to living to 100. Otherwise, I set message to the string that tells the user that he or she entered the wrong password.
if contents == "secret": message = "Here's the secret to living to 100: live to 99 "\ "and then be VERY careful." else: message = "That's not the correct password, so I can't share "\ "the secret with you."
Now that I've got the string that I want to show to the user, I need to insert it into the Text widget. First, I delete any text already in the Text widget by invoking its delete() method:
self.secret_txt.delete(0.0, END)
The delete() method can delete text from text-based widgets. The method can take a single index, or a beginning and an ending point. You pass floating-point numbers to represent a row and column number pair where the digits to the left of the decimal point is the row number and the digits to the right of the decimal point is the column number. For example, in the previous line of code, I pass 0.0 as the starting point, meaning that the method should delete text starting at row 0, column 0 (the absolute beginning) of the text box.
Tkinter provides several constants to help out with this type of method, such as END, which means the end of the text. So, this previous line of code deletes every-thing from the first position in the text box to the end. Both Text and Entry widgets have a delete() method.
Next, I insert the string I want to display into the Text widget:
self.secret_txt.insert(0.0, message)
The insert() method can insert a string into a text-based widget. The method takes an insertion position and a string. In the previous line of code, I pass 0.0 as the insertion position, meaning the method should start inserting at row 0, column 0. I pass message as the second value, so that the appropriate message shows up in the text box. Both Text and Entry widgets have an insert() method.
Wrapping Up the Program
To wrap up the program, I create a root window and set its title and dimensions. Then I create a new Application object with the root window as its master. Finally, I begin the application by starting the window's event loop.
# main root = Tk() root.title("Longevity") root.geometry("250x150") app = Application(root) root.mainloop() EAN: 2147483647
Pages: 194