Packaging the Application as a JAR
Visual Effects for 'o' ImagesA quick look at Table 6-1 shows that ImagesTests utilizes a large number of visuals effects. These can be classified into two groups:
I've already described the first group, which leaves a total of 11 effects. These are applied to the o images inside paintComponent( ) of ImagesTests. The relevant code fragment is: // ------------------ 'o' images --------------------- /* The programmer must manually edit the code here in order to draw the 'o' images with different visual effects. */ // drawImage(g2d, atomic, 10, 25); // only draw the image rotatingImage(g2d, atomic, 10, 25); mixedImage(g2d, balls, 110, 25); teleImage = teleportImage(g2d, bee, teleImage, 210, 25); flippingImage(g2d, cheese, 310, 25); blurringImage(g2d, eyeChart, 410, 25); reddenImage(g2d, house, 540, 25); zapImage = zapImage(g2d, pumpkin, zapImage, 710, 25); brighteningImage(g2d, scooter, 10, 160); fadingImage(g2d, ufo, 110, 140); negatingImage(g2d, owl, 450, 250); mixedImage(g2d, basn8, 650, 250); resizingImage(g2d, basn16, 750, 250); All the methods have a similar interface, requiring a reference to the graphics context (g2d), the name of the image, and the (x, y) coordinate where the modified image will be drawn. The operations can be grouped into eight categories, shown in Table 6-2.
The following subsections are organized according to the eight categories, with the operations explained in their relevant category. However, some general comments can be made about them here. The methods in ImagesTest do not do image processing. Their main task is to use the current counter value, modulo some constant, to generate suitable arguments to the image processing methods located in ImageSFXs. The use of the modulo operator means that the effects will repeat as the counter progresses. For example, resizingImage( ) makes the image grow for six frames, at which point the image is redrawn at its starting size and growth begins again. The image processing methods in ImagesSFXs do not change the original o images. Some of the methods write directly to the screen, by calling drawImage( ) with an image processing operator. Other methods generate a temporary BufferedImage object, which is subsequently drawn to the screen. The object exists only until the end of the method. teleportImage( ) and zapImage( ) are different in that their images are stored globally in ImagesTests, in the variables teleImage and zapImage. This means that method processing can be cumulative since earlier changes will be stored and remembered in the global variables. These operations don't modify the original o images; they only modify the teleImage and zapImage variables. The main reason for not changing the original images is to allow them to be reused as the effects cycles repeat. Another reason is that any changes to the images will cause the JVM to drop them from VRAM. This would make their future rendering slower for a short time. Where possible, image operations should be applied through drawImage( ) directly to the screen, as this will make hardware acceleration more likely to occur. If a temporary variable is necessary, then apply the image operation to a copy of the graphic in a VolatileImage object, forcing processing to be carried out in VRAM. There is a chance that this will allow the operation to be accelerated, but it may slow things down.
Precalculation Is FasterThe main drawback with image processing operations is their potentially adverse effect on speed. On Windows, none of the operations, except perhaps for those using drawImage( ) resizing and flipping, will be hardware accelerated.
In general, visual effects based around image processing operations should be used sparingly due to their poor performance. In many cases, alternatives using image sequences can be employed; rotation is an example. The s cars images display an animated series of rotated car images, which may all be in VRAM since the images are never modified. By comparison, the rotatingImage( ) method applied to the atomic o image makes it rotate, but this is achieved by generating new images at runtime using affine transformations. On Windows, none of these images would be hardware-accelerated. One way of viewing this suggestion is that graphical effects should be precalculated outside of the application and stored as ready-to-use images. The cost/complexity of image processing is, therefore, separated from the executing game. drawImage( )-Based ProcessingSeveral variants of drawImage( ), useful for visual effects such as scaling and flipping, are faster than the corresponding BufferedImageOp operations. The version of drawImage( ) relevant for resizing is: boolean drawImage(Image im, int x, int y, int width, int height, ImageObserver imOb) The width and height arguments scale the image so it has the required dimensions. By default, scaling uses a nearest neighbor algorithm; the color of an on-screen pixel is based on the scaled image pixel that is nearest to the on-screen one. This tends to make an image look blocky if it is enlarged excessively. A smoother appearance, though slower to calculate, can be achieved with bilinear interpolation. The color of an on-screen pixel is derived from a combination of all the scaled image pixels that overlap the on-screen one. Bilinear interpolation can be requested at the start of paintComponent( ): g2d.setRenderingHint(RenderingHints.KEY_INTERPOLATION, RenderingHints.VALUE_INTERPOLATION_BILINEAR); Here's the resizingImage( ) method in ImagesTests: private void resizingImage(Graphics2D g2d, BufferedImage im, int x, int y) { double sizeChange = (counter%6)/2.0 + 0.5; // gives 0.5 -- 3 imageSfx.drawResizedImage(g2d, im, x, y, sizeChange, sizeChange); }The sizeChange value is calculated from the counter value so it increases from 0.5 to 3.0, in steps of 0.5, and then restarts. This causes the image (basn6a16) to start at half-size and grow to three times its actual dimensions. The two copies of sizeChange passed into drawResizedImage( ) in ImageSFXs become widthChange and heightChange. After some error-checking, this is the method's resizing code: int destWidth = (int) (im.getWidth( ) * widthChange); int destHeight = (int) (im.getHeight( ) * heightChange); // adjust top-left (x,y) coord of resized image so remains centered int destX = x + im.getWidth( )/2 - destWidth/2; int destY = y + im.getHeight( )/2 - destHeight/2; g2d.drawImage(im, destX, destY, destWidth, destHeight, null); The drawing coordinate (destX, destY) is adjusted so the image's center point doesn't move on-screen when the image is resized. Here is the version of drawImage( ) suitable for image flipping: boolean drawImage(Image im, int dx1, int dy1, int dx2, int dy2, int sx1, int sy1, int sx2, int sy2, ImageObserver imOb) The eight integers represent four coordinates: (sx1, sy1) and (sx2, sy2) are the top-left and bottom-right corners of the image, and (dx1, dy1) and (dx2, dy2) are the top-left and bottom-right corners of a rectangle somewhere on-screen where those points will be drawn. This idea is illustrated by Figure 6-6. Figure 6-6. Drawing an image into an on-screen rectangle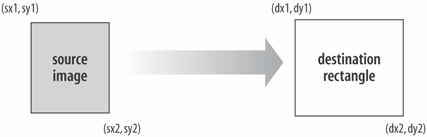 Usually, the image coordinates are (0, 0) and (width, height) so the entire image is drawn. The versatility comes in the range of possibilities for the on-screen rectangle; it can be used to scale, stretch, and flip. flippingImage( ) in ImagesTests calls getFlippedImage( ) in ImageSFXs with an ImageSFXs flipping constant: private void flippingImage(Graphics2D g2d, BufferedImage im, int x, int y) { BufferedImage flipIm = null; if (counter%4 == 0) flipIm = im; // no flipping else if (counter%4 == 1) flipIm = imageSfx.getFlippedImage(im, ImageSFXs.HORIZONTAL_FLIP); else if (counter%4 == 2) flipIm = imageSfx.getFlippedImage(im, ImageSFXs.VERTICAL_FLIP); else flipIm = imageSfx.getFlippedImage(im, ImageSFXs.DOUBLE_FLIP); drawImage(g2d, flipIm, x, y); }The counter value is manipulated so the image (cheese) will be repeatedly drawn normally, flipped horizontally, vertically, then flipped both ways. The image returned from getFlippedImage( ) is drawn by drawImage( ). This code does not make further use of flipIm, but it might be useful to store flipped copies of images for use later. getFlippedImage( ) creates an empty copy of the source BufferedImage and then writes a flipped version of the image into it by calling renderFlip( ): public BufferedImage getFlippedImage(BufferedImage im,int flipKind) { if (im == null) { System.out.println("getFlippedImage: input image is null"); return null; } int imWidth = im.getWidth( ); int imHeight = im.getHeight( ); int transparency = im.getColorModel( ).getTransparency( ); BufferedImage copy = gc.createCompatibleImage(imWidth, imHeight, transparency); Graphics2D g2d = copy.createGraphics( ); // draw in the flipped image renderFlip(g2d, im, imWidth, imHeight, flipKind); g2d.dispose( ); return copy; } // end of getFlippedImage( )renderFlip( ) is a multiway branch based on the flipping constant supplied in the top-level call: private void renderFlip(Graphics2D g2d, BufferedImage im, int imWidth, int imHeight, int flipKind) { if (flipKind == VERTICAL_FLIP) g2d.drawImage(im, imWidth, 0, 0, imHeight, 0, 0, imWidth, imHeight, null); else if (flipKind == HORIZONTAL_FLIP) g2d.drawImage(im, 0, imHeight, imWidth, 0, 0, 0, imWidth, imHeight, null); else // assume DOUBLE_FLIP g2d.drawImage(im, imWidth, imHeight, 0, 0, 0, 0, imWidth, imHeight, null); }To illustrate how the flipping works, consider the vertical flip shown in Figure 6-7. Figure 6-7. A vertical flip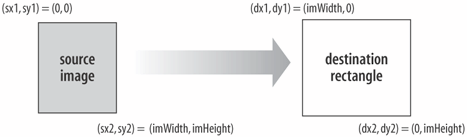 ImageSFXs contains two flipping methods that draw directly to the screen: drawVerticalFlip( ) and drawHorizFlip( ) are not used by ImagesTests. Alpha CompositingCompositing is the process of combining two images. The existing image (often the screen's drawing surface) is called the destination, and the image being rendered onto it is the source. Java 2D offers eight compositing rules which specify various ways that the source can be combined with the destination. The most useful is probably SRC_OVER (source over destination); the others include DST_OVER (destination over source), and SRC_IN, which clips the source to be visible only inside the boundaries of the destination. Java 2D's AlphaComposite class adds another element to the compositing rules: the alpha values for the source and destination. This can be somewhat confusing, especially when both images have alpha channels. However, for the SRC_OVER case, when the destination image is opaque (e.g., the on-screen background), the alpha applies only to the source image. An alpha value of 0.0f makes the source disappear, and 1.0f makes it completely opaque; various degrees of translucency exist between. Figure 6-8 shows the result of applying three different alpha values to a rectangle. fadingImage( ) in ImagesTests hacks together an alpha value based on counter, such that as the counter increases toward 25, the alpha value goes to 0. The result is that Figure 6-8. Alpha values applied to a rectangle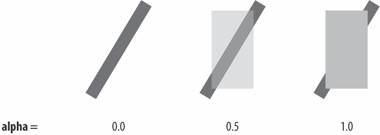 the image (ufo in ImagesTests) will fade in 2.5 seconds (25 frames, each of 0.1 second) and then spring back into view as the process starts again: private void fadingImage(Graphics2D g2d, BufferedImage im, int x, int y) { float alpha = 1.0f - (((counter*4)%100)/100.0f); imageSfx.drawFadedImage(g2d, ufo, x, y, alpha); }drawFadedImage( ) in ImageSFXs does various forms of error checking, and then creates an AlphaComposite object using SRC_OVER and the alpha value: Composite c = g2d.getComposite( ); // backup the old composite g2d.setComposite( AlphaComposite.getInstance( AlphaComposite.SRC_OVER, alpha) ); g2d.drawImage(im, x, y, null); g2d.setComposite(c); // restore old composite so it doesn't mess up future renderingg2d is the screen's graphics context, and its composite is modified prior to calling drawImage( ). Care must be taken to back up the existing composite so it can be restored after the draw. Affine TransformsrotatingImage( ) in ImagesTests rotates the image (atomic) in steps of 10 degrees in a clockwise direction, using the image's center as the center of rotation. The ImageSFXs method getrotatedImage( ) utilizes an AffineTransform operation to rotate a copy of the image, which is returned to rotatingImage( ) and drawn: private void rotatingImage(Graphics2D g2d, BufferedImage im, int x, int y) { int angle = (counter * 10) % 360; BufferedImage rotIm = imageSfx.getRotatedImage(im, angle); drawImage(g2d, rotIm, x, y); }geTRotatedImage( ) makes a new BufferedImage, called dest. An AffineTransform object is created, which rotates dest's coordinate space by angle degrees counterclockwise around its center. The source image is copied in, which makes it appear to be rotated by angle degrees clockwise around the center of dest: public BufferedImage getRotatedImage(BufferedImage src, int angle) { if (src == null) { System.out.println("getRotatedImage: input image is null"); return null; } int transparency = src.getColorModel( ).getTransparency( ); BufferedImage dest = gc.createCompatibleImage( src.getWidth( ), src.getHeight( ), transparency ); Graphics2D g2d = dest.createGraphics( ); AffineTransform origAT = g2d.getTransform( ); // save original // rotate the coord. system of the dest. image around its center AffineTransform rot = new AffineTransform( ); rot.rotate( Math.toRadians(angle), src.getWidth( )/2, src.getHeight( )/2); g2d.transform(rot); g2d.drawImage(src, 0, 0, null); // copy in the image g2d.setTransform(origAT); // restore original transform g2d.dispose( ); return dest; }The AffineTransform object (rot) could be composed from multiple transformssuch as translations, scaling, and shearingby applying more operations to it. For instance, TRanslate( ), scale( ), and shear( ) applied to rot will be cumulative in effect. Ordering is important since a translation followed by a rotation is not the same as a rotation followed by a translation. The main problem with this approach is the image is transformed within the image space of dest, which acts as a clipping rectangle. Thus, if the image is translated/rotated/sheared outside dest's boundaries, for example, beyond the bottom-right corner. Then, the image will be clipped or perhaps disappear completely This problem can occur even with rotations around dest's center; a look at the rotating atomic image highlights the problem. The simplest solution is a careful design of the graphic to ensure that its opaque areas all fall within a rotation circle placed at the center of the image file, with a radius constrained by the file's dimensions. For example, image (a) in Figure 6-9 is safe to rotate around the file's center point, and image (b) is not. When an image is rotated, areas in the destination image may not correspond to pixels in the source. For instance, in image (b) in Figure 6-9, strips on the left and right of the rotated image don't correspond to pixels in the original. They are drawn transparently if the original image has an alpha channel. However, if Figure 6-9. Safe and unsafe rotations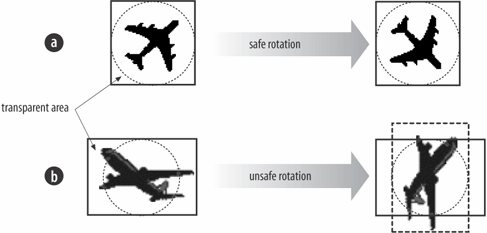 the original image is opaque (e.g., a JPEG), then the pixels will be colored black. For example, the balls.jpg image can be rotated with: rotatingImage(g2d, balls, 110, 25); Figure 6-10 shows the image after being rotated clockwise; black strips are visible on the left and right. Figure 6-10. Rotation of an opaque image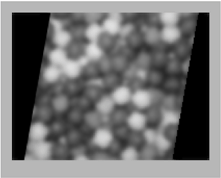 ConvolveOp ProcessingA convolution operator calculates the color of each pixel in a destination image in terms of a combination of the colors of the corresponding pixel in the source image, and its neighbors. A matrix (called a kernel) specifies the neighbors and gives weights for how their colors should be combined with the source pixel to give the destination pixel value. The kernel must have an odd number of rows and columns (e.g., 3x3) so the central cell can represent the source pixel (e.g., cell [1, 1]) and the surrounding cells its neighbors. Convolution is carried out by applying the kernel to every pixel in the source, generating destination pixels as it traverses the image. The example in Figure 6-11 is using a 3x3 kernel. Figure 6-11. Convolution from source to destination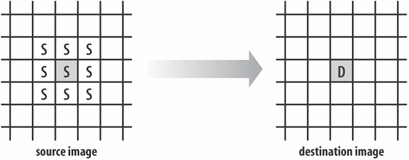 Figure 6-12 is a typical 3x3 kernel. Figure 6-12. A kernel for blurring an image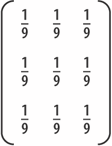 The 1/9 values are the weights. This kernel combines the source pixel and its eight neighbors using equal weights, which causes the destination pixel to be a combination of all those pixel's colors, resulting in an overall blurry image. The weights should add up to 1 in order to maintain the brightness of the destination image. A total weight of more than 1 will make the image brighter, and less than 1 will darken it. The resulting pixel color values are constrained to be between 0 and 255; values higher than 255 are converted to 255. One tricky aspect is what to do at the edges of the image. For example, what happens with the source pixel at (0, 0), which has no left and top neighbors? In most image processing packages, the solution is to treat the graphic as a wraparound so the pixels at the bottom of the image are used as the top neighbors, and the pixels at the right edge as left neighbors. Unfortunately, Java 2D is a little lacking in this area since its edge behaviors are simplistic. Either the destination pixel (e.g., [0, 0]) is automatically filled with black or set to contain the source pixel value unchanged. These possibilities are denoted by the ConvolveOp constants EDGE_ZERO_FILL and EDGE_NO_OP. Aside from blurring, convolution is utilized for edge detection and sharpening. Examples of both are given in Figure 6-13. Figure 6-13. Edge detection and sharpening kernels The edge detection kernel highlights the places where the colors in the image change sharply (usually at the boundaries between parts of the images), drawing them in white or gray. Meanwhile, large blocks of similar color will be cast into gloom. The result is a destination image showing only the edges between areas in the original picture. The sharpening kernel is a variant of the edge detection matrix, with more weight applied to the source pixel, making the overall weight 1.0 so the destination image's brightness is maintained. The result is that the original image will remain visible, but the edges will be thicker and brighter. ImageSFXs contains a drawBluredImage( ) method, which applies a precalculated blurring kernel: private ConvolveOp blurOp; // global for image blurring private void initEffects( ) // Create pre-defined ops for image negation and blurring. { // image negative, explained later... // blur by convolving the image with a matrix float ninth = 1.0f / 9.0f; float[] blurKernel = { // the 'hello world' of Image Ops :) ninth, ninth, ninth, ninth, ninth, ninth, ninth, ninth, ninth }; blurOp = new ConvolveOp( new Kernel(3, 3, blurKernel), ConvolveOp.EDGE_NO_OP, null); } public void drawBlurredImage(Graphics2D g2d, BufferedImage im, int x, int y) // blurring with a fixed convolution kernel { if (im == null) { System.out.println("getBlurredImage: input image is null"); return; } g2d.drawImage(im, blurOp, x, y); // use predefined ConvolveOp }When the ImageSFXs object is created, initEffects( ) is called to initialize the blurOp ConvolveOp object. A 3x3 array of floats is used to create the kernel. The EDGE_NO_OP argument states that pixels at the edges of the image will be unaffected by the convolution. drawBlurredImage( ) uses the version of drawImage( ) which takes a BufferedImageOp argument, so the modified image is written directly to the screen. This coding is satisfactory, but I require an image to become increasingly blurry over a period of several frames (see "eyeChart" in Figure 6-1). One solution would be to store the destination image at the end of the convolution and apply blurring to it again during the next frame. Unfortunately, ConvolveOps cannot be applied in place, so a new destination image must be created each time. Instead, my approach is to generate increasingly blurry ConvolveOps in each frame and apply this to the original image via drawImage( ). Increasingly blurry kernels are larger matrices that generate a destination pixel based on more neighbors. I begin with a 3x3 matrix, then a 5x5, and so on, increasing to 15x15. The matrices must have odd length dimensions so there's a center point. The weights in the matrix must add up to 1 so, for instance, the 5x5 matrix will be filled with 1/25s. The top-level method in ImagesTests is blurringImage( ): private void blurringImage(Graphics2D g2d, BufferedImage im, int x, int y) { int fadeSize = (counter%8)*2 + 1; // gives 1,3,5,7,9,11,13,15 if (fadeSize == 1) drawImage(g2d, im, x, y); // start again with original image else imageSfx.drawBlurredImage(g2d, im, x, y, fadeSize); }drawBlurredImage( ) in ImageSFXs takes a fadeSize argument, which becomes the row and column lengths of the kernel. The method is complicated by ensuring the kernel dimensions are odd, not too small, and not bigger than the image: public void drawBlurredImage(Graphics2D g2d, BufferedImage im, int x, int y, int size) /* The size argument is used to specify a size*size blur kernel, filled with 1/(size*size) values. */ { if (im == null) { System.out.println("getBlurredImage: input image is null"); return; } int imWidth = im.getWidth( ); int imHeight = im.getHeight( ); int maxSize = (imWidth > imHeight) ? imWidth : imHeight; if ((maxSize%2) == 0) // if even maxSize--; // make it odd if ((size%2) == 0) { // if even size++; // make it odd System.out.println( "Blur size must be odd; adding 1 to make size = " + size); } if (size < 3) { System.out.println("Minimum blur size is 3"); size = 3; } else if (size > maxSize) { System.out.println("Maximum blur size is " + maxSize); size = maxSize; } // create the blur kernel int numCoords = size * size; float blurFactor = 1.0f / (float) numCoords; float[] blurKernel = new float[numCoords]; for (int i=0; i < numCoords; i++) blurKernel[i] = blurFactor; ConvolveOp blurringOp = new ConvolveOp( new Kernel(size, size, blurKernel), ConvolveOp.EDGE_NO_OP, null); // leaves edges unaffected // ConvolveOp.EDGE_ZERO_FILL, null); //edges filled with black g2d.drawImage(im, blurringOp, x, y); } // end of drawBlurredImage( ) with size argumentA drawback with larger kernels is that more of the pixels at the edges of the source image will be affected by the edge behavior constants. With EDGE_NO_OP, an increasingly thick band of pixels around the edges will be unaffected. With EDGE_ZERO_FILL, the band will be pitch black. Figure 6-14 shows both effects when blurring is applied to the balls image with: blurringImage(g2d, balls, 110, 25); The black-edged image was generated after the ConvolveOp.EDGE_NO_OP constant was replaced by ConvolveOp.EDGE_ZERO_FILL in the call to ConvolveOp's constructor in drawBlurredImage( ). Figure 6-14. Edge behaviors with ConvolveOp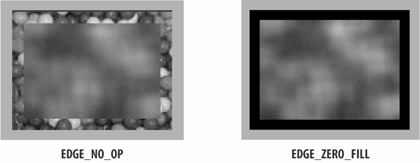 There's a need for more edge behavior options in future versions of the ConvolveOp class. LookupOp ProcessingAt the heart of LookupOp is the representation of a pixel using the sRGB color space, which stores the red, green, blue, and alpha channels in 8 bits (1 byte) each, snugly fitting them all into a single 32-bit integer. This is shown in Figure 6-15. Figure 6-15. The sRGB color space format The red, green, blue, and alpha components can each have 256 different values (28), with 255 being full on. For the alpha part, 0 means fully transparent, and 255 means fully opaque. A LookupOp operation utilizes a lookup table with 256 entries. Each entry contains a color value (i.e., an integer between 0 and 255), so the table defines a mapping from the image's existing color values to new values. The simplest form of LookupOp is one that uses one lookup table. The example below converts a color component value i to (255-i) and is applied to all the channels in the image. For example, a red color component of 0 (no red) is mapped to 255 (full on red). In this way, the table inverts the color scheme: short[] invert = new short[256]; for (int i = 0; i < 256; i++) invert[i] = (short)(255 - i); LookupTable table = new ShortLookupTable(0, invert); LookupOp invertOp = new LookupOp(table, null); g2d.drawImage(im, invertOp, x, y); // draw the image The ShortLookupTable constructor is supplied with an array to initialize the table mapping. A ByteLookupTable is built with an array of bytes. A visual way of understanding the mapping defined by invert[] is shown in Figure 6-16. Figure 6-16. The invert[] lookup table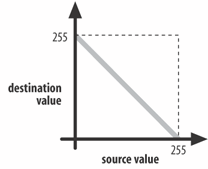 The table defines a straight line in this case, but a table can hold any mapping from source color component values to destination values. It's more common to utilize several lookup tables, using different ones for different channels. Also, no mapping is generally applied to an alpha channel of a transparent or translucent image. reddenImage( ) in ImagesTests draws its source image with increasing amounts of red over a period of 20 frames and then starts again (e.g., see the house image). The original image is unaffected since the LookupOp writes directly to the screen via drawImage( ). To increase the effect, as the redness increases, the amount of green and blue decreases, necessitating two lookup tables: one for red and one for green and blue. Any alpha component in the image is left unaffected: private void reddenImage(Graphics2D g2d, BufferedImage im, int x, int y) { float brightness = 1.0f + (((float) counter%21)/10.0f); // gives values in the range 1.0-3.0, in steps of 0.1 if (brightness == 1.0f) drawImage(g2d, im, x, y); // start again with original image else imageSfx.drawRedderImage(g2d, im, x, y, (float) brightness); }A minor hassle, illustrated by drawRedderImage( ), is dealing with opaque versus nonopaque images. An opaque image requires two lookup tables (one for red, one for green and blue), and a nonopaque image requires a third lookup table for the alpha channel. This separation occurs in all LookupOp methods that are passed both types of image. The same issue arises with RescaleOp and BandCombineOp operations. drawRedderImage( ) in ImageSFXs changes the colors, based on a brightness value that ranges from 1.0 to 3.0: public void drawRedderImage(Graphics2D g2d, BufferedImage im, int x, int y, float brightness) /* Draw the image with its redness is increased, and its greenness and blueness decreased. Any alpha channel is left unchanged. */ { if (im == null) { System.out.println("drawRedderImage: input image is null"); return; } if (brightness < 0.0f) { System.out.println("Brightness must be >= 0.0f;set to 0.0f"); brightness = 0.0f; } // brightness may be less than 1.0 to make the image less red short[] brighten = new short[256]; // for red channel short[] lessen = new short[256]; // for green and blue channels short[] noChange = new short[256]; // for the alpha channel for(int i=0; i < 256; i++) { float brightVal = 64.0f + (brightness * i); if (brightVal > 255.0f) brightVal = 255.0f; brighten[i] = (short) brightVal; lessen[i] = (short) ((float)i / brightness); noChange[i] = (short) i; } short[][] brightenRed; if (hasAlpha(im)) { brightenRed = new short[4][]; brightenRed[0] = brighten; // for the red channel brightenRed[1] = lessen; // for the green channel brightenRed[2] = lessen; // for the blue channel brightenRed[3] = noChange; // for the alpha channel // without this the LookupOp fails; a bug (?) } else { // not transparent brightenRed = new short[3][]; brightenRed[0] = brighten; // red brightenRed[1] = lessen; // green brightenRed[2] = lessen; // blue } LookupTable table = new ShortLookupTable(0, brightenRed); LookupOp brightenRedOp = new LookupOp(table, null); g2d.drawImage(im, brightenRedOp, x, y); } // end of drawRedderImage( )The three lookup tablesbrighten[], lessen[], and noChange[]are shown in Figure 6-17 when brightness has the value 2.0. As the value increases, more of the red color components will be mapped to full on and the blue and green color values will be lowered further. Figure 6-17. Lookup tables used in drawReddenImage( )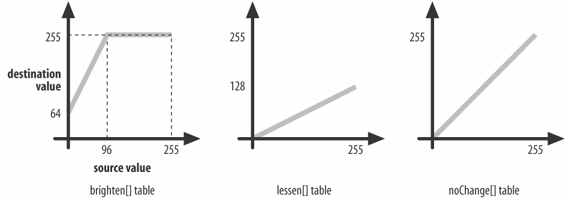 A 2D array, brightenRed[][], is declared and filled with three or four tables depending on if the image is opaque (i.e., only has RGB components) or also has an alpha channel. This array is used to create a LookupOp table called table, and then the operation proceeds. A LookupOp operation will raise an exception if the source image has an alpha channel and the operation only contains three tables. Therefore, check for the presence of an alpha band in the image, which is achieved with hasAlpha( ): public boolean hasAlpha(BufferedImage im) // does im have an alpha channel? { if (im == null) return false; int transparency = im.getColorModel( ).getTransparency( ); if ((transparency == Transparency.BITMASK) || (transparency == Transparency.TRANSLUCENT)) return true; else return false; }
RescaleOp ProcessingThe rescaling operation is a specialized form of LookupOp. As with a lookup, a pixel is considered to be in sRGB form; the red, green, blue (and alpha) channels are each stored in 8 bits (1 byte), allowing the color components to range between 0 and 255. Instead of specifying a table mapping, the new color component is defined as a linear equation involving a scale factor applied to the existing color value, plus an optional offset:
Any LookupOp table that can be defined by a straight line can be rephrased as a RescaleOp operation. Conversely, any RescaleOp can be written as a LookupOp. LookupOp is more general since the table mapping permits nonlinear relationships between the source and destination color components.
drawReddenImage( ), which was defined as a LookupOp using three (or four) tables, can be rephrased as a RescaleOp consisting of three (or four) rescaling equations. Each equation has two parts, which are a scale factor and an offset: RescaleOp brigherOp; if (hasAlpha(im)) { float[] scaleFactors = {brightness, 1.0f/brightness, 1.0f/brightness, 1.0f}; // don't change alpha // without the 1.0f the RescaleOp fails; a bug (?) float[] offsets = {64.0f, 0.0f, 0.0f, 0.0f}; brigherOp = new RescaleOp(scaleFactors, offsets, null); } else { // not transparent float[] scaleFactors = {brightness, 1.0f/brightness, 1.0f/brightness}; float[] offsets = {64.0f, 0.0f, 0.0f}; brigherOp = new RescaleOp(scaleFactors, offsets, null); } g2d.drawImage(im, brigherOp, x, y);The RescaleOp constructor takes an array of scale factors, an array of offsets, and optional rendering hints as its arguments. The three equations are employed in the code fragment:
The new red color component is bounded at 255 even if the equation returns a larger value. The green/blue_color equation is used for the green and blue channels.
As with LookupOp, the right number of scale factors and offsets must be supplied according to the number of channels in the image. For instance, if only three equations are defined for an image with an alpha channel, then an exception will be raised at runtime when the operation is applied. Brightening the imageImagesTests's brigheningImage( ) increases the brightness of its image over a period of nine frames and starts again with the original colors. (Take a look at the scooter image in ImageTests for an example.) The original image is unaffected since the operation writes to the screen. The brightness only affects the RGB channels; the alpha component remains unchanged: private void brighteningImage(Graphics2D g2d, BufferedImage im, int x, int y) { int brightness = counter%9; // gives 0-8 if (brightness == 0) drawImage(g2d, im, x, y); // start again with original image else imageSfx.drawBrighterImage(g2d, im, x, y, (float) brightness); }The ImageSFXs method, drawBrighterImage( ), uses a RescaleOp based around the following equations:
The RGB_color equation is used for the red, green, and blue channels. When the source image has no alpha, I can utilize a RescaleOp constructor that takes a single scale factor and offset. It will automatically apply the equation to all the RGB channels: public void drawBrighterImage(Graphics2D g2d, BufferedImage im, int x, int y, float brightness) { if (im == null) { System.out.println("drawBrighterImage: input image is null"); return; } if (brightness < 0.0f) { System.out.println("Brightness must be >= 0.0f; set to 0.5f"); brightness = 0.5f; } RescaleOp brigherOp; if (hasAlpha(im)) { float[] scaleFactors = {brightness, brightness, brightness, 1.0f}; float[] offsets = {0.0f, 0.0f, 0.0f, 0.0f}; brigherOp = new RescaleOp(scaleFactors, offsets, null); } else // not transparent brigherOp = new RescaleOp(brightness, 0, null); g2d.drawImage(im, brigherOp, x, y); } // end of drawBrighterImage( )Negating the imageImagesTests's negatingImage( ) keeps switching between the original image and its negative depending on the counter value. (See the owl image in ImageTests to see this in actione.g., as shown in Figure 6-1.) A color component value, i, is converted to (255-i) in the RGB channels, but the alpha is untouched: private void negatingImage(Graphics2D g2d, BufferedImage im, int x, int y) { if (counter%10 < 5) // show the negative imageSfx.drawNegatedImage(g2d, im, x, y); else // show the original drawImage(g2d, im, x, y); }When the ImageSFXs object is first created, the negative rescaling operations, negOp and negOpTrans, are predefined. negOpTrans is used when the image has an alpha channel, and contains these equations:
The RGB_color equation is applied to the red, green, and blue channels. negOp is for opaque images, so only requires the RGB equation: // global rescaling ops for image negation private RescaleOp negOp, negOpTrans; private void initEffects( ) { // image negative. // Multiply each color value by -1.0 and add 255 negOp = new RescaleOp(-1.0f, 255f, null); // image negative for images with transparency float[] negFactors = {-1.0f, -1.0f, -1.0f, 1.0f}; // don't change the alpha float[] offsets = {255f, 255f, 255f, 0.0f}; negOpTrans = new RescaleOp(negFactors, offsets, null); // other initialization code } public void drawNegatedImage(Graphics2D g2d, BufferedImage im, int x, int y) { if (im == null) { System.out.println("drawNegatedImage: input image is null"); return; } if (hasAlpha(im)) g2d.drawImage(im, negOpTrans, x, y); // predefined RescaleOp else g2d.drawImage(im, negOp, x, y); } // end of drawNegatedImage( )BandCombineOp ProcessingLookupOp and RescaleOp specify transformations that take a single color component in a pixel (e.g., the red color) and maps it to a new value. A BandCombineOp generalizes this idea to allow a new color component to be potentially defined in terms of a combination of all the color components in the source pixel. The destination pixel {redN, greenN, blueN, alphaN} is created from some combination of the source pixel {red, green, blue, alpha}, where the combination is defined using matrix multiplication, as in Figure 6-18. Figure 6-18. BandCombineOp as a matrix operation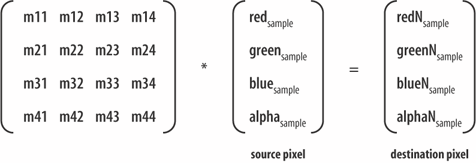 Here's an example equation:
BandCombineOp is different from the other operations I've discussed since it implements the RasterOp interface and not BufferedImageOp. This means that a little extra work is required to access the Raster object inside the source BufferedImage, and that the resulting changed Raster must be built up into a destination BufferedImage. ImagesTests's mixedImage( ) draws an image with its green and blue bands modified in random ways, while keeping the red band and any alpha band unchanged. See the balls and basn6a08 images for examples: private void mixedImage(Graphics2D g2d, BufferedImage im, int x, int y) { if (counter%10 < 5) // mix it up imageSfx.drawMixedColouredImage(g2d, im, x, y); else // show the original drawImage(g2d, im, x, y); }drawMixedColouredImage( ) distinguishes if the source has an alpha channel and creates a 4x4 or 3x3 matrix accordingly. The source Raster is accessed, the operation applied using filter( ), and the result is packaged as a new BufferedImage that is then drawn: public void drawMixedColouredImage(Graphics2D g2d, BufferedImage im, int x, int y) { // Mix up the colors in the green and blue bands { if (im == null) { System.out.println("drawMixedColouredImage: input is null"); return; } BandCombineOp changecolorsOp; Random r = new Random( ); if (hasAlpha(im)) { float[][] colorMatrix = { // 4 by 4 { 1.0f, 0.0f, 0.0f, 0.0f }, // new red band, unchanged { r.nextFloat( ), r.nextFloat( ), r.nextFloat( ), 0.0f }, // new green band { r.nextFloat( ), r.nextFloat( ), r.nextFloat( ), 0.0f }, // new blue band { 0.0f, 0.0f, 0.0f, 1.0f} }; // unchanged alpha changecolorsOp = new BandCombineOp(colorMatrix, null); } else { // not transparent float[][] colorMatrix = { // 3 by 3 { 1.0f, 0.0f, 0.0f }, // new red band, unchanged { r.nextFloat( ), r.nextFloat( ), r.nextFloat( ) }, // new green band { r.nextFloat( ), r.nextFloat( ), r.nextFloat( ) }}; // new blue band changecolorsOp = new BandCombineOp(colorMatrix, null); } Raster sourceRaster = im.getRaster( ); // access source Raster WritableRaster destRaster = changecolorsOp.filter(sourceRaster, null); // make the destination Raster into a BufferedImage BufferedImage newIm = new BufferedImage(im.getColorModel( ), destRaster, false, null); g2d.drawImage(newIm, x, y, null); // draw it } // end of drawMixedColouredImage( )The matrices are filled with random numbers in the rows applied to the green and blue components of the source pixel. The matrix row for the red component is {1, 0, 0, 0}, which will send the red source unchanged into the destination pixel. Similarly, the alpha component is {0, 0, 0, 1}, which leaves the alpha part unchanged. It's possible to treat a pixel as containing an additional unit element, which allows the BandCombineOp matrix to contain an extra column. This permits a wider range of equations to be defined. Figure 6-19 shows the resulting multiplication using a 4x5 matrix. Figure 6-19. BandCombineOp with an additional pixel element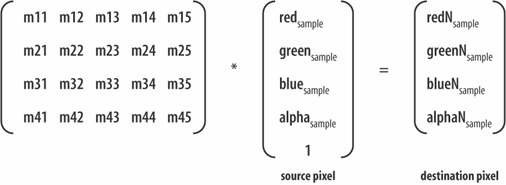 Here's an example:
The additional m15 element can be used to define equations that do not have to pass through the origin. This means that a zero input sample doesn't need to produce a zero output.
Pixel EffectsThe great advantage of BufferedImage is the ease with which its elements can be accessed (e.g., pixel data, sample model, color space). However, a lot can be done using only the BufferedImage methods, getrGB( ) and setRGB( ), to manipulate a given pixel (or array of pixels). Here are the single pixel versions: int getRGB(int x, int y); void setRGB(int x, int y, int newValue); The getrGB( ) method returns an integer representing the pixel at location (x, y), formatted using sRGB. The red, green, blue, and alpha channels use 8 bits (1 byte) each, so they can fit into a 32-bit integer result. The sRGB format is shown in Figure 6-15. The color components can be extracted from the integer using bit manipulation: BufferedImage im = ...; // load the image int pixel = im.getRGB(x,y); int alphaVal = (pixel >> 24) & 255; int redVal = (pixel >> 16) & 255; int greenVal = (pixel >> 8) & 255; int blueVal = pixel & 255; alphaVal, redVal, greenVal, and blueVal will have values between 0 and 255. The setRGB( ) method takes an integer argument, newValue, constructed using similar bit manipulation in reverse: int newValue = blueVal | (greenVal << 8) | (redVal << 16) | (alphaVal << 24); im.setRGB(x, y, newVal); Care should be taken that alphaVal, redVal, greenVal, and blueVal have values between 0 and 255, or the resulting integer will be incorrect. Error checking at runtime may be a solution but will have an impact on performance. Of more use are the versions of geTRGB( ) and setRGB( ) that work with an array of pixels. getrGB( ) is general enough to extract an arbitrary rectangle of data from the image, returning it as a one-dimensional array. However, its most common use is to extract all the pixel data. Then a loop can be employed to traverse over the data: int imWidth = im.getWidth( ); int imHeight = im.getHeight( ); // make an array to hold the data int[] pixels = new int[imWidth * imHeight]; // extract the data from the image into pixels[] im.getRGB(0, 0, imWidth, imHeight, pixels, 0, imWidth); for(int i=0; i < pixels.length; i++) { // do something to pixels[i] } // update the image with pixels[] im.setRGB(0, 0, imWidth, imHeight, pixels, 0, imWidth); At the end of the loop, the updated pixels[] array can be placed back inside the BufferedImage via a call to setRGB( ). The prototypes for the array versions of geTRGB( ) and setRGB( ) are: int[] getRGB(int startX, int startY, int w, int h, int[] RGBArray, int offset, int scansize); void setRGB(int startX, int startY, int w, int h, int[] RGBArray, int offset, int scansize); The extraction rectangle is defined by startX, startY, w, and h. offset states where in the pixel array the extracted data should start being written. scansize specifies the number of elements in a row of the returned data and is normally the width of the image. Teleporting an imageThe teleport effect causes an image to disappear, multiple pixels at a time, over the course of seven frames (after which the effect repeats). Individual pixels are assigned the value 0, which results in their becoming transparent. The bee image has this effect applied to it.
The changes are applied to a copy of the image (stored in the global teleImage). The copy is assigned an alpha channel, if the original doesn't have one, to ensure the image becomes transparent (rather than black). A global is used so pixel erasing can be repeatedly applied to the same image and be cumulative. The relevant ImageSFXs method is eraseImageParts( ). Its second argument specifies that the affected pixels are located in the image's pixel array at positions, which are a multiple of the supplied number: private BufferedImage teleportImage(Graphics2D g2d, BufferedImage im, BufferedImage teleIm, int x, int y) { if (teleIm == null) { // start the effect if (imageSfx.hasAlpha(im)) teleIm = imageSfx.copyImage(im); else // no alpha channel teleIm = imageSfx.makeTransImage(im); // give the copy an alpha channel } int eraseSteps = counter%7; // range is 0 to 6 switch(eraseSteps) { case 0: // restart the effect if (imageSfx.hasAlpha(im)) teleIm = imageSfx.copyImage(im); else // not transparent teleIm = imageSfx.makeTransImage(im); break; case 1: imageSfx.eraseImageParts(teleIm, 11); break; // every 11th pixel goes case 2: imageSfx.eraseImageParts(teleIm, 7); break; // every 7th pixel case 3: imageSfx.eraseImageParts(teleIm, 5); break; // 5th case 4: imageSfx.eraseImageParts(teleIm, 3); break; // 3rd case 5: imageSfx.eraseImageParts(teleIm, 2); break; // every 2nd pixel case 6: imageSfx.eraseImageParts(teleIm, 1); break; // every pixel goes, i.e., fully erased default: System.out.println("Unknown count for teleport"); break; } // end switch drawImage(g2d, teleIm, x, y); return teleIm; } // end of teleportImage( )The ImageSFXs support methods, copyImage( ) and makeTransImage( ), make copies of a BufferedImage, and are similar. copyImage( ) utilizes GraphicsConfiguration's createCompatibleImage( ) to make a BufferedImage object, and then the source image is drawn into it. makeTransImage( ) creates a new BufferedImage object of type TYPE_INT_ARGB to ensure it has an alpha channel. Then the source image is drawn into it: public BufferedImage makeTransImage(BufferedImage src) { if (src == null) { System.out.println("makeTransImage: input image is null"); return null; } BufferedImage dest = new BufferedImage( src.getWidth( ), src.getHeight( ), BufferedImage.TYPE_INT_ARGB); // alpha channel Graphics2D g2d = dest.createGraphics( ); // copy image g2d.drawImage(src, 0, 0, null); g2d.dispose( ); return dest; }ImageSFXs's eraseImageParts( ) has the same structure as the array-based getrGB( ) and setRGB( ) code outlined above: public void eraseImageParts(BufferedImage im, int spacing) { if (im == null) { System.out.println("eraseImageParts: input image is null"); return; } int imWidth = im.getWidth( ); int imHeight = im.getHeight( ); int [] pixels = new int[imWidth * imHeight]; im.getRGB(0, 0, imWidth, imHeight, pixels, 0, imWidth); int i = 0; while (i < pixels.length) { pixels[i] = 0; // make transparent (or black if no alpha) i = i + spacing; } im.setRGB(0, 0, imWidth, imHeight, pixels, 0, imWidth); }The loop jumps over the array, setting every ith pixel to have the value 0. This causes the red, green, blue, and alpha channels to be filled with 0 bits. Due to the alpha channel, this causes the pixel to become transparent. If no alpha existed, then the 0 bits would signify that red, green, and blue are switched off, and the pixel would be drawn in black. Zapping an imageZapping means the gradual changing of the image's visible parts to a random mix of red and yellow pixels. The number of changed pixels increases over the course of the effect (11 frames). See pumpkin for an example of the effect in action. The changes are applied to a copy of the image (stored in the global zapImage). After 11 frames, the image is restored and the effect begins again.
As with the teleportation effect, a global is used so the color changes can be repeatedly applied to the same image and be cumulative. The amount of zapping is controlled by the likelihood value which increases from 0 to 1. The method used in ImageSFXs is zapImageParts( ): private BufferedImage zapImage(Graphics2D g2d, BufferedImage im, BufferedImage zapIm, int x, int y) { if ((zapIm == null) || (counter%11 == 0)) zapIm = imageSfx.copyImage(im); // restart the effect else { double likelihood = (counter%11)/10.0; // produces range 0 to 1 imageSfx.zapImageParts(zapIm, likelihood); } drawImage(g2d, zapIm, x, y); return zapIm; }zapImageParts( ) uses the same approach as previously shown: the pixel array is extracted, modified in a loop, and then written back into the BufferedImage object: public void zapImageParts(BufferedImage im, double likelihood) { if (im == null) { System.out.println("zapImageParts: input image is null"); return; } if ((likelihood < 0) || (likelihood > 1)) { System.out.println("likelihood must be in the range 0 to 1"); likelihood = 0.5; } int redCol = 0xf90000; // nearly full-on red int yellowCol = 0xf9fd00; // a mix of red and green int imWidth = im.getWidth( ); int imHeight = im.getHeight( ); int [] pixels = new int[imWidth * imHeight]; im.getRGB(0, 0, imWidth, imHeight, pixels, 0, imWidth); double rnd; for(int i=0; i < pixels.length; i++) { rnd = Math.random( ); if (rnd <= likelihood) { if (rnd <= 15*likelihood/16 ) // red more likely pixels[i] = pixels[i] | redCol; else pixels[i] = pixels[i] | yellowCol; } } im.setRGB(0, 0, imWidth, imHeight, pixels, 0, imWidth); } // end of eraseImageParts( )The random effect of changing pixels to red or yellow is achieved by the use of Math.random( ). The red color (redCol) is defined as the octal 0xf90000 and yellow (yellowCol) as 0xf9fd00. To understand these, remember that the sRGB format stores color components in the order alpha, red, green, and blue, each in 8 bits. Eight bits can be represented by the octals 0x00 to 0xFF, as in Figure 6-20. Consequently, the red field in the sRGB format will be the fifth and sixth octal digits from the right, and the green field will be the third and fourth. Figure 6-20. The sRGB format in octal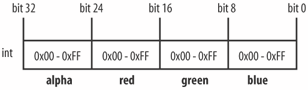 The octals are bitwise-ORed with a pixel, which causes the relevant color components to be overwritten. redCol overwrites the red color component only, and yellowCol replaces the red and yellow parts, which is a more drastic change. This is balanced in the code by having the red change done more often. |

EAN: 2147483647
Pages: 340