More on Picking
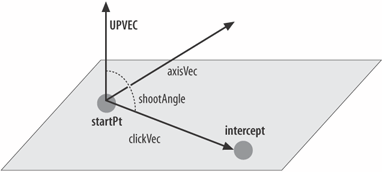
Shooting BehaviorShootingBehaviour is a subclass of PickMouseBehavior, which controls the various shooting-related entities when the user clicks the mouse. The gun cone and laser beam are rotated to point at the placed clicked on the checkerboard. Then, a FireBeam tHRead is created to move (fire) the beam towards the location and display the explosion. ShootingBehaviour's central role in the application means that it has passed references to the GunTurret, LaserBeam, and ExplosionsClip objects. In the first version of this class, the code was complex since it dealt directly with the transformGroups and Shape3Ds of the shooting elements. Good OOD of the application entities (e.g., hiding subgraph details and computation) leads to a halving of ShootingBehaviour's code length, making it easier to understand, maintain, and modify. The ShootingBehaviour constructor is similar to the constructor in ExamplePickBehavior: public ShootingBehaviour(Canvas3D canvas, BranchGroup root, Bounds bounds, Point3d sp, ExplosionsClip ec, LaserBeam lb, GunTurret g) { super(canvas, root, bounds); setSchedulingBounds(bounds); pickCanvas.setMode(PickCanvas.GEOMETRY_INTERSECT_INFO); // allows PickIntersection objects to be returned startPt = sp; // location of the gun cone explsClip = ec; laser = lb; gun = g; // other initialization code... } updateScene( ) is similar to the one in ExamplePickBehavior since it requires intersection information. updateScene( ) rotates the gun cone and beam to point at the intercept and starts a FireBeam thread to fire the beam and display an explosion: public void updateScene(int xpos, int ypos) { if (finishedShot) { // previous shot has finished pickCanvas.setShapeLocation(xpos, ypos); Point3d eyePos = pickCanvas.getStartPosition( ); // viewer loc PickResult pickResult = null; pickResult = pickCanvas.pickClosest( ); if (pickResult != null) { pickResultInfo(pickResult); // for debugging PickIntersection pi = pickResult.getClosestIntersection(startPt); // get intersection closest to the gun cone Point3d intercept = pi.getPointCoordinatesVW( ); rotateToPoint(intercept); // rotate the cone and beam double turnAngle = calcTurn(eyePos, intercept); finishedShot = false; new FireBeam(intercept, this, laser, explsClip, turnAngle).start( ); // fire the beam and show explosion } } } // end of updateScene( ) The finishedShot flag has an important effect on the behavior of the applicationit only allows a single laser beam to be in the air at a time. As FireBeam is started, finishedShot is set to false and will remain so until the thread has moved the beam to the intercept point. If the user clicks on the checkerboard while a beam is still traveling, nothing will happen since the if test in updateScene( ) will return false. As a result, the application only requires a single laser-beam object. Otherwise, the coding would have to deal with a user that could quickly click multiple times, each requiring its own laser beam. The call to getClosestIntersection( ) uses startPt, which is set in the constructor to be the cone's location. The resulting intercept will be the point nearest to the cone. Debugging PickingThe call to pickResultInfo( ) plays no part in the shooting process; it's used to print extra information about the PickResult object (pr). I use this method to check that the picking code is selecting the correct shape. getNode( ) is called to return a reference to the shape that the PickResult object represents: Shape3D shape = (Shape3D) pr.getNode(PickResult.SHAPE3D); The code must deal with a possible null result, which occurs if the selected node is not a Shape3D object. However, I've been careful to ensure only Shape3D nodes are pickable in this application, so there shouldn't be any problem. The PickResult object, pr, contains the scene graph path between the Locale and picked node, which can be employed to access an object above the picked node, such as a transformGroup. The path is obtained by calling getSceneGraph( ): SceneGraphPath path = pr.getSceneGraphPath( ); The path may often be empty since internal nodes aren't added to it unless their ENABLE_PICK_REPORTING capability bit is set. The path can be printed with a for loop: int pathLen = path.nodeCount( ); for (int i=0; i < pathLen; i++) { Node node = path.getNode(i); System.out.println(i + ". Node: " + node); } println( ) requires that the sceneBG BranchGroup node created in WrapShooter3D sets the necessary capability bit: sceneBG.setCapability(BranchGroup.ENABLE_PICK_REPORTING); Here is the output from the for loop in pickResultInfo( ): 0. Node: javax.media.j3d.BranchGroup@2bcd4b This isn't particularly informative. A typical way of improving the labeling of scene graph nodes is to use the setUserData( ) method from SceneGraphObject, which allows arbitrary objects to be assigned to a node (e.g., a String object): sceneBG.setUserData("the sceneBG node"); After a reference to the node has been retrieved, getUserData( ) can be utilized: String name = (String)node.getUserData( ); System.out.println(i + ". Node name: " + name); Rotating the ConerotateToPoint( ) rotates the gun cone and laser-beam cylinder to point at the intercept. The problem is that a simple rotation about the x-, y-, or z-axis is insufficient since the intercept can be anywhere on the floor. Instead, an AxisAngle4d rotation is utilized, which allows a rotation about any vector. The essential algorithm is illustrated in Figure 23-10. Figure 23-10. Rotating to face the intercept The cone (and beam) start by pointing in the UPVEC direction at the StartPt location, and they must be rotated to point in the clickVec direction, a rotation of shootAngle radians. The rotation is around the axisVec vector, which is perpendicular to the plane defined by the two vectors UPVEC and clickVec. startPt and UPVEC values are predefined, and intercept is supplied by updateScene( ) when it calls rotateToPoint( ). clickVec is readily calculated from the startPt and intercept points: clickVec.set( intercept.x-startPt.x, intercept.y-startPt.y, intercept.z-startPt.z); axisVec is the cross product, and Vector3d contains a cross( ) method which calculates it, given normalized values for UPVEC and clickVec: clickVec.normalize( ); axisVec.cross( UPVEC, clickVec);
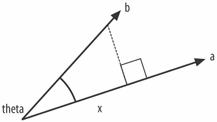
The rotation angle, shootAngle, between UPVEC and clickVec can be easily obtained with Vector3d's angle( ) method: shootAngle = UPVEC.angle(clickVec); shootAngle is related to the dot product: the dot product of vectors a and b (often written as a . b) gives the length of the projection of b onto a. For example, a.b = |x| in Figure 23-11. The angle, theta, between a and b can be expressed as the cosine function in Figure 23-12: If a and b are unit vectors, as in this code, then: Figure 23-11. The dot product of vectors a and b Figure 23-12. The cosine function between the vectors The cosine function can be removed by taking the inverse cosine of both sides (the arc cosine):
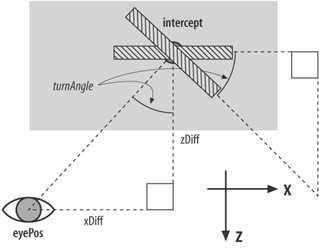
acos( ) is the arc cosine. Since shootAngle is the same as theta, I can obtain it using: shootAngle = Math.acos( UPVEC.dot(clickVec) ); Math.dot( ) is the dot product operation, and Math.acos( ) is the arc cosine. An AxisAngle4d object requires a vector and rotation, which can now be supplied: rotAxisAngle.set(axisVec, shootAngle); This object is used to rotate the cone and laser beam: gun.makeRotation(rotAxisAngle); laser.makeRotation(rotAxisAngle); A complication is that rotateToPoint( ) assumes that the cone and beam start in the UPVEC direction, which is true at the start of the application. For rotations after the first, the objects must be rotated back to the vertical first. This is achieved by rotating by shootAngle around the negative of the axisVec vector: if (!firstRotation) { // undo previous rotations axisVec.negate( ); rotAxisAngle.set( axisVec, shootAngle); gun.makeRotation(rotAxisAngle); laser.makeRotation(rotAxisAngle); } Making the Explosion Face the ViewerupdateScene( ) calls calcTurn( ) to calculate the angle that the explosion shape should rotate to face the viewer: double turnAngle = calcTurn(eyePos, intercept); The algorithm is illustrated by Figure 23-13. Figure 23-13. Turning to face the viewer The stripy red bar in Figure 23-13 is the explosion quad, which originally faces along the positive z-axis. I assume the viewer is at the eyePos position, an offset of xDiff units along the x-axis and zDiff units along the z-axis from the quad. A little bit of geometry shows that the angle that eyePos makes with the positive z-axis (called turnAngle) is the same as the angle that the quad should rotate to face the eyePos position. The eyePos and intercept points are supplied by updateScene( ). turnAngle is readily obtained as the arc tangent of xDiff and zDiff: double zDiff = eyePos.z - intercept.z; double xDiff = eyePos.x - intercept.x; double turnAngle = Math.atan2(xDiff, zDiff); |
EAN: 2147483647
Pages: 340
