Viewer Positioning
The FloorThe floor is made of tiles created with my ColouredTiles class, and axis labels made with the Java 3D Text2D utility class. Figure 15-5 shows the floor branch, previously hidden inside a "Floor Branch" box in Figure 15-3. Figure 15-5. Floor branch of the scene graph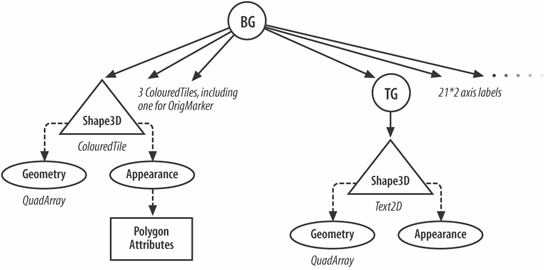 The floor subgraph is constructed with an instance of my CheckerFloor class and made available via the getBG( ) method: sceneBG.addChild( new CheckerFloor( ).getBG( ) ); // add the floor The CheckerFloor( ) constructor uses nested for loops to initialize two ArrayLists. The blueCoords list contains all the coordinates for the blue tiles, and greenCoords holds the coordinates for the green tiles. Once the ArrayLists are filled, they are passed to ColouredTiles objects, along with the color that should be used to render the tiles. A ColouredTiles object is a subclass of Shape3D, so can be added directly to the floor's graph: floorBG.addChild( new ColouredTiles(blueCoords, blue) ); floorBG.addChild( new ColouredTiles(greenCoords, green) ); The red square at the origin (visible in Figure 15-1) is made in a similar way: Point3f p1 = new Point3f(-0.25f, 0.01f, 0.25f); Point3f p2 = new Point3f(0.25f, 0.01f, 0.25f); Point3f p3 = new Point3f(0.25f, 0.01f, -0.25f); Point3f p4 = new Point3f(-0.25f, 0.01f, -0.25f); ArrayList oCoords = new ArrayList( ); oCoords.add(p1); oCoords.add(p2); oCoords.add(p3); oCoords.add(p4); floorBG.addChild( new ColouredTiles(oCoords, medRed) ); The square is centered at (0, 0) on the XZ plane and raised a little above the y-axis (0.01 units) so it's visible above the tiles. Each side of the square is the length of 0.5 units. The four Point3f points in the ArrayList are stored in a counterclockwise order. This is true for each group of four points in blueCoords and greenCoords. Figure 15-6 shows the ordering of the square's points. Figure 15-6. OrigMarker, viewed from above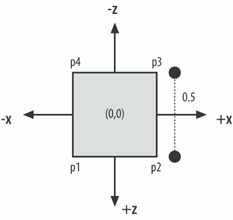 The Colored TilesMy ColouredTiles class extends Shape3D and defines the geometry and appearance of tiles with the same color. The geometry uses a Java 3D QuadArray to represent the tiles as a series of quadrilaterals (quads). The constructor is QuadArray(int vertexCount, int vertexFormat); The vertex format is an ORed collection of static integers, which specify the different aspects of the quad to be initialized later, such as its coordinates, color, and normals. In ColouredTiles, the QuadArray plane is created using this line of code: plane = new QuadArray(coords.size( ), GeometryArray.COORDINATES | GeometryArray.COLOR_3 ); The size( ) method returns the number of coordinates in the supplied ArrayList. The coordinate and color data is supplied in createGeometry( ): int numPoints = coords.size( ); Point3f[] points = new Point3f[numPoints]; coords.toArray( points ); // ArrayList>array plane.setCoordinates(0, points); Color3f cols[] = new Color3f[numPoints]; for(int i=0; i < numPoints; i++) cols[i] = col; plane.setColors(0, cols); The order in which a quad's coordinates are specified is significant. The front of a polygon is the face where the vertices form a counterclockwise loop. Knowing front from back is important for lighting and hidden face culling, and by default, only the front face of a polygon will be visible in a scene. In this application, the tiles are oriented so their fronts are facing upward along the y-axis. It's necessary to ensure that the points of each quad from a convex, planar polygon, or rendering may be compromised. However, each quad in the coordinates array doesn't need to be connected or adjacent to the other quads, which is the case for these tiles. Since a quad's geometry doesn't include normals information, a Material node component can't be used to specify the quad's color when lit. I could use a ColoringAttributes, but a third alternative is to set the color in the geometry, as done here (plane.setColors(0, cols);). This color will be constant, unaffected by the scene lighting. Once finalized, the Shape3D's geometry is set with: setGeometry(plane); The shape's appearance is handled by createAppearance( ), which uses a Java 3D PolygonAttribute component to switch off the culling of the back face. PolygonAttribute can be employed to render polygons in point or line form (i.e., as wire frames), and to flip the normals of back facing shapes: Appearance app = new Appearance( ); PolygonAttributes pa = new PolygonAttributes( ); pa.setCullFace(PolygonAttributes.CULL_NONE); app.setPolygonAttributes(pa); Once the appearance has been fully specified, it's fixed in the shape with setAppearance(app); The Floor's Axis LabelsThe floor's axis labels are generated with the labelAxes( ) and makeText( ) methods in CheckerFloor( ). labelAxes( ) uses two loops to create labels along the x and z. Each label is constructed by makeText( ) and then added to the floor's BranchGroup (see Figure 15-5): floorBG.addChild( makeText(pt,""+i) ); makeText( ) uses the Text2D utility class to create a 2D string of a specified color, font, point size, and font style: Text2D message = new Text2D(text, white, "SansSerif", 36, Font.BOLD); // 36 point bold Sans Serif A Text2D object is a Shape3D object with a quad geometry (a rectangle), and appearance given by a texture map (image) of the string, placed on the front face. By default, the back face is culled; if the user moves behind an axis label, the object becomes invisible. The point size is converted to virtual-world units by dividing by 256. Generally, it's a bad idea to use too large a point size in the Text2D( ) constructor since the text may be rendered incorrectly. Instead, a transformGroup should be placed above the shape and used to scale it to the necessary size. The positioning of each label is done by a transformGroup above the shape: TransformGroup tg = new TransformGroup( ); Transform3D t3d = new Transform3D( ); t3d.setTranslation(vertex); // the position for the label tg.setTransform(t3d); tg.addChild(message); setTranslation( ) only affects the position of the shape. The tg TRansformGroup is added to the floor scene graph. |
EAN: 2147483647
Pages: 340