Creating Your Own Picture Tubes
| [ LiB ] |
Creating Your Own Picture Tubes
Using Paint Shop Pro's F ile > Expor t > P icture Tube command, you can easily add a new tube that you've created. To create your own tube, start by opening a new image and selecting Transparent as the image's Background color . The dimensions of this tube canvas should be large enough to hold all of your Picture Tube elements in a series of regularly spaced columns and rows.
As an example, suppose that you want to make a tube based on the viola images shown in Figure 11.27, where each of the flowers has been isolated from a photograph.
Figure 11.27. Images used to create the example tube.
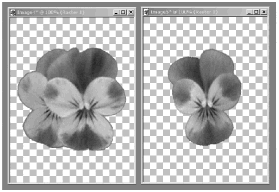
To create the tube, I used these images and mirrored versions of the originals .
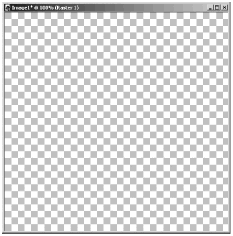
Each of the four images for this tube is 270x264 pixels, so to accommodate the four tube elements, the tube canvas in this case needs to be either 1080x264 (four columns and one row) or 266x1080 (one column and four rows) or 540x528 (two columns and two rows). For this example, a 540x528 canvas is used, as shown in Figure 11.28.
Figure 11.28. Open a new canvas for positioning your tube elements.
NOTE
 TIP
TIP
Although the size of Picture Tube elements can be scaled either up or down when you select a particular tube to paint with, the results are much better when you scale down than when you scale up. For this reason, it's best to make your tube elements as large as you're likely to want to use them.
For example, suppose that you'll usually want to paint with the elements in your tube displayed at about 50x50 pixels, but occasionally you'll want them to be about 100x100 pixels. In that case, create the tube with elements that are 100x100 pixels.
Before you place the Picture Tube elements on your newly opened canvas, turn on Paint Shop Pro's gridwhich makes aligning objects easierby selecting V iew > G rid. You can adjust the spacing of the grid lines by selecting F ile > Pre f erences > G eneral Program Preferences and going to the Rulers and Units tab, or by right-clicking your image canvas's title bar and choosing Change Grid, Guide, & Snap Properties .
Follow these steps to place the Picture Tube elements on the tube canvas:
-
Copy a selection from a source image to the Clipboard, and then paste the copied selection to the tube canvas as a new selection.
-
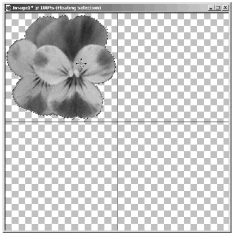
Position the selection, centering it within the first cell area of your tube canvas. In this example, the first pasted-in selection is positioned in the upper-left area of the tube canvas, as shown in Figure 11.29. After you position the selection correctly, click with the right mouse button outside the selection to anchor the selection and turn off the selection marquee.
Figure 11.29. Position each tube element.
NOTE
 CAUTION
 All opaque areas on the tube canvas will appear as opaque paint when you use your tube. You normally will want each tube element to be a figure surrounded by transparency. When the figure that you want for your tube element is only part of an opaque area of the source image, be sure to select only the part of the image that you want for your tube before using E dit > C opy.
-
Continue in the same way to copy, paste, and position the next tube element. Do the same with all the tube elements, positioning each in an appropriate area of the tube canvas.
-
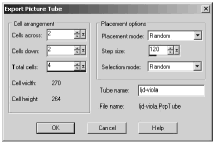
When all of your tube elements are positioned correctly, you're ready to export the image as a tube. Make sure that the tube canvas image is the active image by clicking its title bar. Then choose F ile > Expor t > P icture Tube. The Export Picture Tube dialog box, shown in Figure 11.30, is displayed.
Figure 11.30. Exporting a Picture Tube.
NOTE
TIP If you want to add a drop shadow to each of your tube elements, you don't need to make a selection before you apply the effect, nor do you have to add a shadow to each element individually. Drop Shadow (available under Effec t s > 3 D Effects) works without a selection on a layer anytime the layer contains transparency. Just apply Drop Shadow to the layer, and drop shadows will be added around each opaque figure on the layer.
NOTE
CAUTION Before you export your image as a Picture Tube, be sure that it has exactly one layer and no floating selections. If it has more than one layer, you've flattened the image, or a floating selection is active, Paint Shop Pro will refuse to export the image as a tube. Instead, you'll receive this rather confusing error message: "To save the image as a Picture Tube, the image must be 24-bit and have only one layer with a transparency."
-
In the Export Picture Tube dialog box, fill in the number of Cells across and the number of Cells down . The field for Total cells updates automatically. This example has two cells across and two cells down, for a total of four cells.
-
Fill in the settings you want for the Placement mode (Random or Continuous), Step size , and Selection mode . Here's a summary of the Selection mode options:
-
Random. Tube selection is random.
-
Incremental. Each tube element is selected sequentially, and then the sequence is repeated.
-
Angular. Tube selection is determined by the direction in which you drag the mouse as you paint.
-
Pressure. This is effective only if you're painting with a pressure-sensitive graphics tablet and have Paint Shop Pro set up to recognize different pen pressures.
-
Velocity. Tube selection is dependent on the speed of your mouse drag.
In the Tube name field, enter the name of the new tube as you want it to appear in the Tube drop-down list in the Picture Tube tool's Tool Options palette. (The name of the example tube was entered as "ljd-viola.") After you choose all the settings and enter the name of the tube, click OK.
-
After you click OK in the Export Picture Tube dialog box, Paint Shop Pro creates the new tube file and adds its name to the list of available tubes.
The new tube is ready to use. Choose the Picture Tube tool and select the new tube from the Tube drop-down list in the Tool Options palette. Then paint away with your new creation!
NOTE
TIP
Most tubes have more than one tube element. After all, why have a tube when you can just cut, paste, and resize a single figure? But there's at least one case where it makes sense to have a single tube element: where the tube has a Step of 1 and is used as a 3-D brush, like the 3D gold, 3D green, and 3D orange tubes.
| [ LiB ] |