Making Your Own Shapes Library
| [ LiB ] |
Making Your Own Shapes Library
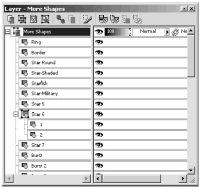
You can add new preset shapes by creating an image that contains groups of vector objects and then exporting the file with F ile > Expor t > S hape to create a new shapes library. Figure 11.6 shows the structure of the shapes library file for Shapes01.PspShape, an extra shapes library supplied by Jasc.
Figure 11.6. The structure of a shapes library.
To create your own shapes library, begin by choosing a drawing tool and creating your new shape or the first part of your new shape. (Be sure that the tool is set to its vector mode.) For complex shapes, continue adding vector objects until your shape is complete. Group all of the objects of a complex shape together as follows :
-
Select the objects that should be included in the shape, either by dragging around them with the Object Selector tool or by shift-clicking their layer buttons in the Layer palette.
-
Right-click on one of the selected objects and choose Group . (Alternatively, choose O bjects > G roup.)
Continue in this way until you have created all of the shapes that you want in your new library. Each shape is either an independent object or a set of objects that are grouped together.
Give each shape a meaningful name. For a single-object shape, rename the object. For a multi-object shape, name the group. To rename an object or a group, double-click its object button in the Layer palette and in the Vector Property dialog box, enter the new name in the Name text box.
To save your library of shapes, be sure that none of the objects or groups is selected, then choose F ile > Expor t > S hape. When prompted to, enter a name for your shapes library. Your new shapes are then available for use when you next select the Preset Shapes tool.
NOTE
 NOTE
NOTE
If your image contains non-vector layers, you must make one of the vector layers the active layer in order for F ile > Expor t > S hape to be available. Keep in mind, too, that only objects on the current vector layer will be exported as shapes.
| [ LiB ] |