Built-In Effects
| [ LiB ] |
Built-In Effects
Built-in effects are operations built into Paint Shop Pro that apply various special effects to your images. Some of them add a 3-D effect, others simulate natural materials or art media, and still others distort your image or add perspective.
You could spend a lifetime experimenting with Paint Shop Pro's built-in effects. Be sure to devote some time to exploring them, both singly and in combination with each other.
NOTE
 TIP
TIP
As mentioned earlier, built-in effects allow you to save your favorite settings as presets, which you can load again whenever you want them. When you're first trying out an effect, be sure to try out any presets that are supplied with Paint Shop Pro. That way, you'll get a feel for the various results possible.
You might also want to try out the Randomize button for an effect. You won't always get useful results, but sometimes this can help you discover more about an effect.
Let's begin with a brief catalog of the various built-in effects. Later, we'll go through some extended examples of what you can do with themsingly, in combination, and in concert with some of Paint Shop Pro's other facilities. Several of the effects are also featured prominently in Chapter 10, "Tricks and Techniques."
3-D Effects
As the name implies, 3-D effects create various sorts of 3-D looks. Apply these with Effec t s > 3 D Effects > effect name .
-
Buttonize. This creates simple rectangular buttons .
Figure 7.1 shows a rectangular image to which Buttonize was applied (with Transparent Edge selected, Height and Width both set to 30, and Opacity set to 75).
Figure 7.1. Rectangular image after Buttonize is applied.

You also can use I mage > Add B orders in combination with Buttonize to produce framelike effects. Figure 7.2 shows an example in which a 20-pixel border was added to a rose image, and then Buttonize was applied with Transparent Edge selected and Height and Width set to 15.
Figure 7.2. A Buttonized border added to an image.
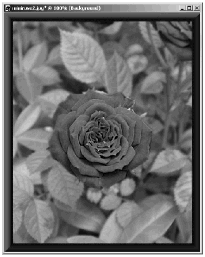
Use multiple Buttonized borders to make even fancier frames .
-
Chisel. This creates a chiseled effect outside the edges of a selection.
Figure 7.3 shows some chiseled text with the Transparent option selected, and Figure 7.4 shows the same text with Solid color selected instead. In each case, Size is set to 10.
Figure 7.3. Chisel with Transparent setting.

Figure 7.4. Chisel with Solid color setting.

-
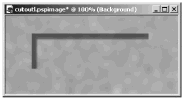
Cutout . This creates a cutout effect inside a selection. You can choose to either fill the interior of the selection with a color, as in Figure 7.5, or not fill the selection with color, as in Figure 7.6. On a layer that supports transparency, this second option "cuts out" the selected area, making it transparent and so letting lower layers show through.
Figure 7.5. Cutout with interior filled.

Figure 7.6. Cutout with no fill color.
-
Drop Shadow. This creates a drop shadow outside a selection. If you choose to place the shadow on its own layer, you can later reposition the shadow or distort it with the Deform tool to create a perspective shadow.
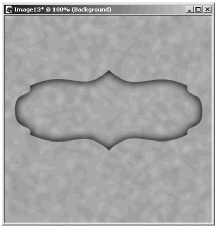
You can get a nice effect by adding a drop shadow around an empty text selection placed over a patterned background, so that only the shadow defines the text. Something else to try is to make a text selection, invert the selection, and apply Drop Shadow with both offsets set to 0. This produces either a cutout or bas-relief effect, as in Figure 7.7, where this method is used with a character from Astigmatic One Eye's ButtonButton, a dingbat font.
Figure 7.7. Drop Shadow applied to an inverted selection.
-
Inner Bevel. This creates a beveled effect inside a selection. You can use Inner Bevel to create nonrectangular buttons and 3-D text.
Although the effects produced by Inner Bevel appear quite simple, the controls available are pretty complex. At first, the Inner Bevel dialog box (see Figure 7.8) might seem a little intimidating, but after you've used this effect a few times, it will become second nature to you.
Figure 7.8. The Inner Bevel dialog box.
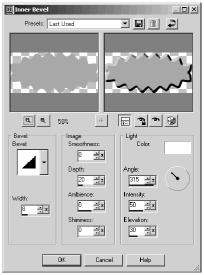
On the left of the dialog box is a section labeled Bevel , in which you choose the shape of the bevel and its width. To the right of the Bevel section is one labeled Image , which contains controls for Smoothness , Depth , Ambience , and Shininess , defined as follows :
Smoothness. Determines to what degree the bevel is sharply edged or blends smoothly in with the flat part of the image. The higher the Smoothness , the rounder the edges of the bevel.
Depth. Determines how pronounced the edges of the bevel are. The higher the Depth , the more pronounced the edges.
Ambience. Determines the overall brightness of the image.
Shininess. Determines how glossy the bevel appears. The higher the Shininess value, the more pronounced the highlights on the bevel.
The right section of the dialog box, labeled Light , contains controls for setting the light shining on the image. At the top of this section is a color swatch. Click this swatch to call up the Color dialog box, where you can select the color for your light.
Below the color swatch are two controls that you can use to set the angle of the light: a dial and a text box labeled Angle . To set the light's angle, you can either drag the hand of the dial or enter a number of degrees in the text box.
Next are two sliders, one labeled Intensity and the other labeled Elevation . Intensity determines the brightness of the light shining on the object. Note that this will be added to the ambient brightness set with Ambience , so adjustments to Intensity might require you to also adjust Ambience in order to maintain a certain overall brightness.
Elevation determines the vertical position of the light source. A setting of 90 places the light source directly overhead. The lower the elevation, the closer the light source is to the "ground."
NOTE
 NOTE
NOTE Several of Paint Shop Pro's effects use Smoothness , Depth , Ambience , Shininess , and the Light controls, including Inner Bevel, Outer Bevel, Sculpture, Texture, and Tiles.
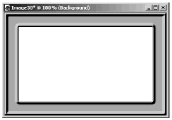
A couple examples of Inner Bevel are shown in Figures 7.9 through 7.11. Figure 7.9 shows an irregularly shaped beveled button, Figure 7.10 shows beveled text, and Figure 7.11 shows a picture frame.
Figure 7.9. An irregularly shaped button made with Inner Bevel.
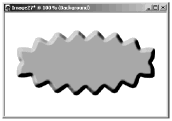
Figure 7.10. Text enhanced with Inner Bevel.
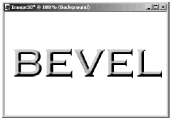
Figure 7.11. A picture frame made with Inner Bevel.
NOTE
 TIP
TIP You can add to a beveled figure's feeling of depth by also applying Drop Shadow to the figure.
After you start experimenting with Inner Bevel, you're sure to find all sorts of uses for it, beyond frames and buttons. You can produce some nice gold text, for example, by filling a text selection with any of the metallic gradients supplied by Jasc and then applying Inner Bevel.
-
Outer Bevel. This creates a beveled effect outside a selection and can be used to make the selected area appear to rise out of the background. (Note that Outer Bevel is unavailable with floating selections.)
NOTE
 TIP
TIP
Chisel, Cutout, Drop Shadow, and Inner Bevel can also be applied to a figure surrounded by transparency on a layer, as well as to a selection.
Art Media Effects
Art Media effects create the look of various art media. Apply them with Effec t s > Art M edia Effects > effect name .
-
Black Pencil and Colored Pencil. These emphasize the edges in your image and lighten other areas, so that the image resembles a pencil drawing.
-
Brush Strokes. Use Brush Stroke to give your image the look of various types of paintings, including oils and watercolor.
-
? These create an effect much like that produced with Black Pencil and Colored Pencil, but with edges that are thicker and rougher.
-
Pencil. This is another effect that can make your image look like a pencil drawing. Good results can usually be achieved with black as the Color and a high Luminance setting or with white as the Color and a low negative Luminance setting.
NOTE
 NOTE
NOTE
While some of these effectssuch as Brush Strokeswork quite well with both drawings and photos, you might find that you get the best results from Black Pencil, Colored Pencil, Charcoal, Colored Chalk, and Pencil on drawings.
With photos, you might first want to eliminate a busy background or other unimportant details before applying one of the Art Media effects. Increasing the contrast a bit might also yield the best results.
Artistic Effects
Artistic effects produce quite a few special effects, some of them quite complex. Apply them with Effec t s > A rtistic Effects > effect name .
-
Aged Newspaper and Sepia Toning. Both of these give a yellowed or sepia tint to your image. In addition, Aged Newspaper slightly blurs the image.
-
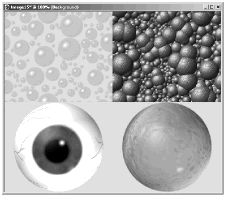
Balls and Bubbles . This is an incredibly versatile addition to Paint Shop Pro 8. You can make almost anything that is vaguely sphere-shaped using this effect, from a cloud of bubbles, to snow, to balls, to planets, to eyeballs, and even to various kinds of fruits and vegetables (particularly if you warp the results). Figure 7.12 shows just a few of the things you can make with Balls and Bubbles.
Figure 7.12. A few things made with Balls and Bubbles.
For more information on the basics of Balls and Bubbles, see my tutorial at http://loriweb.pair.com/8bandb_basics.html . We'll look more at Balls and Bubbles a bit later in this chapter.
-
Chrome. This gives your image a metallic look.
Because Chrome locates areas of contrast in order to produce a shiny effect, using Chrome on a solid-colored object produces disappointing results. To see Chrome at its best, try it on relatively complex images with areas of contrast.
NOTE
 NOTE
NOTE Folks who use Alien Skin Software's Eye Candy filters should note that Eye Candy's Chrome filter works quite differently from Paint Shop Pro's Chrome effect. The Eye Candy filter makes use of selection edges or areas of transparency rather than contrast. It gives pleasing results on solid-colored figures and text but isn't appropriate for use on the more complex images that work best with Paint Shop Pro's Chrome effect.
With Chrome, there are several controls that work together to produce different metal-like effects: Flaws , Brightness , Use original color , and Color (see Figure 7.13).
Figure 7.13. The Chrome dialog box.
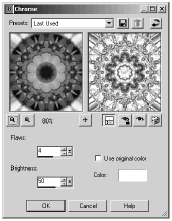
Flaws determines the amount of banding, and Brightness is used to adjust brightness. You have the choice of having the filter retain the original color of the image or to change the image to monochrome. To make the image monochrome, click the Color box to call up the Color dialog box and then select the color you want.
-
Colored Edges. This enhances the edges in your image.
-
Colored Foil and Enamel. These give your image a shiny, 3-D look. Try out the presets to see the different sorts of effects you can create with these.
-
Contours. This gives your image a look that resembles a contour map.
-
Glowing Edges and Neon Glow. Both of these emphasize the edges in your image and affect the color. These effects have the same controls that you also find with Black Pencil, Colored Pencil, Charcoal, and Colored Chalk.
-
Halftone. The basic use of this one is to simulate halftone, making your photos resemble photos printed on newsprint. You can also create other effects, such as scan lines or wild abstract patterns, with this effect. We'll look at Halftone again later in this chapter.
-
Hot Wax Coating. This seems to coat your image with melted wax, the "wax" having the same color as the current Foreground color. This effect can darken your image considerably. For best results, use a light color for the wax.
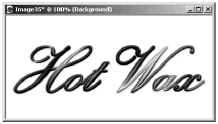
Hot Wax Coating can be used to create metallic effects. An example of this is shown in Figure 7.14, in which a white Hot Wax Coating was applied to delicate script text filled with a silvery gradient. The results could be colorized to change the look from silver to gold, copper , or bronze.
Figure 7.14. Metallic text created with Hot Wax Coating.
NOTE
 TIP
TIP Metallic effects created with repeated applications of Hot Wax Coating sometimes benefit from a little sharpening after the colorizing.
-
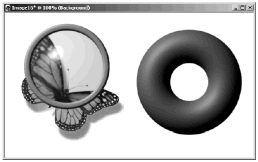
Magnifying Lens. The basic use for this effect is to produce round or rectangular lenses, with or without a frame. If you set Opacity , Shininess , and Gloss on this effect's Properties tab to 0, you can also create a frame without a lens. Figure 7.15 shows both a framed lens and a lensless doughnut shape created with Magnifying Lens. Doughnut shapes can be used for rings, links of a chain, and even inner tubes.
Figure 7.15. A framed lens and a doughnut shape, both made with Magnifying Lens.
Be sure to check out the presets for Magnifying Lens. You'll find some effects you probably hadn't imagined you could get with this.
-
Posterize. This reduces the gradations of color in your image, giving the image the look of an old-fashioned print poster. You control how much the color gradations are flattened using this effect's Levels control.
-
Solarize. This converts the colors in an image or selection to their inverse. You control the range of colors that get inverted using the effect's Threshold control. Only colors whose lightness values exceed the threshold are inverted. (The lightness scale ranges from 0 for black to 255 for white.)
-
Topography. This makes your image look a bit like it was made up of hills and valleys, seen from a bird's-eye perspective.
Distortion Effects
As you would expect, each Distortion effect distorts your image. Apply them with Effec t s > D istortion Effects > effect name .
-
Curlicues. This warps your image into a series of rows and columns of curls.
-
Lens Distortion. This simulates three types of lens distortion: barrel distortion, fish-eye distortion, and pincushion distortion. Later in the chapter, we'll look at an example where Lens Distortion and Halftone are used together to simulate an image on a video screen.
-
Pinch and Punch. Pinch seems to push your image in; Punch seems to push it out.
-
Pixelate. This paints your image in solid-colored square or rectangular blocks.
-
Polar Coordinates. Use this to change a normal image on a rectangular plane to its polar coordinates equivalent, or to warp a generally circular figure from polar coordinates to rectangular coordinates. We'll look at some examples later in the chapter.
-
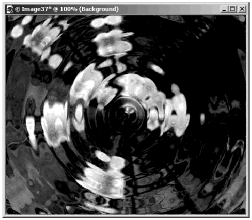
Ripple. This makes your image appear as though it's reflected in water that is rippling after a small object has just been dropped into it. Figure 7.16 shows an example.
Figure 7.16. Ripple applied to a photo of a flower.
-
Spiky Halo. This creates a spiky corona around the edge of your image, radiating from a focus point in the image (which is the center of the image when Horizontal Offset and Vertical Offset are each set to 0). The smaller the Radius (%) setting, the closer to the focus point the effect begins.
-
Twirl. This seems to swirl the colors of your image together, as if the image were a thick liquid being stirred with a circular motion.
-
Warp. This seems to push your image in (somewhat like Pinch) or push it out (somewhat like Punch). For a pushed -in effect, set Strength to a negative value. For a pushed-out effect, set Strength to a positive value.
-
Wave. This displaces the pixels of your image in vertical and/or horizontal waves.
-
Wind. This produces a directional blurring effect somewhat like a horizontal Motion Blur (which is available under A djust > Bl u r).
Edge Effects
Edge effects enhance the contrast along the edges of the figures in your images. Apply these with Effec t s > E dge Effects > effect name .
Each of these effects is applied immediately, with no controls.
-
Dilate and Erode. Dilate enhances the light areas of the image, while Erode enhances the dark areas. These can be used to good effect in creating digital paintings.
-
Enhance and Enhance More. Enhance increases the contrast along the image's edges, with Enhance More providing stronger contrast.
-
Find All, Find Horizontal, and Find Vertical. Find All darkens the image and highlights the edges . Find Horizontal does the same thing except that the highlighting is limited to the horizontal edges. And Find Vertical behaves similarly except that the highlighting is limited to the vertical edges.
-
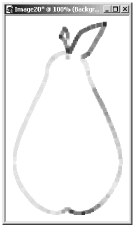
Trace Contour. This traces a line around areas of contrast and turns the rest of the image white. This one can also be used in creating digital drawings and paintings.
Figure 7.17 shows a drawing of a pear, and Figure 7.18 shows the same drawing after Trace Contour and then Erode are applied.
Figure 7.17. An unfiltered image.
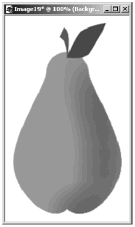
Figure 7.18. The same image after Trace Contour and Erode are applied.
Geometric Effects
Geometric effects apply simple but useful deformations to your images. Apply them with Effec t s > G eometric Effects > effect name .
-
Circle and Pentagon. These warp your image into a circle or a pentagon. How the edges of the resulting image appear is dependent on the Edge mode setting that you choose. (Note that if Circle is applied to something that is already circular, the result is a diamond shape. Applying Pentagon to something circular produces a shape that resembles a shield.)
-
CylinderHorizontal and CylinderVertical. Each of these seems to wrap your image around a cylinder either horizontally or vertically, as indicated by the particular effect's name.
-
PerspectiveHorizontal and PerspectiveVertical. PerspectiveHorizontal adds perspective to your image by narrowing the right or left side of the image. PerspectiveVertical adds perspective by narrowing the top or bottom of the image. How the edges of the resulting image appear is dependent on the Edge mode setting that you choose.
You can use either of these effects on a round objectsuch as the result you get from Balls and Bubbles or Circleto create an egg-shaped or teardrop-shaped object.
-
Skew. This skews your image either vertically or horizontally. How the edges of the resulting image appear is dependent on the Edge mode setting that you choose.
-
Spherize. This seems to wrap your image around the inside or outside of a sphere or elliptical spheroid shape.
Illumination Effects
The two Illumination effects add lighting effects to your images. Apply them with Effec t s > I llumination Effects > effect name .
-
Sunburst. This adds an effect that resembles a lens flare. Set Brightness in the Rays pane to 0 to add a highlight or glint rather than a lens flare. Be sure to try out the presets for Sunburst to get a feeling for this effect.
-
Lights. This enables you to add all sorts of lighting effects. You have five "lights" to work with, each of which has its own settings. To use a particular light, depress its button on the lower left of the Lights dialog box (Figure 7.19), and then check the On check box in the Settings pane. You can then select whatever settings you want for that light. Repeat the same procedure for any of the other lights that you want to use. To turn a light off, click its button, and then uncheck the On check box.
Figure 7.19. The Lights dialog box.
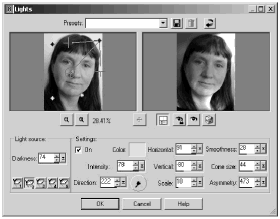
Image Effects
This group is a bit of a grab bag of some useful effects. Apply these with Effec t s > Image E f fects > effect name .
-
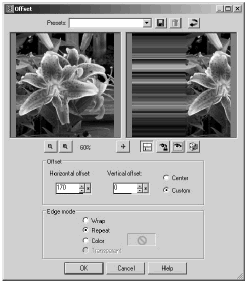
Offset. This has several uses. One is to swap the quadrants of your image as indicated in Figure 7.20. In this case, Edge mode is set to Wrap.
Figure 7.20. Offset (Wrap) swaps quadrants of an image.
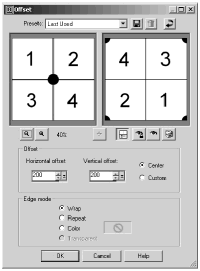
As you'll see later in this chapter, Offset with Edge mode set to Wrap is helpful when you want to make a seamless tile by hand: apply Offset, and then cover the seam that appears where the previous edges of your image meet, running horizontally and vertically along the middle of the filtered image.
Another use of Offset, this one with Edge mode set to Repeat, is to produce an effect like the one shown in Figure 7.21.
Figure 7.21. Offset (Repeat) seems to drag colors from the image horizontally or vertically.
-
Page Curl. This does just as its name implies, adding a page curl effect to any of the corners of your image.
-
Seamless Tiling. This is a much improved replacement of Paint Shop Pro 7's Convert to Seamless Pattern. You use Seamless Tiling to create a repeating pattern that can be tiled with no apparent seam between occurrences of the tiled pattern. You'll explore Seamless Tiling later in this chapter.
Reflection Effects
Reflection effects repeat elements of your image to produce their results. Most of these effects are useful in creating abstract tiles.
-
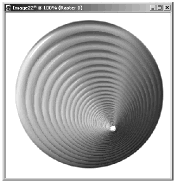
Feedback. This creates repetitions of your image, laid one on top of the other, with the image shrinking with each repetition. Try it on a layer that contains an object on a transparent background, as shown in Figure 7.22 (where the layer contains a repeated ring on top of a solid-colored layer).
Figure 7.22. Feedback used on an object on a transparent layer.
-
Kaleidoscope. This uses your image as the source for creating a kaleidoscopic effect. Figure 7.23 shows the dialog box for Kaleidoscope.
Figure 7.23. The Kaleidoscope dialog box.
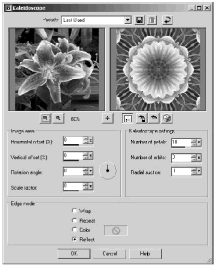
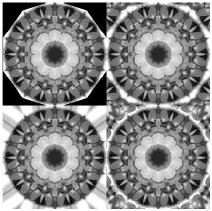
Like several other effects, Kaleidoscope has settings for Edge mode . Edge mode determines how areas outside the area of the main effect are treated. Kaleidoscope's Edge mode settings include Color, Reflect, Repeat, and Wrap, shown in Figure 7.24. Some other effects include Transparent as one of the Edge mode options.
Figure 7.24. Results with different Edge mode s: Color (top left), Reflect (top right), Repeat (bottom left), and Wrap (bottom right).
-
Pattern. This can be used to create an abstract seamless tile that is made up of a repeating pattern. You may need to adjust the Scale to make your pattern seamless. For your source image, I've found that good results are usually produced when the image's height and width are each evenly divisible by 32. Try a section of a photo or an image canvas that you've filled using the Picture Tube tool.
-
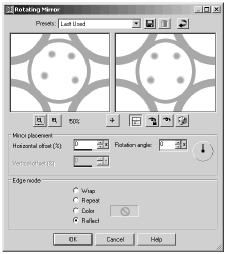
Rotating Mirror. This reflects your image along an axis whose angle you set, as shown in Figure 7.25. This effect can be quite useful when you want to create a symmetrical object from one that is not quite symmetrical.
Figure 7.25. Use Rotating Mirror to create symmetrical effects.
Texture Effects
Texture effects emboss your image, make it appear to be painted on a textured surface, or simulate natural textures such as fur and stone. Apply them with Effec t s > T exture Effects > effect name .
-
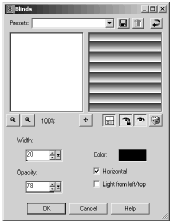
Blinds. Care to do a little home decorating in your images? Blinds can at least help with the window dressing, as Figure 7.26 shows.
Figure 7.26. The Blinds dialog box.
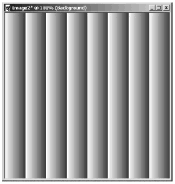
Don't care for horizontal blinds? Uncheck the Horizontal control in the Blindsdialog box, and you'll get vertical blinds instead, as shown in Figure 7.27.
Figure 7.27. An example of vertical blinds.
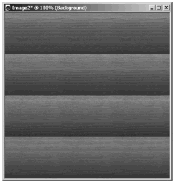
Don't think that window blinds are all you can make with this effect. Figure 7.28 shows a nice log cabin effect made by applying Blinds to a wood-grain pattern.
Figure 7.28. A log cabin effect made with Blinds.
-
Emboss. This makes your image appear to be embossed on the image canvas, as shown in Figure 7.29. Most of the image colors turn to shades of grey, although high-contrast areas will still show a hint of color.
Figure 7.29. Emboss example.
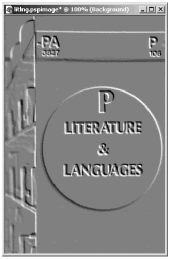
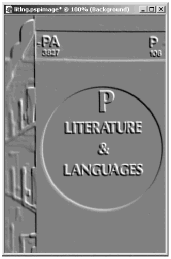
Emboss has no controls, so you have no direct way to specify the direction of the shadows for your embossing. You can easily produce the inverse of the normal Emboss results, though, by choosing A djust > Ne g ative Image after applying Emboss. Figure 7.30 shows the result of using this method on the example in Figure 7.29.
Figure 7.30. Emboss followed by Negative Image.
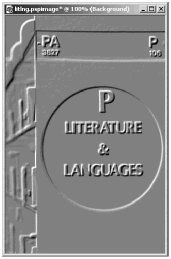
Here's how to produce even more variation in your embossings: Before you apply the Emboss filter, use either I mage > Mirr o r or I mage > F lip or Image > R otate on your original image. After that, you can mirror, flip, or rotate the embossed image back to its original position. Consider a few examples of what you can create with these simple techniques. Using the same source image as the one used for the example in Figure 7.29, you can create the image shown in Figure 7.31 by applying Mirror and then Emboss and then Mirror again. Figure 7.32 shows the same image after applying Flip and then Emboss and then Flip again.
Figure 7.31. Applying Mirror, then Emboss, then Mirror again.
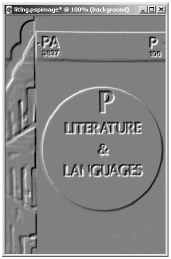
Figure 7.32. Applying Flip, then Emboss, then Flip again.
-
Fine Leather and Rough Leather. Fine Leather makes your image look as though it's dyed into fine-grained leather. Rough Leather makes your image look as though it's embossed on rough-grained leather.
-
Fur. This uses your image as the basis for creating a furry effect. You control the length and density of the "hairs," along with the softness of the hairs (set with Blur ) and how transparent or opaque the furry effect on the image is (set with Transparency ).
-
MosaicAntique. This gives your image the look of old mosaic tiles.
-
MosaicGlass. This makes your image look like it's being viewed through glass blocks.
-
Polished Stone. This makes your image look like it's been carved from hard stone.
-
Sandstone. This makes your image look like it's been carved from soft stone.
-
Sculpture. This seems to carve your image into whatever texture you select.
-
Soft Plastic. This makes your image appear to be molded from plastic.
-
Straw-wall. This gives your image the texture of a straw-plastered wall, with the colors of the image seeming to tint the wall.
-
Texture. This adds a texture to your image, making the image look as though it's painted on a textured surface.
-
Tiles. This makes your image look like it's made from triangular , square, or hexagonal tiles.
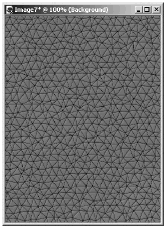
Tiles is a versatile effect. You can create anything from simulated crewel work (Figure 7.33) to something like ceramic tile (Figure 7.34) to a leathery look (Figure 7.35).
Figure 7.33. Crewel work made with Tiles.
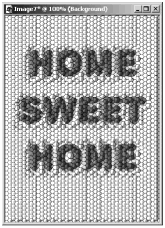
Figure 7.34. Ceramic tile made with Tiles.
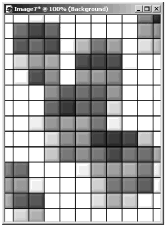
Figure 7.35. Leather made with Tiles.
As Figure 7.36 shows, Tiles uses many of the controls familiar to you from Inner Bevel and other effects. The Tile controls, in the leftmost pane of the Tiles dialog box, are the controls unique to Tiles.
Figure 7.36. The Tiles dialog box.
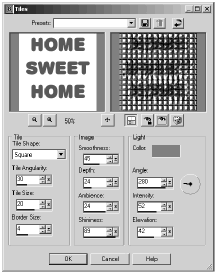
Tile Shape. As its name implies, this control sets the shape of the tiles. For example, you can set the tiles to Hexagon (as in Figure 7.33), Square (as in Figure 7.34), or Triangle (as in Figure 7.35).
Tile Angularity. This control determines whether the tiles are made in a regular, rigid matrix or are made to conform somewhat to the shape of your image; the higher the value, the more the tiles conform to the shape of your image. In Figures 7.33 through 7.35, the crewel work and leather have high values for Tile Angularity , while the ceramic tiles have a value of 0.
Tile Size. This control sets the size of the individual tiles.
Border Size. This control sets the size of the spacing between the tiles. This spacing is always filled in with black.
NOTE
 NOTE
NOTE Tile Angularity has no effect on solid-colored images. To create the effect in Figure 7.35, fill a layer with a color, and then use the Airbrush to lightly paint a random pattern on the image in a few colors that are slightly different than the original color. Because the colors are different (even if you might not be able to see the differences), Tile Angularity will work just fine.
-
Weave. This makes your image look as if it's painted on a woven basket or woven fabric strips .
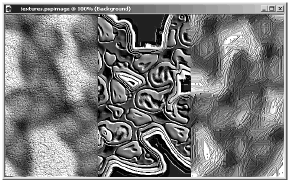
Let's take a quick look at a few more of the effects you can create with the Texture effects. Figure 7.37 shows an unfiltered image, and Figure 7.38 shows the same image with Fine Leather, Polished Stone, and Straw-wall applied.
Figure 7.37. An unfiltered image.
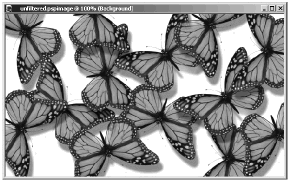
Figure 7.38. The same image with a few Texture effects applied: Fine Leather (left), Polished Stone (center), and Straw-wall (right).
| [ LiB ] |