Work Item Customization and Extensibility
We've covered a bunch of concepts and general information over the past several pages, but now its time to get our hands dirty and delve into this Team Foundation Server work item concept. To do this, we'll help you create a brand new work item type, called the Help Desk Call type. By developing this type, you will get a basic understanding of the XML file that makes up a work item type. While we are intentionally going to make this type very simple, you should be able to build off the information presented here and in the VS SDK, to continue customizing this type to make it as detailed and intricate as you want.
Creating or modifying work item types can become rather tedious, as Microsoft did not ship a visual editor to help with the process. So, you have to make modifications to the XML file by hand, which, for a detailed work item type, can be a little nerve-wracking. You will learn how to make these adjustments by hand, but we will also introduce you to a third-party tool, currently available for free, which makes modifying your work item types, and in fact any part of your process model, much easier.
Before continuing, go ahead and create a test team project called Chp11WIT, using the MSF Agile process model. You'll use this team project throughout the remainder of this chapter.
Work Item Type XML File Overview
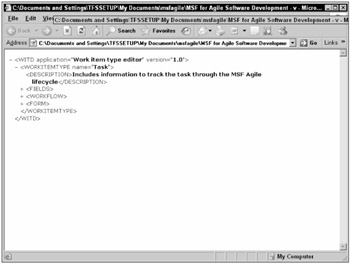
Figure 11-1 shows a compact example of the task work item type from the MSF Agile process model.

Figure 11-1
As this figure shows, a work item type is made up of several parts:
-
A name helps identify the work item type. The name must be unique at a team project level, meaning you cannot have two work item types named Task in the same team project.
-
A description is, as you have probably guessed, a description of the work item type.
-
A collection of fields defines the information that makes up the work item type. This collection also contains any rules associated with the fields, such as a field being required.
-
A collection of work flow states and transitions defines the different possible states of the work item type, and what should happen when you move from one state to the next.
-
A form section defines the layout of the work item type form.
Given these different parts, let's look at the XML code for a very simple help desk form. All this form has is a state (open, closed) and a description of the problem. Obviously, there is much more information we need to make this usable, but this will do for introducing us into the XML syntax for a work item type. A couple of quick housekeeping rules first though. The form must be enclosed in the <WITD> tag. The application name can be anything, but the version must be 1.0. You must have at least one field, one state, one state transition, one state transition reason, and something in the form area. Given these basic rules, here is XML declaration for the simple help desk form:
<?xml version="1.0" encoding="utf-8"?> <WITD application="Work item type editor" version="1.0"> <WORKITEMTYPE name="Help Desk Call"> <DESCRIPTION>I am a description of the help desk call</DESCRIPTION> <FIELDS> <FIELD name="Id" refname="System.Id" type="Integer" /> <FIELD name="Title" refname="System.Title" type="String"> <HELPTEXT>Short description of the task used to differentiate it in a list or report</HELPTEXT> <REQUIRED /> </FIELD> <FIELD name="State" refname="System.State" type="String"> <HELPTEXT>The workflow state of the task</HELPTEXT> </FIELD> </FIELDS> <WORKFLOW> <STATES> <STATE value="Open" /> </STATES> <TRANSITIONS> <TRANSITION from="" to="Open"> <REASONS> <DEFAULTREASON value="New Call Opened" /> </REASONS> </TRANSITION> </TRANSITIONS> </WORKFLOW> <FORM> <Layout> <Control FieldName="System.Title" Type="FieldControl" Label="Title:" LabelPosition="Left" /> <Control FieldName="System.State" Type="FieldControl" Label="State:" LabelPosition="Left" /> </Layout> </FORM> </WORKITEMTYPE> </WITD>
Let's examine the FIELDS, WORKFLOW, and FORM tags in a little more detail, to explain what you are seeing. Let's look at the <FIELDS> tag first.
We declared three fields for this work item type. The first is an ID value for the work item called, obviously, Id:
<FIELD name="Id" refname="System.Id" type="Integer" />
Notice that the field has both a name and a reference name (refname). The name attribute is the visible identifier for the field. This value is used when constructing queries, and is the basic way of referring to this particular field in the work item. The reference name is a globally unique name for this field. While you can change the name attribute on a field, you cannot change the reference name. Reference names are also limited to 70 characters in length. There are two reference name namespaces defined with Team Foundation Server: System and Microsoft. System defines the system fields that Team Foundation Server provides for you; Microsoft defines those fields necessary to use the Microsoft process models. You can easily create your own reference name by just changing the value of the refname attribute to a unique value. The type attribute defines the kind of data that the field is expected to store. The defined types are as follows:
-
Double
-
DateTime
-
HTML
-
Integer
-
PlainText
-
String
You must declare the name, refname, and type attributes when creating a field value.
There is an optional field attribute, called reportable, that allows you to specify that the contents of the field be sent to the Team Foundation Server data warehouse. This allows the field to be included in reports. There are three possible values for this attribute:
-
dimension - This value can be set for Integer, String, and DateTime fields. The data is sent to both the data warehouse and the cube, allowing this field to be used to filter reports.
-
detail - This value can be set for Integer, Double, String, and DateTime fields. The data is sent to the data warehouse, but not the cube.
-
measure - This value can be set for Integer and Double fields only and is used for data aggregation purposes.
In the XML listed previously, look at the field value with the name Title. It contains a work item type definition similar to the previous one, but it also contains the following tags:
<HELPTEXT>Short description of the task used to differentiate it in a list or report</HELPTEXT> <REQUIRED />
This is an example of some of the field rules you can apply to a field. Using the <HELPTEXT> tag, you can give the field a description to help the user understand its purpose. This information is displayed when the mouse is hovered over the field. The <REQUIRED /> tag indicates that this field is required, and the work item cannot be saved until something is added to this field. There are various possible field rules, including the following:
-
<ALLOWEXISTINGVALUE /> - This rule allows a field to keep its existing value, even if that value is not allowed.
-
<CANNOTLOSEVALUE /> - This rule does not allow a field to be cleared once a value has been entered.
-
<EMPTY /> - This rule will clear the field when the work item is committed, and the user is not allowed to enter any values in the field.
-
<FROZEN /> - This rule does not allow a field to be modified, after a value has been entered
-
<MATCH pattern="<pattern>" /> - This rule enforces string pattern matching.
-
<NOTSAMEAS field="fieldname" /> - This rule prevents a field from having the same value as another field.
-
<READONLY /> - This rule prevents a field from being modified.
-
<REQUIRED /> - This rule requires a value to be entered for this field.
-
<VALIDUSER /> - This rule requires that the field contain a user who is a valid Team Foundation Server user.
Finally, we declared a State field, which, when we open a new help desk form work item, will have a state of Open. This field is also required.
Next, let's look at the <WORKFLOW> section. Remember, you have to define at least one state, one transition, and a default reason for that transition. In this code, there is one state with a value of Open. There is one transition from nothing (represented by empty quotation marks) to Open, indicating that the work item is being initially created. The default reason for that transition is that a new call has been opened. Obviously, you can add more states, transitions, and reasons as you see fit. If you'll notice, we are not even displaying the reason on the form. We'll fix that in a little bit.
Finally, let's look at the <FORM> tag. Inside this tag is the <Layout> tag, which will contain all the different fields we want to display. We are currently showing two fields, the System.Title and the System.State. Notice we are using refnames instead of names. Because the names can always change, but the refnames do not, you are required to use the refnames when declaring your controls. There are various formatting options you can use to make the form easier to read and use. For right now, you are just going to slap those two controls on the form and go.
Well, you now have you basic help desk call work item type. Go ahead and save this type to the c:\chp11 directory to a file named HelpDeskCall.xml. Before you can use the type, you must import it into a team project on Team Foundation Server. To do this, you need to use the work item type Import tool, witimport. This tool is located at c:\Program Files\Microsoft Visual Studio 8\Common7\IDE. Open a command prompt and navigate to this directory. The format for using the witimport tool is
witimport /f filename /t tfs /p teamproject [/v]
where filename is the work item type XML file, tfs is the name of the Team Foundation Server, and teamproject is the name of the project you want to import the work item into. The /v switch is optional, and allows you to check to make sure the XML file is valid without actually importing it into the Team Foundation Server. To insert your work item type, run the following at the command prompt:
witimport /f c:\Chp11\HelpDeskCall.xml /t mstfs /p Chp11WIT
If the import runs successfully, you will receive a message saying "Work item type import complete." Otherwise, you will receive an error message, which should help you determine what is wrong with the XML file.
-
Open Visual Studio 2005 and open Team Explorer. Open the Chp11WIT Team Project. Right-click the project name, and select Refresh. This updates the Team Explorer with the latest information from the database.
-
Now, right-click the Work Item folder under the Chp11WIT Team Project, and select Add Work Item. Besides the five work item types installed by default with the MSF Agile process model, you also see the option for your Help Desk Call work item type.
-
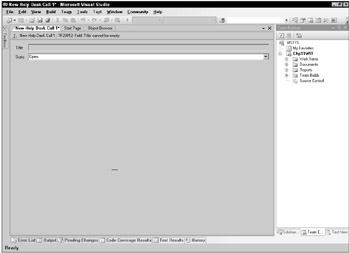
Select the Help Desk Call Work Item Type. Figure 11-2 shows you the Work Item Form for that type.

Figure 11-2
Notice how the State field was populated for us automatically. Remember, we defined a transition in which state is changed to Open when a new help desk call work item is created. Enter a value for the title and click Save. The work item is assigned an ID number, which will appear in the tab of the work item. Make a note of this number, as you will use it in some examples later.
And there you go. You have created a custom work item type, imported it into the Team Foundation Server, and created a work item from that type. And with this simple example, you have only touched the surface of what is possible with custom type creation. For a more detailed look, download the SDK. Download the latest process models from the MSF Agile site, open the XML files for the different work items, and see the beauty and complexity of those types. You can make your work item types as simple or as complex as you want, but the fact is, you can make them work the way you want them to. And that is the real power of the work item system in Team Foundation Server.
Customizing an Existing Work Item
You can see in the XML for the Help Desk Call work item type, a reason is declared, but we do not have a field to hold that reason, and are not displaying that reason on the form. Let's fix that problem now. First, we need to export the work item type, so we can make some modifications to it. To do this, you need to use the Work Item Type Export tool, witexport. This tool is located at c:\Program Files\ Microsoft Visual Studio 8\Common7\IDE. Open a command prompt and navigate to this directory. The format for using the witexport tool is
witexport /f filename /t tfs /p teamproject /n witname
where filename is the destination file you are exporting to, tfs is the name of the Team Foundation Server, teamproject is the name of the team project containing the work item type, and witname is the name of the work item type to be exported. To export the Help Desk Call work item type to c:\chp11\hdc.xml, use the following:
witexport /f c:\Chp11\htc.xml /t mstfs /p Chp11WIT /n "Help Desk Call"
This exports the work item type to a file named htc.xml. If you open the htc.xml file, you'll see a lot more fields defined than were initially there. The Work Item Tracking System automatically adds any missing system fields to your work item type. These fields are not automatically added to the form, however. As you can see, the Reason field has already been added to the Fields collection. But you still need to add it to the form for it to be displayed.
Once you have exported the work item to a file, you can open it up and make modifications to it. We've shown previously how you can make these modifications by hand. Now we are going to show you a third-party tool, currently free, that allows you to modify your work items in a nicer, graphical environment. This tool is called the Process Template Editor, and was created by Joel Semeniuk, a Microsoft Team System Most Valuable Professional. You can get the latest version of this tool at gotdotnet.com/Workspaces/Workspace.aspx?id=812a68af-5e74-48c6-9623-1a4469142a84. Go ahead and download this tool now. It can be used for creating or editing a process model, or for creating and editing work item types. The beauty of this tool is that it can connect to your Team Foundation Server, allowing you to view work item type information that is stored on the server. It even does validation checking to make sure your work item type is configured correctly. Trust me, once you start using a graphical tool for making changes to your work item types, you won't ever go back to Notepad!
Let's open the Process Template Editor, and use it to add the reason field to our work item type and the work item form.
-
Open the Process Template Editor by selecting Start⇨All Programs⇨Imaginet Resources⇨Process Template Editor. This opens the Process Template Editor window. A dialog box appears, asking you to select a Team Foundation Server.
-
Enter the name of your Team Foundation Server, or just click Work Offline. From the main menu, select Work Item Types⇨Open From File.
-
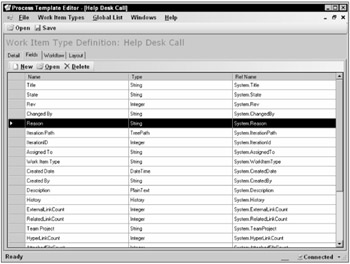
Navigate to the c:\chp11\ and select the htc.xml file that you just exported. Figure 11-3 shows the Process Template Editor with the Help Desk Call work item type open, and the Fields tab selected.
The Reason field was added for you automatically when you imported the work item type, but you still need to make this field displayable to the user.
-
Click the Layout tab to begin editing the form.
-
In the tree view on the left side, right-click Layout and select New Control. On the right side of the window, change the Field Name to System.Reason, and the Label to be Reason. You can even click the Preview Form button to get a general idea of how the form will look.
-
Click the Save button to save the changes to the XML file.

Figure 11-3
We've only briefly touched on using this graphical tool, but as you can see, it can save a lot of time when editing work item types. You can use this tool to define states, transitions, required fields, and work flow options. This tool is a great example of what you can build using the work item tracking object model.
Now that you have changed the work item type, you need to import it back into the Team Foundation Server. Run the following from the command prompt:
witimport /f c:\Chp11\htc.xml /t mstfs /p Chp11WIT
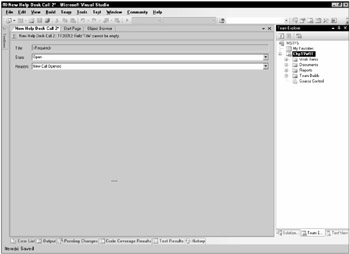
Go back to Team Explorer, and add another Help Desk Call work item. As you can see in Figure 11-4, you can now see the Reason field. If you do not see the field, it could be due to Team Foundation Server's caching mechanism. Simply shut down and restart Visual Studio or Team Explorer, and you will be able to see the new field

Figure 11-4
Notice how the Reason field is filled in for you automatically when you opened the new work item. This is an example of the workflow in the work item tracking system, and how moving from different states can automatically trigger items to change on the form. As with everything else, you can make this as simple or as intricate as you like.
EAN: 2147483647
Pages: 168