Managing Security Groups in Team Foundation Server
As mentioned previously, Team Foundation Server manages most of its own security groups. (The exceptions being security for Windows SharePoint Services and SQL Server Reporting Services.) And just as with Team Build in the previous chapter, you have the option of managing security from the user interface or by using the command-line tools.
Managing groups can be broken down into three different tasks: creating new TFS groups, adding users to the new groups, and associating security permissions with the new groups. In this section, you learn how to accomplish all three of these tasks using both Team Explorer and the command-line tools. You also learn about setting security permissions for Version Control and Work Item Tracking Area level permissions.
The ability to add new groups and set security permissions from the command line allows you to create administrative scripts to help you quickly and easily manage security on your Team Foundation Server. You can also make use of customized process templates to set up the groups and permissions on your team project at the time it is created. This allows you to create multiple projects with the same permissions in a very efficient manner.
Creating New Groups Using the GUI
As mentioned earlier in this chapter, there are two levels of groups: global and project. You use nearly identical steps in creating a new group for either.
To create a new global group, open Team Explorer and right-click Team Foundation Server. From the context menu that opens, select Team Foundation Server Settings, and then Group Membership. This opens the Global Group Membership window, shown in Figure 4-1.
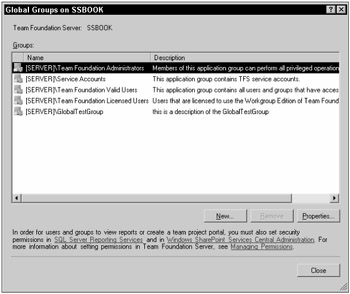
Figure 4-1
To create a new project group, open Team Explorer and right-click the Team Foundation Server project you are interested in. From the context menu that opens, select Team Project Settings, and then Group Membership. This opens the Project Group Membership window, shown in Figure 4-2.
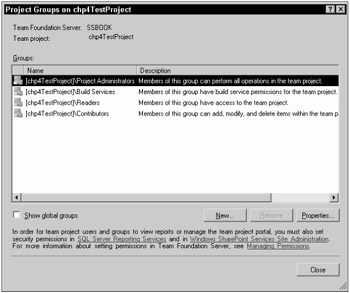
Figure 4-2
As you can see, both windows appear very similar. In the Project Group Membership window, there is a check box called Show Global Groups. You can choose to view or hide the Global groups in this window, depending on whether the box is checked.
Both windows work the same way. To create a new group, click New. This opens the Create Team Foundation Server Group window, as shown in Figure 4-3.
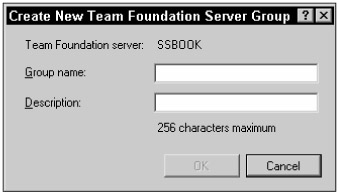
Figure 4-3
Once this window opens, you can enter your new group name and description. As an example, let's create a Global group called MyGlobalGroup. Enter MyGlobalGroup as the group name, and I am a test group on the global level as the description; then click OK. This returns you to the Project Group Membership window, where your new group now appears, as shown in Figure 4-4.
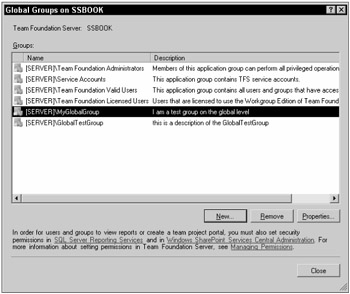
Figure 4-4
You can follow the same steps listed above to create a project-level group. Just start with the Project Group Membership window instead of the Global Group Membership window.
| Important | You can tell the difference between a global group and a project group by what is appended in front of the group name. Global groups are appended by [SERVER], where as project groups are appended by the Team Project name in brackets. |
Creating New Groups Using the Command Line
The TFSSecurity utility is used to create new groups via the command line. This utility is located by default in the Program Files\Microsoft Visual Studio 2005 Team Foundation Server\ tools directory on the Team Foundation Server.
| Important | In older versions of documentation you will see this utility referred to as gssutil. |
To create a new global group, you use the /gcg parameter:
TFSSecurity /server:[TeamFoundationServerName] /gcg GroupName [GroupDescription]
The / server switch identifies the Team Foundation Server you are working with, and is a required switch. So to create a new global group called GlobalTestGroup on the Team Foundation Server SSBOOK, you would use the following command:
TFSSecurity /server:SSBOOK /gcg GlobalTestGroup "this is a description of the GlobalTestGroup"
To display a list of all the global groups, use the /g parameter
TFSSecurity /server:SSBOOK /g
Figure 4-5 shows the output, which is a list of all the global groups:
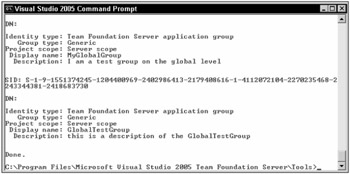
Figure 4-5
You can see the new group you just created is displayed.
To create a new project level group you use the /gc parameter. Here is the syntax:
TFSSecurity /server:[TeamFoundationServerName] /gc scope GroupName [GroupDescription]
Scope is the URI (Uniform Resource Indicator) of the team project you want to create the group in. GroupName is the new group name, and GroupDescription is the optional group description. To find the URI, open Team Explorer, right-click the Team Project, and select Properties. This opens the Properties window. Under the Misc section is a property names URL. This is the URI of the team project, and will be in a format similar to this: vstfs:///Classification/TeamProject/. So to add a new project group, called TestCmdGroup, to the chp4TestProject Team Project, you would run the following code:
TFSSecurity /server:SSBOOK /gc vstfs:///Classification/TeamProject/b1ed6e97-b84e- 48e8-a74c-5ecd166ca2d1 TestCmdGroup
After running the above statement, if you view the project groups for chp4TestProject, the new group, TestCmdGroup, is added. Figure 4-6 shows the Project Groups window for chp4TestProject, after the statement has been run:
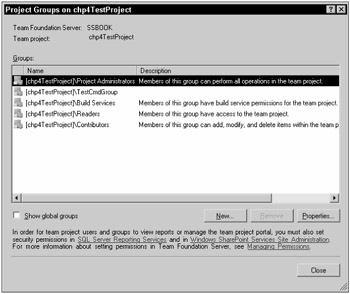
Figure 4-6
Adding Users to Groups Using The GUI
You now have a new group, called TestCmdGroup, added to your project. Next, you need to add some users to this group. Open the Project Group Membership window as discussed in the previous section. Select TestCmdGroup, and click the Properties button. This opens the Team Foundation Server Group Properties window, as shown in Figure 4-7.
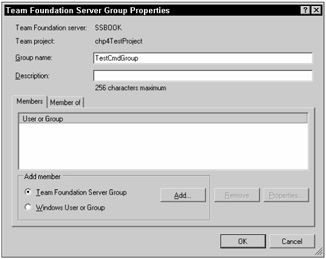
Figure 4-7
You can add other Team Foundation Server groups to this group, or you can add other Windows users or groups, such as from your Active Directory. Select the appropriate radio button option. To add a Team Foundation Server group, select that option and click Add. This opens the Add Groups window, as shown in Figure 4-8.
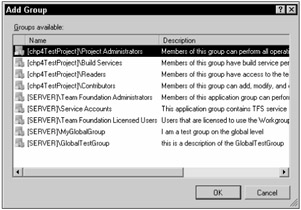
Figure 4-8
| Important | The only groups listed are the groups that are members of this project. |
From this window, you just select the group you want to add, and click OK.
To add a Windows user or group, select the appropriate options and click Add. This opens the Select Users or Groups window, as shown in Figure 4-9.
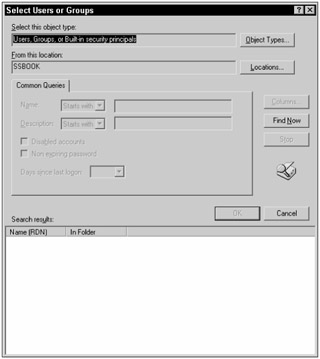
Figure 4-9
Using this window, you can find the users or groups you want to add from your Windows domain or workgroup.
To add users to a global group, you follow the same steps as listed previously, except you open the Global Group Membership window to begin with.
To remove a user, open the Team Foundation Server Group Properties window, as described previously. Select the user or group you want to remove, and click the Remove button.
| Important | You can click the Member Of tab of the Team Foundation Server Group Properties window, to see which Team Foundation Server groups this group is a member of. Currently, it is a member of the Team Foundation Valid Users group, whom they were added to automatically when the group was created. |
Adding Users to Groups Using the Command Line
Again, you use the TFSSecurity application to add users to groups using the command line. The general syntax for adding a user is:
TFSSecurity /server:[TeamFoundationServerName] /g+ GroupIdentity MemberIdentity
GroupIdentity is the global or project group; MemberIdentity is the user or group you want to add to the GroupIdentity.
To specify identity, you use the n: identity specifier. The syntax is n:[domain\]name. For project groups, the domain is the Team Project name, and the name is the display name of the group. If the domain is omitted, it is assumed you are referring to a global group.
Adding a new user to a global group is easy. Let's say you want to add the user Developer1, located in the VSTS domain, to your new global group MyGlobalGroup, that you created previously. You would use the following syntax:
TFSSecurity /server:SSBOOK /g+ n:MyGlobalGroup VSTS\Developer1
To add Developer1 to your new project group, TestCmdGroup, you would use the following code:
TFSSecurity /g+ n:[chp4TestProject]\TestCmdGroup VSTS\Developer1
You can use many other options with TFSSecurity, such as deleting and renaming groups, and removing users from groups. See the online help (http://msdn2.microsoft.com) for more information.
Using the GUI to Set Security Permissions for Groups
So far, we have talked about how to create new global and project level groups, and how to add users to those groups. The groups don't do you any good though, if they don't have any security permissions assigned to them. Remember from the earlier discussion that if a group is not set to explicitly allow a security permission, then the system defaults to denying access to that permission.
To set security permissions for global groups, open Team Explorer and right-click Team Foundation Server. From the context menu, select Team Foundation Server Settings, then Security. This opens the Global Security window, shown in Figure 4-10.
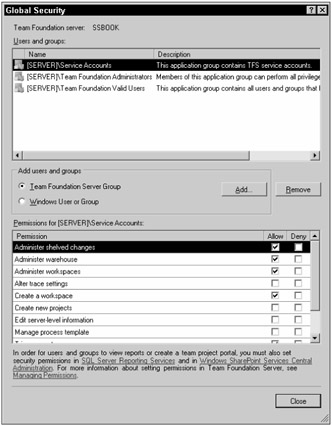
Figure 4-10
Once here, you can add other groups to the Global Security window using the Add button. You can enable permissions by checking the Allow check box, or disable them by checking the Deny check box. Simply select the appropriate group and then the appropriate permissions. Clicking the Close button will save all your changes.
| Important | Do not change the default permissions given to the original global groups. This could cause Team Foundation Server to act erratically. |
To set security permissions for project level groups, open Team Explorer and right-click Team Project. From the context menu, select Team Project Settings, then Security. This opens the Project Security window, shown in Figure 4-11.
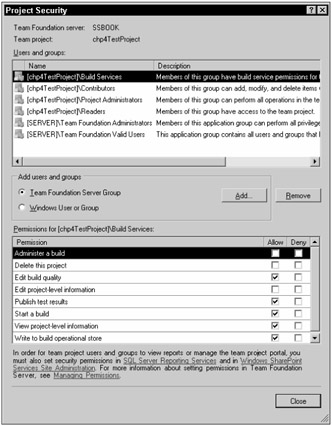
Figure 4-11
Notice the new project groups you created earlier are not listed here. You will need to add them, using the Add button. Once you have added them, you can enable the group permissions as needed. Clicking the Close button will save all your changes.
| Important | Do not change the default permissions given to the original project groups. This could cause Team Foundation Server to act erratically. |
Using the Command Line to Set Security Permissions
To set security permissions from the command line, you have to choose the appropriate tool. Which tool to use depends on the security permission you are trying to set.
For any of the permissions that deal with the version control system, use the version control commandline utility, tf.exe. This utility is located in the Program Files\Microsoft Visual Studio 8\ Common7\IDE directory on any machine on which Visual Studio Team System is installed. All the permissions listed in the Version Control table earlier in this chapter can be set with this utility. In addition, the following global permissions can be set with it as well:
-
Administer shelved changes
-
Administer workspaces
-
Create a workspace
The general syntax for using the tf.exe utility is:
tf command item[/options]
There are a variety of commands that can be used, all of which are documented in the online help (http://msdn2.microsoft.com).The command you are interested in for this section is the Permission command. For example, to give your global group, MyGlobalGroup, the ability to read from the root of the version control system, use the following code:
tf permission /server:SSBOOK /allow:Read /group:MyGlobalGroup $/
You can also use wildcards if you like. Let's say you wanted to give your project level group, TestCmdGroup, Allow rights for all the version control permissions for the chp4TestProject. You could run the following code:
tf permission /server:SSBOOK /allow:* /group:[chp4TestProject]\TestCmdGroup $/chp4TestProject
There are a variety of options that can be used with the Permissions command, including /allow, /deny, /group, and /user, just to name a few. The online helps lists in detail all these options and how to use them.
The following is a list of possible options to use with the Permissions command. The online help lists details on all these options and how to use them.
-
/allow - Lists the source control permissions to allow
-
/deny - Lists the source control permissions to deny
-
/group - Name of the group to modify permissions for
-
/inherit - All parent permissions are inherited
-
/recursive - Applies this command to all subdirectories
-
/remove - Lists source control permissions to remove
-
/server - The Team Foundation Server you want to access
-
/user - Name of the user to modify permissions for
For all other permissions, you need to use the TFSSecurity.exe utility, which was touched on earlier in the chapter.
Managing Security for Other Areas
We have discussed how to set permissions on global groups and project groups, but you have not been shown how to set version control permissions or work item tracking area level permissions yet. The next two sections touch on those topics.
Version Control
All version control permissions can be controlled using the command-line utility, tf.exe. Please see the previous section for information on using this utility to set version control permissions.
You can also modify version control permissions using the Source Control Explorer. To open the Source Control Explorer, select the View menu option in Visual Studio 2005, and then select Other Windows, then Source Control Explorer. This opens the Source Control Explorer window, as shown in Figure 4-12.
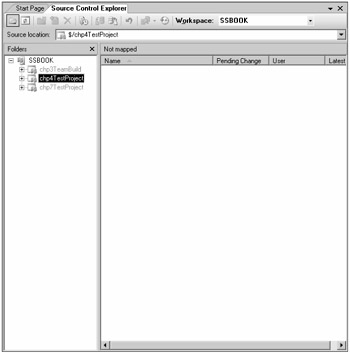
Figure 4-12
Once you have the Source Control Explorer open, you can set security permissions from the server level all the way down to individual files in particular projects. You can control how granular you need to get, depending on your situation. You need to develop some sort of guidelines of how your team is going to work the version control permissions, and what level of granularity you are going to enforce them at. If everyone on the team has the ability to change these settings to any level they want, this could lead to an administrative nightmare.
To modify the security permissions, right-click the file or folder you want to modify, and select Properties. This opens the Properties window. Click the Security Tab on that window, as shown in Figure 4-13.
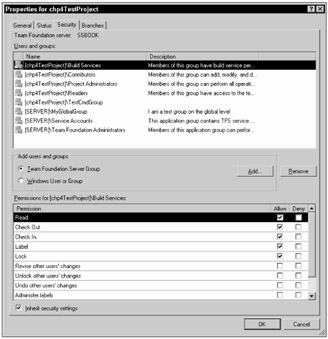
Figure 4-13
From this window, you can easily add more users and groups, remove users and groups, and give them the appropriate permissions needed to do their job.
Setting Work Item Tracking Areas Permissions
All Work Item Tracking Areas permissions can be set at the command line, using the TFSSecurity.exe tool. As you would expect, just as there was for Version Control, there is a graphical interface for this as well.
Right-click your Team Project, select Team Project Settings, then Areas and Iterations. This opens the Areas and Iterations window, as shown in Figure 4-14.
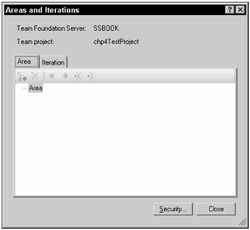
Figure 4-14
Select the area on which to modify security, and click the Security button. This opens the Area Node Security window, shown in Figure 4-15.
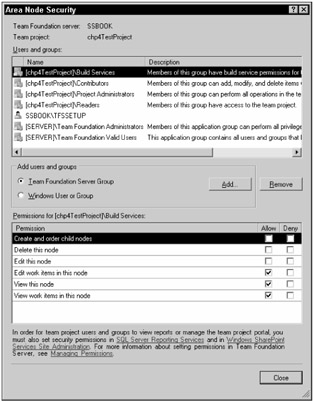
Figure 4-15
Have you noticed how all these security windows look the same? As you can guess, you use this window just like you do all the others.
EAN: 2147483647
Pages: 168