Setting Up Team Foundation Build Server
Thus far in this chapter, you have learned what Team Foundation Build Server is and how it works. We've overviewed the architecture, explained some of the different parts, and discussed how to implement several different build scenarios.
In this last section of the chapter, you are going into a more detail concerning how to set up and manage the Team Foundation Build Server. We talk about managing builds, utilizing multiple build servers, and security permissions, among some other topics. As always, the online help (http://msdn2.microsoft.com) is also a great place to obtain information related to Team Foundation Build Server.
Managing Builds
In reality, you can manage your builds and your build process any way you want. Team Foundation Build does provide a couple of ways to help you with that management.
We've discussed previously the Team Foundation Build Reports and the detailed information they contain. Obviously, those provide a great management overview of specific builds. Let's shift our focus to the Team Build Browser. The Team Build Browser provides a different yet effective view of the build information.
Figure 3-4 shows a view of the Team Build Browser. To open the Team Build Browser, you can double-click All Build Types in the Team Builds folder of your Team Project, or you can double-click a specific build type. If you choose a specific build type, it will only display information for builds of those types. If you choose All Build Types, then all the build reports for all the build types will be displayed.
The Team Build Browser displays Build Name, Build Status, Build Quality, and Completed On date. Notice that each Build Name is the name of a build type, followed by an underscore, a date, a period and then a number, representing the number of times the build type has been run that day. For example, if you have a build type named BuildType1, and you ran the build type on July 18, 2006, and it was the third time that day you had run the build, the Build Name would appear as BuildType1_20060718.3.
| Important | If you go look in the drop directory for the build, you will see a directory with the same name as the build. This directory contains all the different compiled configurations from the build. |
There is a drop-down list at the top of the Team Build Browser, which you can use to determine which builds are shown. The filter options include None, Today, Yesterday, This Week, Last Week, and Last 4 Weeks. You can use this filter to narrow the range of builds you want to look at.
To examine the details of a particular build, you can double-click the build name to open the build report. Once you have examined the build, you should return to the Team Build Browser and change the Build Quality to the appropriate value. That way, other people who examine the build information will know the current state of that build. To do this, simply select the Build Quality column for the appropriate build in the Team Build Browser. The column becomes a drop-down list box, from which you can change the build quality. The default options for Build Quality are Initial Test Passed, Lab Test Passed, Ready For Deployment, Ready for Initial Test, Rejected, Released, UAT Passed, Under Investigation, and Unexamined. In addition, you can easily add your own build quality states, by selecting the Edit option from the Build Quality drop-down list.
| Important | You must have the Team Foundation Server Edit build status permission to change the Build Quality. |
Setting Up Build E-Mail Notifications
You can configure Team Foundation Server to notify you via e-mail when different events occur. With regards to Team Foundation Build, you can receive e-mails whenever a build status changes or a build is completed. To do this, you need to modify your project alerts.
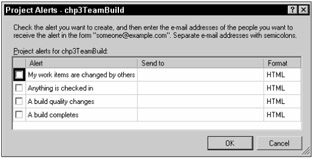
To open the Project Alerts window, open Team Explorer and navigate to the team project you are interested in. Right-click the team project, and select Project Alerts. This opens the Project Alerts window, shown in Figure 3-8:

Figure 3-8
Using this window, you can specify which events you are interested in receiving notifications for. You enter your e-mail address, and also specify the format: HTML or Text.
When you receive a build notification e-mail, it contains a link to a build detail Web page. You can click this link to view the detailed build information. The e-mail also contains some basic build information, such as the name of the build, when it was started, when it completed, and its quality, as well as links to the build log.
Setting Up Multiple Build Servers
You can have as many build servers in your environment as you would like. Remember, if a build server is going to run tests against the build, then Visual Studio Team Test Edition or Team Suite Edition must be installed on the machine. This means you must have a license for Visual Studio Team Test for each build server you want to run tests on.
When you configure a build type, you specify a build server and a directory on that build server to be used during the build process. You might think, for the same project, you have to create another build type in order to run the build on a different build machine, but that is not the case. Remember, when you start a build from Team Explorer, it opens the Build window, as shown in Figure 3-3. Using this window, you can override the defaults in the build type, and specify a different build machine or build directory. You cannot, however, change the drop location. For that, you do have to create a new build type.
You can do the same thing from the command line, using /machine and /d commands.
Setting Up a Common Build Drop Site
The build drop site is where the final build files are deposited, after the build has been completed. In this drop directory is a directory named for each build. Inside each build directory are directories containing the files for each configuration listed in the build type for that particular build.
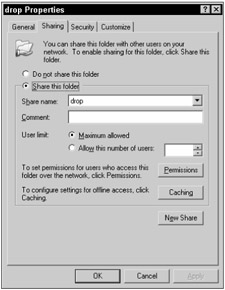
The drop directory is not automatically shared. Therefore, you need to share the directory out, so that it can be accessed via the UNC (\\server\share) location. To create a share, open Windows Explorer on the machine where the build will be dropped. This can be the build machine, or a separate machine just for evaluating built programs. Navigate to the folder where you want to drop the built applications, and right-click the folder name. From the context menu, select Sharing and Security. This opens the property window for the folder to the Sharing tab, shown in Figure 3-9.

Figure 3-9
Click the Share this folder radio button. Enter the name for the share. Now click the Permissions button to open the Permissions window for the share. Add the service account used to run the Team Build Service, for example, TFSSERVICE, and give them Read and Change permissions on the share. Click OK to save your changes and return back to the properties window for the folder.
Next, click the Security tab in the property window of the folder. Add the service account used to run the Team Build Service, and give it write access. Click the Apply button to apply the changes, and then click OK to close the window. At this point, your drop directory is configured correctly.
Team Foundation Build Security Permissions Overview
As Chapter 4 of this book covers in some detail, and as we have already previously mentioned, Team Foundation Server manages its own list of security rights and permissions. Each section of Team Foundation Server has its own set of permissions, and team build is no exception. In some of the previous sections of this chapter, we mention the appropriate security permissions needed to perform particular tasks. In this section, we are going to briefly mention the Team Foundation build security permissions and what they allow you to do.
The following is a list of all the Team Foundation Server security permissions that apply to Team Foundation Build:
-
Administer a build - This permission is required to create a new build type, edit an existing build type, or delete an existing build type.
-
Edit build quality - This permission is required to change the build quality status in the Team Build Browser.
-
View project-level information - The permission is required to view build reports and to subscribe to e-mail notifications.
-
Start a build - This permission is required to start, stop, and restart builds.
-
Write to build operational store - This permission is required to be able to write the results of builds to the data tier.
EAN: 2147483647
Pages: 168