Setting Up the Tools
Team System has several tools that were designed out of the box to work in a distributed environment. These include Team Foundation Version Control, the load agent and controller, and Team Foundation Build. This next section looks at each one of these tools and how to deploy them in your development environments.
Shared Repositories
A large part of the implementation of distributed teams is standardization. By standardizing development, testing, and project management practices, your team will get benefits such as predictability and productivity. Another advantage is that your project assets will be easier to manage, therefore cutting down on costs and effort. When deploying Team System, an important part of the process is reexamining the way software is developed from an end-to-end perspective.
Shared repositories can help in the standardization process. To share resources, you need software that allows you to connect across corporate firewalls and networks, and you need to establish standards and practices. The Internet-connected software has to provide great performance across wide topologies.
Another advantage with a shared repository will provide your entire team with up to date information about your project. Several different types of repositories are used in a distributed environment:
-
Workflow - Every team member can benefit from connecting from a common Team Foundation Server. As requirements change and specifications need to be updated for business reasons, everyone remains in the loop. Team Foundation Server online capabilities enable workflow, change management, and requirements management.
-
Version control - Team Foundation Server Proxy allows teams outside of the immediate network to retrieve the latest source code files without performance problems.
-
Test case management - Assuming that Team Foundation Server has a copy of Team Suite or Team Edition for Software Testers installed, it can run a variety of tests during the build and check-in process. The load controller and agents allows your team to perform distributed load testing on a server farm to stress test your Web applications under real-world conditions. Test case management in a distributed scenario also allows you to track test plans and results for your entire development team.
Team Foundation Server Proxy
The Team Foundation Server File Cache Proxy is an important tool to help enable branch offices and geographically distributed teams to connect to a common source repository. The proxy was designed because of internal testing within Microsoft. In "dog fooding" their product, they realized that better performance was required to use Team System between the Raleigh office and the Redmond office.
Figure 15-3 shows how Team Foundation Server Proxy fits in with the rest of the Team System architecture.
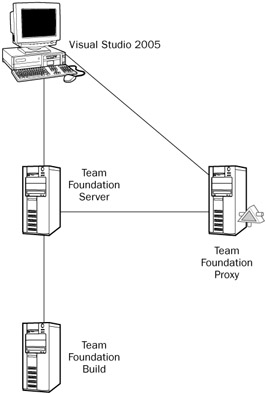
Figure 15-3
Installing the Proxy
It's important that you follow the instructions found in the Team Foundation Server Installation Guide (also found in the Team Foundation Server media). In particular, make sure you have a sufficiently large hard drive for your files. The main reason is that you would likely want to cache as many files as possible, which will in turn increase the cache hits (and increase performance). Make sure you install Team Foundation Server first, test it out, and then install the proxy. Otherwise, it will be more difficult to troubleshoot whether installation problems will be attributed to the proxy or the server. The proxy server typically runs on port 8081.
You may also want to create a script to pull the latest files into the proxy and use the Task Scheduler to run the script at a predefined interval (for example, every 5 to 10 minutes). This will assure that your users will have access to the latest files and it will improve the performance of your server (from an enduser perspective).
| Important | Each of the files stored in the cache contain a unique id to allow multiple versions of the same file. The file versions that will be cached will depend on whether the user did a "get latest" or get a specific version of a changeset. |
Since the cached version control artifacts are stored locally, it's super important that you secure the assets. Access to the file system should be locked down as a result.
| Important | The Team Foundation Proxy is available on the Team Foundation Server media. Simply look for a directory called "proxy" on the CD or DVD. Double-click setup.exe to start the installation process. |
How GET Works in Team Foundation Proxy
To effectively use the Team Foundation Proxy, it's important to understand how it works internally. The following describes a get latest scenario of a cache miss in both the server and proxy behind the scenes:
-
When you do a get operation, Visual Studio communicates with Team Foundation Server. Team Foundation Server in turn performs a prc_Get to the data tier to retrieve and validate your authentication information. The client never authenticates directly with the proxy.
-
Team Foundation Server then runs a security filter. If you are an authenticated user, the server creates the download tickets.
-
The client receives the download ticket and then uses them to start the download of the items. The client (Visual Studio 2005) now does an HTTP Get operation, but rather than communicate with Team Foundation Server, it communicates directly with the proxy. Note that the ticket system is enabled using the exchange of private and public keys (PKI).
-
The HTTP Get operation is made from the proxy to Team Foundation Server (if the file is not in the proxy cache).
-
If Team Foundation Server does not have the requested items in cache, Team Foundation Server performs a prc_GetItemContent to the data tier. This retrieves the desired code (or other assets) from version control.
-
The file contents are then sent to the proxy and saved into the proxy cache (using WriteToFileCache).
-
The file contents are then sent to the client machine.
-
An UpdateLocalVersion is run from the client to Team Foundation, and then to the data tier to update the server with the information on what are the latest files that were downloaded in your workspace
Here is a representation of the SOAP request and response from the client. You can obtain this by enabling tracing on the client in the tf.exe.config file. In Visual Studio, you can configure it in devenv.exe.config as shown below:
<appSettings> <add key="VersionControl.EnableSoapTracing" value="True" /> <add key="VersionControl.TraceDownloadContent" value="True" /> </appSettings> The following request sets the recursion level, and tells the server what file is requested. This SOAP message is automatically generated by Team Explorer (or the command-line tool) during a GET operation:
<GetRequest> <ItemSpec recurse="OneLevel" item="C:\Application.cs" /> <VersionSpec xsi:type="LatestVersionSpec" /> </GetRequest>
Once the request has been authenticated, the following response will be generated:
<GetResponse xmlns=http://schemas.microsoft.com/TeamFoundation/2005/06/VersionControl/ClientServ ices/02> <GetResults> <ArrayOfGetOperations> <GetOperation type="File" item slocal="C\Application.cs" tlocal=" C\Application.cs" titem="$/NewProject/Files/Application.cs" sver="4" lver="4" durl="sfid=1025,0,0,0,0,0,0,0,0,0& ts=56357635345345345345& s=A4e3hUiIOlGuy7t; fid=1025" > <HashValue>+gdGH7fI9C3bVD59s12i0aaN</HashValue> </GetOperation> </ArrayOfGetOperation> </GetResults> </GetResponse>
titem contains the path to the requested file in Team Foundation Version Proxy. The sfid is the signed file download ticket that the application tier generated for the request. The ts variable contains an expiry time stamp. The s variable contains a Base64 encrypted hash string and fid stands for File ID.
| Important | A commonly asked question is if the Team Foundation Server goes offline, can a user continue working with just the proxy. The answer is no - Team Foundation Proxy uses a Team Foundation Server ticket to authenticate the user. |
Client and Server Configuration
To configure your Visual Studio 2005 client to connect to the proxy, you must first change the proxy settings - your Visual Studio clients will not automatically detect a proxy. To start, click Tools⇨Options. Then expand the Source Control node and select Visual Studio Team Foundation. As shown in Figure 15-4, you need to select "Use proxy server" and specify the server name for your proxy and the port. Finally, you have to define whether your proxy connection will be done over HTTP or HTTPS.
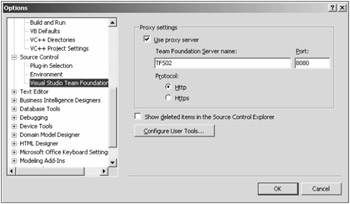
Figure 15-4
| Important | The Plug-In Selection settings allow you to easily switch over from different version control systems including Visual SourceSafe or Team Foundation Version Control. |
On the server, you will have to modify the proxy.config configuration file located in the Web services directory. Specifically, the file can be found (assuming that you installed the proxy on the C: drive) at the following location: C:\Program Files\Microsoft Visual Studio 2005 Team Foundation Server\Web Services\VersionControlProxy.
When you open up this file, the first thing you notice is a node called Servers. Here you can specify what Team Foundation Server Version Control systems you want to cache. Between the Server nodes, you can add as many Uri references to as many servers as you need. In case you are wondering, @H_TFSSERVER@ refers to the current server:
<?xml version="1.0"?> <ProxyConfiguration xmlns:xsd="http://www.w3.org/2001/XMLSchema" xmlns:xsi="http://www.w3.org/2001/XMLSchema-instance"> <Servers> <Server> <Uri>@H_TFSSERVER@/VersionControl</Uri> </Server> </Servers> Next, you need to specify the proxy file cache root folder. This is the folder specified during the installation process that contains the cache data:
<CacheRoot>C:\Program Files\Microsoft Visual Studio 2005 Team Foundation Server\Web Services\VersionControlProxy\Data\</CacheRoot>
It is now time to set the cache limit on the proxy. You can express the cache limit in many ways including as a percentage of disk space (for example, the proxy cache can only take up 75 percent of your hard drive space. As a best practice, Microsoft typically uses the percentage based cache limit policy:
<CacheLimitPolicy> <PercentageBasedPolicy>75</PercentageBasedPolicy> You can also express your cache limit as a fixed number of megabytes (as shown below):
<FixedSizeBasedPolicy>1000</FixedSizeBasedPolicy> </CacheLimitPolicy> Once the limit has been reached, you need to decide what percentage of the cache size needs to be freed. The CacheDeletionPercent node below indicates that 10 percent of the cache will be freed up. It's important to note that the cache is freed according to an algorithm (CacheLimit = (AvailableSpace + CurrentCacheSize * CacheLimitPercent)/100) and your files will be removed according to the LastWriteTime. Note that the last writes will be removed first.
<CacheDeletionPercent>10</CacheDeletionPercent>
The StatisticsPersistTime shows how many hours the proxy statistics logs should be persisted to a file. This setting is especially important to set depending on the number of users accessing the proxy and whether you are using the proxy server to do some performance monitoring:
<StatisticsPersistTime>1</StatisticsPersistTime>
Finally, we have the ReaderChunkSize and WriterChunkSize, which indicate in what size chunk the data should be propagated in and out of the proxy. ReaderChunkSize specifies what packet size is read from the application tier to the proxy, and WriterChunkSize denotes the packet size written to the client.
<ReaderChunkSize>1048576</ReaderChunkSize> <WriterChunkSize>1048576</WriterChunkSize> </ProxyConfiguration>
Managing the Proxy
At this point, Team Foundation Proxy has been appropriately configured. Once you install Team Foundation Proxy, it initiates several performance counters behind the scenes including the following:
-
Current cache size
-
Total cache hits (count and percentage)
-
Total download requests
-
Total files in cache
-
Total cache miss (count and percentage)
There are two ways you can monitor the proxy, either by using the Web service, or by using the Performance Monitor (perfmon.msc). You can access the Web service by following these instructions.
-
Type this address in your preferred Web browser: http://localhost:8081/VersionControlProxy/v1.0/proxystatistics.asmx.
-
You will get access to a Web service.
-
Click the QueryProxyStatistics method.
-
Click Invoke to bring up the proxy statistics in XML format.
<ProxyStatisticsInfo CurrentCacheSize="102403" NoOfRequests="112" OverallCacheHits="22" NoOfFilesInCache="22" OverallCacheMisses="22" CacheHitsPercentage="50" CacheMissPercentage="50" Server ServerUrl="http://VSTSRTM:8080/VersionControl" />
You can learn a lot from proxy statistics; in fact, it's like a scorecard. For example, the OverallCacheHits in the example is 22 percent. That isn't a good sign at all. It means that your proxy is constantly retrieving the files from the application tier - a best practice is to try to get this number up to 80 percent or greater. Also, notice that the proxy contains a very small number of files (22), and thereby is reduced in effectiveness. The CurrentCacheSize provides a view into what is currently cached on the server - if you compare it to your total cache size, it will provide an indication of how much cache you have left.
The Performance Monitor is accessible by clicking Start⇨Administrative Tools⇨Performance. A window appears as shown in Figure 15-5.
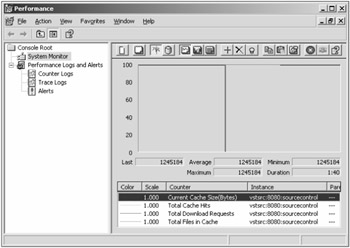
Figure 15-5
To configure the counters, simply right-click the System Monitor pane (the graph) and select Add Counters. A configuration window appears as shown in Figure 15-6.
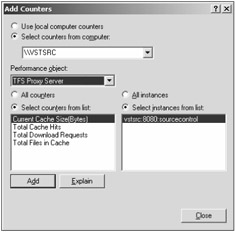
Figure 15-6
From the Performance object drop-down menu, select TFS Proxy Server. You can then select the counters from the list and add them to the display by clicking on the Add button. You will now be able to see your counters on the System Monitor pane and print them off for analysis. You can also obtain log information about the proxy server and correlate them with application logs to troubleshoot any problems that may come up. From a day-to-day perspective, a typical proxy administrator retrieves proxy statistics (weekly or every two weeks), sets up proxy security (including account credentials), and configures the cache settings. Here are pragmatic best practices targeted to Team Foundation Proxy administrators, some of which will improve your performance dramatically:
-
Use Team Foundation Proxy in high-performance, high-bandwidth environments. Using Team Foundation Proxy within a LAN reduces CPU and memory stress on your Team Foundation Server and SQL Server 2005.
-
If you want to access files from a Team Foundation Server for a short amount of time, connect directly to the server rather than add the proxy to the proxy.config file. The common sense reason for this is that the proxy will turn around and cache files that will be unused for the most part.
-
If the proxy needs to go offline for maintenance or any other reasons, tell your team members to turn off the proxy settings within Visual Studio. Visual Studio is designed to reconnect to a proxy server every five minutes. This will cause unnecessary network traffic.
-
If you are proxying large files, you should reset the executionTimeout to a higher value to compensate.
Working Offline
There may be scenarios where your users may need to work offline. Team Foundation Server does not support this scenario out of the box, however you can use the Team Foundation Power Toy online utility (found in the Visual Studio 2005 SDK in the Utilities folder) to integrate your offline work. To invoke the online tool, simply navigate to your workspace using the command prompt and type in a command such as this one:
C:\Visual Studio 2005 SDK\tfpt.exe online
The utility scans your workspace for writeable files and then creates a changeset. The workspace scan is shown in Figure 15-7.
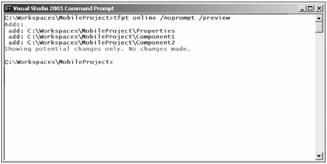
Figure 15-7
Don't try to undo changes made by the online tool; make sure the changeset contains exactly what you want checked in. (You can do this by using the /preview flag to give you a sneak peek.) If you are planning to use the tool, there are very specific instructions you must follow:
-
When in offline mode, remove the read-only flag on the files you want to edit. You can do this by right-clicking the folder or file, select Properties, and uncheck Read Only.
-
Don't rename files while offline. Team Foundation Server will not know the difference between a renamed file and a new file.
-
When you regain connectivity, before doing anything else run the online tool and check in the pending changeset that is generated. That way, there will be no confusion between the new online work you will be doing and your offline work. If you don't do this and you do a "get latest," there is a chance you may overwrite your work.
-
You can add and delete files offline. Make sure the files you are deleting are marked writeable before you proceed.
For more information about the tool, please refer to the most current version of the Visual Studio 2005 SDK, which can be downloaded for free at http://msdn.microsoft.com/vstudio/extend/.
Distributed Load Testing
Team System supports a scenario where you can test an application under load using multiple servers. This type of testing isn't specific to geographically distributed teams. In fact, in most cases you will want to run test rigs within a self-contained Web farm (rather than set up agents in distant geographies). You might be asking at this point, why include this topic in a book called Professional Team Foundation Server, and specifically in this chapter? In this book, we try to take a scenario and theme approach (as opposed to a feature-centric approach).
We are covering the topic here to specifically show how you can set up distributed tests, and specifically provide a scenario where you need to test the performance of an Enterprise-grade Web application under load of thousands of virtual users. For example, a tester in Hyderabad can connect to Team Foundation Server in Toronto, run his tests on a Canadian test rig then receive results back in India (as shown in Figure 15-8).
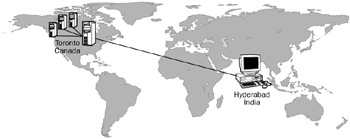
Figure 15-8
| Important | Note that the load controller and agents are sold separately from Team System. You can learn more about the product by visiting the following link: http://go.microsoft.com/fwlink/?linkid=64719. It is highly recommended that you read the Team Foundation Server installation and administration guides for in-depth configuration information. |
There are two key points to consider when installing the test controller and agents. First is not to install the controller on a domain controller. This configuration isn't supported and will most likely fail. The second important point is that you shouldn't install any of the agents until the controller has been installed. If you do so, your installation has a great likelihood of failing.
Once installed, you can administer your test controller by clicking Test⇨Administer Test Controller. You will see an interface as shown in Figure 15-9.
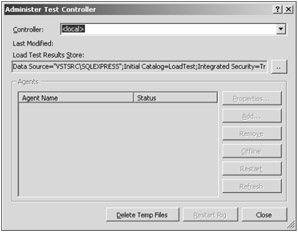
Figure 15-9
This interface allows you to delete temporary files, restart rigs, and add, remove, and manipulate controllers and agents. You can learn more about the process by looking at the official MSDN documentation at http://msdn2.microsoft.com/en-us/library/ms182637.aspx.
We will now look at how to set up a load test and associate it to a rig. We provide you with the step-by-step instructions on how to do this. However, if you want a great deal of depth on the topic, we would highly recommend you pick up Professional Visual Studio 2005 Team System published by Wrox Press. To start a load test, you must first create a test project. You can create one by clicking File⇨New⇨Project. A window appears with multiple project types. Expand Test Projects and select Test Documents (as shown in Figure 15-10).
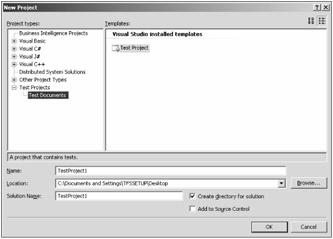
Figure 15-10
You should now create Web tests to use as the basis for your load test. In many development shops, usability tests are done against functional requirements to see if the Web site fulfills the business needs of the application. In many cases, this process is slow and manual. Web tests allow you to automate these manual tests, making regression testing really easy. On top of that, you get full integration of the tests with the rest of Team System, allowing you to create work items if a bug is found, or integrate the tests within a build (or check-in).
To create a Web test, all you need to do is right-click your test project and select Add⇨Web Test. Once the test is created, Internet Explorer launches along with the Web Test Recorder (as shown in Figure 15-11).
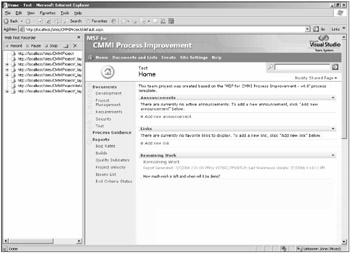
Figure 15-11
| Important | You'll notice the above example is a Web test of the team portal. In most real-world scenarios, you will want to Web test your own production and development applications. |
-
Once all of your Web tests have been created, right-click your project name in Solution Explorer, and select Add⇨Load Test. The New Load Test Wizard (Figure 15-12) provides you with the opportunity to configure your load tests, including your agent and controller settings.
-
Click Next to move on to the Test Scenario. You can define the recorded think times. You can also set up the think time between iterations (shown in Figure 15-13).
-
You can then add your mix of tests to a load test, and then set the load distribution of each test (as shown in Figure 15-14).
-
Next, you can add the mix and distribution of browsers (Figure 15-15).
-
You can then add the network type mix, including LAN, 56k dial-up, and distribute it according your user profile. You can figure out the normal profile for your Web site based on statistics (Figure 15-16).
-
At this point, you can specify the controllers and agents to monitor, and include the results within the load test (seen in Figure 15-17):
-
At the end of the process, you can set the timings, a description, and set the validation level for your load test (Figure 15-18). Once you click Finish, the load test is added to your project.
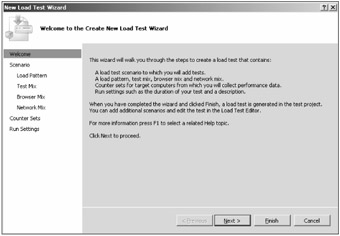
Figure 15-12
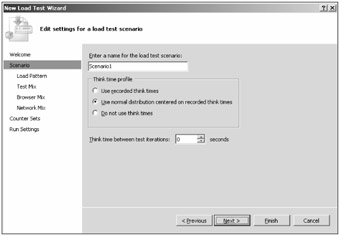
Figure 15-13
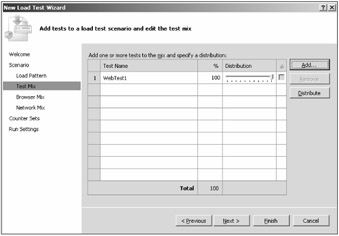
Figure 15-14
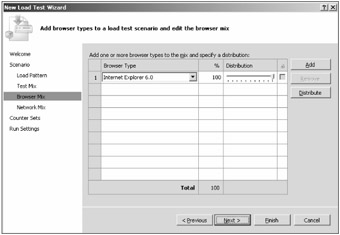
Figure 15-15
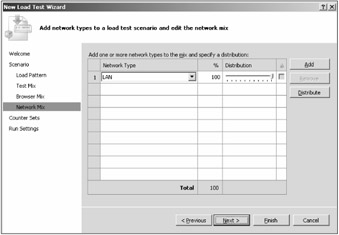
Figure 15-16
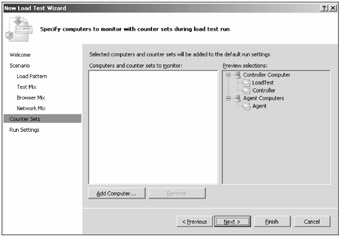
Figure 15-17
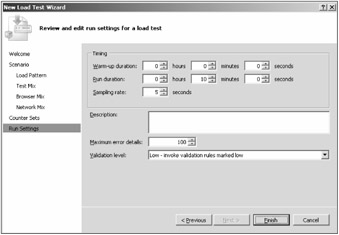
Figure 15-18
Figure 15-19 shows the various counters that are measured on the controller. It includes memory, network interfaces, process, processor, and system.
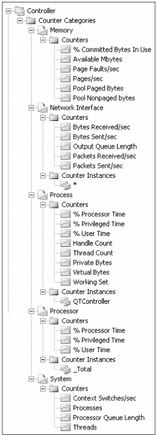
Figure 15-19
Team Foundation Build
Depending on the configuration of your remote teams, projects, and what hardware you have at your disposal, you may decide to deploy one (or several) build servers in your infrastructure. The most common scenario with most companies is one build server in the center of the development environment. If your builds take a long time to complete or you have several distributed projects with unique build requirements, you may want to set up a farm of build servers. If your builds are also performance intensive, the extra horsepower will definitely come in handy.
One of the advantages of doing this is that the licensing is quite flexible in the deployment of multiple build servers. The rule of thumb is that you can deploy as many build servers as you want as long as the users accessing or triggering builds have a client access license (CAL).
| Important | To install Team Foundation Build, simply explore the Team Foundation Server media and find a directory called build. Simply double-click setup.exe to start the process - you can install Team Foundation Build directly on your Team Foundation Server or on a standalone machine. |
In Figure 15-20, you can see a deployment of multiple Team Foundation Build servers partitioned by project. This is but one of many scenarios - you have to decide what is applicable in your environment. Another logical scenario is setting up a separate build server for every phase of development - a daily development/integration server, a test/quality assurance build server for intensive testing, and a release build server dedicated for creating clean, release-ready builds.
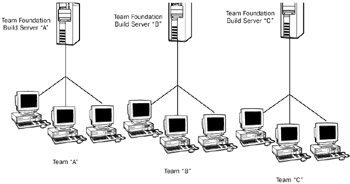
Figure 15-20
You can target any of your build servers within a build script when you create a build type. Right-click the Team Builds folder of your team project (within Team Explorer) and select New Team Build Type. The following table is a decision chart to help guide you through the process of planning a multiple Team Foundation Build deployment:
| Single Build Server | Multiple Build Servers |
|---|---|
| Daily or nightly build: A single server can run at off-peak hours to build the code. | Continuous Integration: Code is built continuously at every check-in. |
| Small development team: A single build server is adequate for a small development team. | Large development team: The volume of build requests may increase with a larger number of team members. A build farm would help alleviate the load of requests. |
| Localized team: If the entire development team is in one location, you won't have the same concerns as a distributed team - for example, communication and operational delays due to differences in time zone. | Distributed team: A build server per location may alleviate lag time in generating and retrieving builds. This scenario has to be assessed on a case-by-case basis based on the responsibilities of each of the teams. |
| Short build cycles: Builds take 5 to 15 minutes without disruption. | Long build cycles: If your builds take several hours to run, you may want to set up multiple build servers to load balance your builds. |
EAN: 2147483647
Pages: 168