6.5 Setting global Simple Mail Transfer Protocol parameters
|
| < Day Day Up > |
|
Exchange allows you to set global message delivery properties that direct how Exchange handles certain types of messages. Using the ESM console, you can define global SMTP configuration settings, such as message size limits, recipient limits, and options to prohibit junk e-mail.
-
Start ESM from the Windows Start menu by selecting All Programs →Microsoft Exchange →System Manager.
-
Expand the Global Settings section.
-
Right-click on Message Delivery and select Properties.
-
Defaults tab Select the Defaults tab to specify incoming and outgoing message size and to restrict the number of recipients for each e-mail message (Figure 6.2).
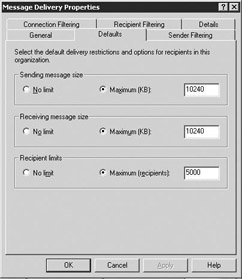
Figure 6.2: Message Delivery Defaults tabThese are default values, and you can override these values for specific SMTP virtual servers.
-
You can use the Sending message size configuration parameter to prevent users from sending large e-mail messages. Select either No limit or Maximum (KB) and enter a value for the maximum message size that can be sent. If a user attempts to send an e-mail message that is larger than the specified value, the message will be returned to the user as undeliverable.
-
The Receiving message size configuration parameter can be used in a similar manner to limit the size of messages being received. Select either No limit or Maximum (KB) and enter a value for the maximum message size that can be received. Incoming e-mail that exceeds the specified size will be returned to the sender as undeliverable. Setting limits for outgoing and incoming message size prevents large e-mail messages from affecting your network performance and can also save disk space.
-
You can use the Recipient limits option to restrict the number of recipients that can be included for a single e-mail distribution. Select either No limit or Maximum (recipients) and enter a value in the associated field that specifies the maximum number of recipients. If a user attempts to send a message that exceeds the specified maximum number of recipients, the message will be returned to the user as undeliverable.
-
If you elect to place restrictions on incoming or outgoing e-mail (and, by default, Exchange 2003 implements limits), it is important that you clearly communicate your e-mail policies to your users. Effective communication can help to minimize user frustration and reduce unnecessary help desk calls. You should also be careful not to set limits too low. If you set the limits too low, users will search for ways to bypass the limits, such as using compressed attached files to decrease their size. Setting limits too low may help Exchange performance, but it could add cost to the enterprise as users spend time compressing and decompressing files.
-
Sender Filtering tab Select the Sender Filtering tab to prevent delivery of messages that were sent by particular users, such as known distributors of junk e-mail (Figure 6.3).
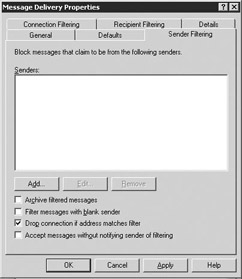
Figure 6.3: Message Delivery Sender Filtering tab -
The e-mail addresses in the Senders list are those addresses that are to be blocked. Incoming messages from these e-mail addresses will not be delivered to the recipient. Select the Add button to display the Add Sender dialog box for adding an e-mail address to the list. Enter an e-mail address to be blocked. You can use wild card characters to block a group of users. For example, to block all messages from the badpeople.com domain, enter *@badpeople.com as the e-mail address. Because junk e-mailers change domain names frequently, filtering on the basis of domain names should not be your only strategy for blocking incoming spam.
-
If you are concerned about unintentionally blocking legitimate mail, you can select the Archive filtered messages check box to archive a copy of all blocked messages in .tmp files in the \filter directory of the SMTP virtual server's working directory (e.g., exchsrvr\mailroot\vs1\filter). Archiving filtered messages can help you evaluate the effectiveness of your filtering policy. Although archiving the blocked messages may be useful, the archive files can grow in size quickly. Because old messages are not automatically removed from the archive, periodically you must manually remove them.
-
Knowing that some e-mail products can block delivery of incoming e-mail on the basis of the sender's SMTP address, junk e-mailers sometimes send their junk e-mail with a blank SMTP From field. Select the Filter messages with blank sender check box to block delivery of messages in which the From field is blank.
-
Select the Drop connection if address matches filter check box to immediately terminate the SMTP session if a sender's address matches an address on the filter.
-
If you do not want the sender of incoming junk e-mail to know that you have blocked delivery of their message, select the Accept messages without notifying sender of filtering check box to keep from sending a non-delivery report (NDR) to the sender of blocked messages. Senders of junk e-mail often rely on NDRs or other automatic notifications to validate an e-mail address. When senders of junk e-mail know that the address is valid, they add the address to their full collection of junk e-mail distribution lists. To limit the number of spam messages, it is a good idea to suppress NDRs for most Internet domains. Message delivery will still be blocked and the blocked message can still be archived, but the sender will not be told.
-
Connection Filtering tab Select the Connection Filtering tab (Figure 6.4) to create connection filtering rules to block SMTP servers that are found on lists maintained by a block list provider or that you have configured on your global deny list. These lists are also known as Real-time Blackhole Lists. Connection filtering rules apply only to anonymous connections and do not affect authenticated users and Exchange servers.
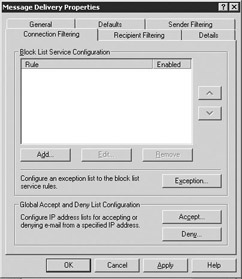
Figure 6.4: Message Delivery Connection Filtering tab -
Select Add to display the Connection Filtering Rule dialog box (Figure 6.5) to add a connection filter rule to the Block List Service Configuration list.
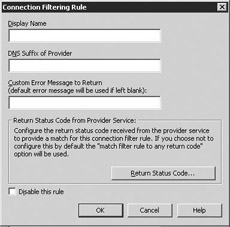
Figure 6.5: Connection Filtering Rule dialog boxUsing a block list provider allows you to compare an incoming IP address against the provider's list for categories you want to filter. If the IP address appears on the list, the provider returns a status code or bit mask indicating a positive match.
Note Your block list provider should be able to supply specific configuration information to use in the Connection Filtering Rule dialog box.
-
Enter the connection filtering rule name in the Display Name field.
-
In the DNS Suffix of Provider field, enter the DNS suffix that the provider appends to the IP address.
-
In the Custom Error Message to Return field, you can create a custom error message that Exchange will return to the sender. If you leave this field blank, Exchange will use the default error message that says, ' <IP address > has been blocked by < connection filter rule name?.' You can use the following variables to create your custom message:
-
Use '%0' to insert the connecting IP address.
-
Use '%1' to insert the connection filter rule name.
-
Use '%2' to insert block list provider name.
-
-
Select Return Status Code to display the Return Status Code dialog box (Figure 6.6) to configure the return status code against which you want to filter.
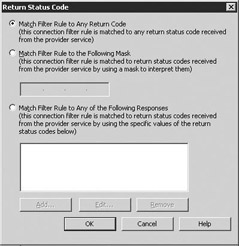
Figure 6.6: Return Status Code dialog box -
Use the options on the Return Status Code dialog box to specify the value returned by your block list provider that indicates a match. Select OK to return to the Connection Filtering Rule dialog box. Select OK to return to the Message Delivery Properties window.
-
Exchange checks the connection filter rules on the basis of the order in which they appear in the list. Exchange rejects the connection as soon as it finds a match and does not check the remaining rules. You can use the up and down arrows to change the order of the rules.
-
Select Exception to display the Block List Service Configuration Settings dialog box (Figure 6.7) to add an SMTP address as an exception to the connection rules.
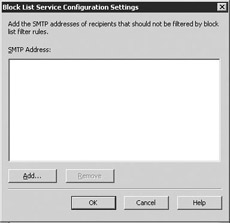
Figure 6.7: Block List Service Configuration Settings dialog box -
Select Add to add an SMTP address as an exception to the connection rules. You can enter either an individual e-mail address or use wild cards to allow messages from all users in a specific domain. This is similar to a 'white list.' For example, to allow all messages from the company.com domain, enter *@company.com. Exchange will accept mail from the SMTP addresses in the exception list even if the same address appears on the block list provider's list. Select OK.
-
Select Deny to display the Deny List dialog box (Figure 6.8) to specify IP addresses that should always be denied. You can use the global accept and deny lists to add IP addresses that should always be accepted or denied. Exchange checks the entries in the global accept or deny lists before it checks entries in the Block List Service provider. Exchange accepts or rejects the connection as soon as it finds a match and does not check the remaining rules.
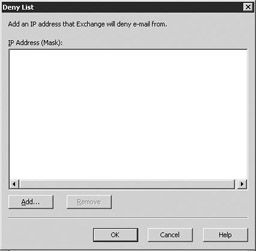
Figure 6.8: Deny List dialog box -
Select Add to display the IP Address dialog box (Figure 6.9) to add a single IP address or a group of IP addresses (using the subnet address and subnet mask) that should always be denied. Filtering junk e-mail on the basis of the sender's IP address is generally more effective than filtering on the basis of the SMTP address, because senders of junk e-mail typically do not change their IP addresses as often as their SMTP addresses. However, many professional junk e-mail senders have a set of addresses and will use more than one IP address. For these senders of junk e-mail, you may find it more effective to block a range of IP addresses instead of a single address. Of course, the risk of blocking the full subnet is that other legitimate e-mail users may share the same subnet as the junk e-mail sender. Therefore, use caution when blocking a range of IP addresses. Select OK to return to the Deny List dialog box. Select OK to return to the Message Delivery Properties window.
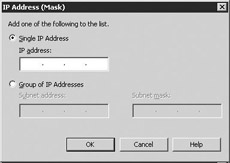
Figure 6.9: Internet Protocol Address dialog box -
Select Accept to display the Accept List dialog box (Figure 6.10) to specify IP addresses that should always be accepted. The global accept list overrides the global deny list. This is useful for situations in which you want to block all but one IP address from an IP subnet. You can block the group of IP addresses by entering the subnet and mask on the global deny list and then adding the individual IP address to the global accept list.
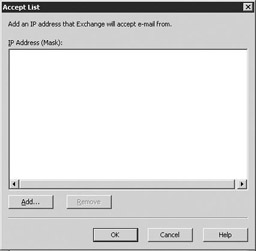
Figure 6.10: Accept List dialog box -
Select Add to display the IP Address dialog box (see Figure 6.9) to add a single IP address or a group of IP addresses (using the subnet address and subnet mask) that should always be accepted. Select OK to return to the Accept List dialog box. Select OK to return to the Message Delivery Properties window.
-
Recipient Filtering tab Select the Recipient Filtering tab (Figure 6.11) to prevent the delivery of messages that are sent to particular recipient addresses or messages that are sent to users who are not listed in the Active Directory. Recipient filter rules apply only to anonymous connections and do not affect authenticated users and Exchange servers.
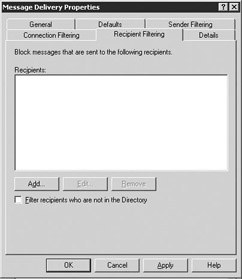
Figure 6.11: Message Delivery Recipient Filtering tab -
The e-mail addresses in the Recipients list are those addresses that are to be blocked. Incoming messages sent to an e-mail address or display name that appears on this list will not be delivered to the recipient. Select the Add button to display the Add Recipient dialog box for adding an e-mail address to the Recipients list. Enter an e-mail address to be blocked. You can use wild card characters to block a group of users. For example, to block all messages sent to the company.com domain, enter *@company.com as the e-mail address.
-
Select the Filter recipients who are not in the Directory check box to block incoming messages sent to users who are not in the Active Directory. Exchange only performs Active Directory lookups and blocks invalid recipients for incoming mail destined to a domain over which it is authoritative. This setting is configured in recipient policies. Enabling this check box seems like a good idea. However, enabling it causes the SMTP virtual server to send a different response for valid and invalid recipients. A perpetrator of unsolicited commercial e-mails could use these differing responses to discover valid e-mail addresses in your organization.
-
Details tab Select the Details tab.
-
Use the Administrative note field on the Details tab to enter additional information about the global SMTP properties. One good use of this field is to record configuration changes.
Applying Message Filters
After you create a sender filter rule, a recipient filter rule, or a connection filter rule, you must apply the rule to the appropriate SMTP virtual servers. If a message arrives at a server before you enable your filtering rules, Exchange will process the message without using the filters. You can use the following procedure to enable filtering on an SMTP virtual server:
-
Start ESM from the Windows Start menu by selecting All Programs →Microsoft Exchange →System Manager.
-
Expand the Administrative Groups section.
-
Expand the administrative group (e.g., First Administrative Group) that contains the SMTP virtual server.
-
Expand the Servers section.
-
Expand the server that contains the SMTP virtual server.
-
Expand the Protocols section.
-
Expand the SMTP section.
-
Right-click on the SMTP virtual server you want to change and select Properties.
-
On the General tab, select the Advanced button to display the Advanced dialog box showing the TCP port and IP addresses for this virtual server. If you have multiple virtual servers on the same system, each virtual server will have a different IP address or a different TCP port.
-
For each IP address you want to filter, select the address and then select Edit to display the Identification dialog box (Figure 6.12).
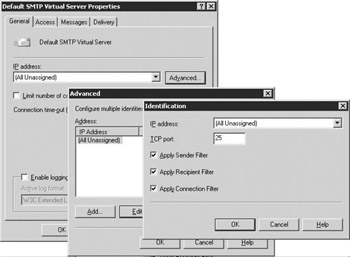
Figure 6.12: Applying Message Filters -
Select the Apply Sender Filter, Apply Recipient Filter, and/or Apply Connection Filter check boxes to apply the selected filters to this virtual server.
|
| < Day Day Up > |
|
EAN: 2147483647
Pages: 128