Third-Person Cameras
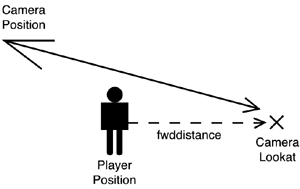
| Now that we have mastered flight simulators (and quaternions, hopefully), we will learn to specify a floating camera that follows the player behind and above his head, much like those in the classic Tomb Raider titles. To do so, our first approach involves always placing the camera behind the player and at a certain elevation angle over his position. The camera will be aimed at the player, who will therefore occupy the center of the screen. Using very simple math, here are the equations for this first camera's position and look-at point: camposition.x= playerpos.x cos(yaw)*cos(pitch)*distance; camposition.y= playerpos.y + sin(pitch)*distance camposition.z= playerpos.z sin(yaw)*cos(pitch)*distance; camlookat=playerpos; We can implement such a camera by rehashing the OpenGL or DirectX we previously used in this chapter. Notice how we are basically applying a spherical coordinate transform using distance as the radius and pitch and yaw as the sphere mapping parameters. Then, pitch=0 means the camera is at the same height as playerpos, and we should limit the camera to a pitch no greater than PI/2 (90°). If we didn't impose such a restriction, the camera would be upside down because we would have surpassed the vertical (90° from ground level). Remember that sphere mapping creates X,Y,Z coordinates from radius, longitude, latitude, using an equation such as X=Radius*cos(longitude)*cos(latitude) Y=Radius*sin(latitude) Z=Radius*sin(longitude)*cos(latitude) where longitude is a number in the range (0..2*PI), and latitude is in the range (-PI/2.. PI/2). Latitude=0 would, in this equation, yield Y=0, thus representing a point on the equator or the imaginary sphere, or in camera terms, horizontal. Although it should suffice for simple demos, there are a number of problems involved with this camera model. Our first limitation is having to target the player directly. After all, we are designing an action title, so we not only care about the player, but also about whatever he is currently seeing. Imagine that there is an enemy coming toward the player frontally. If we aim the camera at the player, he will most likely occlude the enemy, so we won't see the enemy until it's too late. Thus, we will improve the preceding code so we do not aim our camera at the player directly but at a point in space located in his viewing direction. In practical terms, this will make the player move vertically to the lower part of the screen, ensuring that we get a clear vision of whatever he's facing (see Figure 16.2). The math for this camera is quite straightforward. We will use the same approach as before, changing the look-at point (and thus shifting the whole sphere): point camlookat=playerpos; camlookat.x+=fwddistance*cos(yaw); camlookat.z+=fwddistance*sin(yaw); camposition.x= camlookat.x cos(yaw)*cos(pitch)*distance; camposition.y= camlookat.y + sin(pitch)*distance camposition.z= camlookat.z sin(yaw)*cos(pitch)*distance; Figure 16.2. Camera parameters for a third-person view ahead of the player.
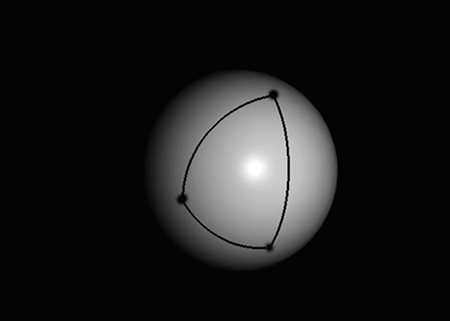
Now our camera is correct, both in its position and orientation. But this camera model will definitely cause lots of motion sickness. Notice how rotating the player will cause the camera to describe large arcs through the game level: The camera will move too fast. To reduce this effect, an inertial camera must be implemented. Here the idea is to limit the speed of the camera and use the position and look-at values computed previously only as indications of where the camera is moving to, not where the camera really is. When doing inertial cameras, we need to implement smooth interpolations between different orientations. Doing so in terms of Euler angles will again look wrong. The camera will shake, look unnatural, and lose most of its smoothness. To solve this problem and compute smooth interpolations, we will again use quaternions. Quaternions provide an intuitive, simple mechanism to interpolate orientations. All we need to do is to describe both orientations using quaternions, and then interpolate between them using the Spherical Linear Interpolator (SLERP). A SLERP interpolates between two quaternions using a sphere (see Figure 16.3), so orientations transition from one to another smoothly. Figure 16.3. Interpolating with SLERP blends orientations that follow the surface of a unit sphere.
Its mathematical definition is SLERP(q0,q1,t)=(q0*sin((1-t)*theta)+q1*sin(t*theta))/sin theta where q0, q1 are the source and destination quaternion, t is the interpolation parameter that is in the range of 0 to 1, and theta is the acute angle between both quaternions. This produces a new quaternion, which is the spherical interpolation of the two. Here is the full source code for the SLERP routine: QuatSlerp(QUAT * from, QUAT * to, float t, QUAT * res) { float to1[4]; double omega, cosom, sinom, scale0, scale1; cosom=from->x*to->x + from->y*to->y + from->z*to->z + from->w*to->w; if ( cosom <0.0 ) { cosom = -cosom; to1[0] = - to->x; to1[1] = - to->y; to1[2] = - to->z; to1[3] = - to->w; } else { to1[0] = to->x; to1[1] = to->y; to1[2] = to->z; to1[3] = to->w; } if ( (1.0 - cosom) > DELTA ) { // standard case (slerp) omega = acos(cosom); sinom = sin(omega); scale0 = sin((1.0 - t) * omega) / sinom; scale1 = sin(t * omega) / sinom; } else { // "from" and "to" quaternions are very close // ... so we can do a linear interpolation scale0 = 1.0 - t; scale1 = t; } // calculate final values res->x = scale0 * from->x + scale1 * to1[0]; res->y = scale0 * from->y + scale1 * to1[1]; res->z = scale0 * from->z + scale1 * to1[2]; res->w = scale0 * from->w + scale1 * to1[3]; } The last issue we must deal with when coding a third-person camera is preventing it from colliding with the level geometry. Imagine that your character moves backward, so his back ends up leaning against a wall. If we use any of the algorithms explained in this section, the camera will actually cross the wall, and the sense of realism will be destroyed. Lots of games have suffered from bad camera placement in the past, and to most gamers' surprise, many of them still do today. A camera that crosses room walls sends a really negative message to the player in regard to game quality, so we must address this problem carefully. The first option is to let the camera cross geometry, but never allow this geometry to occlude what's going on. To solve this issue, geometry between the camera and the player is alpha-blended, so room walls become partially transparent. This is a relatively straightforward effect, but is not very convincing to the player. A second option is to seek alternative camera positions if we detect we are about to cross level geometry. This is the most common approach, but finding the right spot is not an easy task. We can choose to raise the camera vertically, but by doing so, we lose some perspective on what's coming toward the player. Besides, we can encounter a side problem if the room has a low roof. Another approach involves placing the camera laterally, which can again be tricky if we are at a corner or anywhere with geometry to the sides. An alternative solution involves doing an inverted shot. Instead of shooting from behind the player, we can place the camera in front of him, so we actually see the monsters approaching. |
EAN: N/A
Pages: 261

