Older Queuing Methods
Older versions of IOS offered only a few congestion management tools. Before we cover the newer QoS features (especially MQC), let's review the older QoS methods, including first-in-first-out (FIFO ), priority queuing, custom queuing, and weighted fair queuing. These methods are the easiest to understand, and the newer tools are best understood in comparison to these more basic methods.
11.2.1. FIFO
In a first-in-first-out (FIFO) queue, the first packet on your interface is the first packet out your interface. There aren't any queuing decisions going on here: the packets are simply lined up as they come in and processed as quickly as possible.
If you have several high-bandwidth connections (such as HTTP or FTP), these connections can hog the queue by filling it with their packets. When the queue is full, and a lower-bandwidth connection such as telnet comes along, the telnet packets are forced to wait for the other connection's packets. Forcing the later connection to wait just because it is less demanding is unfair and results in bandwidth-intensive traffic starving well-behaved network traffic.
FIFO is the default setting on connections greater than 2.048 Mbps.
11.2.2. Priority Queuing
Priority lists allow the router to sort and process incoming packets based on priorities you assign. These lists should be used only on WAN links that occasionally become congested; during congested periods, we want to give mission-critical packets top priority. If the link is always congested, using priority lists isn't recommended, for reasons we'll soon explain.
Priority queuing (PQ) handles all high-priority queues before handling any lower-priority queues. On networks that have brief intermittent congestion, Priority queuing is a fantastic way to handle some real-time applications such as VoIP because those applications can't stand queuing delays. In a network with severe congestion, however, the lower-priority queues really suffer with priority queuing , which causes significant network performance problems. In that case, if you want to ensure low latency queuing for real-time applications (such as VoIP), Low-Latency Queuing (LLQ) might be better.
With priority lists, we assign different queue levels to entire protocols or to particular ports. Packets are handled depending on the queue to which they are assigned: low, medium, normal, or high. Each one of these queues is handled individually as a FIFO queue, which means each queue is emptied completely before the next queue is handled. This reiterates the point that busy flows at the higher-priority level can starve well-behaved flows at lower-priority levels.
For example, in Figure 11-1, the users on Network 2 access the web server on Network 1 across the WAN link. The web server is the primary application for our users, and it is the interface to the company database. During times of congestion, web traffic should have top priority. We give telnet medium priority, which allows our telnet sessions to get through, and give all other traffic normal priority.
Figure 11-1. Using a priority list
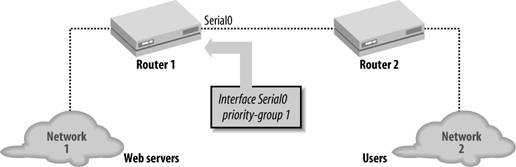
The configuration for this priority list is:
 ! Give web access the highest priority
 priority-list 1 protocol ip high tcp 80
 ! Give telnet medium priority
 priority-list 1 protocol ip medium tcp 23
 ! Everything else is default traffic
 priority-list 1 default normal
To complete the example, we apply the priority list to serial0 on Router 1 with the following commands:
 interface serial0
 priority-group 1
11.2.2.1. Monitoring priority queueing
To display the queue list, use the command show queuing priority.
 Router#show queueing priority
 Current DLCI priority queue configuration:
 Current priority queue configuration:

 List Queue Args
 1 high protocol ip tcp port www
 1 medium protocol ip tcp port telnet
11.2.3. Custom Queuing
Priority lists let us assign a priority to different protocols. Custom Queueing (CQ) lets us specify queue lists with certain characteristics. Queue lists are similar to priority lists in that they allow you to prioritize traffic across a WAN link.
With CQ, however, we create queues of various sizes, then process each queue individually for a certain amount of time before going on to the next queue. A round-robin algorithm is still used for queue processing, but this time, a byte count specifies the amount of data that should be delivered from a queue before moving on to the next queue. While PQ says "process this type of queue completely before moving onto the next," CQ says "process this amount of data in the queue before moving on to the next queue." If we again process web traffic at the highest priority, assign telnet a medium priority, and then all other IP traffic low priority, with this type of queuing we specify that the network should process a large chunk of web traffic, then a medium chunk of telnet traffic, followed by a small chunk of everything else, and then repeat this process. Now let's talk about exactly how we specify that.
11.2.3.1. Setting the queue size
The queue size is the number of packets the queue can hold at any time. We are going to set two different values: the limit and the byte-count.
The limit is the number of packets that the router is allowed to stuff into a queue at any one time. We can set the queue from 0 to 32,767 queue entries. A value of 0 means that the queue can be of unlimited size.
In the following example, we set the limit for Queue 1 to 100 packets and the limit for Queue 2 to 50 packets.
 queue-list 1 queue 1 limit 100
 queue-list 1 queue 2 limit 50
The second value we are going to set is the byte-count, which is the number of bytes the router is allowed to process from the queue in each cycle. Remember that CQ doesn't empty the entire queue before moving on to the next like PQ but instead processes a certain number of packets from the queue before moving on. This "certain number of packets" is set by the byte-count.
Computing the queue size isn't difficult. If you are calculating IP packet size across a link, you might guess that the maximum packet size is 1,500 (the link's MTU). We add 20 to this number to take care of packet headers, which gives us a total of 1,520 bytes per packet.
For example, if we want the highest priority queue to process 10 packets, we set its byte-count to 15,200 bytes (10 x 1,520). Likewise, if we want to process 5 packets in a lower priority queue, we set its byte-count to 7,600 bytes. Here's how to construct a queue list with these two queues:
 queue-list 1 queue 1 byte-count 15200
 queue-list 1 queue 2 byte-count 7600
This byte-count is just a guide; the router is still going to process whole packets each cycle. If it goes over the byte-count for one cycle, it will remember that value and subtract it from the limit at the next cycle. In other words, if the queue had to use a few extra bytes in one cycle in order to process a whole packet, it would subtract those few bytes from the limit the next time through the cycle.
11.2.3.2. Applying a queue to an interface
We can apply the queue list to an interface with the command custom-queue-list:
 interface serial0
 custom-queue-list 1
11.2.3.3. Assigning packets to queues by protocol type
Now all we need to do is describe what kinds of packets we want to send into each queue. Let's use the same example we used earlier (in Figure 11-1): high priority for web access, medium priority for telnet access, and some sort of default priority for all other IP traffic. The custom queue list equivalent of the priority list would look like this:
 queue-list 1 protocol ip 1 tcp 80
 queue-list 1 protocol ip 2 tcp 23
 queue-list 1 default 3
 queue-list 1 queue 1 byte-count 7600
 queue-list 1 queue 2 byte-count 4560
 queue-list 1 queue 3 byte-count 1520

 interface serial0
 custom-queue-list 1
Again, we use the show queueing command to display our queue information.
 Router#show queueing custom
 Current custom queue configuration:

 List Queue Args
 1 3 default
 1 1 protocol ip tcp port www
 1 2 protocol ip tcp port telnet
 1 1 byte-count 7600
 1 2 byte-count 4560
 1 3 byte-count 1520
11.2.4. Weighted Fair Queuing (WFQ)
Instead of paying attention to the most demanding protocols, Weighted Fair Queuing (WFQ) views all incoming packets as part of a "network flow" (also called a "conversation") between two network nodes. It can use the source and destination IP addresses, TCP/UDP ports, or anything else to determine the flow to which the packets belong. Once it knows which packets belong to which flows, WFQ can provide all conversations with equal access to the interface.
WFQ uses IP Precedence to weight the traffic flows and then handle those with the highest weights preferentially. The fact that WFQ uses IP Precedence is one of its advantages. Another advantage is that it ensures that an extremely busy flow will starve itself before causing dropped packets in other more well-behaved flows.
Figure 11-2 illustrates how the flows are treated in WFQ. In this diagram, we have three conversations: a telnet session and two HTTP sessions (A and B). Assume that three packets arrive at the interface and are placed in the queue. T1 is forwarded out first, regardless of the number of packets in the queue for HTTP A and HTTP B, because T1 is a telnet packet. We don't want a telnet session to wait for our HTTP traffic. After T1 has gone out, the remaining packets are sent out based on their flows and timestamps.
Figure 11-2. Weighted Fair Queuing with three separate conversations

|

You can disable WFQ with the following command:
 interface serial0
 no fair-queue
The setting we want to look at is the congestive discard threshold, which is the number of packets (queue size) allowed for each flow. The default value is 64; it can range from 16 to 4,096 and must be a power of 2. When this queue size has been reached, all incoming packets for that flow will be discarded.
In this example, we set the congestive discard threshold for each queue on the serial0 interface to 300.
 interface serial0
 fair-queue 300
|
11.2.4.1. Monitoring WFQ
Use the show queue command to examine your current queues and their performance. Here we look at the queue for serial0 with the command show queue serial0.
 Router#show queue serial0
 Input queue: 0/75/0 (size/max/drops); Total output drops: 0
 Queueing strategy: weighted fair
 Output queue: 0/1000/64/0 (size/max total/threshold/drops)
 Conversations 0/1/256 (active/max active/max total)
 Reserved Conversations 0/0 (allocated/max allocated)
Getting Started
- Getting Started
- IOS User Modes
- Command-Line Completion
- Get to Know the Question Mark
- Command-Line Editing Keys
- Pausing Output
- show Commands
IOS Images and Configuration Files
- IOS Images and Configuration Files
- IOS Image Filenames
- The New Cisco IOS Packaging Model
- Loading Image Files Through the Network
- Using the IOS Filesystem for Images
- The Routers Configuration
- Loading Configuration Files
Basic Router Configuration
- Basic Router Configuration
- Setting the Router Name
- Setting the System Prompt
- Configuration Comments
- The Enable Password
- Mapping Hostnames to IP Addresses
- Setting the Routers Time
- Enabling SNMP
- Cisco Discovery Protocol
- System Banners
Line Commands
- Line Commands
- The line Command
- The Console Port
- Virtual Terminals (VTYs)
- Asynchronous Ports (TTYs)
- The Auxiliary (AUX) Port
- show line
- Reverse Telnet
- Common Configuration Items
Interface Commands
- Interface Commands
- Naming and Numbering Interfaces
- Basic Interface Configuration Commands
- The Loopback Interface
- The Null Interface
- Ethernet, Fast Ethernet, and Gigabit Ethernet Interfaces
- Token Ring Interfaces
- ISDN Interfaces
- Serial Interfaces
- Asynchronous Interfaces
- Interface show Commands
Networking Technologies
Access Lists
IP Routing Topics
- IP Routing Topics
- Autonomous System (AS) Numbers
- Interior and Exterior Gateway Protocols
- Distance-Vector and Link-State Routing Protocols
- Static Routes
- Split Horizon
- Passive Interfaces
- Fast Switching and Process Switching
Interior Routing Protocols
Border Gateway Protocol
- Border Gateway Protocol
- Introduction to BGP
- A Simple BGP Configuration
- Route Filtering
- An Advanced BGP Configuration
- Neighbor Authentication
- Peer Groups
- Route Reflectors
- BGP Confederacies
- BGP TTL Security
Quality of Service
- Quality of Service
- Marking
- Older Queuing Methods
- Modern IOS QoS Tools
- Congestion Avoidance
- Traffic Policing
- Traffic Shaping
- AutoQoS
- QoS Device Manager
Dial-on-Demand Routing
- Dial-on-Demand Routing
- Configuring a Simple DDR Connection
- Sample Legacy DDR Configurations
- Dialer Interfaces (Dialer Profiles)
- Multilink PPP
- Snapshot DDR
Specialized Networking Topics
- Specialized Networking Topics
- Bridging
- Hot Standby Routing Protocol (HSRP)
- Network Address Translation (NAT)
- Tunnels
- Encrypted Tunnels
- Multicast Routing
- Multiprotocol Label Switching (MPLS)
Switches and VLANs
- Switches and VLANs
- Switch Terminology
- IOS on Switches
- Basic Switch Configuration
- Trunking
- Switch Monitor Port for IDS or Sniffers
- Troubleshooting Switches
Router Security
- Router Security
- Securing Enable Mode Access
- Routine Security Measures
- Restricting Access to Your Router
Troubleshooting and Logging
Quick Reference
Appendix A Network Basics
Index
EAN: 2147483647
Pages: 1031
