Application Security
| Some applications require that users log in before they have access to some application resources. There are two basic elements of application security:
Authentication checks whether a valid user is logged in. The authentication process usually involves user interaction with a log form and code on the backend. The authentication process queries the database to verify the username and password provided by the user in the login form and to retrieve information about that user if his or her login is validated. For example, our InsideColdFusionMX application has many sections. Some are public and some are intended only for authenticated users. The application might let visitors view the welcome page and some other content, but it would require that a user be registered and authenticated prior to viewing the forums area. The authorization process retrieves information about the authenticated user's rights, privileges, and roles within the application and makes decisions about what content to show the user. Authorization helps to ensure that users see and have the opportunity to interact with only those things to which they should have access. Let's think again about the InsideColdFusionMX application. Every authenticated user might be able to see all the latest news that appears on the site, but a handful of people might also have access to edit current news items or to add new ones. By identifying the role or roles of each logged-in user, we can show selected users an icon that gives them edit access to the News section. ColdFusion MX makes the process of implementing and managing application security much easier. This is done with several new CFML tags and functions, as shown in Table 17.1.
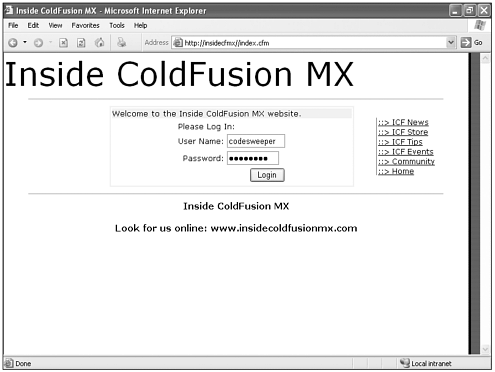
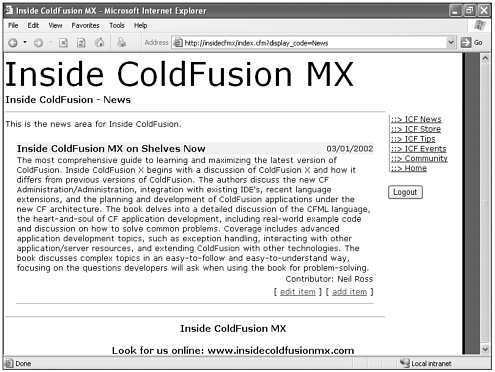
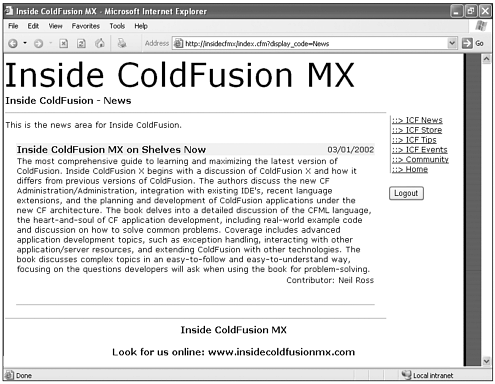
In the next few pages, we take a look at some of these new features in action. User AuthenticationWe've stated that authentication ensures that only a valid user is logged in. ColdFusion MX has introduced the new CFLOGIN tag, which encapsulates the authentication logic. Within the body of the CFLOGIN tag, you can put all your logic that validates the username and password against the database and that differentiates between successful and unsuccessful login attempts. If a user successfully logs in, our application should call the CFLOGINUSER tag within the body of the CFLOGIN tag. The CFLOGINUSER tag takes the ID of the logged-in user as the value of the name attribute and can optionally take the value of that user's roles as a comma-delimited list into the roles attribute. Note The list of values passed into the roles attribute should not contain spaces after each comma. The most logical place to handle user authentication is in Application.cfm. However, there is nothing to stop us from using the older model of breaking the login procedure out into its own directory and creating separate login and authentication templates. Application.cfmBecause Application.cfm runs on each template in the application, it is a perfect place within which to check for user authentication. Each time a template is requested, the application can check to make sure that the user has been authenticated. If the user is not logged in, he or she can be presented with the login form. Let's walk through the logic of Listing 17.1. First, we check whether the logout form variable exists. If it does, we can call the CFLOGOUT tag to end the session and to delete all session variables related to this user. Next, we check whether the username and password form variables exist. If they do not exist, we include the loginform.cfm template and stop further processing with the CFABORT tag. If the username and password form variables do exist, we query our datasource to return the UserID and Roles for the user who is attempting to log in. If the login is validated, we use the CFLOGINUSER tag to set the UserID and Roles to a session variable. If the login is not validated, we create a suitable message for the user and include the Loginform.cfm template again. This is a very basic overview of the authentication and authorization process. We'll take a look at the new tags and elements in Listing 17.1 as we move through this section. Listing 17.1 CFLOGIN Security <cfif IsDefined("Form.logout")> <cflogout> </cfif> <cflogin> <cfif NOT IsDefined("Form.username") OR NOT IsDefined("Form.password")> <cfinclude template="loginform.cfm"> <cfabort> <cfelseif IsDefined("Form.username") AND IsDefined("Form.password")> <cfquery name="q_login" dataSource="#request.dsn#"> SELECT UserID, Roles FROM User WHERE UserName = '#Form.username#' AND UserPassword = '#Form.password#' </cfquery> <cfif q_login.recordcount EQ "1"> <cfloginuser name="#q_login.UserID#" roles="#q_login.Roles#"> <cfelse> <cfset loginmessage="You must provide a valid username and password."> <cfinclude template="loginform.cfm"> </cfif> </cfif> </cflogin> LDAP directories are also often used to store application security information. CFLOGIN can also be used to check for user authentication against an LDAP directory, to set the authenticated user ID, and to retrieve user roles (see Listing 17.2). Listing 17.2 CFLOGIN Security with LDAP <cflogin> <!--- Setting Basic Attributes ---> <cfset root = "o=insidecoldfusionmx.com"> <cfset server="nross.insidecoldfusionmx.com"> <cfset port="399"> <!--- These attributes are used in the first search. ---> <!--- This filter look in the objectclass for the user's ID. ---> <cfset filter = "(&(objectclass=*)(uid=#Form.UserID#))"> <!--- Need directory manager's cn and password to get the user's password from the directory ---> <cfset LDAP_username = "cn=directory manager"> <cfset LDAP_password = "password"> <!--- search for the user's dn information. This is used later to authenticate the user. NOTE: We do this as the Directory Manager to ensure access to the information ---> <cfldap action="QUERY" name="userSearch" attributes="uid,dn" start="#root#" scope="SUBTREE" server="#server#" port="#port#" filter="#filter#" username="#LDAP_username#" password="#LDAP_password#"> <cftry> <cfldap action="QUERY" name="auth" attributes="dn,roles" start="#root#" scope="SUBTREE" server="#server#" port="#port#" filter="#filter#" username="#userSearch.dn#" password="#Form.password#"> <cfcatch type="any"> <cfif FindNoCase("Invalid credentials", cfcatch.detail)> <cfoutput>User ID or Password invalid for user: #Form.UserID# </cfoutput> <cfabort> <cfelse> <cfoutput>Unknown error for user: #Form.UserID# #cfcatch.detail# </cfoutput> <cfabort> </cfif> </cfcatch> </cftry> <!--- the user is valid. ---> <cfif auth.recordcount> <cfloginuser name="#Form.UserID#" roles="#auth.roles#"> </cfif> </cflogin> In Listings 17.1 and 17.2, the code starts with the CFLOGIN tag body and then sets several of the values used as attributes in the CFLDAP tags as variables. This ensures that the same value is used in both tags, and it makes it easier to change the settings if needed. Next we set the directory manager's username and password for the first query. The code uses the directory manager's identity to get the distinguished name (dn) for the user. If the user ID is not in the directory, the code return an empty recordset. In the CFTRY block, we use the dn from the previous query and the user-supplied password to access the directory and get the user's roles. If either the dn or the password is invalid, the CFLDAP tag throw an error, which is caught in the CFCATCH block. CFCATCH catches any exception that occurs. We then check whether the error information contains the string "invalid credentials", which indicates that either the dn or the password is invalid. If it does contain the text, we display an error message indicating the problem. Otherwise, we display a general error message. If an error is caught, the CFABORT tag ends the processing of the request after displaying the error description. If the second query returned a valid record, the user is logged in and the UserID and Roles that were returned by the query are added to the session variable. Then we close by ending the CFLOGIN tag body. Checking for LoginThe CFLOGIN tag itself takes care of checking whether the current user is logged in. Outside the CFLOGIN tag, we might need to check whether the current user has been authenticated. I've put this check in the navigation template so that if the user is logged in, a log out button appears below the regular navigation elements. ColdFusion MX has made the task of checking for the existence of an authenticated user much easier. In applications prior to ColdFusion MX, you might have had similar functionality that looked a bit like this: <cflock scope="session" type="readonly" timeout="10"> <cfif NOT IsDefined("session.logged_in")> <cflocation url="login_form.cfm"> </cfif> </cflock> In ColdFusion MX, we use the GetAuthUser() function to handle the majority of the same logic: <cfif GetAuthUser() EQ ""> <cfinclude template="login_form.cfm"> </cfif> The GetAuthUser() function takes no arguments and returns the ID of the currently authenticated valid user. If the current user is not authenticated, the GetAuthUser() function does not return a value. Loginform.cfmAuthentication requires that users identify themselves. Usually this identification happens through the input of a username and password. It really doesn't matter what values you authenticate against; for the sake of security, this process simply should not be left out. We need to create a login form to handle the authentication tasks of the application. This form does not have to be anything fancy. It is simply a utility. However, you'll probably want to integrate the login form into the look and feel of the rest of your application. In addition, you should incorporate your application header and footer into your login template. In Application.cfm, our logic determines whether the user has been authenticated. If the user has not been authenticated, the login template is executed in Application.cfm with a CFINCLUDE tag: <cfinclude template="loginform.cfm"> <cfabort> Note The CFABORT tag is called to keep the requested template from executing. One of the first pieces of code in our login template is the section that creates a variable for the requested URL. Many times, visitors might set a bookmark on a page within our application. Allowing that user to access the requested URL, including any URL parameters after the completion of the login, is a nice feature to build in to your application. The code is not so complex: <cfset url="http://" & cgi.server_name & ":" &cgi.server_port & cgi.script_name> <cfif cgi.query_string IS NOT ""> <cfset url=url & "?#cgi.query_string#"> </cfif> In Listing 17.3, we see how this bit of conditional logic can easily be worked into our application. Listing 17.3 Conditional Logic for Authentication Processing<!--- Remember the Requested URL ---> <cfset url="http://" & cgi.server_name & ":" &cgi.server_port & cgi.script_name> <cfif cgi.query_string IS NOT ""> <cfset url=url & "?#cgi.query_string#"> </cfif> <cfinclude template="/common/header.cfm"> <cfoutput> <form action="#url#" method="Post"> <table align="left" width="800"> <tr> <td colspan="2"><hr size="1" width="80%"></td> </tr> <tr> <td align="center"> <table border="1"> <tr> <td>You are not currently logged into the Inside ColdFusion MX website. </td> </tr> <tr> <td align="center"> <table><tr> <td colspan="2">Please Log In:</td> </tr> <tr> <td align="right">User Name:</td> <td><input type="text" name="username" size="10"></td> </tr> <tr> <td align="right">Password:</td> <td><input type="password" name="password" size="10"></td> </tr> <td></td> <td align="right"><input type="submit" value=" Login "></td> </tr></table> </td> </tr> </table> </td> <td><cfinclude template="/common/right_nav.cfm"></td> </tr> <tr> <td colspan="2"><hr size="1" width="80%"></td> </tr> </table> </form> </cfoutput> <cfinclude template="/common/footer.cfm"> The validation process takes place within Application.cfm itself. In other versions of ColdFusion, the normal method of authenticating a user was to create an authentication template and then identify that template as the target of your login form's action attribute. Because our authentication code exists within the Application.cfm template, we can point directly to the originally requested page, and authentication occurs when the request is made. The login screen that we've built in Listings 17.1 and 17.3 should yield what is shown in Figure 17.1. Figure 17.1. Including the login template to authenticate users. AuthorizationAuthorization is the second element of application security, and it ensures that the authenticated user can view and interact with only the information for which he or she is authorized. This is just like the idea of permissions that we assign to files and shared folders on a workstation. These permissions are usually managed by groups on our file server. In our ColdFusion MX application, these groups be referred to as roles. For example, if the authenticated user has a role assigned that enables him to add or edit content for our news section, he might see a button on his screen that enables him to access the administrative portion of the News section of our application. The capability to enable viewers to see and interact with application content based on user roles or security privilege is a nice addition to the functionality of an application. ColdFusion MX makes this type of functionality a lot easier with the introduction of another new tag. That tag is the CFLOGINUSER tag. The tag looks like this: <cfloginuser name="required" roles="optional,comma-delimited-list"> The CFLOGINUSER tag identifies the authenticated user to the ColdFusion application. The name attribute holds the authenticated user's ID and the optional roles attribute identifies a comma-delimited list of user roles. The beauty of the new login tag functionality in ColdFusion is the actual assignment of the authentication values. All the tasks that once took many lines of code are wrapped up into a neat little package (see Listing 17.4). Listing 17.4 Setting Authenticated User and Roles with CFLOGINUSER<cfloginuser name="#q_login.UserID#" roles="#q_login.Roles#"> The preceding code creates a session structure in the ColdFusion Server memory that retains the authenticated user's ID and a list of the user's roles throughout the duration of the session. Our earlier example mentioned that when we view the content of our news section, we see an edit button if our assigned roles enable us to do so. In Listing 17.5, let's take a look at some of the code associated with that type of functionality. Listing 17.5 Displaying News to Authenticated and Authorized Users<cfquery name="getNews" datasource="#application.dsn#"> SELECT * FROM News </cfquery> <p>This is the news area for Inside ColdFusion.</p> <cfif IsUserInRole(1)> <table width="100%"> <cfoutput query="getNews"> <tr> <td> <table width="100%" cellspacing="0"> <tr bgcolor="f2f2f2"> <td >#getNews.NewsTitle#</td> <td align="right">#getNews.NewsStartDate#</td> </tr> <tr> <td colspan="2">#getNews.NewsBody#</td> </tr> <tr> <td></td> <td align="right">Contributor: #getNews.NewsSource#</td> </tr> </table> </td> </tr> <tr> <td><hr size="1"></td> </tr> </cfoutput> </table> <cfelse> You are not authorized to view the content on this page. </cfif> If the user is authorized to view the special features on this page, he or she sees a screen similar to what is shown in Figure 17.2. Figure 17.2. User authorized to view, edit, or add content. If the user is not authorized to access the edit and add content functionality of this template, he or she sees a screen that looks like Figure 17.3. Figure 17.3. User authorized only to view content. We'll talk more later about authorization-based access to content and functionality when we talk about content management in the section "Content Management." Logging OutYour application should also provide some type of functionality that enables your user to log out. Failing to provide a logout mechanism is a security risk because the user session does not end until the session timeout has been reached. This means that if you log in, create a session, and then close your browser, your session remains active. The next time you open your browser (up until the session timeout), your session will still be active. ColdFusion MX uses the new CFLOGOUT tag to complete logout transactions. CFLOGOUT takes no attributes and has no body. When CFLOGOUT is executed, it immediately kills the current user session. You might be wondering how we execute the CFLOGOUT tag. It's simple really we just create a simple logout form or link. The first thing that we need to know is whether the user is actually authenticated. We check for an authenticated user with the GetAuthUser() function. GetAuthUser() is a function new to ColdFusion MX. When executed, it returns the value of the user ID of the authenticated user. If there is no authenticated user ID, the function returns an empty string. Listing 17.6 shows what the code would look like. Listing 17.6 Including the Logout Form<cfif GetAuthUser() NEQ ""> <cfoutput> <form action="index.cfm" method="Post"> <input type="submit" Name="Logout" value="Logout"> </form> </cfoutput> </cfif> SummaryApplication security can be handled simply with the addition of the new tags to ColdFusion MX. Application security can be as easy as checking a username and password for authentication. Application security can add another layer of complexity when incorporating elements of authorization into the equation. Our discussion of authorization in this sections leads us naturally into the topic of content management. This is a natural segue because the management of content is based on application authentication and a user's authorization to manipulate specific pieces or whole sections of content. |
EAN: 2147483647
Pages: 579


