| You need to modify some additional system preferences in order to fully optimize your system design and workflow. In this section, you'll learn about adjustments that are geared towards configuring Mac OS X to work with specific hardware, including dual displays and digital receivers. You'll also modify features that affect your working methods, such as the Dock, Exposé, Dashboard, and Spotlight. Note Though we don't address them in this lesson, you should be aware that some applications, including Adobe Version Cue, Telestream Flip4Mac, and Apple Qmaster install additional preferences, which are listed under the Other category in the System Preferences window.
Set Up Displays As previously noted in the Lesson 8, Macintosh computers support a wide variety of display solutions. Whether you are using one, two, or three displays, or cutting on the largest Cinema Display or a PowerBook G4, you can customize Final Cut Pro to make the best use of the available screen real estate. Before you start arranging windows in FCP, you first need to set up and configure displays in system preferences. In the System Preferences window, click the Displays icon.  Note If you have additional displays connected to your computer, you may need to click the Detect Displays button before your system will recognize it. If everything is connected properly, a corresponding preferences window should appear.
Tip To collect multiple preference windows together on the same screen, click the Gather Windows button.
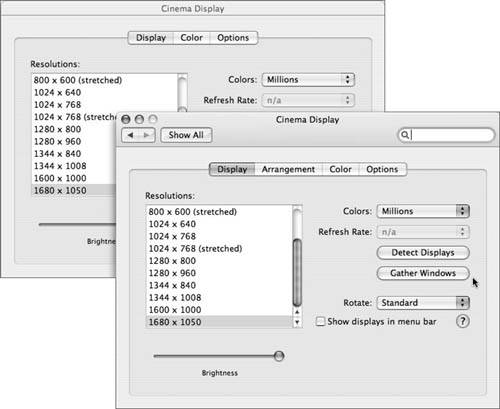 Select one of the options listed under Resolutions. Computer displays usually support a range of resolutions; the supported settings will vary among models. Which one you choose depends on the nature of your workflow and the resolution you find most comfortable and effective. Tip If you are testing window arrangements in FCP and different display resolutions, you may need to relaunch the application to access some of the presets. This is due to the system check Final Cut Pro performs as it loads to determine the configuration of your system. Some options, such as Dual Screen arrangements and Multiple Edits are only available with specific setups.
Tip If you select a resolution that is not supported by your display, your screen might go blank, and you will be unable to readjust the settings. A Safe Boot should fix the problem in Mac OS X 10.4hold down the Power button to shut down the computer and hold down the Shift key after the startup tone. Solutions for Mac OS X 10.3.9 or earlier are available on the Apple Web site: http://docs.info.apple.com/article.html?artnum=106564.
Confirm that the Colors pop-up menu is set to Millions to ensure that your video displays at the appropriate bit-depth. The Refresh Rate option is not available for LCD displays, but if you are working with CRT, choose 85Hz for optimum performance in Final Cut Pro. More Info For more information of displays and Final Cut Pro, see the Apple support documents at http://docs.info.apple.com/article.html?artnum=58640 and http://docs.info.apple.com/article.html?artnum=25117.
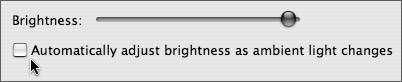
Note To maintain brightness settings at a fixed level, PowerBook G4 users may want to turn off the automatic brightness control by deselecting the Automatically Adjust Brightness As Ambient Light Changes check box.
 Click the Arrangement tab if you are working with multiple displays; if you're working with one display, skip ahead to step 8. Note The Arrangement tab is only visible if multiple displays are connected to the system.
Drag the blue screen icons to define the relationship between your displays. 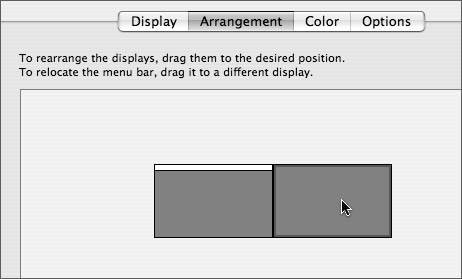 More Info You can use the Arrangement pane to configure more than two displays; see the "Setting Up Multiple Displays as an Extended Desktop" topic in Mac Help.
Drag the menu bar icon to set your primary display.  Make sure the Mirror Displays check box is not selected. Don't mirror displays while working with FCP, because this is likely to overtax your system and result in dropped frames. If you need to mirror your display, use a DVI splitter or similar device. Click the Color tab. Confirm that the model selected in the Display Profile list matches your display. The precise representation of color varies from display to display, so it is important that you choose the correct setting. You can further adjust Apple displays using the Display Calibrator Assistant (click the Calibrate button), but Final Cut Pro does not use ColorSync to calibrate or compensate colors. For this reason, leave gamma settings at the 1.8 Standard Gamma setting. Tip Due to differences in the way that colors are represented, never rely on a computer display for online workflows. As suggested in other lessons, you should use a properly calibrated external monitor to ensure that color is rendered accurately.
Note You can use the controls under the Options tab, which is only available if you're using an Apple Cinema Display, to modify the behavior of buttons on the display.
Control System Sound Mac OS X and Final Cut Pro also support an extensive range of audio hardware. (Refer to Lesson 8 for more information on specific interfaces.) After you have connected your device to your system, you need to configure Mac OS X to use it. Note FCP is a Carbon application, and it uses the standard sound output preferences. Cocoa applications such as Soundtrack Pro are controlled via the Audio Midi Setup application.
In the System Preferences window, click the Sound icon.  If you like to work with alerts and sound effects enabled, choose your preferred alert sound from the list of available noises. If you prefer to turn alerts off, skip ahead to step 4. In order to hear the sounds, you need to raise both the Alert Volume and the Output Volume. Choose Internal Speakers from the Play Alerts and Sound Effects pop-up menu. It's typical to route the alerts and effects to the internal speakers to prevent them from playing through your main monitors. Drag the Alert Volume slider to set a level for alerts and sound effects. Dragging the slider all the way to the left turns off alerts.  Note Whether you activate Play User Interface Sound Effects and Play Feedback When Volume Keys Is Changed is largely up to individual preferenceneither will affect the performance of FCP. As with alerts sounds, you want to be careful not to play them through your main sound system.
Click the Output tab. From the list of available devices, select the output device you want to use. Note Power Mac G5 computers include a Digital Out port, which utilizes the S/PDIF format, sometimes called Toslink, to transfer digital audio directly to a range of devices, including digital receivers that support 5.1 audio. Once you select the Digital Out port, the volume slider is disabled at the maximum level setting, and you will need to control system volume using the output device. For more information on using the Digital Out port, refer to the Apple Web site: http://docs.info.apple.com/article.html?artnum=86438 and http://docs.info.apple.com/article.html?artnum=86415.
Drag the Balance slider to the center. Drag the Output Volume slider to set the overall level of your audio output. It's usually a good idea to choose a high setting and use your external monitors to control the levels. When working with audio, keep the output volume at a consistent level and make adjustments within Final Cut Pro rather than raising the level for quiet sounds and lowering it for loud sounds. This is the only way you can effectively judge the average loudness of your mix. Play a section of a project that represents the average volume to help you make the appropriate adjustments. Once your levels are set correctly, any changes to the master setting should be infrequent. Click the Input tab. If you use the FCP Voice Over tool, you'll need to connect an audio input device to your system. From the list of available devices, select an appropriate input device. Use the Input level to monitor the sound, and use the Input volume slider to adjust the level appropriately.
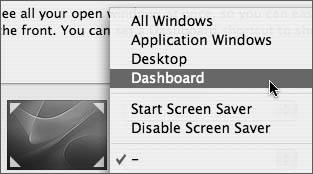
Manage Dashboard & Exposé Exposé is intended to help you streamline your working methods and support multitasking operations. For example, if you have multiple windows open in FCP, and you've misplaced the Viewer, simply press the Exposé shortcut for Application Windows (F10 by default) and all the open windows in current application tile across the screen. Dashboard is one of the new features introduced in Mac OS X 10.4. It creates an additional environment for you to run widgetssmall accessory applications, built around common Web standards, such as HTML, CSS, and JavaScript, which usually perform very specific functions. When you click to make Dashboard appear, you have immediate access to your installed widgets. Once you have performed the required task, Dashboard disappears and you continue with what you were originally doing. The default Exposé shortcutsF9, F10, and F11will most likely be familiar to you as the keys used in Final Cut Pro for Insert, Overwrite, and Replace. In Mac OS X 10.4, Dashboard also overrides F12the FCP shortcut for Superimpose Clip. Without modifying Exposé and Dashboard, when you press one of the shortcuts, the Mac OS X user interface functions will override the FCP commands. Press F9 and you will display all open windows; F10 will show open windows in the current application; F11 will reveal the Desktop; and F12 opens Dashboard. If you rely on the keyboard to do your editing, you need to decide whether you want to modify these shortcut keys. Though it's easy to remap the keyboard in Final Cut Pro, adjusting well-established habits can require a little patience and perseverance. The alternative is to customize Exposé and Dashboard, which is equally easy to do, but be aware that you're making a system-wide modification and you could inadvertently create conflicts with other applications. In the System Preferences window, click the Dashboard & Exposé icon.  Press and hold Option while you choose a new keystroke from the All Windows, Application Windows, and Desktop pop-up menus. You can replace F9, F10, and F11 with any combination of the standard modifier keys (Cmd, Option, Ctrl, and Shift). Option-F9, Option-F10, and Option-F11 are popular choices amongst FCP users because they don't currently conflict with default commands in Final Cut Pro. 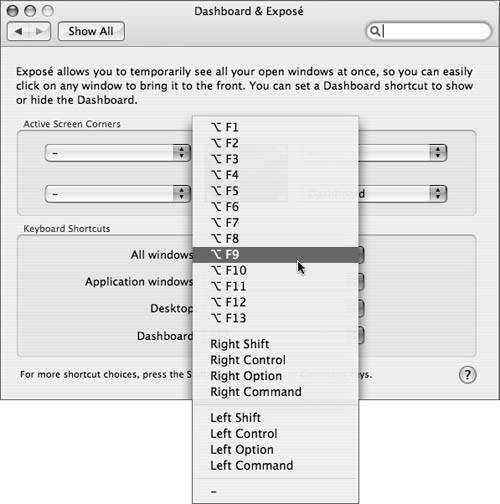 Press and hold Cmd-Option while you choose a new keystroke from the Dashboard pop-up menu. Modifying Dashboard is a little more complicated because Final Cut Pro already uses F12 (Superimpose Clip), Cmd-F12 (External Video: All Frames), Ctrl-F12 (Play: Rate 6), Option-F12 (Refresh A/V Devices), and Shift-F12 (Show Current on External Video). The combination of Cmd-Option-F12 doesn't interfere with any of the default Final Cut Pro shortcuts. If that doesn't work for you, another alternative would be to deactivate the keyboard shortcut (by selecting dash [-] from the menu). Then you would need to open Dashboard by clicking the Dock icon or by setting an Active Screen Corner. Tip If you choose to set an Active Screen Corner, the bottom right does not conflict with default FCP window arrangements.
 Tip You deactivate individual shortcuts by selecting the dash option at the bottom of each menu.
More Info For more information, consult the Keyboard Shortcuts topic in Mac OS X Help.
Multitasking with Exposé One way to utilize Exposé when you're working in Final Cut Pro is to quickly drag and drop files into your projects from the Finder. Copy one of the media folders (Lesson 11 Media, for example) from the other lessons onto your Desktop. Create a new project in FCP. Press your Desktop Exposé shortcut (F11 by default) to hide all open windows and reveal the Desktop. Click and hold the media folder. Still holding the mouse button down, press the Desktop Exposé shortcut again, and the FCP windows should move back into position. Drag the media folder to the Browser to create a new bin. 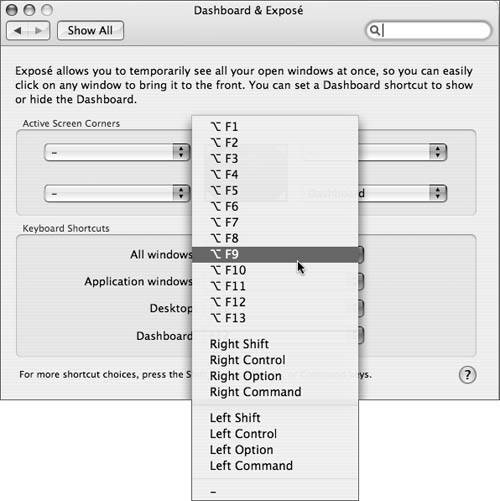
Widgets for FCP Users There are currently over a thousand widgets available, and new applications appear daily. The Apple Web site features a comprehensive resource to help users find and download widgets (www.apple.com/downloads/dashboard). Amongst the many widgets, there are some that you might find useful when you're working with FCP, optimizing your system, and tracking system performance. Hardware Monitor Widget Edition Registered users of the shareware application, Hardware Monitor (www.bresink.com/osx/HardwareMonitor.html), can use this companion widget to quickly access Mac OS X sensor readouts and monitor the status of system hardware. www.apple.com/downloads/dashboard/status/hardwaremonitorwidgetedition.html Final Cut Pro Forum Search Search the German language Final Cut Pro forum, www.finalcutpro.de. www.apple.com/downloads/dashboard/blogs_forums/finalcutproforumsearch.html Los Angeles FCP User Group Searcher Quickly perform a Google search of the popular LAFCPUG Web site. www.apple.com/downloads/dashboard/blogs_forums/losangelesfcpusergroupsearcher.html Sysstat Monitor current system activity, including CPU and memory usage, network statistics, uptime, and the top three processes. www.apple.com/downloads/dashboard/status/sysstat.html (System activity is discussed in more detail later in this lesson.) Transmit Transfer files over a network connection with drag-and-drop simplicity. www.apple.com/downloads/dashboard/networking_security/transmitftpwidget.html Version Tracker Keep track the latest Mac OS X software updates. www.apple.com/downloads/dashboard/news/versiontrackerwidget.html More Info Consult the Dashboard topic in Mac Help for information on how to download, install, and create widgets. You can find more information on removing widgets on the Apple Web site: http://docs.info.apple.com/article.html?artnum=301629.
Search with Spotlight The first time you log into Mac OS X 10.4, Spotlight immediately begins indexing all the files on your computer. Two stores are created during this process: one for metadata (descriptive information about your files) and the other for selected file content. Whenever you create or modify a file, the new information is added to the index. Spotlight can be very useful to FCP users; it will allow you to create Smart Folders to collect the most recently updated project files together, or instantly search through the Final Cut Pro manuals. Instant Search Results Click the Spotlight icon in the menu bar, or press Cmd-spacebar.  Type a search query into Spotlight's text field.  A list of results appears the moment you start typing. As you enter more text, the results become more refined. Click an item from the list to open it. Tip You can also use the up and down arrow keys to navigate the results list. Press Enter to open an item.
Prioritizing Results and Privacy Settings You can customize Spotlight to prioritize results and restrict access to certain areas. More Info Details on which areas Spotlight searches by default are documented in an Apple Knowledge Base article: http://docs.info.apple.com/article.html?artnum=301533.
In the System Preferences window, click the Spotlight icon.  Deselect categories you do not want to search. Drag the remaining categories to define the order of your search results. 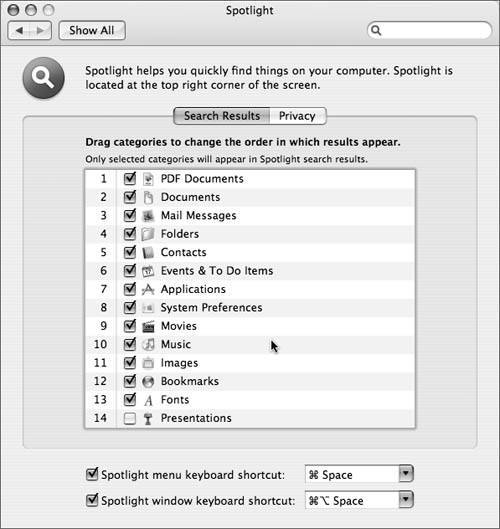 Note The default Spotlight shortcuts conflict with the default Input Menu commands and some of the commands within Motion. Refer to the Keyboard Shortcuts topic in Mac Help for more information.
Click the Privacy tab. Click the Add (+) button. Select the areas of the computer you would like to shield from Spotlight, and click Choose. If you select partitions, the entire partition will become invisible to Spotlight and will no longer be indexed. Tip If you connect a drive to your system and need to override Spotlight, you can also use the Privacy feature to interrupt active indexing. Any areas that are not part of the index cannot be searched with Spotlight.
Tip You can use this same technique of choosing items in the Privacy tab to force Spotlight to re-index your hard drive. After you have made an item private, Spotlight will have to re-create its record if you choose to reintroduce it.
Creating Custom Metadata You can add keywords to files and folders as special Spotlight comments that you can then use in your searches. Create a new project in Final Cut Pro. Save the project to your hard disk. Select the new project file in the Finder. Choose File > Get Info (Cmd-I). Add the keyword myComment to the Spotlight Comments text field. 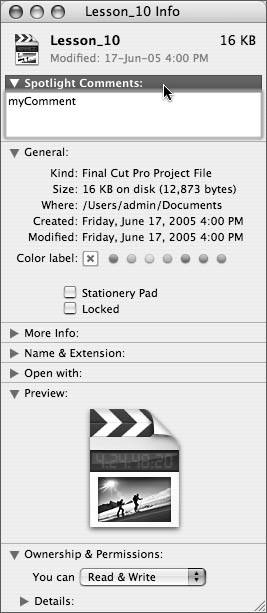 Close the Info window and use Spotlight to search for your keywords. The file or folder you modified should appear in the results. 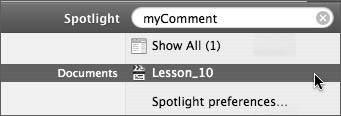
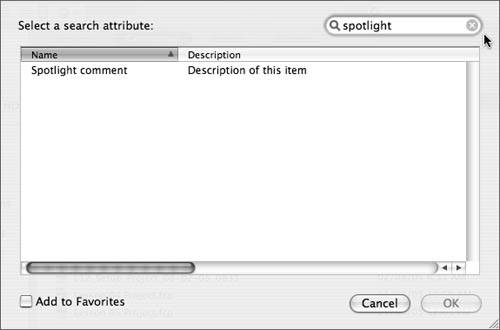
Creating Smart Folders Spotlight searches can also be saved as Smart Folders, which will dynamically update to include relevant files as they appear in the index. In the Finder, choose File > New Smart Folder. Leave the default search criteria, Kind, in the first pop-up menu. 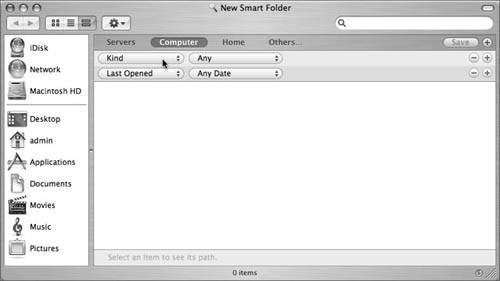 Choose Others from the second column pop-up menu to further limit your search. 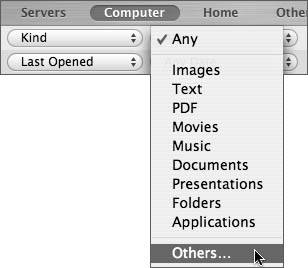 Choose Final Cut Pro Project File from the third pop-up menu. A list of all the FCP projects on your system appears in the window.  Choose Other from the first pop-up menu in the second row. Scroll down the list and select Spotlight Comment. Tip You can also type Spotlight into the Search field.
 Click OK and choose Is from the second pop-menu. Type myComment in the text field. Your project is automatically added to the folder. 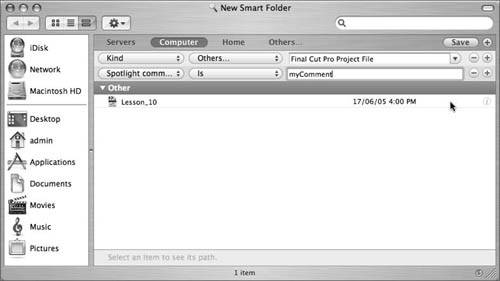 Click Save.  Name your new Smart Folder and save it to your hard disk. Create and save another new project in Final Cut Pro. Open the Info window and add myComment to the Spotlight comments. Close the comments window and open your Smart Folder on the Desktop. Both FCP files should be listed.
Indexing Final Cut Pro Help Files The Final Cut Pro user's manual and Help documents are stored as PDF files inside the FCP package. In most cases, Spotlight is able to search the content of PDF documents, but in their default location the FCP Help files are inaccessible. If you want to use Spotlight to search through these documents, you need to copy them to a different location. One way to access the Help documents is to individually select the manuals from the FCP Help menu and save each file into area of your hard drive included in the Spotlight index. More Info See the Apple Web site for specific instructions: http://docs.info.apple.com/article.html?artnum=301571.
Or you can access all of the documents in the Final Cut Pro package. Open the Applications folder and Ctrl-click the Final Cut Pro application. Choose Show Package Contents from the contextual menu. A new window opens to reveal the Contents folder inside the FCP package.  Navigate the Finder to locate the Final Cut Pro Help folderfor English localizations, it's located in Contents/Resources/English.lproj. You'll need to change the path for non-English installationsto access the French localization, for example, you'll need to use the hierarchy Contents/Resources/French.lproj. Choose Edit > Copy Final Cut Pro Help. Open your Documents folder and choose Edit > Paste Item. The Final Cut Pro Help folder copies into Documents. In the menu bar, click the Spotlight icon or press Cmd-spacebar to open a new Spotlight search. Enter the search term Multicamera Editing. Click to open New Features.pdf. The document opens and highlights the first instance of the search term. 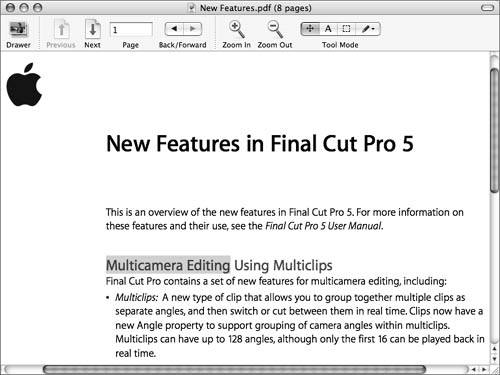
Hide the Dock To maximize your screen real estate, you may want to hide the Dock. You can also position it on different sides of the display to accommodate different working methods. Tip If you want more than the standard three positions: Left, Bottom, and Right, a third-party application like Marcel Bresink's TinkerTool (www.bresink.com/osx/TinkerTool.html) will allow you to choose further options.
Some users shy away from the Dock, and use third-party alternatives instead, such as DragThing (www.dragthing.com), LaunchBar (www.obdev.at/products/launchbar), and Drop Drawers (www.sigsoftware.com/dropdrawers). |