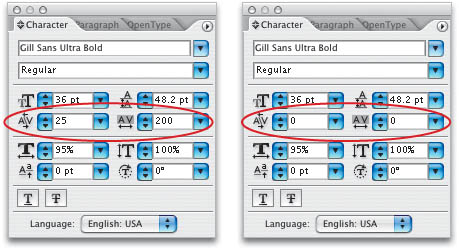
Reset Kerning and Tracking
| We showed you in an earlier tip how to reset all the settings in the Character and Paragraph palettes (choosing Reset Palette from the respective palette's flyout menu). If you want to keep everything else as-is but reset just the kerning and tracking to zero, here's how: To reset the tracking, highlight your text with the Type tool (T) and press Command-Option-Q (PC: Control-Alt-Q). To reset the kerning, click the Type tool where you've adjusted the kerning and use the same shortcut. Needless to say, make sure you've got the Option (PC: Alt) key held down, or you'll get a very different result! |
Illustrator CS2 Killer Tips
ISBN: 032133065X
EAN: 2147483647
EAN: 2147483647
Year: 2006
Pages: 473
Pages: 473
Authors: Dave Cross, Matt Kloskowski
- Chapter III Two Models of Online Patronage: Why Do Consumers Shop on the Internet?
- Chapter V Consumer Complaint Behavior in the Online Environment
- Chapter VII Objective and Perceived Complexity and Their Impacts on Internet Communication
- Chapter IX Extrinsic Plus Intrinsic Human Factors Influencing the Web Usage
- Chapter XV Customer Trust in Online Commerce