Shapes Around a Circle
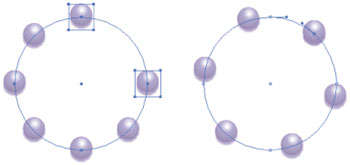
| If you use a circular path for the Replace Spine command, chances are the objects in your blend will not be evenly distributed around the circle. There's a simple trick to make sure the objects in your blend are evenly spaced around the circle: Select the path, and with the Scissors tool (C) click somewhere on the path of the circle to create an open path (don't move anything, just click once to cut the path). The blended objects will automatically be distributed along the path. (Note: Try this for any path, not just circles.) |
Illustrator CS2 Killer Tips
ISBN: 032133065X
EAN: 2147483647
EAN: 2147483647
Year: 2006
Pages: 473
Pages: 473
Authors: Dave Cross, Matt Kloskowski