Chapter 10: Finishing Touches for Our First Game
In the previous chapter, we started the development of a game. If you want to play the game at this time, there are several things we have left to do. In this chapter, we’ll continue working on this and add music, sound effects, player lives, scoring, and so on.
Continuing the Project
If you have not already done so, you should open the game from Chapter 9, “Our First Game in MMF.” Next, open the Event Editor (see Figure 10.1) and click on New Condition to open the New Condition window, seen in Figure 10.2.
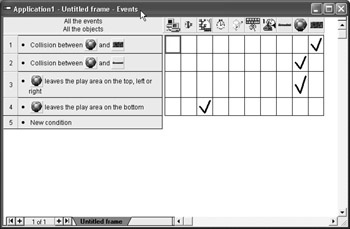
Figure 10.1: The Event Editor in MMF.
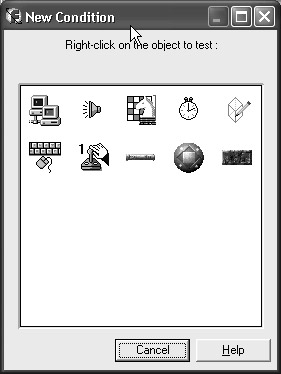
Figure 10.2: Creating a new condition.
The New Condition window has several items within its boundaries. We need to double-click (or right-click) the icon that looks like a chessboard to display a menu like the one seen in Figure 10.3.
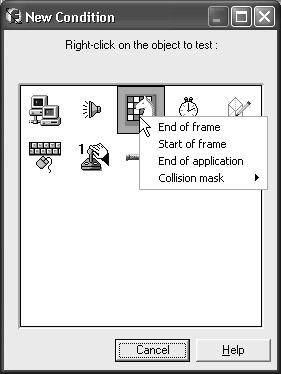
Figure 10.3: A pop-up menu is displayed.
In this case, the menu being displayed has items in it related to the frame, such as its beginning and ending. We are going to set the number of lives for our game and begin playing some music, so we’ll use Start of Frame. Choose it from the list to create the event in the Event Editor (see Figure 10.4).
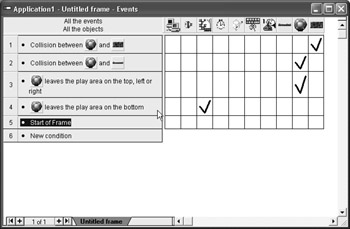
Figure 10.4: A Start of Frame event is now shown.
We can now right-click the square beneath the sound icon and to the right of the new event to display the menu seen in Figure 10.5. Choose Play and Loop Music from the menu. The Play and Loop Music window is displayed (see Figure 10.6). In this window, click the Browse button and locate the ![]() Chapter10.mid file from the CD-ROM that accompanies this book (it is located in the Music and SFX folder). Click OK after you locate it. A new window is now shown, which is also titled Play and Loop Music, but this window has a new set of options (see Figure 10.7). This window allows us to set how many times we want the music to play. As we want it to continue playing constantly throughout the life of the frame, we’ll choose 0, which makes it loop infinitely, and then click OK.
Chapter10.mid file from the CD-ROM that accompanies this book (it is located in the Music and SFX folder). Click OK after you locate it. A new window is now shown, which is also titled Play and Loop Music, but this window has a new set of options (see Figure 10.7). This window allows us to set how many times we want the music to play. As we want it to continue playing constantly throughout the life of the frame, we’ll choose 0, which makes it loop infinitely, and then click OK.
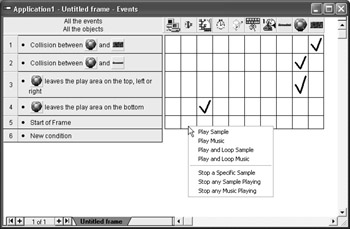
Figure 10.5: The menu allows us to pick various options.
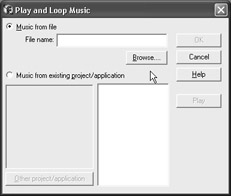
Figure 10.6: The Play and Loop Music window.
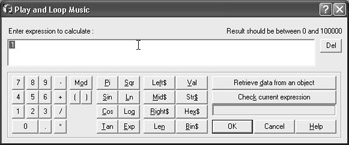
Figure 10.7: We set how many times the music loops in this window.
Inside the same Start of Frame event, we’ll also set up the number of lives by right-clicking the square to the right of the event and beneath the player 1 object. Choose Set Number of Lives, located in the pop-up menu, an example of which is seen in Figure 10.8. The Add to Number of Lives window (see Figure 10.9) is displayed. Change the value (Val) to 3 and click OK. This gives us an initial value of three lives.
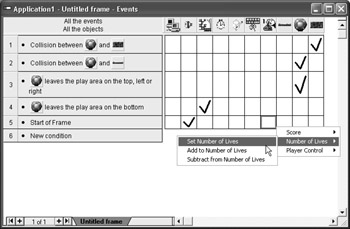
Figure 10.8: Choose Set Number of Lives from the pop-up menu.
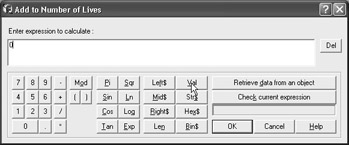
Figure 10.9: The Add to Number of Lives window.
Scoring and Sound Effects
We now have three lives and music playing, so we can turn our attention to the scoring and sound effects of the game. The player will add to his score when a collision occurs between the ball and the bricks, which results in the brick being destroyed. We have already created the collision event between the ball and the brick. This event is where we have already set the brick to be destroyed during the collision and the ball to bounce. This event is probably the first event if you’ve been following along. Right-click on the player 1 object next to this event and choose Score, Add to Score (see Figure 10.10). A new window (see Figure 10.11) is displayed that allows us to set a score. In this case, a value of 100 is entered, and then we can click OK. Inside the same event, right-click on the icon beneath sound and choose Play Sample from the pop-up menu seen in Figure 10.12. Browse to ![]() Chapter10.wav, which is in the Music and SFX folder on the CD-ROM that accompanies this book, and click OK. You can create this sound for the collision between the ball and bat objects, but we should not create the scoring aspect.
Chapter10.wav, which is in the Music and SFX folder on the CD-ROM that accompanies this book, and click OK. You can create this sound for the collision between the ball and bat objects, but we should not create the scoring aspect.
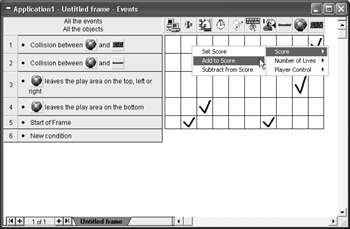
Figure 10.10: Adding to the score.
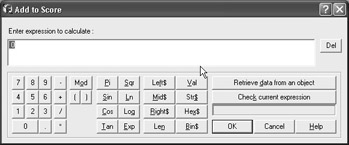
Figure 10.11: Increasing our score by 100.
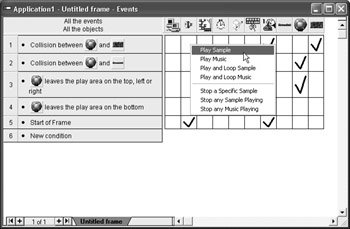
Figure 10.12: The pop-up menu allows us to choose Play Sample.
Although we have created an event that deals with the ball leaving at the bottom of the play area, at this time, the application ends. As you know, we have already set up our game to allow for three lives. Therefore, instead of ending the application, we’d like to remove one of the lives. Before decreasing the lives, we need to remove End Application from the event. Right-click the checkbox that is located in the Ball Leaves the Play Area on the Bottom event and then choose Delete from the pop-up menu to remove it from the game.
The event should now be void of any checkboxes. Right-click the box beneath player 1 inside the event to display the pop-up menu seen in Figure 10.13 and choose Number of Lives, Subtract from Number of Lives. A new window is displayed, as seen in Figure 10.14. Set a value of 1, as we’d like to subtract one life every time the ball leaves the window on the bottom, and then click OK.
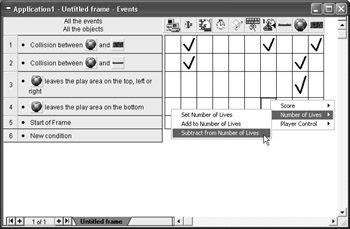
Figure 10.13: The first step in subtracting a life.
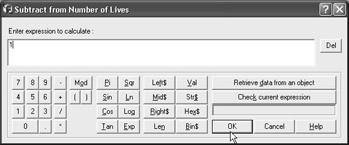
Figure 10.14: We can choose the number of lives we would like to subtract.
The lives will now be subtracted, but we still have a problem. We have been ending the application when the ball exited the window, so we were not concerned with the position of the ball after it leaves the screen. Now we are removing a life from the player, and if we want to continue to play, we need to reset Position of Ball after losing the life. Beneath the ball (and inside the same event) right-click to display a pop-up menu and choose Position, Select Position. The Select Position window is opened (see Figure 10.15). The default values are 320 and 240, which is in the middle of our screen and is a good location for the ball to be positioned. We can click the OK button to close it.
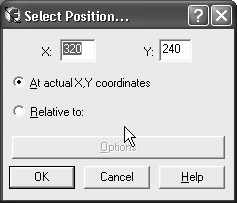
Figure 10.15: The Select Position window.
The ball is now positioned in the middle of the screen, and now we need to set the direction to a random upward direction so that we don’t just quickly lose another life. Right-click the square beneath the ball and inside the same event to display a menu from which we can choose Direction, Select Direction. This displays another window, seen in Figure 10.16, which shows us that the ball is traveling to the right by default. We need to click the square in the right direction to remove it and then click the squares going up to match Figure 10.17. Click OK to close the window. The ball will now randomly travel in one of the directions we have selected.
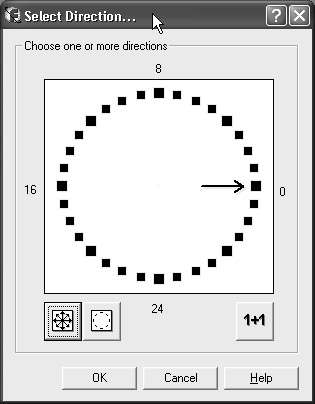
Figure 10.16: The ball is traveling to the right by default.
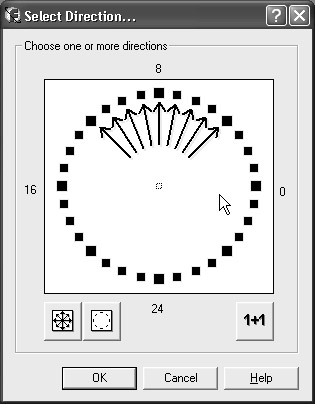
Figure 10.17: We need to set the directions.
If you save and then run the game at this time, you cannot see the current score and lives, so we’ll add these now. Click on the Frame Editor to open it (or bring it to the front). Right-click an empty area inside the frame and choose Insert an Object (see Figure 10.18). This will display a window like that in Figure 10.19. Choose Score from the list and click OK. This will change your cursor to a plus symbol. Move to the lower right of the frame (see Figure 10.20) and then click the mouse to position the score. This will open a window like that in Figure 10.21. You can hit the X in the upper right of the window to close it. Figure 10.22 now shows the score on the screen.
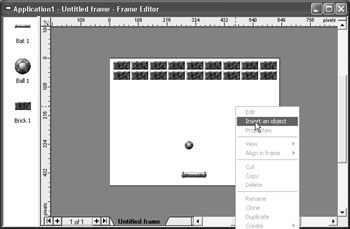
Figure 10.18: Choose Insert an object.
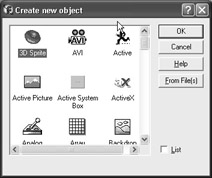
Figure 10.19 : The Create new object window.

Figure 10.20: Position the + in the correct location.
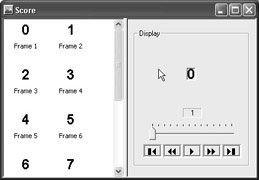
Figure 10.21: You can close this window.
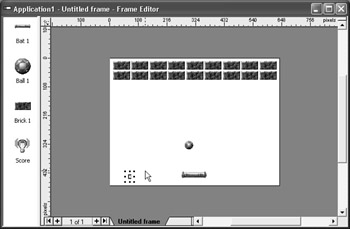
Figure 10.22: The score is now displayed in the frame.
Displaying the lives involves nearly the same process. Right-click an empty area inside the frame and choose Insert Object. Next, choose Lives from the window and click OK. The Lives Setup window is shown (see Figure 10.23). Choose Picture from the drop-down list and click OK. We’ll now position our cursor at the lower right of the frame and left-click to display the lives (see Figure 10.24).

Figure 10.23: The Lives Setup window.
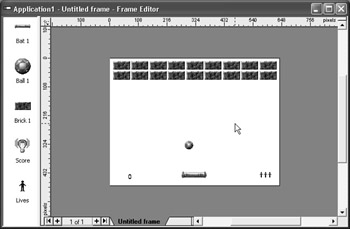
Figure 10.24: Position your cursor on the opposite side of the screen.
EAN: 2147483647
Pages: 168
- Key #1: Delight Your Customers with Speed and Quality
- Beyond the Basics: The Five Laws of Lean Six Sigma
- When Companies Start Using Lean Six Sigma
- Making Improvements That Last: An Illustrated Guide to DMAIC and the Lean Six Sigma Toolkit
- The Experience of Making Improvements: What Its Like to Work on Lean Six Sigma Projects