Power Management for the Tablet PC
 Download CD Content
As you know, the Tablet PC is often used without an AC power source. In fact, the ability to last for many hours without a charge is one of the strong points for the Tablet PC. It's ironic that a strong point can also be a weak one. With the potential for problems, we need to do what we can to help with power management for the end user. Therefore, we take some time in this chapter to look at the power management API and how we can support some of its many features.
| Note |
The source code for the projects are located on the CD-ROM in the PROJECTS folder. You can either type them in as you go or you can copy the projects from the CD-ROM to your hard drive for editing. |
Power Management API
Although Windows provides a great deal of power management functions that we can take advantage of, there is currently no way to do it using managed code in VB .NET. Therefore, we'll create a module that will contain the appropriate structures, functions, and API calls.
Let's take a quick look at some of the API functions we'll use:
SetActivePwrScheme: Sets active power scheme
CanUserWritePwrScheme: Determines whether the user can write to power scheme
GetActivePwrScheme: Finds the index of the active power scheme
GetSystemPowerStatus: Locates the power status of the system
ReadGlobalPwrPolicy: Gets the current global power policy settings
ReadProcessorPwrScheme: Gets the processor power policy settings for the specified power scheme
ReadPwrScheme: Gets the power policy settings that are unique to the specified power scheme
WriteProcessorPwrScheme: Writes processor power policy settings for the specified power scheme
We'll also use some of the structures:
GlobalMachinePowerPolicy: This structure contains global computer power policy settings that apply to all power schemes for all users. This structure is part of the next structure called GlobalPowerPolicy.
GlobalPowerPolicy: This structure contains global power policy settings that apply to all power schemes.
GlobalUserPowerPolicy: This is another structure that is part of the GlobalPowerPolicy structure and contains global user power policy settings that apply to all power schemes for a user.
MachinePowerPolicy: This structure, part of the PowerPolicy structure, contains computer power policy settings that are unique to each power scheme on the computer.
MachineProcessorPowerPolicy: This structure contains processor power policy settings that apply while the system is running on AC power or battery power.
PowerActionPolicy: This structure contains information used to set the system power state.
PowerPolicy: This structure contains power policy settings that are unique to each power scheme.
ProcessorPowerPolicy: This structure contains information about processor performance control and C-states.
ProcessorPowerPolicyInfo: This structure is part of ProcessorPowerPolicy and contains information about processor C-state policy settings.
SystemPowerLevel: This structure is part of GlobalUserPowerPolicy and contains information about system battery drain policy settings.
SystemPowerStatus: This structure contains information about the power status of the system.
UserPowerPolicy: This last structure is also part of PowerPolicy. It has power policy settings that are unique to each power scheme for a user.
We need to add these structures and functions to a project. Start a new Windows Forms application and add a new code module to the project called Powerapi.vb. We can now add the code for the structures and functions we have talked about beginning with the structures:
Imports System.Runtime.InteropServices
Module powerapi
 Private Structure GlobalMachinePowerPolicy
 Public Revision As Integer
 Public LidOpenWakeAc As Integer
 Public LidOpenWakeDc As Integer
 Public BroadcastCapacityResolution As Integer
End Structure

 Private Structure GlobalPowerPolicy
 Public User As GlobalUserPowerPolicy
 Public Machine As GlobalMachinePowerPolicy
End Structure

 Private Structure GlobalUserPowerPolicy
 Public Revision As Integer
 Public PowerButtonAc As PowerActionPolicy
 Public PowerButtonDc As PowerActionPolicy
 Public SleepButtonAc As PowerActionPolicy
 Public SleepButtonDc As PowerActionPolicy
 Public LidCloseAc As PowerActionPolicy
 Public LidCloseDc As PowerActionPolicy
 Public DischargePolicy0 As SystemPowerLevel
 Public DischargePolicy1 As SystemPowerLevel
 Public DischargePolicy2 As SystemPowerLevel
 Public DischargePolicy3 As SystemPowerLevel
 Public GlobalFlags As Integer
End Structure

 Private Structure MachinePowerPolicy
 Public Revision As Integer
 Public MinSleepAc As Integer
 Public MinSleepDc As Integer
 Public ReducedLatencySleepAc As Integer
 Public ReducedLatencySleepDc As Integer
 Public DozeTimeoutAc As Integer
 Public DozeTimeoutDc As Integer
 Public DozeS4TimeoutAc As Integer
 Public DozeS4TimeoutDc As Integer
 Public MinThrottleAc As Byte
 Public MinThrottleDc As Byte
 Public Pad0 As Byte
 Public Pad1 As Byte
 Public OverThrottledAc As PowerActionPolicy
 Public OverThrottledDc As PowerActionPolicy
End Structure

 Private Structure MachineProcessorPowerPolicy
 Public Revision As Integer
 Public ProcessorPolicyAc As ProcessorPowerPolicy
 Public ProcessorPolicyDc As ProcessorPowerPolicy
End Structure

 Private Structure PowerActionPolicy
 Public PowerAction As Integer
 Public Flags As Integer
 Public EventCode As Integer
End Structure

 Private Structure PowerPolicy
 Public User As UserPowerPolicy
 Public Machine As MachinePowerPolicy
End Structure

 Private Structure ProcessorPowerPolicy
 Public Revision As Integer
 Public DynamicThrottle As Byte
 Public Spare0 As Byte
 Public Spare1 As Byte
 Public Spare2 As Byte
 Public Reserved As Integer
 Public PolicyCount As Integer
 Public Policy0 As ProcessorPowerPolicyInfo
 Public Policy1 As ProcessorPowerPolicyInfo
 Public Policy2 As ProcessorPowerPolicyInfo
End Structure

 Private Structure ProcessorPowerPolicyInfo
 Public TimeCheck As Integer
 Public DemoteLimit As Integer
 Public PromoteLimit As Integer
 Public DemotePercent As Byte
 Public PromotePercent As Byte
 Public Spare0 As Byte
 Public Spare1 As Byte
 Public AllowBits As Integer
End Structure

 Private Structure SystemPowerLevel
 Public Enable As Byte
 Public Spare0 As Byte
 Public Spare1 As Byte
 Public Spare2 As Byte
 Public BatteryLevel As Integer
 Public PowerPolicy As PowerActionPolicy
 Public MinSystemState As Integer
End Structure

 Private Structure SystemPowerStatus
 Public ACLineStatus As Byte
 Public BatteryFlags As Byte
 Public BatteryLifePercent As Byte
 Public Reserved1 As Byte
 Public BatteryLifeTime As Integer
 Public BatteryFullLifeTime As Integer
End Structure

 Private Structure UserPowerPolicy
 Public Revision As Integer
 Public IdleAc As PowerActionPolicy
 Public IdleDc As PowerActionPolicy
 Public IdleTimeoutAc As Integer
 Public IdleTimeoutDc As Integer
 Public IdleSensitivityAc As Byte
 Public IdleSensitivityDc As Byte
 Public ThrottlePolicyAc As Byte
 Public ThrottlePolicyDc As Byte
 Public MaxSleepAc As Integer
 Public MaxSleepDc As Integer
 Public Reserved0 As Integer
 Public Reserved1 As Integer
 Public VideoTimeoutAc As Integer
 Public VideoTimeoutDc As Integer
 Public SpindownTimeoutAc As Integer
 Public SpindownTimeoutDc As Integer
 Public OptimizeForPowerAc As Byte
 Public OptimizeForPowerDc As Byte
 Public FanThrottleToleranceAc As Byte
 Public FanThrottleToleranceDc As Byte
 Public ForcedThrottleAc As Byte
 Public ForcedThrottleDc As Byte
End Structure


Private Class Win32
 Declare Auto Function ApplyPwrScheme Lib "powrprof.dll" Alias "SetActivePwrScheme" _
 (ByVal SchemeId As Integer, Optional ByVal Unused As Integer = 0, _
 Optional ByVal Unused2 As Integer = 0) As Byte

 Declare Auto Function CanUserWritePwrScheme Lib "powrprof.dll" () As Byte

 Declare Auto Function GetActivePwrScheme Lib "powrprof.dll" _
 (ByRef SchemeId As Integer) As Byte

 Declare Auto Function GetSystemPowerStatus Lib "kernel32.dll" _
 (ByRef Status As SystemPowerStatus) As Byte

 Declare Auto Function ReadGlobalPwrPolicy Lib "powrprof.dll" _
 (ByRef GlobalPolicy As GlobalPowerPolicy) As Byte

 Declare Auto Function ReadProcessorPwrScheme Lib "powrprof.dll" _
 (ByVal SchemeId As Integer, ByRef Policy As MachineProcessorPowerPolicy) As Byte

 Declare Auto Function ReadPwrPolicy Lib "powrprof.dll" Alias "ReadPwrScheme" _
 (ByVal SchemeId As Integer, ByRef Policy As PowerPolicy) As Byte

 Declare Auto Function SetActivePwrScheme Lib "powrprof.dll" _
 (ByVal SchemeId As Integer, ByRef GlobalPolicy As GlobalPowerPolicy, _
 ByRef Policy As PowerPolicy) As Byte

 Declare Auto Function WriteProcessorPwrScheme Lib "powrprof.dll" _
 (ByVal SchemeId As Integer, ByRef Policy As MachineProcessorPowerPolicy) As Byte

End Class
| Note |
As you add the code, you probably noticed that we created a class for the API functions. This is an easy way to wrap up the entire set of functions that we'll use throughout the project. |
With the API functions added, we can now focus on the functions and Sub procedures we need to create to take advantage of them. The following sections list the functions we will create and their overall objectives along with the code for each of them (the code can be added to the module after the Win32 Class).
GetCpuDynamicThrottling
The first function we look at determines both the AC and DC CPU dynamic throttling values. Here is its code:
Public Enum Powermode
 modedc
 modeac
End Enum

Public Enum ThrottlingMode
 ThrottleNone = 0 'NONE
 ThrottleConstant = 1 'CONSTANT
 ThrottleDegrade = 2 'DEGRADE
 ThrottleAdaptive = 3 'ADAPTIVE
End Enum


Private Sub GetCpuDynamicThrottling(ByRef throttleAc As Integer, _
 ByRef throttleDc As Integer)

 Dim schemeId As Integer
 Dim currentPolicy As MachineProcessorPowerPolicy
 Dim result As Byte

 result = Win32.GetActivePwrScheme(schemeId)
 If result <> 1 Then
 Throw New System.Exception("Unable to determine the active power scheme")
 End If

 result = Win32.ReadProcessorPwrScheme(schemeId, currentPolicy)
 If result <> 1 Then
 Throw New System.Exception("Unable to read the current CPU power scheme")
 End If

 throttleAc = currentPolicy.ProcessorPolicyAc.DynamicThrottle
 throttleDc = currentPolicy.ProcessorPolicyDc.DynamicThrottle

End Sub
GetCpuThrottlingAc
The AC throttling power policy is handled in this function. Here is this function's code:
Public Function GetCpuThrottlingAc() As ThrottlingMode
 Dim throttleDc As Integer

 GetCpuDynamicThrottling(throttleAc, throttleDc)

 Return throttleAc

End Function
GetCpuThrottlingDc
This is similar to the previous function, but this one handles the DC throttling power policy. Here is the code:
Public Function GetCpuThrottlingDc() As ThrottlingMode

 Dim throttleAc As Integer
 Dim throttleDc As Integer

 GetCpuDynamicThrottling(throttleAc, throttleDc)

 Return throttleDc

End Function
GetPowerMode
We need a way to tell if the system is using AC or DC power, which is what we handle with the following code:
Public Function GetPowerMode() As Powermode

 Dim pwrStatus As SystemPowerStatus
 Dim result As Byte

 result = Win32.GetSystemPowerStatus(pwrStatus)
 If result <> 1 Then Throw New System.Exception("Cannot determine system power status")

 If pwrStatus.ACLineStatus = 0 Then Return Powermode.modedc
 Return Powermode.modeac

 End Function
SetCpuDynamicThrottling
This Sub procedure allows us to change the CPU throttling policies for both the AC and DC power modes:
Private Sub SetCpuDynamicThrottling(ByVal throttleAc As Integer, ByVal throttleDc As Integer)

 Dim schemeId As Integer
 Dim currentPolicy As MachineProcessorPowerPolicy
 Dim newPolicy As MachineProcessorPowerPolicy
 Dim result As Byte

 result = Win32.CanUserWritePwrScheme()
 If result <> 1 Then
 Throw New System.Exception("Cannot get CPU power information")
 End If

 result = Win32.GetActivePwrScheme(schemeId)
 If result <> 1 Then
 Throw New System.Exception("Cannot determine the active power scheme")
 End If

 result = Win32.ReadProcessorPwrScheme(schemeId, currentPolicy)
 If result <> 1 Then
 Throw New System.Exception("Cannot read the current CPU power scheme")
 End If

 newPolicy = currentPolicy
 If throttleAc >= 0 Then newPolicy.ProcessorPolicyAc.DynamicThrottle = throttleAc
 If throttleDc >= 0 Then newPolicy.ProcessorPolicyDc.DynamicThrottle = throttleDc

 result = Win32.WriteProcessorPwrScheme(schemeId, newPolicy)
 If result <> 1 Then
 Throw New System.Exception("Cannot change the current CPU power scheme")
 End If

 result = Win32.ApplyPwrScheme(schemeId)
 If result <> 1 Then
 Win32.WriteProcessorPwrScheme(schemeId, currentPolicy)
 Throw New System.Exception("Cannot apply the changes made to the power scheme")
 End If
SetCpuThrottling
This Sub procedure changes the CPU throttling power for the current power mode:
Public Sub SetCpuThrottling(ByVal throttle As ThrottlingMode)

 Dim pwrMode As Powermode

 pwrMode = GetPowerMode()
 If pwrMode = Powermode.modeac Then
 SetCpuThrottlingAc(throttle)
 Else
 SetCpuThrottlingDc(throttle)
 End If

End Sub
SetCpuThrottlingAc
The AC power policy can be changed with this Sub procedure:
Public Sub SetCpuThrottlingAc(ByVal throttle As ThrottlingMode)
 SetCpuDynamicThrottling(throttle, -1)
End Sub
SetCpuThrottlingDc
This is the same as the previous Sub, but for DC power:
Public Sub SetCpuThrottlingDc(ByVal throttle As ThrottlingMode)
 SetCpuDynamicThrottling(-1, throttle)
End Sub
That's all there is for the Powerapi.vb module. You can close this and open the form, so that we can create a user interface for our application.
User Interface
The user interface for this application is going to be quick to create. We need to add the controls shown in Table 24.1 to the form:
|
Type |
Name |
Text |
|---|---|---|
|
Label |
lblInfo |
Info |
|
Label |
lblCPU |
CPU |
|
StatusBar |
StatusBar1 |
StatusBar1 |
|
GroupBox |
GroupBox1 |
CPU |
You can refer to Figure 24.1 for their locations.
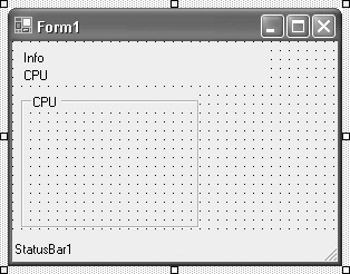
Figure 24.1: The controls in the correct location.
The next step is to add the following radio buttons (shown in Table 24.2), placing them inside GroupBox1, which automatically allows the end user the ability to select only one of the options.
|
Name |
Text |
|---|---|
|
NoCPUThrottling |
No Throttling |
|
ConstThrottling |
Constant Throttling |
|
DegradeLow |
Low Power Degrade |
|
Adaptive |
Adaptive |
You can refer to Figure 24.2 for the visible GUI. The last control we need to add to the project is a Timer. You can leave its settings as the default, with the exception of the Interval property, which needs to be set to 10000.
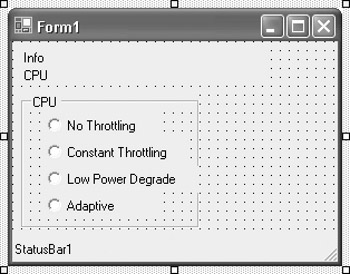
Figure 24.2: The visible GUI is finished.
We can now create the code that will actually be used in our application. It calls the functions we created earlier. Open the Code Editor for Form1. Begin with the Imports statements and the following declarations:
Imports Microsoft.Win32
Imports System.Management
Dim moReturn As ManagementObjectCollection
Dim moSearch As ManagementObjectSearcher
Dim mo As ManagementObject
We are going to display the CPU speed in the status bar, which is the reason for the declarations and the Timer control. Let's look at the Timer Elapsed method. This Sub procedure will be executed every time the timer gets to 10 seconds. During execution, we'll display the processor information.
Here is the code:
Private Sub Timer1_Elapsed(ByVal sender As System.Object, ByVal e As System.Timers.ElapsedEventArgs) Handles Timer1.Elapsed
 moSearch = New Management.ManagementObjectSearcher("Select * from Win32_Processor")
 moReturn = moSearch.Get

 For Each mo In moReturn
 Dim strOut As String
 Dim speed As UInt32
 speed = mo("CurrentClockSpeed")
 strOut = mo("Name") + " - " + speed.ToString
 StatusBar1.Text = mo("Name") + " - " + speed.ToString & " mhz"
 Next
End Sub
The Form_Load event is next. We use this Sub procedure to hook the SystemEvents PowerModeChange event handler function. We need to do this so that it is called when the power mode is changed. We'll also call it immediately so as to initialize the current AC or DC throttling information.
Here is the code for the procedure:
Private Sub Form1_Load(ByVal sender As System.Object, ByVal e As System.EventArgs) Handles MyBase.Load


 Dim cpuMode As ThrottlingMode

 AddHandler Microsoft.Win32.SystemEvents.PowerModeChanged, AddressOf Me.OnPowerModeChange
 OnPowerModeChange(Me, New PowerModeChangedEventArgs(PowerModes.StatusChange))
 StatusBar1.Text = "Retrieving CPU Info"

 Select Case cpuMode

 Case ThrottlingMode.ThrottleNone
 NoCpuThrottle.Select()

 Case ThrottlingMode.ThrottleConstant
 ConstThrottling.Select()

 Case ThrottlingMode.ThrottleDegrade
 DegradeLow.Select()

 Case ThrottlingMode.ThrottleAdaptive
 Adaptive.Select()

 End Select
End Sub
As we just used it, let's look at OnPowerModeChange, which handles the system power mode change event. The PowerModes.StatusChange event is the only event we need to concern ourselves with. We begin by checking this event to see if it is a StatusChange. If so, we continue on in the Sub procedure. Otherwise, we continue our execution and ignore the event.
Here is the code:
Private Sub OnPowerModeChange(ByVal sender As Object, ByVal args As PowerModeChangedEventArgs)
 Dim pwrMode As Powermode
 Dim cpuMode As ThrottlingMode
 If args.Mode <> PowerModes.StatusChange Then Return
The remaining steps read the current power mode, and depending on what it is, we read the CPU throttling mode. The following code finishes the procedure:
Try

 pwrMode = GetPowerMode()

 If pwrMode = Powermode.modeac Then
 cpuMode = GetCpuThrottlingAc()
 Else
 cpuMode = GetCpuThrottlingDc()
 End If

 Catch except As System.Exception

 MessageBox.Show(except.Message.ToString(), "Error ", MessageBoxButtons.OK, MessageBoxIcon.Error)

 Return

 End Try


 If pwrMode = Powermode.modeac Then
 lblInfo.Text = "Using AC power"
 Else
 lblInfo.Text = "Using DC power"
 End If

 Select Case cpuMode

 Case ThrottlingMode.ThrottleNone
 lblCPU.Text = "CPU is unthrottled"

 Case ThrottlingMode.ThrottleConstant
 lblCPU.Text = "CPU is constantly throttled"

 Case ThrottlingMode.ThrottleDegrade
 lblCPU.Text = "CPU throttles on low battery"

 Case ThrottlingMode.ThrottleAdaptive
 lblCPU.Text = "CPU is throttled adaptively"

 End Select
The final coding steps for this project involve the radio buttons. These buttons simply call the powerapi to set the appropriate type of throttling depending on the button clicked.
Here is the code:
Private Sub ConstThrottling_CheckedChanged(ByVal sender As System.Object, ByVal e As System.EventArgs) Handles ConstThrottling.CheckedChanged
 powerapi.SetCpuThrottling(powerapi.ThrottlingMode.ThrottleConstant)
 OnPowerModeChange(Me, New PowerModeChangedEventArgs(PowerModes.StatusChange))
End Sub


Private Sub Adaptive_CheckedChanged(ByVal sender As System.Object, ByVal e As System.EventArgs) Handles Adaptive.CheckedChanged
 powerapi.SetCpuThrottling(powerapi.ThrottlingMode.ThrottleAdaptive)
 OnPowerModeChange(Me, New PowerModeChangedEventArgs(PowerModes.StatusChange))
End Sub


Private Sub NoCpuThrottle_CheckedChanged(ByVal sender As System.Object, ByVal e As System.EventArgs) Handles NoCpuThrottle.CheckedChanged
 powerapi.SetCpuThrottling(powerapi.ThrottlingMode.ThrottleNone)
 OnPowerModeChange(Me, New PowerModeChangedEventArgs(PowerModes.StatusChange))
End Sub


Private Sub DegradeLow_CheckedChanged(ByVal sender As System.Object, ByVal e As System.EventArgs) Handles DegradeLow.CheckedChanged
 powerapi.SetCpuThrottling(powerapi.ThrottlingMode.ThrottleDegrade)
 OnPowerModeChange(Me, New PowerModeChangedEventArgs(PowerModes.StatusChange))
End Sub
Testing the Application
You can now save the application and test it. Figure 24.3 displays the application as an example of how it should appear. You can test the various options to see how well it performs.
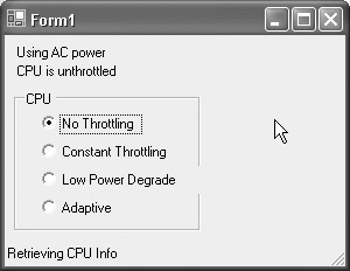
Figure 24.3: The application being executed.
Summary
This chapter continued our look at the hardware of the Tablet PC. We created a project that you could include in your applications to help an end user manage their power management, one of the more important aspects of mobile computing. In Chapter 25, Virtual Joystick, we build a 'virtual joystick' as an example of how games or applications can be controlled via the pen.
- The Tablet PC
- Introduction to Visual Basic .NET
- Working with VB .NET
- Basics of the .NET Framework
- Introduction to the VB .NET Language
- Object-Oriented Programming with VB .NET
- Strings, GDI+, and Error Handling in VB .NET
- Math and Random Number Functions in VB .NET
- Your First Program
- Console Application Input/Output
- Your First Windows Forms Application
- Obtaining the Tablet PC SDK
- Introduction to Ink-Enabled Applications
- Tablet PC Full Screen Utility
- Tablet PC Screen Rotation and Special Buttons
- Creating an MP3 Player
- Form Effects
- Using Gestures to Control Tablet Media Player
- Getting Started with Microsoft Agent
- Advanced Microsoft Agent
- Speech Input with SAPI
- Custom Grammars for Speech Recognition
- WMI and Hardware
- Power Management for the Tablet PC
- Virtual Joystick
- Pong Game
- Not Quite a Magic Ball
- Storing Ink in a Database
- 3D Rendering with OpenGL and DirectX 9
- Using Third-Party Engines
- Tablet Fax
EAN: 2147483647
Pages: 191
