Section 5.5. JSF Actions and Views
5.5. JSF Actions and ViewsNow that we've set up our managed beans, we can start looking at the JSF pages themselves. Let's start with the home page for the Library application, which is shown in Example 5-3. Example 5-3. index.jsp <%@ taglib uri="http://java.sun.com/jsf/html" prefix="h" %> <%@ taglib uri="http://java.sun.com/jsf/core" prefix="f" %> <html> <f:view> <head> <title>JSF Library Home Page</title> <link rel="stylesheet" type="text/css" href='<%= request.getContextPath( ) + "/css/app.css" %>'> </head> <body> <h:form> <h1>JSF Library</h1> <hr> Welcome to the JSF library. <p> <h:outputText value="You are logged in as #{usersession.currentUser.username}"/> <p> <h:commandButton action="viewbooks" value="View Books"/> <h:commandButton action="addbook" rendered="#{usersession.currentUser.librarian}" value="Add Book"/> <hr> <h:commandLink rendered="#{not usersession.loggedIn}" action="login"> <h:outputText value="Log In"/> </h:commandLink> <h:commandLink rendered="#{usersession.loggedIn}" action="#{usersession.logout}"> <h:outputText value="Log Out"/> </h:commandLink> </h:form> </body> </f:view> <html>This file lives in the root directory of our web application. But if we try and access it at http://server/library/index.jsp, we'll get a messy error. Instead, we access it via the FacesServlet, which is responsible for managing the JSF lifecycle. Earlier, we set up a mapping in web.xml that forwards all requests with a .faces extension to the FacesServlet. The FacesServlet sets up a FacesContext object and then dispatches to the appropriate view definitionsuch as the index.jsp file. The mapping is simple: a request for /index.faces uses the /index.jsp view. In situations where you are using both JSF-enabled and standard JSPs, it can be useful to be able to easily distinguish between the two. One way to do this is to use the javax.faces.DEFAULT_SUFFIX context parameter. The value of this parameter determines the suffix used to find matching JSPs when the FacesServlethandles a request. If we used our earlier mapping for the FacesServlet and set the DEFAULT_SUFFIX to *.jsf, for example, then every URL ending with .faces will be resolved to a JSP with a .jsf suffix. Remember that context parameters are set using <context-param> elements in the web.xml file. See Appendix A for full details on web.xml syntax. We've imported two tag libraries into this JSP file. The first, which we've given the h: prefix, is the JSF HTML tag library. The HTML tags provide access to the various UI components provided by the JSF libraries. The second tag library, which we've given the f: prefix, is the JSF core tag library. These are the standard prefixes, and we'll use them for the rest of the chapter. All of the JSF content in a page must be contained within an <f:view> tag, which represents the root of the JSF component tree. Example 5-3 uses the <h:outputText> tag to display text based on an EL expression, and the <h:commandButton> and <h:commandLink> tags to allow navigation within the application. All of the HTML-related tags support the rendered attribute, which allows us to specify whether or not the UI component is displayed, based on the runtime value of a JSF expression. In Example 5-3, we display a login link if the user isn't logged in and a logout link if he is. We also display an Add Book button for librarians only. 5.5.1. NavigationPage-to-page navigation in JSF is built around navigation rules . A navigation rule has three basic parts: an originating view, an outcome, and a destination view. The two kinds of views are identified by URL patterns, and the outcome is a simple text string. When a user triggers a navigation event (by clicking on a button or a command link), the JSF framework selects a destination view by finding the navigation rule with the appropriate outcome that most closely matches the originating view. Let's start with a simple definition. This rule states that the addbook outcome from the /index.jsp file should lead to the /view/addbook.jsp view: <navigation-rule> <from-view-id>/index.jsp</from-view-id> <navigation-case> <from-outcome>addbook</from-outcome> <to-view-id>/view/addbook.jsp</to-view-id> </navigation-case> </navigation-rule> Within the index.jsp file, we can reference this outcome directly by specifying the outcome name as the action associated with the command button: <h:commandButton action="addbook" rendered="#{usersession.currentUser.librarian}" value="Add Book"/>The result is a button that, when clicked, causes the server to display the /view/addbook.jsp view. Rather than linking views one by one, we can use wildcards and provide multiple navigation cases. Here's how we define a set of rules that applies to outcomes originating from any view: <navigation-rule> <from-view-id>*</from-view-id> <navigation-case> <from-outcome>login</from-outcome> <to-view-id>/login/index.jsp</to-view-id> </navigation-case> <navigation-case> <from-outcome>home</from-outcome> <to-view-id>/index.jsp</to-view-id> </navigation-case> <navigation-case> <from-outcome>viewbooks</from-outcome> <to-view-id>/view/listbooks.jsp</to-view-id> </navigation-case> </navigation-rule> We use the wildcard character (*) in the <from-view-id> tag to declare that this rule should apply to all originating views unless a more exact match is available. With this rule in place, we can use the login, home, and viewbooks outcomes from anywhere in the application. Wildcard mapping for navigation rules works almost exactly as it does for servlets. More precise mappings take precedence: if we defined a home outcome in a navigation rule governing the /view/addbook.jsp view, it would override the default navigation rule as well as a rule governing (for example) /view/*. 5.5.1.1. Dynamic actions and navigationMost applications need to control navigation based on the result of an action rather than just hardcoding outcomes directly to buttons. That's why they're called outcomes: they can differ based on the circumstances. We also need a way to execute code after clicking a button. Let's take a look at the library login functionality to see how this is done. We start by defining the navigation rules in faces-config.xml. We want to display a success message if the user logs in successfully, and we want to redisplay the login page if the user can't log in for some reason. Here's the navigation rule: <navigation-rule> <from-view-id>/login/index.jsp</from-view-id> <navigation-case> <from-outcome>success</from-outcome> <to-view-id>/login/success.jsp</to-view-id> </navigation-case> <navigation-case> <from-outcome>failure</from-outcome> <to-view-id>/login/index.jsp</to-view-id> </navigation-case> </navigation-rule> Next, we write a Java method to handle the login process. We include this method in the backing bean associated with the login activity. In this case, the method is confirmCredentials( ). The only thing that's special about this method is that it returns a string indicating the outcome of the requestin this example, success or failure. The code is in Example 5-4. Example 5-4. LoginForm.java import logic.UserManager; import session.UserSession; import model.User; import javax.faces.context.FacesContext; import javax.faces.application.FacesMessage; public class LoginForm { private String username; private String password; public String getUsername( ) { return username; } public void setUsername(String username) { this.username = username; } public String getPassword( ) { return password; } public void setPassword(String password) { this.password = password; } public String confirmCredentials( ) { UserSession userSession = (UserSession)FacesContext.getCurrentInstance( ) .getExternalContext( ).getSessionMap( ).get("usersession"); if (UserManager.confirmLogin(username, password)) { User user = UserManager.getUser(username); userSession.setCurrentUser(user); return "success"; } FacesMessage message = new FacesMessage( ); message.setSummary("Login Error"); message.setDetail("Unable to log you in -" + " username and password combination not found."); message.setSeverity(FacesMessage.SEVERITY_WARN); FacesContext.getCurrentInstance( ).addMessage(null,message); return "failure"; } }Finally, as you'll see in Example 5-5, we can wire the <h:commandButton> on the login form to the confirmCredentials( ) method on the backing bean. We use the same action property we used when we wired command buttons directly to outcomes. Example 5-5. /login/index.jsp <%@ taglib uri="http://java.sun.com/jsf/html" prefix="h" %> <%@ taglib uri="http://java.sun.com/jsf/core" prefix="f" %> <html> <f:view> <head> <title>JSF Library Login</title> <link rel="stylesheet" type="text/css" href='<%= request.getContextPath( ) + "/css/app.css" %>'> </head> <body> <h1>JSF Library Login</h1> <hr> In order to borrow or add books you must log into the Library application. <h:messages showDetail="true" warn layout="table"/> <h:form> <table> <tr> <td>Username:</td> <td><h:inputText value="#{loginform.username}"/></td> </tr> <tr> <td>Password:</td> <td><h:inputSecret value="#{loginform.password}"/></td> </tr> </table> <p> <h:commandButton value="Login" action="#{loginform.confirmCredentials}"/> </p> </h:form> </body> </f:view> </html>When the user clicks the button, the JSF server performs the following steps:
We do a few special things with the failure case, which is shown in Figure 5-1. First, the username input field remains populated with whatever the user originally submittedthat's because the LoginForm bean instance created in step 1 is still in scope. The password field doesn't get filled back in, because it's an <h:inputSecret> component, which doesn't prepopulate. The original bean instance isn't thrown away until after the page is rendered. When the user resubmits the form, a new instance is created (however, the component tree is retained until the user accesses another view). Figure 5-1. JSF Library Login failure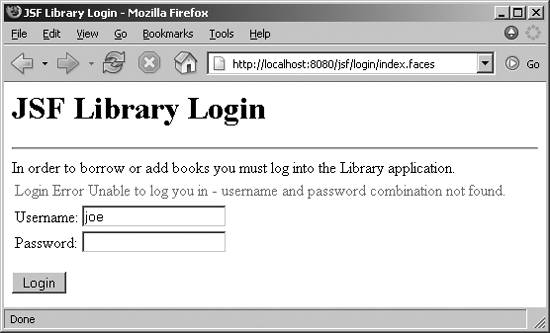 Second, the action method adds a FacesMessage object to the current instance of the FacesContext object. This message is then displayed via the <h:messages> tag. A JSF message has two parts: a summary and a detail. The <h:messages> tag lets us display both the summary and the detail (by default, only the summary is shown) for each message in the queue for the current page. We'll look at message display a bit more closely at the end of the chapter. 5.5.2. Sophisticated ViewsLet's take a look at another page in the JSF Library, the View Books screen. This screen allows users to browse books and to check books in and out, provided that they have appropriate privileges. This screen illustrates how to use JSF select boxes and how to group display elements into panels for more control of the display. Example 5-6 shows the listbooks.jsp file. Example 5-6. /view/listbooks.jsp <%@ taglib uri="http://java.sun.com/jsf/html" prefix="h" %> <%@ taglib uri="http://java.sun.com/jsf/core" prefix="f" %> <html> <f:view> <head> <title>Library Books</title> <link rel="stylesheet" type="text/css" href='<%= request.getContextPath( ) + "/css/app.css" %>'> </head> <body> <h1>Library Collection</h1> <hr> <h:form> <table> <tr><td valign="top"> <h:selectOneListbox size="10" value="#{bookdisplayform.currentBookID}" onchange="submit( )"> <f:selectItems value="#{bookdisplayform.bookList}"/> </h:selectOneListbox> <p/> <h:commandButton value="Return Home" action="home"/> </td><td valign="top"> <h:panelGroup rendered="#{bookdisplayform.bookSelected}"> <h:panelGrid columnClasses="rowLabel,rowContent" columns="2"> <h:outputText value="Title:"/> <h:outputText value="#{bookdisplayform.book.title}"/> <h:outputText value="Author:"/> <h:outputText value="#{bookdisplayform.book.author}"/> <h:outputText value="ISBN:"/> <h:outputText value="#{bookdisplayform.book.ISBN}"/> <h:outputText value="Status:"/> <h:outputText value= "#{bookdisplayform.book.checkedOut ? 'Checked Out' : 'Checked In'}"/> </h:panelGrid> <h:panelGroup > <h:panelGroup rendered="#{usersession.currentUser.borrower}"> <h:commandButton value="Check Out" action="#{bookdisplayform.checkBookOut}" rendered="#{not bookdisplayform.book.checkedOut}"/> </h:panelGroup> <h:panelGroup rendered="#{usersession.currentUser.librarian}"> <h:commandButton value="Check In" action="#{bookdisplayform.checkBookIn}" rendered="#{bookdisplayform.book.checkedOut}"/> </h:panelGroup> </h:panelGroup> </h:panelGroup> </td></tr> </table> <h:selectBooleanCheckbox onclick="submit( )" valueChangeListener="#{bookdisplayform.safeModeChange}"/> <h:outputText value="Safe Mode"/> </h:form> </body> </f:view> </html>Figure 5-2 shows what the page looks like for Librarian users who have selected a particular book. The JSP produces a selection box based on the booklist property of the BookDisplayForm backing bean. Earlier we showed how the BookDisplayForm is configured as a managed bean in faces-config.xml. If a book has been selected, the page displays details about the book using the <h:panelGrid> and <h:panelGroup> tags. If the user has logged in, the page may also display a Check In or a Check Out button, depending on the book's status and whether the user is logged in as a Librarian or as a regular Borrower. Just ignore the Safe Mode checkbox for now; we'll look at it later. Figure 5-2. Library Collection screen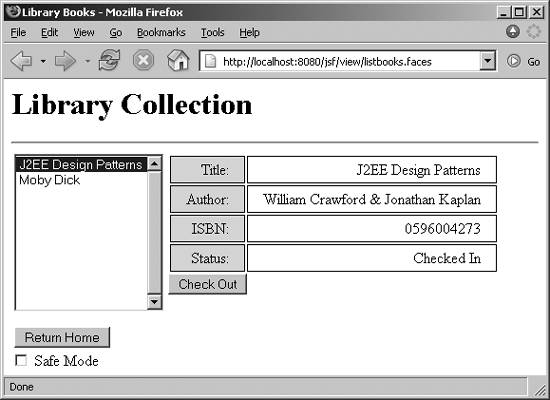 Let's look at the select box first. The code in the JSP for creating this component is very simple: <h:selectOneListbox size="10" value="#{bookdisplayform.currentBookID}" onchange="submit( )"> <f:selectItems value="#{bookdisplayform.bookList}"/> </h:selectOneListbox>We use the <h:selectOneListbox> component since we want the user to be able to select only one book at a time. We've also embedded some JavaScript in the tag, using the onchange attribute. This is a pass-through attribute to the HTML <select> tag that is produced when the page is rendered. It causes the form to be submitted when the user selects a new value. The <f:selectItems> tag provides the list of items to include in the select box. In this case, we don't want to hardcode the options into the JSP tag (although this can be done using the <f:selectItem> tag). Rather, we want to get the list of books from the application's data model. So we've written a method on our backing bean for the form, which accesses our data model object to produce an array of javax.faces.model.SelectItem objects: public SelectItem[] getBookList( ) { Library library = Directory.getLibrary( ); List books = library.getBookList( ); SelectItem[] items = new SelectItem[books.size( )]; for (int i = 0; i < books.size( ); i++) { Book book = (Book)books.get(i); items[i] = new SelectItem(book.getTrackingID( ), book.getTitle( )); } return items; }Since we don't want the data model itself to know about JSF objects (it doesn't need to) we haven't built the ability to create the SelectItem array into the Library class itself: we use the backing bean as the intermediary between the user interface and the data model. The SelectItem constructor requires an object ID and a label. The object ID is used as the key when building the select box, and the label is used as the text displayed to the user. When an item is selected and the form is submitted, the object ID is what's made available to the application. For the Library application, the object ID is the book's tracking ID, which is a unique string that can be used to retrieve a Book object from the Library object. The following three methods from the BookDisplayForm backing bean work together to translate the book ID bound to the <h:selectOneListbox> tag into the book property, which can then be accessed by any other tags in the UI that need access to the currently selected book:[*]
public String getCurrentBookID( ) { return currentBookID; } public void setCurrentBookID(String currentBookID) { this.currentBookID = currentBookID; } public Book getBook( ) { if (currentBookID == null) return null; return (Book)getLibrary( ).getBooks( ).get(currentBookID); }5.5.3. User Interface EventsIn Example 5-3, we used logic within a Java bean to modify the display based on selected values. This approach doesn't always make sense, so JSF provides another mechanism to respond to user actions that are focused primarily on the interface: events. By taking advantage of JSF's event model (which we mentioned briefly during our discussion of the JSF lifecycle earlier in this chapter), we can respond to changes made to user interface components without processing a full action. Unlike actions, events have access to the UIComponent object that fired the event and through it to the rest of the component tree for the page. Events are, in general, not the place to implement business functionality: an event shouldn't be firing off emails or making model changes. That kind of business logic should be reserved for actions, which should not need to know the details of the user interface. On the View Books page, we've added a Safe Mode checkbox that allows the user to turn the Check In/Check Out buttons on and off (OK, we'll fess up: this is a trivial example, but it shows how events can be used to modify the appearance of the user interface). We set up the Safe Mode checkbox like this, using the standard <h:selectBooleanCheckbox> UI component: <h:selectBooleanCheckbox onclick="submit( )" valueChangeListener="#{bookdisplayform.safeModeChange}"/>We use a JavaScript handler to submit the page when the value is changed, and we include a reference to a listener method on the backing bean for the form. One thing that we don't do is provide a value binding: all we're interested in is the change, so we don't bind the value of the checkbox to any JavaBean properties. This means the checkbox defaults false every time a user navigates to the view. The checkbox retains its value each time the view is reloaded, until the user navigates to a different view (at which point the JSF engine builds a new component tree for the new view, and any values that aren't bound to session- or application- scoped beans are lost). The code for the listener function itself looks like this: public void safeModeChange(ValueChangeEvent event) { UIComponent buttonHolderGrid = event.getComponent( ).findComponent("buttonHolder"); if (buttonHolderGrid != null) { Object newVal = event.getNewValue( ); if (newVal instanceof Boolean) buttonHolderGrid.setRendered( !((Boolean)newVal).booleanValue( )); } }The listener starts out by retrieving the UIComponent that fired the event and uses that object to find the buttonHolder panel grid. Then, depending on the value the checkbox has been set to, it sets the rendered property for the panel grid, which either hides or shows the Check In and Check Out buttons. Listeners can also be attached to command components such as buttons and links. This allows the application to respond to UI events before (or instead of) processing an action. |
EAN: 2147483647
Pages: 269
- ERP System Acquisition: A Process Model and Results From an Austrian Survey
- Distributed Data Warehouse for Geo-spatial Services
- Data Mining for Business Process Reengineering
- Intrinsic and Contextual Data Quality: The Effect of Media and Personal Involvement
- Relevance and Micro-Relevance for the Professional as Determinants of IT-Diffusion and IT-Use in Healthcare