Section 10.4. Web Component Security
10.4. Web Component SecurityJ2EE provides comprehensive support for security in the web tier including transport-level security with SSL as well as authentication and authorization for application-level security. These security services are provided as both declarative security features (configured through web.xml deployment descriptor elements) and programmatic security calls integrated with the Servlet and JSP APIs. 10.4.1. Web-Tier Transport-Level SecurityThe web tier provides fine-grained control over transport-level security. There are three modes of transport-level security: NONE, INTEGRAL, and CONFIDENTIAL. NONE, as the name implies, means no transport-level security; all information is sent in the clear. This is the default mode. INTEGRAL means that the client and the server cooperate to ensure that content is not changed in transit. CONFIDENTIAL means that the client and server keep the content secret as it is transported over the wire. INTEGRAL and CONFIDENTIAL imply using SSL to communicate between the clients (typically browsers) and the server. Such transport-level security is also known as one-way SSL. You specify the transport-level security constraints in the web.xml deployment descriptor as part of the <security-constraint> elements as depicted in Figure 10-1. The <security-constraint> element uses the <web-resource-collection> element to specify the subset of the application that is the target of the constraint. The <web-resource-collection> element also supports specification of specific HTTP request types, such as GET and POST. You can specify the URL collection for the constraint using a fully specified URL (e.g., /admin/edit.jsp) or you can use the * wildcard to specify groups of URLs, such as all URLs that fall within a particular path (/admin/*) or all URLs that end with a particular suffix (/admin/*.jsp). The rules for matching URLs to url-pattern values within <web-resource-collection> entries are the same as those used for matching <servlet-mapping> entries and <filter-mapping> entries in web deployment descriptors. Refer to Chapter 3 for full details on these mapping preferences. What happens if you access an INTEGRAL or CONFIDENTIAL resource using HTTP instead of HTTPS? There are at least two alternatives. The first alternative is to display an error informing the user that access to the resource is restricted. The second alternative is to redirect the request using the HTTPS protocol. The second approach is seamless and elegant in terms of the user experience. Recent servlet specifications mandate such redirects. Example 10-1 shows a security constraint. The constraint specifies a web resource collection that encapsulates all URLs that start with /admin. Therefore, the constraint will match a URL such as /admin/manageRegions.jsp. The <user-data-constraint> entry specifies that this collection of URLs must be protected to the CONFIDENTIAL level. This means that the URLs must be accessed over SSL. If a user attempts to access /admin/manageRegions.jsp over HTTP, for example, the web container triggers a redirect to the same URL over HTTPS in order to enforce this constraint. Figure 10-1. Security constraint schema diagram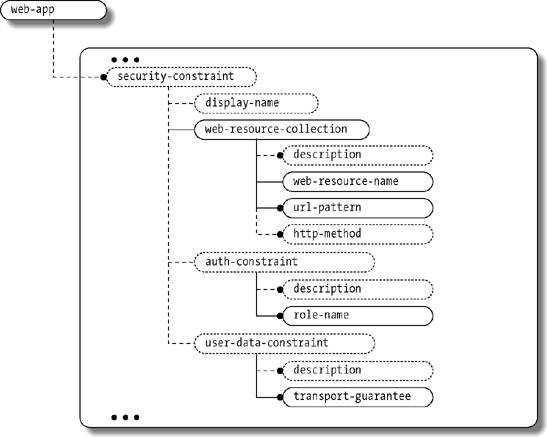 Example 10-1. Example security constraint configuration<web-app> ... <security-constraint> <display-name>The user must access these over SSL</display-name> <web-resource-collection> <web-resource-name>AdminURLs</web-resource-name> <description>Collection of admin urls</description> <url-pattern>/admin/*</url-pattern> <http-method>GET</http-method> <http-method>POST</http-method> </web-resource-collection> <user-data-constraint> <description>Only confidential is allowed.</description> <transport-guarantee>CONFIDENTIAL</transport-guarantee> </user-data-constraint> </security-constraint> ... </web-app> 10.4.2. Web-Tier AuthenticationJ2EE web containers also support the declaration of authentication schemes for applications. The standard HTTP authentication mechanisms available in the web tier include BASIC, DIGEST, FORM, and CLIENT. The authentication mechanism is specified in the web.xml file using the <login-config> element shown in Figure 10-2. The authentication method applies to all web components in the application. Figure 10-2. Login configuration schema diagram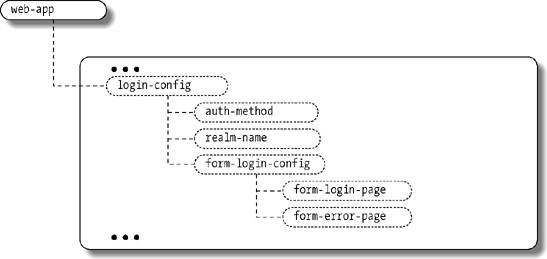 10.4.2.1. BASIC authenticationExample 10-2 shows a web.xml fragment that specifies BASIC authentication for a web application. With BASIC authentication, when a user interacts with a page that requires authentication, the underlying HTTP server prompts the user with a dialog box requesting a username and password. The browser controls the look and feel of the dialog, which is one of the limitations of BASIC authentication. The username and password are base64 encoded when sent to the server. Base64 encoding simply obscures the text so that it does not pass in the clear; it does not encrypt it. Transport-level security such as SSL should be used to ensure that the usernames and passwords are sent securely. Example 10-2. BASIC authentication<web-app> ... <login-config> <auth-method>BASIC</auth-method> </login-config> ... </web-app> 10.4.2.2. DIGEST authenticationIn an application configured with DIGEST authentication, the user experience is very similar to BASIC authentication. A request to a protected page triggers a dialog box that asks the user for a username and password. Again, the browser controls the look-and-feel of the dialog. The client base64 encodes the username but encrypts the password. This mechanism is more secure than BASIC authentication, but compatibility problems between different HTTP server implementations and web browsers have limited its adoption in web applications. 10.4.2.3. FORM authenticationExample 10-3 shows a declaration of FORM authentication for a web application. In an application configured with FORM authentication, a developer creates a login screen, login.jsp in this example, that displays an HTML form to prompt the user for a username and password. When the user requests a page that requires authentication, the web container redirects her to this login page. The user fills out the login form and submits the request to the server. This mechanism is not secure from a transport level, unless used in conjunction with SSL or other network encryption protocols. One of the neat features of FORM authentication is that the server remembers the requested page, including all request parameters. Upon successful authentication, the application server directly takes the user to the authenticated page originally requested. If authentication fails, the application server takes the user to a customized login failure page, loginError.jsp in this example. Example 10-3. FORM authentication configuration<web-app> ... <login-config> <auth-method>FORM</auth-method> <form-login-config> <form-login-page>/login.jsp</form-login-page> <form-error-page>/loginError.jsp</form-error-page> </form-login-config> </login-config> ... </web-app> What action should you specify for the login form, and who implements that action? As shown in the HTML fragment in Example 10-4, the application server implements a special internal action called j_security_check, and you specify this special action as the target of your login form. How does the j_security_check action know about the username and password fields? It expects you to use the standard name of j_username for the user's identifier and the standard name of j_password for the password field. Example 10-4. Login form for FORM-based authentication<form action="j_security_check" method="POST"> <table> <tr> <td>Username:</td> <td><input type="text" name="j_username"></td> </tr> <tr> <td>Password:</td> <td><input type="password" name="j_password"></td> </tr> <tr> <td><input type="submit" value="Login"></td> <td><input type="reset" name="Reset"></td> </tr> </table> </form> 10.4.2.4. CLIENT authenticationWhen a user interacts with a page that requires authentication, when using CLIENT authentication, the client browser sends the client's digital certificate to the server. This method of authentication works in conjunction with the transport-level security. The browser never prompts the user for a username and password. The CLIENT authentication approach is also known as two-way SSL. CLIENT authentication is the most secure method among the standard methods offered by web containers, but it is not widely implemented since it mandates issuing digital certificates to all clients that access the application. 10.4.2.5. Custom authenticationAnother option for implementing authentication in your web application is to implement your own scheme within the general web component model. In other words, rather than use the declarative authentication configuration offered by the web deployment model, you can write your own login scheme. One common approach to custom web authentication is to write a servlet filter that checks for credentials on the request (cookies or session data defined by the filter, for example). If none are found, the filter logs in the user, perhaps by forwarding him to a custom login page or component. 10.4.3. Web-Tier AuthorizationWeb containers support both declarative and programmatic authorization, as described in the following sections. 10.4.3.1. Declarative authorizationDeclarative authorization in the web tier allows you to declare authorization policies for collections of URLs in your web application. As with the other declarative security features in J2EE, these policies are defined in a deployment descriptor. In this case, since we're discussing web components, the declarative authorization is done in the web.xml deployment descriptor. You specify declarative authorization in web.xml using the <security-constraint> element, the same element that is used to specify transport-level security settings. Refer back to Figure 10-1 for the schema diagram of the <security-constraint> element. The <security-constraint> element specifies which roles are allowed to access specific sets of web resources; the application server enforces these constraints. As shown in Example 10-5, the resources are specified using the same <web-resource-collection> element used for transport constraints. The roles that are allowed to access the collection of URLs are specified using the <auth-constraint> element. You can specify roles by name, or you can use an asterisk (*) to match all the roles in the deployment descriptor. Example 10-5. Security constraint example<web-app> ... <security-constraint> <display-name>Seller constraints</display-name> <web-resource-collection> <web-resource-name>SellerURLs</web-resource-name> <description>Collection of seller urls</description> <url-pattern>/seller/*</url-pattern> <http-method>GET</http-method> <http-method>POST</http-method> </web-resource-collection> <auth-constraint> <description>Only individuals with seller role.</description> <role-name>seller</role-name> </auth-constraint> </security-constraint> ... </web-app> When an unauthenticated user accesses a restricted resource, the application server rejects the request by returning an HTTP 401 status code. The 401 status code (SC_UNAUTHORIZED) indicates that the server must authenticate the user in order to process this request. The return of a 401 status code causes the browser to prompt the user for authentication (typically a username and password). If the user is not authorized to access the resource (because her role does not give her permission to access that resource), the application server rejects the request by returning an HTTP 403 (SC_FORBIDDEN) status code. 10.4.3.2. Programmatic authorizationThe primary methods that support programmatic authorization in the web tier are geTRemoteUser( ), getUserPrincipal( ), and isUserInRole( ) on the javax.servlet.http.HttpServletRequest interface. The getremoteUser( ) method returns the username of the currently authenticated user as a string. The getUserPrincipal( )method returns similar information to getremoteUser( ), but instead of returning a string, it returns a java.security.Principal object. What if there is no currently authenticated user? The geTRemoteUser( ) and getUserPrincipal( ) methods return null, and the isUserInRole( ) method returns false. The isUserInRole( ) method takes a role in a string form. You define the role in the web.xml file using a <security-role> element and then reference it within a web component declaration using a <security-role-ref> element as depicted in Figure 10-3. Figure 10-3. Security role reference schema elements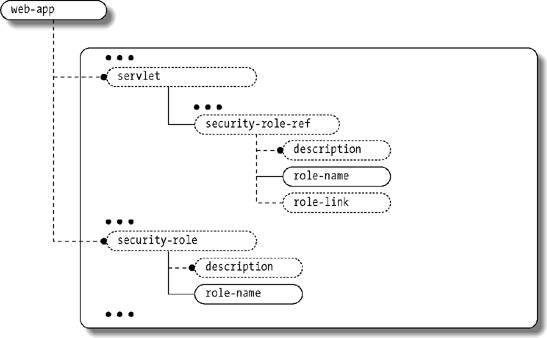 Let's look at an example that illustrates programmatic authorization. Your company sells widgets online. You have regular buyers and special VIP buyers. You would like to offer a significant discount, say 20%, to the VIP buyers. One way to do this is to assign VIP buyers a special vip role. This role is specified in the web.xml file in a <security-role> element as shown in Example 10-6. Example 10-7 shows how the application gives the discount to VIP buyers in the DiscountServlet class. As you can see, role-based authorization can do more than simply admit or bar access to a given resource; it has business applications as well, especially when combined with programmatic security. Example 10-6. Security role reference<web-app> ... <servlet> <description>The discount servlet.</description> <servlet-name>DiscountServlet</servlet-name> <servlet-class>com.oreilly.jent.securitydemo.servlets.DiscountServlet </servlet-class> <security-role-ref> <role-name>VIPRole</role-name> <role-link>vip</role-link> </security-role-ref> </servlet> ... <security-role> <description>The VIP role.</description> <role-name>vip</role-name> </security-role> Example 10-7. Programmatic authorization code public static String VIP_ROLE = "VIPRole"; String aDiscount = "10"; if (aRequest.isUserInRole(VIP_ROLE)) { aDiscount = "20"; } ...You specify the roles in the deployed application using <security-role> elements. These elements declare roles that must be resolved to actual user principals and groups by the underlying application server or container. However, you may want or need to use these roles under different names in the application code itself, and one security role can be referenced multiple times under different names by various web components. In our example, we've linked the role name used in the code, VIPRole, to the deployed role name, vip. VIPRole is specified in the <role-name> element of the <security-role-ref>. You map the role name to the actual deployed role, using the <role-link> element. Using a <security-role-ref> is optional if the role name in the code is the same as the role name in the deployed environment. However, it's a good idea to specify the <security-role-ref> element anyway, using identical values for the <role-name> element and the <role-link> element. This makes it easier to adjust deployed role names in the deployment descriptor when needed, and it also makes it clear in the deployment descriptor which roles are used by which web components. 10.4.4. Identity Propagation from the Web Tier to the EJB TierWe've discussed programmatic and declarative authentication as well as authorization in the web tier. Frequently, though, the web tier is not completely independent of the EJB tier. One common scenario is for the web tier to act as a client of one or more EJB components, delegating business behavior to the EJB tier. In order for security to work seamlessly across tiers, we need to pass along the user's credentials from the web tier to the EJB tier. This technique is called identity propagation. In the EJB tier, clients are responsible for authenticating users. For example, if the client is a web application, the web tier specifies the mechanisms for authentication. Once the application server authenticates a user in the web tier, his identity is established. The application server passes along this identity to the EJB components as depicted in Figure 10-4. Figure 10-4. Propagation from the web tier to the EJB tier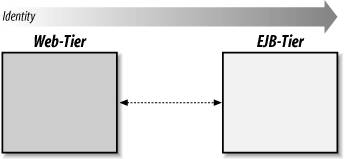 Identity propagation, passing along the credentials from the web tier to the EJB tier, is the default and works well in most applications. However, in some circumstances, the components in the EJB container do not care about the client's identity but only the client's role. In other situations, the web application may allow unauthenticated users to access certain web components, but the EJB components require a role to be associated with all incoming requests. In such scenarios, you can use the <run-as> element in the declaration of a web component within the deployment descriptor. The position of the <run-as> element in the web.xml structure is depicted in Figure 10-5. When a role is specified in a <run-as> element, all user requests of the component are run under the specified role, and this role is propagated to any EJBs accessed by the web component. Figure 10-5. run-as element in web.xml schema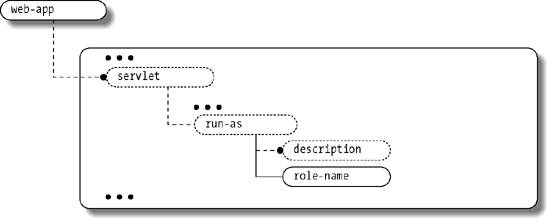 Example 10-8 illustrates the use of <run-as> within a deployment descriptor. In this example, we declare that the TaxServlet does not pass along the caller identity. Instead, the TaxServlet passes the role name TaxServiceUserRole to any EJB components that it invokes. Example 10-8. run-as<web-app> ... <servlet> <description>The tax servlet.</description> <servlet-name>TaxServlet</servlet-name> <servlet-class>com.oreilly.jent.securitydemo.servlets.TaxServlet </servlet-class> <run-as> <description>Specify the role to invoke tax service</description> <role-name>TaxServiceUserRole</role-name> </run-as> </servlet> ... </web-app> 10.4.5. Web Tier Best PracticesWe recommend the following best practices for the web tier:
|
EAN: 2147483647
Pages: 269