Implementing, Managing, and Troubleshooting Disk Devices
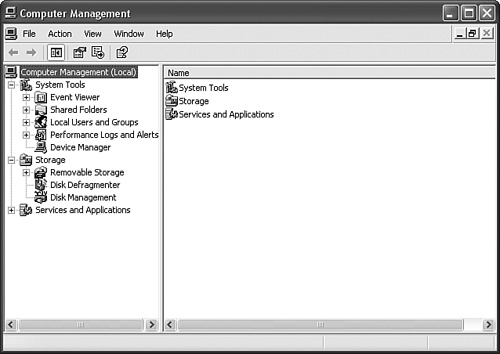
| Storage needs for computers have changed significantly over time. You could feed the data of hundreds of computers from just 10 years ago into a single computer today and still not fill its hard disk. Part of the reason is that today's data is much different than that of 10 years ago. It includes multimedia files, extended attributes, complex formulas, and WYSIWYG (What You See Is What You Get) formatting. The result is that the size of a single file can be hundreds of megabytes (MB) or larger. So, although storage space has grown, the demand for storage space has increased along with it. To implement storage devices in Windows XP, you use the Computer Management tool, shown in Figure 7.1. To open Computer Management, right-click My Computer and select Manage from the shortcut menu. Computer Management offers the following tools and utilities:
Installing, Configuring, and Managing DVD and CD-ROM DevicesObjective: Implement, manage, and troubleshoot disk devices.
CD-ROM drives are considered standard equipment on a computer, and DVD-ROM/CD-RW drives are quickly becoming the de facto standard on a new PC. Considering that some drives are not included within the Windows Catalog, there are bound to be some problems. To troubleshoot a problem with your CD or DVD device, you can use the following process:
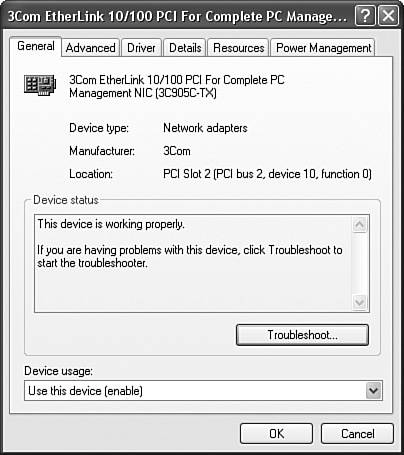
After you determine that the device is installed correctly and is listed in the Windows Catalog, you should look in Event Viewer for error messages. The System log contains the events pertaining to hardware devices. As you can see in Figure 7.2, error messages are represented by a red circle with a white "X" in the center. Information messages are represented by a balloon with a blue "I" in the center, and warning messages are represented by a yellow triangle with an exclamation mark in the center. Although not always true, an error is often preceded by one or more warning messages. A series of warning and error messages can describe the exact source of the problem, or at least point you in the right direction. Figure 7.2. Event Viewer's System log displays any errors or warnings regarding hardware devices.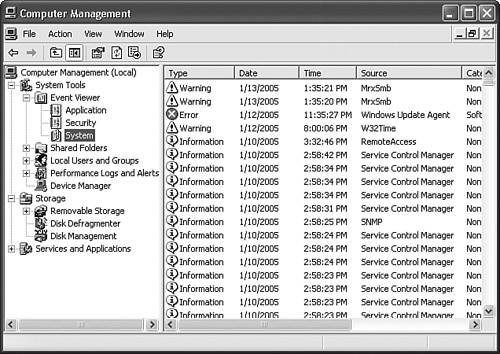 You should next check to see whether the device is detected by Windows XP and is functioning by checking Device Manager for its listing. You can access Device Manager by right-clicking My Computer, selecting Properties, clicking the Hardware Tab, and then clicking the Device Manager button. Devices that are not functioning are represented by icons with red Xs floating over the device icon. When you right-click a device, a shortcut menu, similar to the one displayed in Figure 7.3, appears. You can select to update the driver, or uninstall or disable the device. You may also scan the device for hardware changes or access the device's properties. Another place to check devices is in the System Information console. You can open it by clicking Start, Run, typing msinfo32, and then pressing Enter. Figure 7.3. Device Manager provides several options for managing a computer's devices. When you open the device's Properties dialog box, you can put a variety of configurations into effect, as well as disable or enable the device. The troubleshooting wizard is started from the Troubleshoot button on the General tab of the device's Properties dialog box, which is shown for a network card in Figure 7.4. Figure 7.4. Windows XP includes a Troubleshoot button in a device's Properties dialog box. When you click the Troubleshoot button, the Help and Support utility opens and a wizard leads you through a decision tree that helps you narrow down the cause of the device error. The first question in the wizard asks you to specify which device is having problemsa CD/DVD drive, hard disk, network adapter, or a tape drive. (An example of this type of screen is shown in Figure 7.5.) The wizard then prompts you to identify the nature of the problem with the CD/DVD drive. You can select the option that matches your problem and continue on the decision tree. The troubleshooting wizard makes suggestions for repair based on the answers you provided to that point, and then asks you to indicate whether the suggestion worked or not. If you select the negative or opt to skip that step, you are given another suggestion of what might be wrong with the device and how to fix it. Figure 7.5. The Help and Support troubleshooting wizard walks you through a decision tree to pinpoint the cause of failure.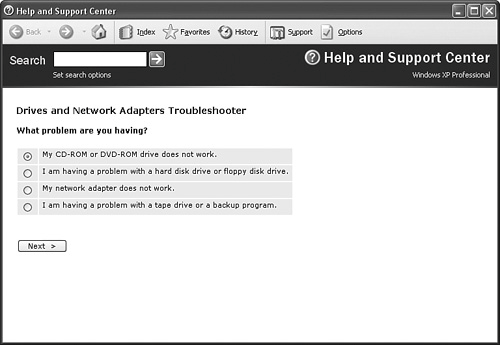 If you are having problems with CD audio playback, it could be that your device has digital audio playback enabled when the actual device doesn't support digital audio. You can disable digital audio playback by clearing the Enable Digital CD Audio for This CD-ROM Device check box. This option is located on the Properties tab of the Properties dialog box. If you suspect the problem is confined to the CD or DVD media that you are currently using, you can check the volume for the disc by selecting the Volumes tab in the device's Properties dialog box while the CD or DVD is in the drive. If the CD or DVD was able to mount, you see a description of the volumes contained on the disk. To investigate the configuration, you can click the Details tab in the Properties dialog box. Click the arrow on the drop-down box and select the various items from the list. Although this dialog box does not allow you to make configuration changes, it displays whether power is being provided to the device, the hardware ID, and more. For DVD drives, an additional configuration tab is available in the Properties dialog boxthe DVD Region tab. DVD discs are encoded for a specific geographical location, called a region, in which they are intended to be used. A DVD drive reads only the DVD discs that match the region for which it has been configured. A problem presents itself when a user travels internationally, or for some other reason, requires access to DVDs from more than one region. You are allowed to change regions a limited number of times. If a user needs to read DVDs from two different regions on a frequent basis, you should purchase a second DVD drive for that user. For a short-term change to another region, you can configure the new region in the DVD Region tab. Simply select the country where the DVD originated, or a country whose region matches the region indicated by the error message that was received when the DVD was inserted, and click OK to change the region. The Driver tab in the device's Properties dialog box allows you to uninstall or update the device driver, roll the driver back to an older version, or simply view the driver details. Drivers are often the source of problems with all types of devices. We will walk through how to manage a video device driver in the "Installing, Configuring, and Troubleshooting a Video Adapter" section later in this chapter. The Properties tab can be used to troubleshoot an array of challenging problems. Table 7.1 displays common problems, and the responses that you can use to troubleshoot them.
Some error messages indicate a problem with a CD drive reading a disc, but they are generic types of messages that could lead you to think there was some other error with your system. These messages include the following:
Note Source of CD/DVD error messages The messages in the previous list are from the "How to Troubleshoot CD-ROM or DVD-ROM Read Issues" Web page at http://support.microsoft.com/default.aspx?scid=kb;en-us;218617. This Web page is a valuable reference for CD/DVD troubleshooting. The computer may also stop responding and does not eject the CD when there is an error reading the disc in the CD drive. Exam Alert Know how to perform a clean boot Know when to perform a clean boot, as well as the process to do so. You can customize how Windows XP Professional starts up by clicking Start, Run, typing msconfig in the Open text box, and pressing Enter. Select Diagnostic Startup and then reboot. You may want to simply disable a selection of applications and services, in which case you can use the Selective Startup option and disable the items you want in the resulting dialog box. You can keep this configuration for several reboots, if you need to. After your final reboot, you can restart Windows XP normally by returning to the System Configuration utility (Msconfig.exe), selecting the Normal Startup option, and then rebooting a final time. Monitoring and Configuring DisksObjective: Implement, manage, and troubleshoot disk devices.
Disk Management, which can be found in Computer Management, displays the disks installed on your computer as well as the volumes configured for the disks. Disks can be either basic (the default) or dynamic. You can convert a basic disk to a dynamic disk but you cannot change back. Your only avenue to reverting to a basic disk is by deleting the dynamic disk, losing the data, creating a new basic volume, and restoring the data from a backup. The process to convert a basic disk to a dynamic disk requires that you have a minimum of 1MB of available space on the disk. Best practices state that when you make changes to a disk configuration, you should back up the data before starting, just in case you need to restore it after you are finished. Even so, converting a basic disk to a dynamic disk should not have any effect on your data. Step by Step 7.1 walks you through converting a basic disk to a dynamic disk. To perform a conversion, you must be logged on as an administrator of the computer.
The Disk Management utility is fairly comprehensive, but it is not the only tool available in Windows XP to configure or manage disks. Some of these tools hearken back to the days of DOS and Windows 3.x, yet they are still very useful, especially if there is a problem accessing the graphical user interface (GUI).
When you use fault-tolerant volumes, a disk can fail and the operating system will continue to function. The failure can be repaired with no loss of data. Most Windows XP Professional workstations do not have fault-tolerant volumes. An administrator should understand how to handle the errors that can plague a hard disk. Common problems are listed in Table 7.2.
Monitoring, Configuring, and Troubleshooting VolumesObjective: Implement, manage, and troubleshoot disk devices.
When you convert a basic disk to a dynamic disk, the existing partitions are converted to simple volumes and fault-tolerant volumes are converted into dynamic volumes. Dynamic volumes can be changed on the fly, as the name "dynamic" implies. A dynamic volume is a unit of storage initially created from the free space on one or more disks. Table 7.3 lists the volume types available on a dynamic disk.
Note Booting from the system partition Terms for partitions are backward because the computer boots from the system partition, and the operating system resides on the boot partition. The disadvantages of a dynamic disk are the following:
Caution RAID-5 and mirrored volumes Don't confuse the RAID-5 or mirrored volumes that you can create within the Windows XP operating system with RAID-5 or mirrored drives that are configured in a hardware storage array. A disk array produces a highly performing, fault-tolerant volume that appears in Windows XP Disk Management as a simple volume. When you create mirrored or RAID-5 volumes in Windows XP, you achieve fault tolerance but lose some performance to disk management processes, especially if a disk fails. When you add a new disk to an existing Windows XP Professional computer, or when you want to create a new partition (also known as a basic volume) from the free space on an existing disk, you can follow the process shown in Step by Step 7.2.
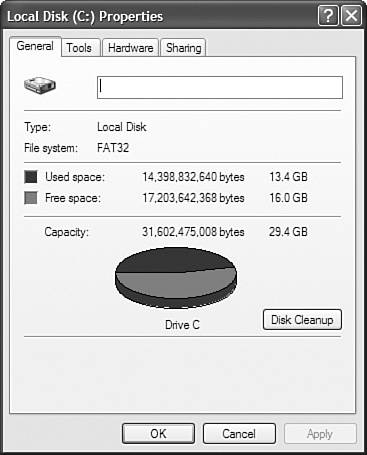
To view how a partition is configured, you can look at its properties in the Disk Management utility. Right-click the partition and select Properties from the shortcut menu. The General tab is displayed, as shown in Figure 7.6, which provides an immediate view of the space allocation on the disk in a pie chart. The General tab also allows you to type a volume name and to click a button that executes the Disk Cleanup graphical utility. Figure 7.6. A volume's properties displays its space allocation. The Tools tab has two buttons, as follows:
The Hardware tab displays the storage device hardware for the computer. From this tab, you can select a storage device, and then click the Troubleshoot button to launch the Drives and Network Adapters Troubleshooter Wizard. You can also click the Properties button to view the hardware's Properties dialog box. Keep in mind that, in Windows XP Professional, a volume or partition is considered a logical object separate from the physical device, which is why a volume has a separate Properties dialog box from the hardware device on which it resides. The Sharing tab enables you to share the entire drive. This is not considered a good practice. It is often unnecessary because the computer automatically generates an administrative share for each partition when Windows XP starts. You can delete a logical drive or partition easily from within the Disk Management utility. Simply right-click the logical drive and select Delete Logical Drive from the shortcut menu, as depicted in Figure 7.7. If you right-click a partition, the shortcut menu includes Delete Partition instead of Delete Logical Drive. A prompt appears to verify that you want to have the logical drive or partition deleted. When you click Yes, Windows XP deletes the drive or partition. Windows XP prevents you from deleting the system partition, the boot partition, or any partition that contains its swap file for active paging. Extended partitions can be deleted only if they are empty of data and logical drives. Figure 7.7. The Disk Management utility enables you to delete a partition or logical drive.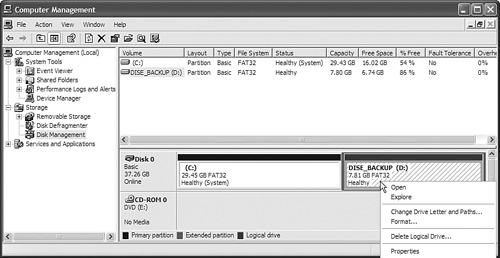 After converting basic disks to dynamic disks in Windows XP Professional, you can begin configuring dynamic volumes. Step by Step 7.3 discusses how to create a spanned volume and how to create a RAID-5 volume. (The process to create a simple volume is nearly identical to the process for creating a partition on a basic disk, which is provided in Step by Step 7.2.)
Dynamic volumes allow you to change their properties on an as-needed basis. If you have a computer, for example, that is running short of space, you can install an extra hard drive and extend an existing simple or spanned volume so that the new space is immediately available without directing the user to use drive J for this data, drive C for that data, drive Y for the network, and so on. Users find multiple drive letters confusing, so being able to keep it all under one letter is highly preferable. Unfortunately, you cannot extend a system volume or a boot volume. Because most computers are installed with a single volume, C:, which includes boot and system files, any volumes created on a new disk added to the computer must have a separate drive letter from the C: drive. Note Extending volumes has restrictions Only existing simple or spanned volumes can be extended. They cannot be system or boot partitions, and they cannot be formatted with FAT or FAT32. To increase the size of a simple volume, in Disk Management, right-click the existing volume and select Extend Volume from the shortcut menu. The Extend Volume Wizard starts and you are prompted to select the disk or disks that contain the free space you will be adding. After you specify the size of free space to add, you need to confirm your options and click Finish. The volume is extended and appears in the Disk Management window with new space allocated to it. Exam Alert Mounting a volume You might be quizzed on your knowledge of how to mount a volume to an existing drive or even a folder path. You can mount a new volume only to an existing empty folder path on an NTFS-formatted volume. To mount a volume, you can use Disk Management, right-click the graphical view of the volume, and select Change Drive Letters or Paths. When you view a volume in Windows XP Professional, you see one of several statuses:
When you see a status other than Healthy for your volumes, or other than Online for your disks, you can attempt to repair by selecting the Rescan Disks option from the Action menu in Disk Management.
Monitoring and Configuring Removable Media, Such as Tape DevicesObjective: Implement, manage, and troubleshoot disk devices.
Backup systems are notoriously never used for workstations, yet often that is where a user's most business-critical data resides. Any removable media can work for a backup system. With the proliferation of CD-RW and DVD writable discs, you could implement a backup system using those types of discs. Traditionally, making a tape backup is the practice used. In Computer Management, there is a utility specifically geared toward tape drives, optical media drives, and CD-RW drives. It is called Removable Storage. To access this utility, right-click My Computer and select Manage. In the resulting Computer Management console, click Removable Storage in the left pane. You see the screen shown in Figure 7.8. Figure 7.8. The Removable Storage window enables you to manage backup devices.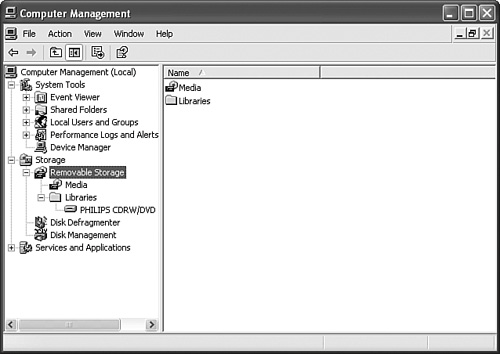 The Removable Storage window allows you to create a media library that can then be organized and managed for backups, which has been traditionally a capability in third-party backup software packages. The Removable Storage window displays available backup devices. You can view the devices' properties and manage them in this window as well. CDs, DVDs, and tapes almost always have a primary partition that is the full size of the media. You usually cannot create an additional partition, extended partition, logical drive, or any type of dynamic volume. However, if the media does not have a primary partition, you can generate one. An ordinary user does not have the rights required for backing up a Windows XP computer. You must add the user, at a minimum, to the Backup Operators group for the user to be able to create a media library and then perform backups. Many portable backup devices connect to a computer's parallel port and are often the backup device of choice for a workstation. A problem occurs when the computer's parallel port is configured as a bidirectional port, Enhanced Parallel Port (EPP), or an Extended Capabilities Port (ECP) because Windows XP does not support these port types for a backup device. To resolve this issue, you must go into the computer's BIOS and return the parallel port to standard, unenhanced behavior. Any backup device, whether or not it is Plug and Play, can be installed on a computer running Windows XP as long as the device is listed in the Windows Catalog. To install a backup device, you must first install the device physically in the computer while it is off, and then boot the computer. Log on as an administrator-level user on the computer so that you have the rights to install a new device driver. You should then allow Windows XP to attempt to detect the drive. Plug and Play devices are simple to install. When Windows XP initially installs, Windows XP Setup performs an inventory of the devices on the computer and records them in the registry. Later, when you add a device, Windows XP detects the new device and determines that it is not a member of the existing inventory of hardware. Windows XP finds the Plug and Play ID for the device and compares it to the INF files that contain information about device drivers. If the device's Plug and Play ID is found, a compatible driver is available within Windows XP, and it installs with very little, if any, user input. If the device is not found in the INF files, the Found New Hardware Wizard starts and requests the media that contains the OEM's driver. When the device is not Plug and Play, you need to open Control Panel and start the Add New Hardware Wizard. Some devices do require a specific installation procedure that is proprietary to the manufacturer. The manufacturer's documentation should provide the installation method if it differs from that of Windows XP.
|
EAN: 2147483647
Pages: 193